- 3 Genius Ways to Delete a File in Use in Windows
- Force Deleting a File in Use in Windows
- More Related Articles:
- From Command Prompt
- Using a Third-Party Tool – Unlocker
- How to Restore a File If It Has Been Deleted Accidentally
- Your Safe & Reliable Data Recovery Software
- Video Tutorial on How to Recover Deleted Files on Windows 10/8/7 Easily?
- 5 ways to delete files (temporarily or permanently) in Windows 10
- 1. Delete or permanently delete files using keyboard shortcuts
- 2. Delete files using the right-click menu
- 3. Delete or permanently delete files from File Explorer’s ribbon
- 4. Permanently delete files using PowerShell or Command Prompt
- 5. Permanently delete files using specialized software
- Problems when deleting files: File In Use
- Which method do you prefer for deleting files from Windows 10?
3 Genius Ways to Delete a File in Use in Windows

Amy Dennis
Dec 21, 2020 • Filed to: Recover & Repair Files • Proven solutions
When working on Microsoft Windows, how many times have you seen a message telling that the particular file you are attempting to delete is already in use and that the program using the file must be stopped before Windows allows you to remove the file from the PC?
Annoying!! Isn’t it?
Well, not anymore.
Here are the three genius ways that you can use to force delete a file that is in use and Windows doesn’t allow you to remove it normally.
Force Deleting a File in Use in Windows
This method works most of the time. All you need to do is to force terminate the program that is using the file. Assuming that you already know which program is using the file that you want to remove, this is how you delete the file:
Note:В Windows 7 is used here as a reference PC.
Force terminating a process shuts down the entire program and you may lose any unsaved data that any other file that relies on the program may have. It is advisable to save all your work progress before proceeding.
1. On your desktop screen, right-click the taskbar.
2. From the context menu that appears, clickВ Start Task Manager.

3. In the Task Manager box, if not already there, go to theВ ProcessesВ tab.
4. From the displayed list of running processes, right-click the one that you know is using the file that you want to delete.
5. From the context menu, clickВ End ProcessВ orВ End Process Tree. (End process treeВ is clicked here.)

6. On the confirmation box that pops up, click theВ End process treeВ button from the bottom.

7. Once the process has been forcefully terminated, you can easily remove the file as it is no longer used until the process starts running again.
Note:В In some cases, you need to be quick in deleting the file after force terminating the process. This is because some processes are stubborn and even if you terminate them forcefully, they restart automatically after a few seconds.
More Related Articles:
From Command Prompt
This method requires you to open Command Prompt on your Windows PC. For the files used by some local processes (the processes that can be started and closed by a standard – non-administrator user account), opening Command Prompt on a standard user account would suffice. However, if the file is used by any system process, the elevated Command Prompt must be initialized. An elevated Command Prompt is the command window that has all the administrator rights and all the administrative tasks can be performed via commands in its interface.
This is what you need to do:
Note:В A Windows 7 PC is used in this example.
1. On your Windows PC, locate the folder that contains the file in use that you want to delete. (Do not enter into the folder.)
2.В Shift + right-clickВ the folder.
3. From the advanced context menu that appears, clickВ the Open command window hereВ or press theВ WВ key on the keyboard.

Note:В This method does not allow you to open an elevated command window.
Note: To start elevated Command Prompt, click the Start button, type CMD in the search box at the bottom of the Start menu, right-click CMD from the suggested programs’ list, click Run as administrator from the context menu, and on the User Account Control confirmation box, type the password for the admin account (or click Yes if Windows doesn’t ask you for the password) to provide your consent to continue. After the elevated command window opens up, you must use the DOS commands like CD and DIR to locate the directory where the file you want to delete is placed and to check the presence of the file respectively.
4. In the command window, type theВ DEL /F file nameВ command and pressВ EnterВ to force delete the file that is in use.
Note:В In the above command,В the file nameВ must be replaced by the name of the file along with its extension that you want to delete. For exampleВ del /f TestFile.txt.
WARNING!! – A file deleted using the DEL command does not move it to the Recycle Bin but deletes it permanently. Use the DEL command with caution.

5. Once the file is deleted, you can close Command Prompt by clicking theВ CloseВ button from the top-right corner of the window or by typingВ EXITВ in the command window and pressingВ Enter.
Using a Third-Party Tool – Unlocker
Even though you can use any of the two methods described above to remove a file that is in use, a third-party tool such as Unlocker makes your task extremely simple. The best part is that Unlocker is a freeware and is free to download and use. This is how Unlocker works:
Note:В A Windows 7 computer is used for reference.
1. Log on to your Windows PC.
2. Ensure that it is connected to the Internet.
3. Open any web browser of your choice and open your preferred search engine. (Google, Yahoo!, Bing, etc.)
4. Using the search engine, search for Unlocker.
5. Once found, download Unlocker’s installable file and install the program using the normal installation method, or get its portable version.
Note:В Unlocker is installed on this referenceВ PC.
6. After this, locate the file that you want to delete but is in use.
7. Right-click the file.
8. From the context menu that is displayed, clickВ Unlocker.

9. On theВ User Account ControlВ confirmation box, clickВ YesВ to provide your consent to continue launching the program.
10. On the displayed interface, from the available list of files in use, click to select the one that you want to unlock.
11. From the bottom of the interface, clickВ UnlockВ to unlock the file while leaving the corresponding application open. Alternatively, you can also click theВ Kill ProcessВ button to force terminate the running process that is responsible for engaging the file.

12. Once the file is unlocked, you can right-click the file and clickВ DeleteВ from the context menu.
13. ClickВ YesВ on theВ Delete FileВ confirmation box when/if displayed.
How to Restore a File If It Has Been Deleted Accidentally
Even if the file has been forcefully unlocked using any of the methods, it is moved to the Recycle Bin when deleted (except for when deleted using the command line). That being said, restoring the file from the Recycle Bin is simple. This is what you need to do.
1. On your Windows desktop screen, double-click the Recycle Bin’s icon.
2. Once inside theВ Recycle Bin, right-click the file that you want to restore.
3. From the context menu, clickВ Restore.

Note:В If a file has been deleted permanently (e.g. when removed with the DEL command), you need an efficient file recovery software such as RecoveritВ Data RecoveryВ to recover the file back.
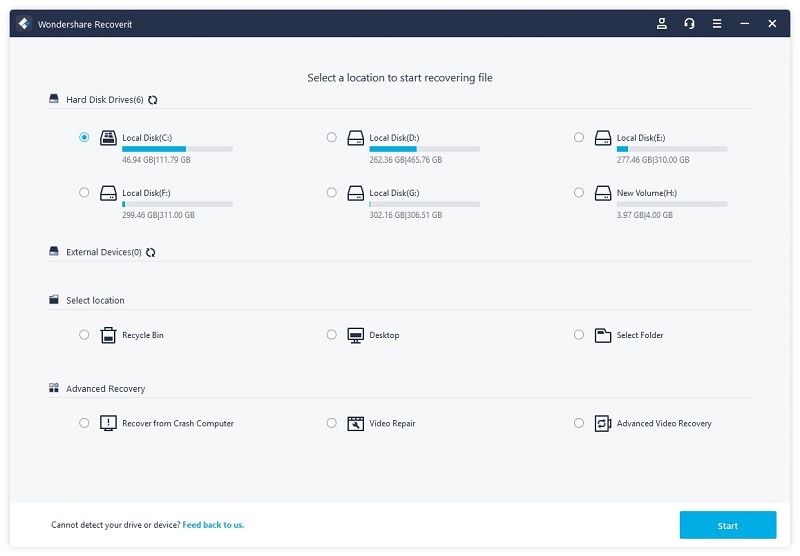
Your Safe & Reliable Data Recovery Software
- Recover lost or deleted files, photos, audio, music, emails from any storage device effectively, safely and completely.
- Supports data recovery from recycle bin, hard drive, memory card, flash drive, digital camera, and camcorders.
- Supports to recover data for sudden deletion, formatting, hard drive corruption, virus attack, system crash under different situations.
Although the above-mentioned tricks work almost every time, you must take the utmost care while deleting any file that is in use. Deleting a wrong file may cause consequences like permanent or temporary system failure or data loss. To avoid this, before force deleting your files, make sure you have thoroughly verified the following:
- The file in use does not contain any important data.
- Force terminating the process to unlock the file doesn’t cause any permanent damage to its corresponding program.
- You have backed up the file before deleting it.
- You have tried (and failed) other ways to do what you want to do, and that force deleting the file is the only option left.
Video Tutorial on How to Recover Deleted Files on Windows 10/8/7 Easily?
Recent Videos from Recoverit
5 ways to delete files (temporarily or permanently) in Windows 10
Whether it’s work-related documents and presentations or personal pictures and files, when you run out of space on your Windows 10 computer or device, you have to delete some of them. We delete files regularly, and yet, not many of us know how the process works or that there is more than one way you can delete files. If you want to know how to delete files from Windows 10, including permanently deleting them so that they can no longer be recovered, read this article:
TIP: When you delete a file, even when you use the permanently delete option, that file can still be recovered. To learn why, read: What happens to deleted files? Why can you recover some of them?
1. Delete or permanently delete files using keyboard shortcuts
The simplest way to delete a file or a group of files is to open File Explorer and navigate to its location. Find the file that you want to delete, and click or tap on it to select it. You can select more than one file by pressing the CTRL key and keeping it pressed. With the mouse, click the files that you want to select. Release the CTRL key when done.
TIP: To select all files in a folder, press CTRL+A on your keyboard.
To delete the selected file(s) and move it (them) to the Recycle Bin, press the Delete key on your keyboard.
By default, Windows 10 does not ask for a confirmation when you remove files, but if your Recycle Bin is configured to display a delete confirmation dialog, confirm the process by pressing Yes.
To delete the selected file(s) without moving to the Recycle Bin, press SHIFT+Delete on your keyboard.
This action permanently deletes the selected file(s), and Windows 10 asks for confirmation before it goes ahead with the removal. When you are asked “Are you sure you want to permanently delete this file?”, press Yes.
The file is gone from your Windows 10 PC, without being moved to the Recycle Bin. It can be recovered only with specialized software like Recuva.
2. Delete files using the right-click menu
Another method involves selecting the file(s) that you want to delete in File Explorer and right-clicking (or pressing and holding) the selected item(s). In the contextual menu, choose Delete.
This action moves the selected file(s) to the Recycle Bin, from which they can be recovered, if needed. It does not permanently delete files as other methods do.
3. Delete or permanently delete files from File Explorer’s ribbon
You can also browse to the files that you want to delete in File Explorer and select them. Then, click or tap the Home tab on the ribbon, and then the Delete button. This action removes the selected item(s) and moves them to the Recycle Bin.
If you want to delete a file permanently, select it. In the Home tab on the ribbon, instead of clicking Delete, click the arrow beneath the Delete button and then choose “Permanently delete.”
4. Permanently delete files using PowerShell or Command Prompt
Windows 10 has a command that you can use to permanently delete files, and it can be used both in PowerShell and Command Prompt. Depending on what you prefer, start the Command Prompt or open PowerShell. Then, enter the command: del “path to file”.
For example, to delete the sample.jpg file found on the D: drive, in the Digital Citizen folder, we typed: del “D:\Digital Citizen\sample.jpg”.
Press Enter to execute the command, and the file is deleted without any confirmation being required. As documented by Microsoft here, this command can be used with several parameters. The most interesting is /f, which forces the deletion even when dealing with a read-only file that normally cannot be deleted. To use this parameter, type in: del /f “path to file”.
Don’t forget to press Enter to execute the command.
NOTE: When using the command-line to delete files, they are not moved to Recycle Bin.
5. Permanently delete files using specialized software
If you want to remove files from your Windows 10 PC so that they cannot be recovered with specialized file recovery tools, it is a good idea to remove them using apps that are permanent file erasers. Eraser is an excellent app for this purpose, and it works on any PC or device running Windows.
Problems when deleting files: File In Use
When deleting a file, you may encounter an error that says: “File In Use. This action can’t be completed because the file is open in…” followed by an app’s name. If you Try Again, you hit the same error over and over.
To solve this problem, you have to close the app mentioned by the error message. That app uses the file that you want to remove and keeps it open for editing. In this state, the file cannot be deleted. After the app is closed, and it no longer uses the file, the deletion process works.
If closing the app doesn’t lead to the expected result, restart Windows 10 and try again.
Which method do you prefer for deleting files from Windows 10?
Now you know how to delete files using the keyboard, the mouse, and even specialized software or commands in PowerShell. Before closing this guide, let us know which method you prefer and why. Are you a keyboard user? Do you prefer to use the mouse? Or maybe the del command? Comment below and let’s discuss the best way to remove files from Windows 10.


