- FULL FIX: Exe files deleting themselves on Windows 10
- What can I do if the Exe files keep deleting themselves?
- 1. Check your antivirus
- VIPRE Antivirus Plus
- 2. Try using Safe Mode
- Run a System Scan to discover potential errors
- 3. Use a different file archiver
- WinZip
- 4. Try running the application as an administrator
- Force the application to run with administrative privileges
- 5. Create a new user account
- 6. Install the missing updates
- 7. Perform a Clean Boot
- IObit Uninstaller 10 Pro
- 8. Perform an in-place upgrade
- Удаляем программы из списка автозагрузки с помощью редактора реестра
- Где найти разделы реестра, отвечающие за автозагрузку?
- Какие программы лучше не трогать?
- Удалить exe во время его исполнения
- 5 ответов 5
FULL FIX: Exe files deleting themselves on Windows 10

- Many users reported that exe files keep disappearing from their PC for no apparent reason.
- The missing executable files case is pretty strange but most evidence point to the antivirus solution.
- If you want to learn more about fixing executable files, visit our EXE Troubleshooting page.
- Helping you fix your PC is our main objective so check our Troubleshooting Hub for solutions.
- Download Restoro PC Repair Tool that comes with Patented Technologies (patent available here).
- Click Start Scan to find Windows issues that could be causing PC problems.
- Click Repair All to fix issues affecting your computer’s security and performance
- Restoro has been downloaded by 0 readers this month.
Many users reported that exe files keep deleting themselves on their PC. This is a strange problem, and in today’s article we’ll show you how to fix this issue.
There are many issues with exe files that can appear on your PC, and speaking of exe issues, here are some common problems that users reported:
- Exe files automatically deleted, being deleted, deleted after download, disappearing, missing, getting deleted – These are some common problems with exe files, and in most cases, you can fix them simply by checking your antivirus settings.
- Exe file disappears after double clicking, delete itself – Can appear if you don’t have administrative privileges. Run the exe file as an administrator and check if that helps.
- Windows 10 deletes exe files – Can appear due to certain glitches. Switch to Safe Mode and check if the problem is still there.
What can I do if the Exe files keep deleting themselves?
1. Check your antivirus

If you’re having this problem, be sure to scan your PC for malware. Sometimes malware can infect your PC and start removing exe files on its own.
To be sure that your PC is not infected, perform a full system scan.
If your PC isn’t infected, the problem might be your antivirus settings. If your antivirus keeps removing certain exe files, add that file to the list of exceptions and check if that helps.
Alternatively, you can try disabling certain antivirus features or even disable your antivirus altogether.
If that doesn’t work, perhaps you should uninstall your third-party antivirus. Even if you choose to do so, you’ll still be protected by Windows Defender, so there’s no need to worry about your safety.
Users reported problems with Norton and Malwarebytes, but bear in mind that other antivirus tools can cause this problem to appear.
If removing the antivirus solves the problem, perhaps you should consider switching to a different antivirus solution.
There are many great antivirus tools on the market, but if you’re looking for a reliable antivirus that won’t interfere with your system, we recommend that you try VIPRE Antivirus Plus.
In case you’re not familiar with it, it’s a very reliable security solution with a reasonable price and a free trial version so you can test it properly.
Even if you choose to buy it straight away, VIPRE has a 30-day money-back guarantee policy so you’re absolutely safe.

VIPRE Antivirus Plus
2. Try using Safe Mode
- Open the Settings app by using the Windows Key + I shortcut.
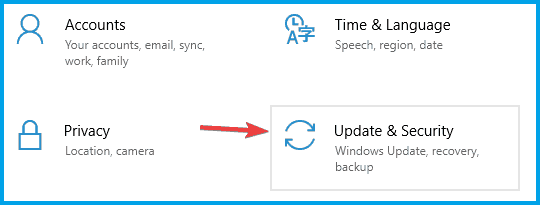
- Head over to the Update & Security section.

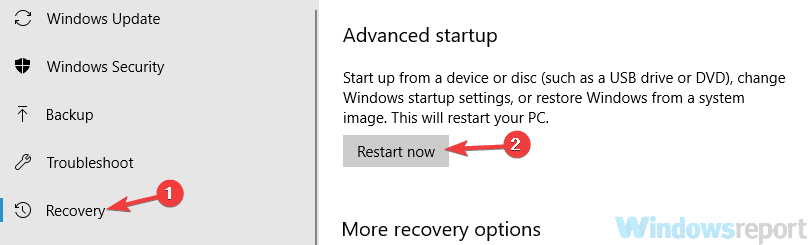
- Select Recovery from the left pane and click the Restart now button from the right pane.
- Select Troubleshoot, then Advanced options and Startup Settings. Now click the Restart button.
- You should now see a list of options. Select the version of Safe Mode you want to use by pressing the corresponding keyboard key.
Run a System Scan to discover potential errors


Note: If the issue doesn’t appear, you can start troubleshooting it. Some users are suggesting to copy or extract the file while you’re in Safe Mode, so you can do that as well.
3. Use a different file archiver
Some users reported that exe files are deleting themselves when you extract them from a zip archive.
This problem usually appears when using a built-in archiver tool in Windows, and in order to avoid it, users are recommending to switch to a third-party archiver such as WinZip.
This is probably one of the most popular tools on the planet so you probably know a lot of things about it. It features a long list of different archive types and it’s the quickest archiver you can find.
But few probably know that WinZip also protects your data with high-level encryption and it has a lot of other advanced options.
This awesome software has direct integration with your cloud storage accounts on Dropbox, Google Drive, MediaFire, OneDrive, and others so you can send large files quickly.
WinZip
4. Try running the application as an administrator
- Locate the problematic application.
- Right-click the exe file and choose Run as administrator from the menu.
Note: If this solves your problem, you’ll need to repeat this process every time you want to run that exe file.
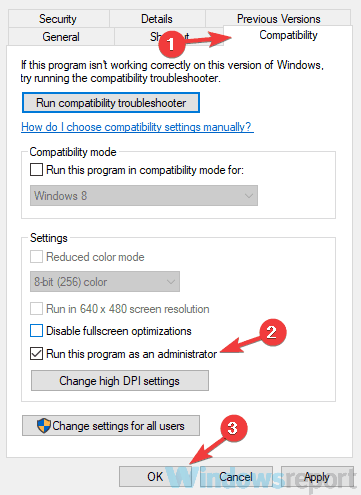
Force the application to run with administrative privileges
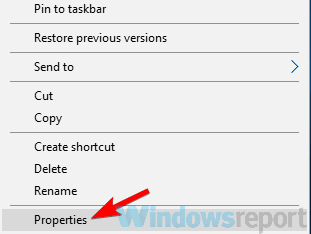
- Right-click the problematic exe file and choose Properties from the menu.
- Head over to the Compatibility tab and check Run this program as an administrator option . Click Apply and OK to save the changes.
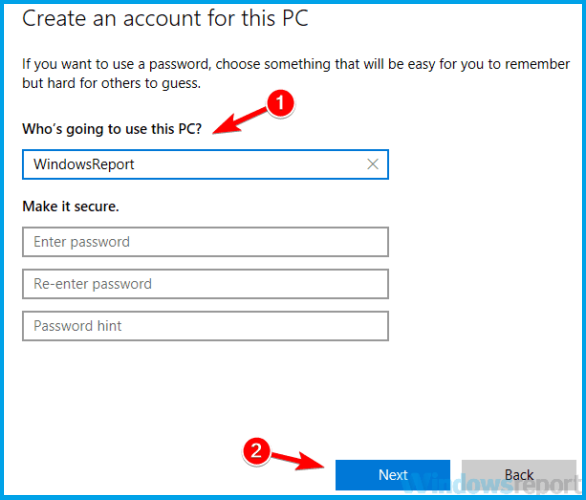
5. Create a new user account
- Open the Settings app and navigate to the Accounts section.
- Select Family & other people from the left pane and choose Add someone else to this PC from the right pane.
- Select I don’t have this person’s sign-in information, then Add a user without a Microsoft account.
- Enter the username for the new account and click Next.
- Switch to the new account and check if the problem is resolved.

Note: If the issue isn’t present on the new account, move your personal files to it and start using it instead of your old account.
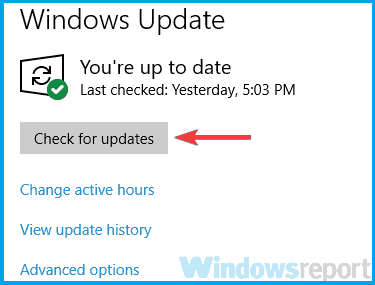
6. Install the missing updates
- Open the Settings app and navigate to the Update & Security section.
- Click the Check for updates button.
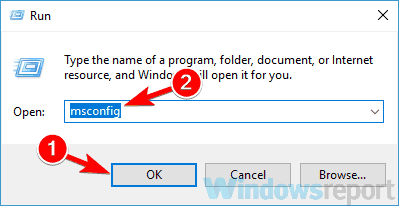
7. Perform a Clean Boot
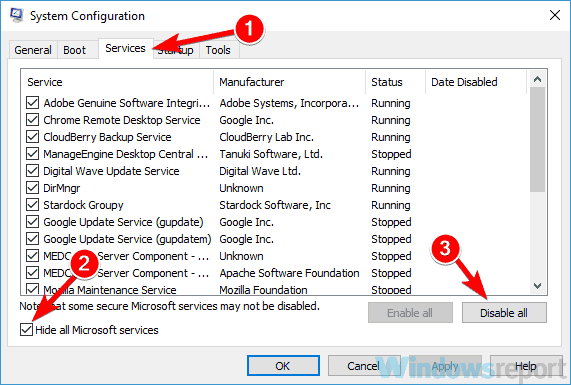
- Press the Windows Key + R combination, type msconfig, and press Enter.
- Navigate to the Services tab and check the Hide all Microsoft services box. Click the Disable all button to disable all available services.
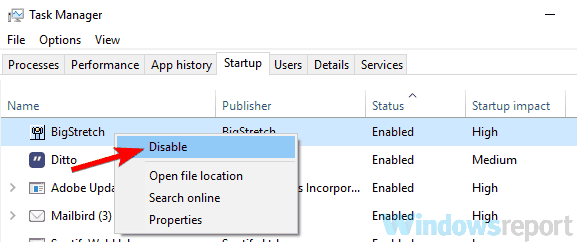
- Navigate to the Startup tab and click Open Task Manager.
- Right-click the first application on the list and pick Disable from the menu. Do this for all applications on the list.
- Once you disable all startup applications, go back to the System Configuration window.
- Click Apply, OK, and restart your PC.
Note: If the problem is fixed, it’s certain that one of the disabled applications or services was causing the issue. To find the root cause, enable disabled services and applications one by one or in groups.
Keep in mind that you’ll need to restart your PC after enabling an application or service in order to apply changes.
Once you find the cause of the problem, remove the application using an uninstaller software such as IOBit Uninstaller.
This excellent tool will make sure that you won’t find any traces of the uninstalled application.

IObit Uninstaller 10 Pro
8. Perform an in-place upgrade

- Download and run the Media Creation Tool.
- Select Upgrade this PC now and click Next.
- Choose Download and install updates and click Next.
- Follow the instructions on the screen. Once you reach Ready to install screen select Change what to keep.
- Select Keep personal files and apps option and click Next.
- Follow the instructions on the screen to complete the upgrade.
Note: After you complete the upgrade, you’ll have a fresh installation of Windows installed, and all your files and applications should remain intact. If the problem is still there, your next step would be to perform a Windows 10 reset.
Exe files that keep deleting themselves can be a problem, but we hope that you managed to fix this problem with one of our solutions.
Удаляем программы из списка автозагрузки с помощью редактора реестра
Несмотря на то, что сегодня можно скачать массу оптимизаторов, позволяющих убрать программы из автозапуска, а последние версии Windows и вовсе содержат инструменты для управления этим параметром, использование редактора реестра не утрачивает актуальность.
Дело в том, что от большинства вредоносного ПО просто невозможно избавиться другим путём, ведь после удаления оно начнёт снова устанавливается при следующей загрузке. Однако, удаление определённых файлов из реестра позволит раз и навсегда решить проблему.
Где найти разделы реестра, отвечающие за автозагрузку?
« Выполнить » ( R+Win ) – regedit – клавиша Enter. Таким образом вы попадаете в редактор реестра.
Нас интересует папка Run , расположенная в левой части окна. У новичков может уйти достаточно много времени на её поиск, ведь они не знают, что она расположена по одному из следующих путей:
• HKEY_LOCAL_MACHINE – Software – Microsoft – Windows – CurrentVersion — Run
• HKEY_CURRENT_USER — Software – Microsoft –Windows – CurrentVersion – Run
Отмечу, что элементы автозагрузки находятся и в других разделах, но я бы не советовал рядовым пользователям отправляться туда, чтобы не нарушить работу системы.
Попав в нужную папку, вы увидите список файлов. Их имена, как правило, совпадают с названиями программ, загрузка которых и будет происходить при запуске системы. Если ваш компьютер был заражён вредоносным ПО, то здесь вы обнаружите массу названий, состоящих из букв и цифр, расположенных в случайном порядке. Убирайте их все без раздумий, даже если они представляются системными файлами.
Какие программы лучше не трогать?
Ни в коем случае не удаляйте из автозагрузки драйверы, особенно те, которые обеспечивают корректную работу графических процессоров. Это позволит избежать возникновения существенных сбоев и сэкономить время, которые вы бы потратили на возвращение упомянутого ПО в автозапуск.
Есть «хитрые» программы, которые мониторят наличие себя в реестре и добавляются снова в случае удаления. Советую перейти в настройки этого ПО и отключить подобную возможность. Стоит отметить, что аналогичную тактику, чаще всего, используют всякие назойливые бесполезные программы, появившиеся на вашем ПК лишь потому, что вы забыли убрать несколько «галочек» при установке.
Удалить exe во время его исполнения
Мне необходимо удалить exe файл после того, как он запустился, чтобы его невозможно было анализировать (если, конечно, пропустить возможность дампа). Есть пару известных мне методов это сделать, но они очень костыльные:
- Вытащить флешку после запуска программы. Она продолжит работать, но образа уже нигде не будет (что может вызвать runtime ошибку при запросе, например, к ресурсам, но это не важно).
- Создавать виртуальный диск и отключать его когда программа с него будет запущена (делает практически то же самое, что и метод 1.
Так как же нормально удалить exe во время исполнения? Может быть, работа с дисками на физическом уровне?

5 ответов 5
Есть 1 очень сложный вариант для винды: 1. Создаём файл 2.exe он
1) создаёт область с ассемблерным кодом(VirtualAlloc на адрес 0x20000 например и ещё на 0x410000(для 1.exe))
2) считывает 1.exe в 0x410000 единым блоком
3) создаёт область с ассемблерным кодом(на адрес 0x20000 например)
4) переходит на ассемблер очищает все ассемблерные стеки и делает jmp 0x20000
5) ассемблерный код стирает из памяти 2.exe (тоже винапи упр. виртуальной памятью)
6) записывает туда же(откуда стёр 2.exe) 1.exe из памяти 0x410000 и jmp на этот код но тут не знаю сработает ли
можно попробовать скомпилить как-то по особому сам файл 1.exe как длл например и подгрузить в память процесса. Вобщем стоит покопать про вирт. память. Наверняка если удалить проецируемый exe и закрыть дескриптор(ы) файла то можно будет и файл стереть(тогда 2.exe ненужен вообще). Тестить надо.
Хорошо назовём это тестировщик уязвимостей Windows.

Вообще-то Windows блокирует файлы во время исполнения или чтения\записи. Можно, конечно, попробовать обойти это методами, которые используются вирусами, но, думаю, что антивирус быстро зарубит такой беспредел. Думаю, лучшим вариантом для вас будет поставить скрипт удаления после завершения.

Это не отвечает на вопрос, но это максимум, чем владею.
Самое простое решение из статьи основано на том факте, что bat-файл может удалить сам себя: del %0 или del %0.bat сохранили в блокноте, затем запустили.
Из личного опыта добавлю (не связано с вышеприведённой статьёй): Программа WinHEX позволяет заменять любые байты на носителе, не важно, файл не файл, запущен не запущен, Вы можете использовать знания о файловой системе, чтобы в разделе устройства найти исполняемый модуль и убрать его из файловой системы путём перезаписи этих байт. Но неизвестны способы достижения таких действий программой WinHEX. Таким же способом, Вы также можете находясь в среде Windows, прочитать системные файлы, хранящие пароли. Это можно сделать с помощью одной из утилит восстановления удалённых файлов. Когда Вы просите восстановить файл, который существует (например, хранящий пароли и заблокированный операционной системой), она скопирует его содержимое туда, куда пожелаете.


