- Download and install Windows support software on your Mac
- Install the latest macOS updates
- Format a USB flash drive
- Download the Windows support software
- Install the Windows support software
- Learn more
- Get started with the macOS client
- Get the Remote Desktop client
- What about the Mac beta client?
- Add a workspace
- Export and import connections
- Add a remote resource
- Connect to an RD Gateway to access internal assets
- Manage your user accounts
- Customize your display resolution
- Displays have separate spaces
- Drive redirection for remote resources
- Use a keyboard in a remote session
- Support for Remote Desktop gateway pluggable authentication and authorization
Download and install Windows support software on your Mac
After using Boot Camp Assistant to install or upgrade Microsoft Windows on your Mac, you may also need to install the latest Windows support software (drivers) from Apple.
When you install Microsoft Windows on your Mac, Boot Camp Assistant automatically opens the Boot Camp installer, which installs the latest Windows support software (drivers). If that doesn’t happen or you experience any of the following issues while using Windows on your Mac, follow the steps in this article.
- Your Apple mouse, trackpad or keyboard isn’t working in Windows.
Force Touch isn’t designed to work in Windows. - You can’t hear audio from the built-in speakers of your Mac in Windows.
- The built-in microphone or camera of your Mac isn’t recognised in Windows.
- One or more screen resolutions are unavailable for your display in Windows.
- You can’t adjust the brightness of your built-in display in Windows.
- You’re having issues with Bluetooth or Wi-Fi in Windows.
- You’ve received an alert stating that Apple Software Update has stopped working.
- You’ve received a message stating that your PC has a driver or service that isn’t ready for this version of Windows.
- Your Mac starts up to a black or blue screen after you’ve installed Windows.
If your Mac has an AMD video card and is having graphics issues in Windows, you may need to update your AMD graphics drivers instead.

Install the latest macOS updates
Before proceeding, install the latest macOS updates, which can include updates to Boot Camp.
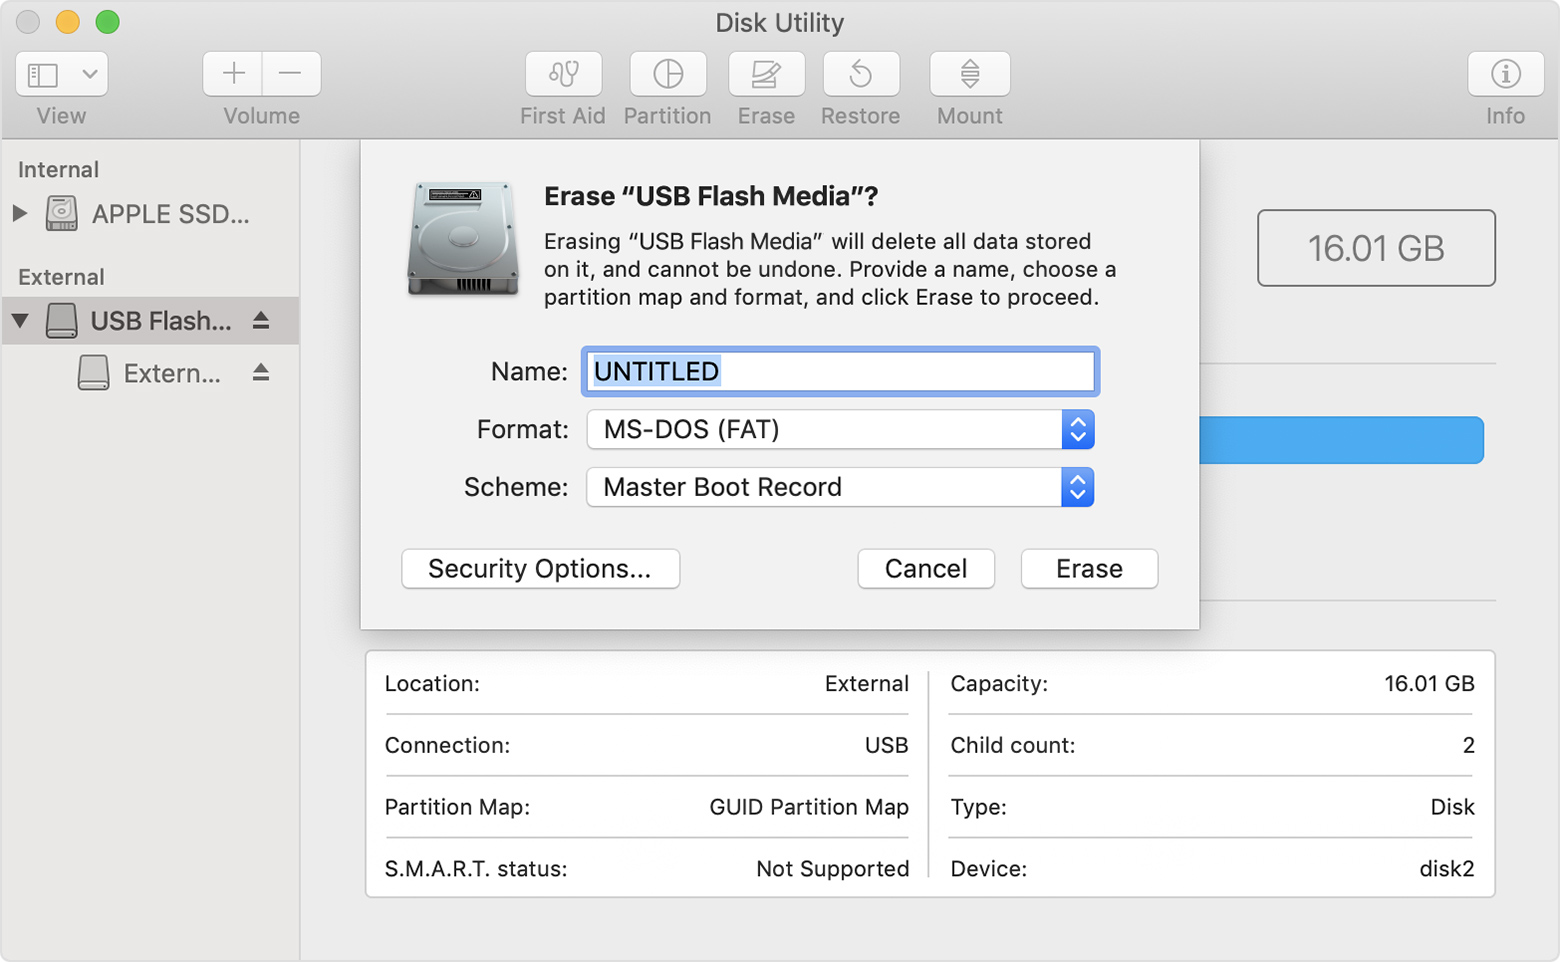
Format a USB flash drive
To install the latest Windows support software, you need a 16 GB or larger USB flash drive formatted as MS-DOS (FAT).
- Start your Mac from macOS.
- Plug the USB flash drive into your Mac.
- Open Disc Utility, which is in the Utilities folder of your Applications folder.
- Choose View > Show All Devices from the menu bar.
- From the sidebar in Disc Utility, select your USB flash drive. (Select the drive name, not the volume name beneath it.)

- Click the Erase button or tab.
- Choose MS-DOS (FAT) as the format and Master Boot Record as the scheme.
- Click Erase to format the drive. When it’s finished, quit Disk Utility.
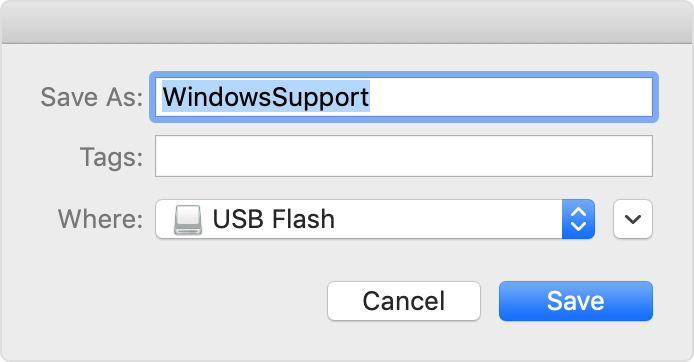
Download the Windows support software
- Make sure your Mac is connected to the Internet.
- Open Boot Camp Assistant, which is in the Utilities folder of your Applications folder.
- From the menu bar at the top of your screen, choose Action > Download Windows Support Software, then choose your USB flash drive as the destination to save to. When the download has been completed, quit Boot Camp Assistant.
Install the Windows support software
After downloading the Windows support software to your flash drive, follow these steps to install the software. (If you’re attempting to resolve issues with a Bluetooth mouse or keyboard, it may be easier to use a USB mouse or keyboard until these steps have been completed.)
- Make sure the USB flash drive is plugged into your Mac.
- Start up your Mac in Windows.
- From File Explorer, open the USB flash drive, then open Setup or setup.exe, which is in the WindowsSupport folder or BootCamp folder. When you’re asked to allow Boot Camp to make changes to your device, click Yes.
- Click Repair to begin installation. If you receive an alert stating that the software hasn’t passed Windows Logo testing, click Continue Anyway.
- After the installation has been completed, click Finish, then click Yes when you’re asked to restart your Mac.
Learn more
If you can’t download or save the Windows support software:
- If the assistant states that the Windows support software could not be saved to the selected drive or that the USB flash drive can’t be used, make sure your USB flash drive has a storage capacity of at least 16 GB and has been formatted correctly.
- If the assistant can’t see your USB flash drive, click Go Back and make sure the drive has been connected directly to the USB port on your Mac – not to a display, hub or keyboard. Disconnect and reconnect the drive, then click Continue.
- If the assistant states that it can’t download the software because of a network problem, make sure your Mac is connected to the Internet.
- Make sure your Mac meets the system requirements to install Windows using Boot Camp.
If a Mac feature still doesn’t work after updating the Windows support software, search for your symptom on the Apple support website or Microsoft support website. Some features of your Mac aren’t designed to work in Windows.
Information about products not manufactured by Apple, or independent websites not controlled or tested by Apple, is provided without recommendation or endorsement. Apple assumes no responsibility with regard to the selection, performance or use of third-party websites or products. Apple makes no representations regarding third-party website accuracy or reliability. Contact the vendor for additional information.
Get started with the macOS client
Applies To: Windows 10, Windows 8.1, Windows Server 2012 R2, Windows Server 2016
You can use the Remote Desktop client for Mac to work with Windows apps, resources, and desktops from your Mac computer. Use the following information to get started — and check out the FAQ if you have questions.
- Curious about the new releases for the macOS client? Check out What’s new for Remote Desktop on Mac?
- The Mac client runs on computers running macOS 10.10 and newer.
- The information in this article applies primarily to the full version of the Mac client — the version available in the Mac AppStore. Test-drive new features by downloading our preview app here: beta client release notes.
Get the Remote Desktop client
Follow these steps to get started with Remote Desktop on your Mac:
- Download the Microsoft Remote Desktop client from the Mac App Store.
- Set up your PC to accept remote connections. (If you skip this step, you can’t connect to your PC.)
- Add a Remote Desktop connection or a remote resource. You use a connection to connect directly to a Windows PC and a remote resource to use a RemoteApp program, session-based desktop, or a virtual desktop published on-premises using RemoteApp and Desktop Connections. This feature is typically available in corporate environments.
What about the Mac beta client?
We’re testing new features on our preview channel on AppCenter. Want to check it out? Go to Microsoft Remote Desktop for Mac and select Download. You don’t need to create an account or sign into AppCenter to download the beta client.
If you already have the client, you can check for updates to ensure you have the latest version. In the beta client, select Microsoft Remote Desktop Beta at the top, and then select Check for updates.
Add a workspace
Subscribe to the feed your admin gave you to get the list of managed resources available to you on your macOS device.
To subscribe to a feed:
- Select Add feed on the main page to connect to the service and retrieve your resources.
- Enter the feed URL. This can be a URL or email address:
- This URL is usually a Windows Virtual Desktop URL. Which one you use depends on which version of Windows Virtual Desktop you’re using.
- For Windows Virtual Desktop (classic), use https://rdweb.wvd.microsoft.com/api/feeddiscovery/webfeeddiscovery.aspx .
- For Windows Virtual Desktop, use https://rdweb.wvd.microsoft.com/api/arm/feeddiscovery .
- To use email, enter your email address. This tells the client to search for a URL associated with your email address if your admin configured the server that way.
- This URL is usually a Windows Virtual Desktop URL. Which one you use depends on which version of Windows Virtual Desktop you’re using.
- Select Subscribe.
- Sign in with your user account when prompted.
After you’ve signed in, you should see a list of available resources.
Once you’ve subscribed to a feed, the feed’s content will update automatically on a regular basis. Resources may be added, changed, or removed based on changes made by your administrator.
Export and import connections
You can export a remote desktop connection definition and use it on a different device. Remote desktops are saved in separate RDP files.
To export an RDP file:
- In the Connection Center, right-click the remote desktop.
- Select Export.
- Browse to the location where you want to save the remote desktop RDP file.
- Select OK.
To import an RDP file:
- In the menu bar, select File >Import.
- Browse to the RDP file.
- Select Open.
Add a remote resource
Remote resources are RemoteApp programs, session-based desktops, and virtual desktops published using RemoteApp and Desktop Connections.
- The URL displays the link to the RD Web Access server that gives you access to RemoteApp and Desktop Connections.
- The configured RemoteApp and Desktop Connections are listed.
To add a remote resource:
- In the Connection Center select +, and then select Add Remote Resources.
- Enter information for the remote resource:
- Feed URL — The URL of the RD Web Access server. You can also enter your corporate email account in this field – this tells the client to search for the RD Web Access Server associated with your email address.
- User name — The user name to use for the RD Web Access server you are connecting to.
- Password — The password to use for the RD Web Access server you are connecting to.
- Select Save.
The remote resources will be displayed in the Connection Center.
Connect to an RD Gateway to access internal assets
A Remote Desktop Gateway (RD Gateway) lets you connect to a remote computer on a corporate network from anywhere on the Internet. You can create and manage your gateways in the preferences of the app or while setting up a new desktop connection.
To set up a new gateway in preferences:
- In the Connection Center, select Preferences > Gateways.
- Select the + button at the bottom of the table Enter the following information:
- Server name – The name of the computer you want to use as a gateway. This can be a Windows computer name, an Internet domain name, or an IP address. You can also add port information to the server name (for example: RDGateway:443 or 10.0.0.1:443).
- User name — The user name and password to be used for the Remote Desktop gateway you are connecting to. You can also select Use connection credentials to use the same user name and password as those used for the remote desktop connection.
Manage your user accounts
When you connect to a desktop or remote resources, you can save the user accounts to select from again. You can manage your user accounts by using the Remote Desktop client.
To create a new user account:
- In the Connection Center, select Settings >Accounts.
- Select Add User Account.
- Enter the following information:
- User Name — The name of the user to save for use with a remote connection. You can enter the user name in any of the following formats: user_name, domain\user_name, or user_name@domain.com.
- Password — The password for the user you specified. Every user account that you want to save to use for remote connections needs to have a password associated with it.
- Friendly Name — If you are using the same user account with different passwords, set a friendly name to distinguish those user accounts.
- Select Save, then select Settings.
Customize your display resolution
You can specify the display resolution for the remote desktop session.
- In the Connection Center, select Preferences.
- Select Resolution.
- Select +.
- Enter a resolution height and width, and then select OK.
To delete the resolution, select it, and then select —.
Displays have separate spaces
If you’re running Mac OS X 10.9 and have disabled Displays have separate spaces in Mavericks (System Preferences > Mission Control), you need to configure this setting in the Remote Desktop client using the same option.
Drive redirection for remote resources
Drive redirection is supported for remote resources, so that you can save files created with a remote application locally to your Mac. The redirected folder is always your home directory displayed as a network drive in the remote session.
In order to use this feature, the administrator needs to set the appropriate settings on the server.
Use a keyboard in a remote session
Mac keyboard layouts differ from the Windows keyboard layouts.
- The Command key on the Mac keyboard equals the Windows key.
- To perform actions that use the Command button on the Mac, you will need to use the control button in Windows (for example Copy = Ctrl+C).
- The function keys can be activated in the session by pressing additionally the FN key (for example, FN+F1).
- The Alt key to the right of the space bar on the Mac keyboard equals the Alt Gr/right Alt key in Windows.
By default, the remote session will use the same keyboard locale as the OS you’re running the client on. (If your Mac is running an en-us OS, that will be used for the remote sessions as well.) If the OS keyboard locale is not used, check the keyboard setting on the remote PC and change it manually. See the Remote Desktop Client FAQ for more information about keyboards and locales.
Support for Remote Desktop gateway pluggable authentication and authorization
Windows Server 2012 R2 introduced support for a new authentication method, Remote Desktop Gateway pluggable authentication and authorization, which provides more flexibility for custom authentication routines. You can now try this authentication model with the Mac client.
Custom authentication and authorization models before Windows 8.1 aren’t supported, although the article above discusses them.
To learn more about this feature, check out https://aka.ms/paa-sample.
Questions and comments are always welcome. However, please do NOT post a request for troubleshooting help by using the comment feature at the end of this article. Instead, go to the Remote Desktop client forum and start a new thread. Have a feature suggestion? Tell us in the client user voice forum.


