- Desktop Window Manager (dwm.exe) high RAM usage
- Replies (13)
- Назначение процесса dwm.exe в ОС Windows
- Функции Диспетчера окон рабочего стола
- Как включить или отключить DWM?
- DWM нагружает процессор или память.
- Является ли dwm.exe вирусом?
- Fix: Desktop Window Manager High CPU Usage ‘dwm.exe’
- Solution 1: Changing Wallpaper/Theme
- Solution 2: Disabling Screensaver
- Solution 3: Scanning for Malware
- Solution 4: Removing Specific Applications
- Solution 5: Disabling Hardware Acceleration for Office Products
- Solution 6: Changing Default App Mode
- Solution 7: Running the Performance Troubleshooter
- Solution 8: Updating Graphics Driver
- Solution 9: Changing a Policy in Group Policy Editor
Desktop Window Manager (dwm.exe) high RAM usage
Recently I felt a big performance decrease on my pc.
I have 2 screens:
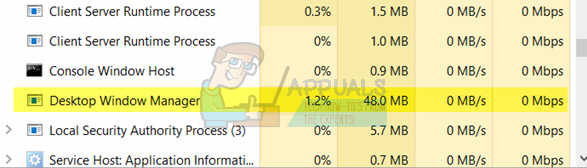
When I start Task Manager I often see 94% RAM usage and the first reason is Desktop Window Manager. It uses nearly 5Gb of memory.
If I kill this process it starts to use about 300Mb and then slowly rises to previous values.
I use Wallpaper Engine and tried to disable it, but got no result.
I also see dwm using more than 10-15% of CPU and GPU. I’ve done almost everythnig I found on web such as updating drivers or something but nothing’s changed.
PLEASE don’t write about scanning for viruses, buying new memory and etc. I need real help and want to improve performance of my pc.
Replies (13)
* Please try a lower page number.
* Please enter only numbers.
* Please try a lower page number.
* Please enter only numbers.
Hi! My name is Anderson Souza. I’m an Independent Advisor and a Microsoft user like you, I’ll be glad to help you today.
In addition to the GTX1660Ti, do you also have an Intel HD Graphics 630 interface on your computer? If so, what driver version is it using? You can check this within the Device Manager under Display Adapters.
Was this reply helpful?
Sorry this didn’t help.
Great! Thanks for your feedback.
How satisfied are you with this reply?
Thanks for your feedback, it helps us improve the site.
How satisfied are you with this reply?
Thanks for your feedback.
Was this reply helpful?
Sorry this didn’t help.
Great! Thanks for your feedback.
How satisfied are you with this reply?
Thanks for your feedback, it helps us improve the site.
How satisfied are you with this reply?
Thanks for your feedback.
Was this reply helpful?
Sorry this didn’t help.
Great! Thanks for your feedback.
How satisfied are you with this reply?
Thanks for your feedback, it helps us improve the site.
How satisfied are you with this reply?
Thanks for your feedback.
Thank you for updating me. The most recent driver for this video adapter is the 27.20.100.8935, you can download it at the link below.
Note: This is a non-Microsoft website. The page appears to be providing accurate, safe information. Watch out for ads on the site that may advertise products frequently classified as a PUP (Potentially Unwanted Products). Thoroughly research any product advertised on the site before you decide to download and install it.
I suppose your GTX GPU is updated, right?
Please, update your Intel driver and check if the problem is solved.
Was this reply helpful?
Sorry this didn’t help.
Great! Thanks for your feedback.
How satisfied are you with this reply?
Thanks for your feedback, it helps us improve the site.
How satisfied are you with this reply?
Thanks for your feedback.
My Nvidia drivers are up to date. I judt updated my Intel drivers and reset my computer and it seems the memory leak is still present in DWM
RAM usage started at about 150mb and has been steadily climbing
Currently at 686.2 mb with only task manager window being open.
EDIT: seems elsewhere people have found out this is a bug specifically with the drivers to the Intel HD/UHD 630 and how it behaves on current Windows updates. Currently updating Intel Drivers doesn’t help but downgrading them to a version before this bug was present seems to. Going to try it myself and see how that goes.
EDIT: Alright, after booting in to safemode, running DDU and unintalling my Intel HD Drivers, and installing the 24.20.100.6286 drivers and then getting back in to Windows seems to have done the trick, even from shutdown instead of reset.
Назначение процесса dwm.exe в ОС Windows
Desktop Window Manager (Диспетчер окон рабочего стола) — это менеджер по работе с окнами, присутствующий в операционной системе Windows с релиза версии Vista.
Изначально он был создан для добавления эффекта Aero , тем не менее в скором времени функционал DWM был расширен и он стал неотъемлемой частью Windows.
Функции Диспетчера окон рабочего стола
Как мы уже говорили выше, основной задачей dwm.exe является управление окнами рабочего стола, он следит за отображением всех пикселей на экране вашего компьютера.
DWM можно назвать еще и инструментом компоновки. Почему? Он использует собранные со всех одновременно открытых приложений (окно браузера, проводник и т.д.) графическую информацию и создает окончательное изображение, которые мы привыкли видеть обычным набором окон.
DWM управляет не только окнами. Он отвечает еще и за важные системные функции, такие как визуальные эффекты, стеклянные рамки, скринсейверы, обои, темы Windows, 3D-анимации и Windows Flip.
Главной отличительной особенностью последних его версий является возможность сохранения графических данных в разных буферах. Это позволяет внедрять новые современные функции, которые не было бы возможности запустить на старых системах.
Как включить или отключить DWM?
Прежде чем мы приступим к разбору этой темы, важно отметить, что Desktop Windows Manager стал важным компонентом операционной системы. Microsoft отключили любую возможность деактивировать его еще с момента выпуска Windows 8. Тем не менее данную службу можно отключить, если вы используете Windows 7 или Windows Vista.
Воспользовавшись комбинацией клавиш Windows + R , введите команду services.msc и нажмите Enter . Найдите службу Desktop Windows Manager (Диспетчер окон рабочего стола) и отключите ее.
Рекомендуем даже не думать о том, чтобы отключить данную функцию в последних версиях операционной системы Windows, поскольку это действие может повлечь за собой массу неприятных последствий.
Она не потребяет много ресурсов, поэтому не должна мешать. Тем не менее, если возникли ошибки с визуальными эффектами, попробуйте перезапустить компьютер.
DWM нагружает процессор или память.
Некоторые пользователи жаловались на то, что Desktop Windows Manager по какой-то причине отнимал чрезмерно большое количество ресурсов компьютера. Если узнаете свою ситуацию, попробуйте выполнить следующее:
Перейдите в раздел Персонализация > Цвета . Прокрутите содержимое окна ближе к концу и смените значение Эффекты прозрачности на Откл .
Отключите визуальные эффекты
Немаловажный шаг для снижения нагрузки на DWM — отключение всех возможных эффектов Windows.
1. Щелкните правой кнопкой по иконке Мой компьютер (Этот компьютер) .
2. Перейдите в Свойства .
3. Откройте Дополнительные параметры системы .
4. Откройте вкладку Дополнительно .
5. В меню Быстродействие перейдите в Параметры .
6. Установите активное состояние на параметр Обеспечить наилучшее быстродействие .
Эти действия существенно снизят презентабельность внешнего вида Windows, тем не менее нагрузка на DWM будет снижена, а производительность ПК повысится.
Рекомендуем по возможности обновить драйвер дисплея.
Существует множество процессов, запускаемых сторонними приложениями. Как следствие, они могут напрямую влиять на загруженность системы.
Вспомните, не устанавливали ли вы на днях новую программу — вполне возможно причина кроется именно в этом действии.
Является ли dwm.exe вирусом?
Однозначный ответ — нет . По умолчанию эта служба находится в папке System32 системного диска. Если же вы обнаружили его в неположенном месте, допустим это другой логический раздел, тогда есть смысл включить настороженность.
Просканируйте компьютер при помощи Защитника Windows или воспользуйтесь сторонним антивирусным программным обеспечением, чтобы вовремя устранить возможный вирус.
Надеемся, статья оказалась для вас полезной и помогла разобраться с функциями Диспетчера окон рабочего стола!
Fix: Desktop Window Manager High CPU Usage ‘dwm.exe’
Desktop Windows Manager is a manager which is responsible for enabling visual effects on your desktop. In the latest version of Windows (Windows 10), it is responsible for managing glass window frames, high-resolution support, 3D window transitions animations etc. According to Microsoft officials, this process is always running in the background and consuming a certain amount of processor to operate.
However, many users reported that they experienced high CPU usage from the service itself. This can be due to a number of different as each computer has a different configuration and it is very difficult to exactly create the same conditions each time. We have listed down a number of different workarounds for you to try. Take a look.
Solution 1: Changing Wallpaper/Theme
Since desktop window manager is responsible for managing your wallpaper and theme, it is possible that your current settings are causing the service to consume so many resources. We can try changing the current wallpaper or theme and check if this solves anything.
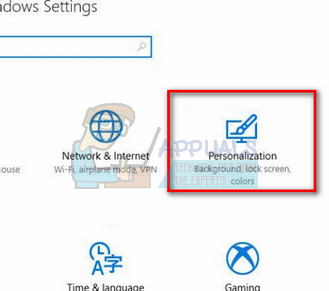
- Press Windows + I to launch the Settings application.
- Once in settings, click on “Personalization”
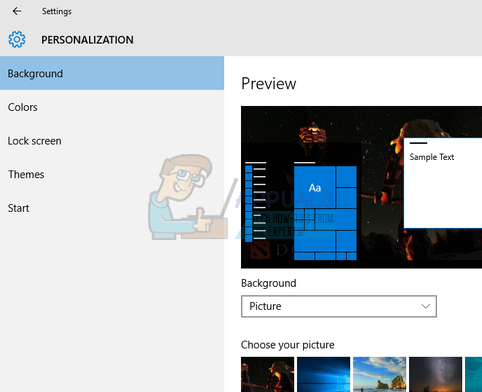
- Now change your current theme and wallpaper using the settings and check if they make any difference.
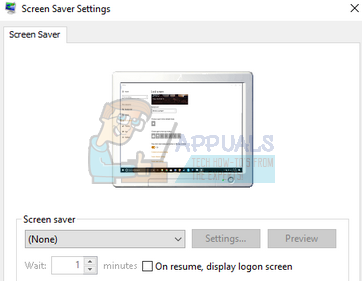
Solution 2: Disabling Screensaver
Desktop Windows Manager is also responsible for managing your screensavers. Since the creators update, there are many reports that the screensaver causes extreme high CPU usage due to unknown circumstances at the moment. If your screen saver is activated, try deactivating it and check if this brings any difference to our problem.
- Press Windows + S to launch the search bar of your start menu. Type “lock screen settings” in the dialogue box and hit enter.
- Select the first result which comes and click it. You will be navigated to your computer’s lock screen settings.
- Navigate to the bottom the screen and click on “Screensaver settings”.
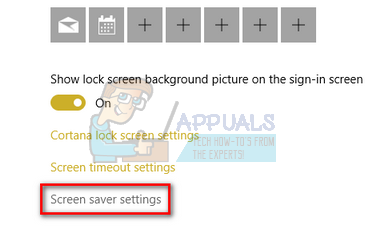
- It is possible that there is a default screensaver active on your computer. Many users gave feedback that the screensaver was activated with a black background which didn’t let it distinguish whether it was a screensaver or not. Make sure that it is disabled and try checking the problem again.
Solution 3: Scanning for Malware
Sometimes, this unusual behavior is caused by malware or virus present on your machine. They may have special scripts which run in the background which can be extracting your data or making changes to the settings.
Scan your computer using your antivirus utility and ensure that your PC is clean. If you don’t have any specific antivirus utility installed, you can use the Windows Defender utility and scan.
- Press Windows + S to launch the start menu’s search bar. Type “Windows Defender” and open the first result which comes forward.

- At the right side of the screen, you will see a scan option. Select the full scan and click on Scan This process might take some time as Windows scans all of your computer’s files one by one. Be patient and let the process complete accordingly. Restart your computer at the end and check if the problem is solved.

Solution 4: Removing Specific Applications
If all the above solutions didn’t work for you, we can try removing some specific programs. After surveying and reviewing a lot of cases, we determined that there were several applications which seemed to be causing the problem. Some of them are SetPoint, OneDrive etc. Also, try stopping or temporarily disabling your current antivirus utility and check the CPU usage. Look for programs which are interacting with your desktop and diagnose accordingly.
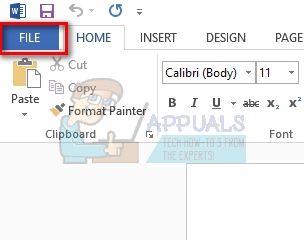
Solution 5: Disabling Hardware Acceleration for Office Products
Another workaround which worked prominently for various users was disabling the hardware acceleration for Microsoft Office products installed on your computer. Hardware acceleration is the use of computer hardware to perform some functions more efficiently as compared to its software solution.
- Open any blank page of any Office product and click “File” present at the top left side of the screen.
- Click on “Options” using the navigation pane present at the left side of the screen.
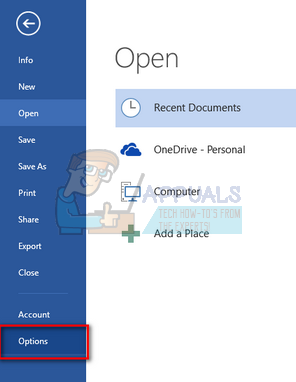
- Select “Advanced” using the left navigation pane, scroll through the entries until you find the heading “Display” and check the option “Disable hardware graphics acceleration”. Press Apply to save changes and exit.
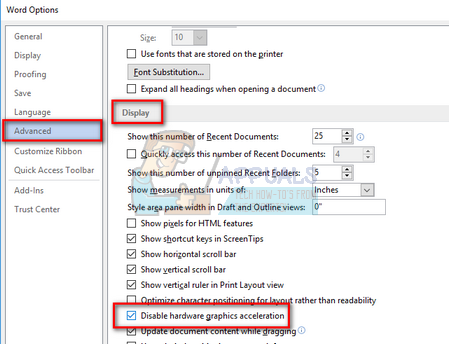
- Restart your computer and check if the problem at hand got solved.
Solution 6: Changing Default App Mode
This is the new feature introduced by Microsoft in Fall Creators Update 1709. There are two modes available to you; Light and Dark. By default, the mode is set to Light. If you have changed to the dark mode, you should revert back to the light one. This is known to be one of the causes for the high CPU usage under discussion.
- Press Windows + S to launch the search bar. Type “settings” in the dialogue box and open the application.
- Once in Settings, open the sub-category of Personalization.

- Once in Personalization, select “Colors” using the navigation menu present on the left side of the screen.
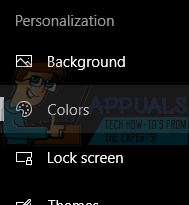
- Scroll to the bottom of the screen until you find the option “Choose your default app mode”. Select the option “Light”.

- Reboot your computer and observe the CPU usage.
Solution 7: Running the Performance Troubleshooter
Before we move on to updating the graphics drivers on your computer, we can run the Performance Troubleshooter. This troubleshooter will automatically detect anomalies regarding the speed and performance of your Windows and take actions accordingly. Make sure you are logged in as an administrator to carry out this solution.
- Press Windows + S, type “command prompt”, right-click on the application and select “Run as administrator”.
- Once in elevated command prompt, execute the following instruction:
msdt.exe /id PerformanceDiagnostic
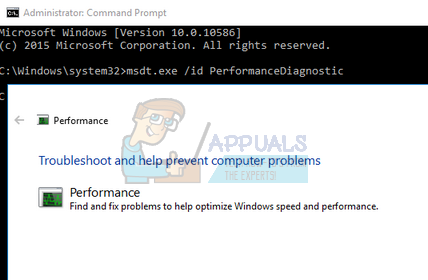
- Click “Next” when the troubleshooter pops up to start the process.
Solution 8: Updating Graphics Driver
If all the above solutions don’t produce any improvement, we can try updating your graphics drivers. Graphics hardware is responsible for visual representations on your computer. If the drivers are outdated or corrupted, they can be causing the high CPU usage. Navigate to your manufacturer’s website and download the drivers to an accessible location.
Note: Other than installing the latest drivers, you should also try rolling them back to a previous build.
- Right-click on Windows key and select Device Manager from the list of options available.
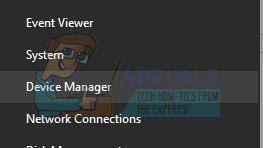
Another way to launch the device manager is by pressing Windows + R to launch the Run application and typing “devmgmt.msc”.
- Right-click on the adapter and select “Update Driver”.
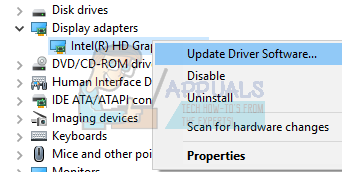
- Now a new window will pop up asking you to whether update the driver manually or automatically. Select “Browse my computer for driver software”.
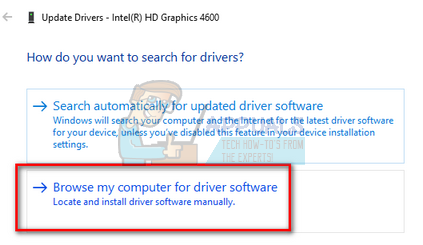
- Now browse through the folders to where you downloaded the drivers. Select it and Windows will install the required drivers. Restart your computer and check if the problem got solved.
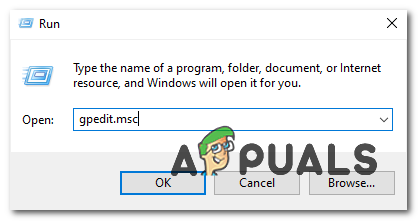
Solution 9: Changing a Policy in Group Policy Editor
If you are getting this issue when you are trying to use remote display protocol (RDP) you can try this fix to get your problem resolved. Follow these steps:-
- Press and hold the Windows key and press the R key to open the run program.
- Type “gpedit.msc” and press enter to open Group Policy Editor. (If you are using Windows 10 Home you can follow this tutorial to know how to run gpedit.msc on Windows 10 home).
 Opening GPedit.msc
 - Now Navigate to the following address:-
“Computer Configuration > Administrative Templates > Windows Components > Remote Desktop Service > Remote Desktop Session Host > Remote Session Environment” - Now double-click on “Use WDDM graphics display driver for Remote Desktop Connections”.
- Select “disabled” and restart your computer.
- Check to see if the issue persists Editing the Policy
 Opening GPedit.msc
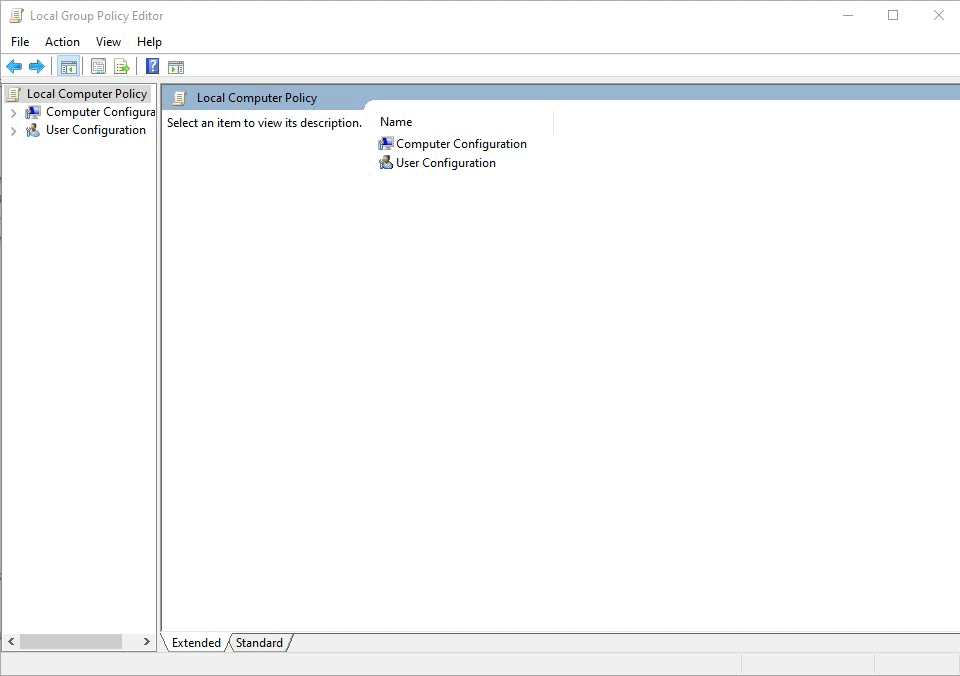 Editing the Policy


