- How to permanently add columns to all folders in Windows Explorer
- Add columns to all folders in Windows 10 Explorer
- How to set a default Folder View for all folders in Windows 10
- What are Folder Templates
- Set a default Folder View for all folders
- How to see the same view in all Windows 7 folders
- Force “Details” folder view to show standard columns in folders with music file in Windows
- 2 Answers 2
- How to set a folder view in Explorer for all folders – List, Details, Tiles, Small or Large Icons
- About Gaurav Kale
- 8 thoughts on “ How to set a folder view in Explorer for all folders – List, Details, Tiles, Small or Large Icons ”
How to permanently add columns to all folders in Windows Explorer
When you open any folder in Windows 10/8/7 display, File Explorer will typically display the following details about the objects – name, date modified, Type, Size, etc. But if you wish, you can display additional information or details about the objects, be they document files, image files, video files, or folders.
Add columns to all folders in Windows 10 Explorer
This post shows how to choose folder details to display and show additional information in Windows File Explorer columns, in Windows 10.

To add columns to all folders in Windows 10:
- Open File Explorer
- Make sure that you have set its Folder View to display Details.
- Next click on the Add columns button.
- From the drop-down menu which appears, you can select some additional file attributes to display.
If you need to see all the information that can be displayed about the file, click on Choose columns to open the following Choose Details box.
Here you will be able to select the details that you wish to display for the items in this folder like Account Name, Album artist, Authors, Date acquired, date archived, Document ID, Folder path, Tags, Title, Word count and so on
Selecting these entries will also let you Sort or Group the objects using these attributes.
You can also arrange the column order by using the Move up or Move down buttons and set the width of the columns.
Once you have done this, you will have to open Folder Options. To do this, you will have to click on Options > Change folder and search options.
Under the View tab, click the Apply to Folders button.
This will apply this folder view to all folders of a particular type.
Hope this helps.
Date: January 2, 2017 Tags: Explorer, Folder
How to set a default Folder View for all folders in Windows 10
In Windows File Explorer, you might have noticed the different folder layout settings for different folders. Some of the folders have smaller icons while some puts on a large icons view layout. There are several folder layouts available in Windows 10/8/7 which you can choose from, for any folder. While Windows has set these defaults based on the nature of the files in the folder, if you wish, you can set a default Folder View for all folders. In this post, we will how to set & apply the same view settings of the current folder, as the default, for all other folders on your PC.
What are Folder Templates
Before rolling on to change the folder’s view settings, let’s take a look at how folder templates work. You might have noticed that folders that contain pictures have a different view layout than that which contains videos or documents. This is the folder optimization technique in play which chooses one of the five templates for any folder based on the content that is stored in it. These templates are:
- General Items – Applies to any folder that contains a mixed combination of files and other sub-folders.
- Documents – Applies to the folders that contain documents (Word files, text files, etc.)
- Pictures – Applies to the folders that contain image files (.jpg, .png files, etc.)
- Music – Applies to all such folders which contain music files (.mp3, .wav, etc.)
- Videos – Applies to any folder that contains just video items (.mp4, .avi, etc.)
Whenever you create a new folder and put some files in it, Windows does its best to decide the folder template based on the content. If you’re storing mixed type of files in any folder, Windows automatically assigns General Items as the folder template. If you want to view any folder’s template, right-click the folder icon and open its Properties window. In here, navigate to the Customize tab where you can see the correct template optimized for the folder in question.
Set a default Folder View for all folders
Now that we are clear on basics, let’s roll over to the task at hand. You can apply a folder’s view settings to only those folders which are optimized for the same folder template type. Once the view layout is generalized for a folder template type (say, Music), every time you change the layout of file icons (from tile icons to large icons), the same will be reflected in other folders as well that are optimized for Music template. Now, you can follow the below steps to apply the folder view settings across a folder template type:
1. Open File Explorer by using key combination Windows Key + E and navigate to the folder you want to use as a source for view layout settings.
2. Navigate to the View tab in ribbon bar on the top and change the settings per your wish. You can change the layout and choose the folder details to display, add extra panes, adjust column width, etc.
3. Once done with the changes, click Options to open Folder Options window.
4. Navigate to View tab in Folder Options window.
5. Click/Tap on Apply to Folders button.
6. Click/Tap Yes on the confirmation window that pops up.
7. Click/Tap OK on the Folder Options window to save the settings.
That is it. You have just generalized the view settings for a particular folder template type across the OS. Hope this works for you.
How to see the same view in all Windows 7 folders
Whether you prefer details, lists, thumbnails, or icons, making sure Windows Explorer always displays your files and folders in the view of your choice is more difficult than it should be. Freeware alternatives to Explorer may be just the ticket.

I will go out on a limb and say that in the history of humankind no product has caused more irritation to more people than Windows. At least not since the invention of the pop-top can (and with the possible exception of the Ford Escort).
Terry from Moncton, New Brunswick, agrees:
«Probably a bad way to start, but I think Windows [stinks]. However, I have to use it vis-a-vis my business. Just bought a Windoze 7 machine and its idiotic permissions, among other things, are even more irritating than previous incarnations. All I want is for the default for all folders to be medium [icons].«
I hear you, Terry. To set the default view for all folders and files to details, follow the four steps described on the Microsoft Support site:
- Locate and open the folder that has the view setting that you want to use for all folders.
- On the Tools menu, click Folder Options.
- On the View tab, click Apply to All Folders.
- Click Yes, and then click OK.
Note: To reset all the folders to the default view settings, repeat these steps, but click Reset All Folders in step 3.
 The options under the View tab in the familiar Windows Explorer Folder Options dialog box. Screenshot by Dennis O’Reilly
In Vista and Windows 7, you have to follow these steps for five different folder templates to have all Explorer folders show the details view: General Items, Documents, Pictures, Music, and Videos. Even then, a system change may reset your folder views to the Windows default, which uses different views based on the folder’s contents.
So where does that leave us poor souls who simply want to see all our files and folders in the same view—details, lists, thumbnails, or icons—in every Explorer folder?
In August 2008 I described how to change the default Explorer view in Vista . The steps are about the same in Windows 7. The comments to that post suggest two alternative methods for resetting Explorer’s default folder view.
You can reset the view shown in the five folder templates in Windows Explorer via the Folder Properties dialog. The How-to Geek provides step-by-step instructions for customizing folder views in XP, Vista, and Windows 7.
Going the Explorer-replacement route
You might wonder why Microsoft would make it so difficult for Windows users to see the contents of all folders in Explorer in the view of their choice, whether details, lists, small icons, large icons, or some other view. You might also wonder whether there might be a better file manager available for Windows.
The free Classic Shell file manager was one of the three Windows 7-enhancing utilities I described in April 2010. Gizmo’s Freeware site recently updated its list of the best free file managers for Windows.
But my current favorite Explorer alternative is David Erceg’s Explorer++ donationware, which has many useful file-management features, including the ability to select the default view for all folders: click Tools > Options > Default Settings, make your selection, and click OK.
The donationware Explorer file manager lets you set the view for all folders via a single option. Screenshot by Dennis O’Reilly
Explorer++ can be set to work along with Windows Explorer or to replace Explorer. You can drag and drop files between Explorer++ and other programs, including Explorer windows. Like other Explorer replacements, Explorer++ adds multiple tabs for quick folder switches and easy file management. The program also lets you split, merge, or «destroy» files, and create bookmarks and custom keyboard shortcuts.
Even if you use a Windows file manager other than Explorer, you’re likely to find yourself navigating through Windows’ built-in file and folder viewers from time to time. Unless you find yourself spending a big chunk of your workday managing files and folders on a Windows machine, it may be most efficient to change Explorer’s view to your preference once for each folder type and then learn to live with the handful of folders that will inevitably insist on presenting whichever view Microsoft preselected for us.
Force “Details” folder view to show standard columns in folders with music file in Windows
In Windows explorer if I change the folder view to details, for a standard folder the columns shown are Name, Date modified, Type and Size. When I open a folder containing files with audio extensions (wav, mp3, etc), the columns change to something else such as artist, genre, etc. Is there a way to force the details view to always show the same standard columns, viz, Name, Date modified, Type and Size?
The view changing to thumbnails in case of image files is not a problem for me, as I can go to details rather quickly in a few clicks, and it shows the standard columns by default. My main problem is audio files which seem to change the columns that are shown. I have seen this, but preferably I would like to do this without registry hacks. I am using Windows 7 enterprise edition.
2 Answers 2
Edit: may be duplicate of Windows 7 Explorer: How to change the columns displayed for file attributes? Alternative systematic solution presented is not in other thread.
Those columns are because File Explorer sees the audio files in the folder and defaults to using its «music» template to show the folder’s contents. There are 2 options depending on how systematic you want the changes you make to be.
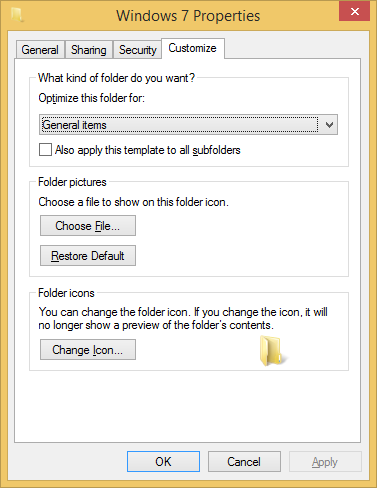
You can force change the folder template back to «general items» for this folder so that it won’t show those columns by:
- Go in to the folder’s Properties
- Select the » Customize » tab
- Under the section » What kind of folder do you want? » change the » Optimize this folder for: » option from » Music » to » General Items «.
Once it’s applied, the folder’s detail view should no longer have the columns specific to music files.
Keep in mind that the changes will only apply to this folder (and any contained subfolders if you selected that option when applying the new properties).
Alternatively, you can change the «music» template itself. So that any folder that windows explorer opens which it automatically applies the «music» template, will display whatever customized view you made.
In the currently open folder that is already in «Music» view mode/template (ie. with columns for artists, genre, etc.), manually change the columns to the desired fields by:
- Right-clicking on the title row (row containing Name, #, title, artists, album), and select More. in the pop-up menu.
- Change the column selection and order to your desired layout.
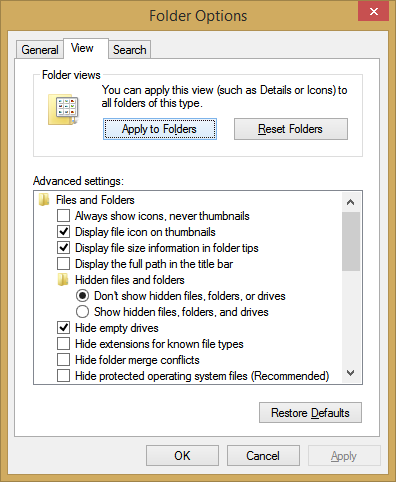
Save the changed layout as the default for the » Music » template by:
- Open up the File menu (top left)
- Select » Change folder and search options «
- Select the » View » tab
- Under the » Folders views » section, select » Apply to Folders «
Once that is applied, all folders that file explorer will default to «Music» view mode/template will now use this layout.
For more details and illustrations on the alternate method, please consult How-to-Geek’s Guide on customizing the windows folder templates
How to set a folder view in Explorer for all folders – List, Details, Tiles, Small or Large Icons
If you use the built-in file manager in Windows, Windows Explorer, you will realize that it has a feature to remember each folder’s view setting. Unfortunately, it is not explained very properly by Microsoft and some changes were made in modern Windows versions which make it even more confusing for end users. We constantly get this question asked by our readers — is there any way to make Windows Explorer set a desired view for all folders and then remember it? Let us explore how to do that.
In Windows XP and earlier versions of Windows, you could open Folder Options from the Tools menu of Windows File Explorer, switch to the View tab and then click «Apply to all folders» to set the view you were currently using to all folders. But in Windows 8.1, Windows 8, Windows 7 or Windows Vista, it is not so simple because Explorer now stores the view for each folder template separately.
Windows Explorer has five folder templates — General Items, Documents, Pictures, Music and Videos. When you see the Customize tab of a Library or of a folder, you will see these templates. This adds more flexibility to view your personal data. For instance, even if you prefer, say, List view for Documents, you may want your Music Library to be shown in Details view and you would want your Pictures and Video Libraries to be in icon-based views such as Medium, Large or Extra Large icons. So for each folder templates, Explorer stores it settings individually. Naturally, to change the view for all templates to the one you want, you need to do «Apply to Folders» 5 times, once for each template.
Folder Properties Customize tab
- Open these five folders in Explorer:
C:\Users
C:\Users\ \Documents
C:\Users\ \Music
C:\Users\ \Pictures
C:\Users\ \Videos - For each of these folders, set the desired view you want. I use List View for General items and Documents, Details View for Music, and Large Icons view for Pictures and Videos folders.
- Now you need to open Folder Options in each of these 5 Explorer windows. On Windows 8.1 and Windows 8’s, Folder Options command is on the View tab of the Ribbon. On Windows 7 or if you disabled the Ribbon in Windows 8, press Alt+T on your keyboard to open the Tools menu and then open Folder Options.
Tip: you can add the Folder Options button to Quick Access Toolbar. See the following article: How to add any ribbon command to the Quick Access toolbar of File Explorer in Windows 8.1.
Folder Options Views
Note that despite setting these views, Explorer still remembers the views of individual folders that you change later after clicking «Apply to Folders». For example, if you set Pictures folder to Extra Large Icons and then clicked «Apply to Folders» then by default, any folders containing Pictures will now have Extra Large icons view. But if you were to change one of your specific folders containing Pictures to Medium icons, Explorer will remember that view for that particular folder.
In addition, when you access any folders from their Libraries, the folders will always follow the parent library’s view. So if you directly opened the My Documents folder at C:\Users\ \Documents, then it will show you the view you’ve set. But if you access the same folder from the Documents Library, it will show you in the view that you use for the Documents Library.
Finally, special folders like Recycle Bin, This PC / Computer, Libraries have their own views which Explorer remembers.
So, now hopefully, the mystery of how Explorer determines which view to use for a folder will be a bit more clear to you and you won’t be bewildered why suddenly Explorer decided to switch to another view. Happy tweaking! 😛
Winaero greatly relies on your support. You can help the site keep bringing you interesting and useful content and software by using these options:
Share this post
About Gaurav Kale
Gaurav is a software enthusiast from India and Classic Shell tester & UX consultant. He started with Windows 95 and is good at software usability testing. He firmly believes that user experience is just as important as software code quality and architecture for software to be successful.
8 thoughts on “ How to set a folder view in Explorer for all folders – List, Details, Tiles, Small or Large Icons ”
thanx that clears up a lot of confusion. I was pulling my hair out wondering why explorer did not respect the views I had set. setting them from libraries worked perfectly.
Thank you, I was despairing of ever getting the view I wanted without doing it every time I opened a folder.
Nice one 🙂 Very clear and well laid out. There’s so many system settings in Windows that it’s hard to remember them all, and this explained it all very well.
Very clear steps, thank you
I don’t use any of the 5 folders you name. I have my own file structure. In fact, I have a separate partition for all my non system files.
I don’t see how your method can work in my case. Can you please indicate whether it should and, if so, why?
Kindly update this article to include Windows 8.1 Update and Windows 10.
Thanks a lot. Was getting really frustrated why years old XP steps were not working even though there was no obvious change in options. How counter intuitive.
It works here (Windows 10 build 16193).
Ctrl+Shift+1..4 change the appearance of icons.


