- a problem with the hard disk has been detected press enter to continue
- Replies (3)
- Сбой жесткого диска — как исправить SMART ошибку 301
- Причины возникновения SMART-ошибки 301
- Как исправить ошибку HDD SMART 301?
- Способ №1. Проверьте диск на наличие ошибок
- Способ №2. Используйте утилиту CHKDSK
- Способ №3. отремонтировать диск с помощью BIOS
- Альтернативное решение
- How to fix «Windows detected a hard disk problem»?
- Overview of the problem
- Possible reasons of error message
- How to fix the «Windows detected a hard disk problem»
- How to disable the feature that reports error message
- What to do when computer reports «Windows detected a hard disk problem»?
- Summary
a problem with the hard disk has been detected press enter to continue
Replies (3)
Your hard drive has probably died. Test the hard drive with a diagnostic utility downloaded from the drive mftr.’s website or use Seagate’s SeaTools For DOS. You will create a bootable CD with the file you download. You will need third-party burning software to do this such as Roxio, Nero, or the free ImgBurn. Burn as an image, not as data.
Boot with the CD you made and do a thorough test of the drive. If it fails any physical tests, replace it.
Testing hardware failures often involves swapping out suspected parts with known-good parts. If you can’t do the testing yourself and/or are uncomfortable opening your computer, take the machine to a professional computer repair shop (not your local equivalent of BigComputerStore/GeekSquad).
MS-MVP — Elephant Boy Computers — Don’t Panic!
4 people found this reply helpful
Was this reply helpful?
Sorry this didn’t help.
Great! Thanks for your feedback.
How satisfied are you with this reply?
Thanks for your feedback, it helps us improve the site.
How satisfied are you with this reply?
Thanks for your feedback.
I have this error «A Problem with the hard drive has been detected. Consult the troubleshooting section of your user manual. Press enter key to continue.»
My pc continues just fine. I have ran every test I can get my hands on. Checkdisk, Defrag, and I still can’t figure out what is causing this error. I have swapped cables, change from CS to Master. Still cannot get this error to resolve, yet my pc runs fine once I «enter» to continue. I have ran these test at boot up, booted to both a floppy, cd and usb, and still cannot find the issue.
6 people found this reply helpful
Was this reply helpful?
Sorry this didn’t help.
Great! Thanks for your feedback.
How satisfied are you with this reply?
Thanks for your feedback, it helps us improve the site.
How satisfied are you with this reply?
Thanks for your feedback.
![]()
Since we don’t know anything about your system — like make and model assumptions will have to be made.
I don’t think there is any such message from Windows XP and you are probably seeing the message when you reboot before XP starts to load, right?
Most modern systems have buit into their BIOS what is called S.M.A.R.T. technology that performs a quick series of health tests on your HDD(s) when you restart your system. You might catch a glimpse of the results when your system reboots.
You can read about S.M.A.R.T. technology here:
The results of the last S.M.A.R.T. test and other information about your HDD is saved in some memory built into the HDD and you can query it with a free software tool that you can download from here:
After you install and run it, you can quickly view the S.M.A.R.T. status of your HDD(s) like so:
It is up to you how many of the other features you want to use/enable and you can just uninstall the PassMark software later if you decide you don’t like it.
You will probably find an error (FAIL) in the Status column for something and there is not much you can do about it. There is a user forum on the PassMark page where you can share your information and ask any questions — maybe they have some ideas/remedies.
A S.M.A.R.T. failure is usually an indication of impending catastrophic HDD failure so you need to make a plan for how to replace your HDD, salvaging your files, etc.
Your HDD manufacturer may have some other test you can download and run, but they will probably NOT be able to «fix» the problem:
Сбой жесткого диска — как исправить SMART ошибку 301
Причин, вызывающих сбой при котором компьютер перестает нормально функционировать много. Это может быть вирусное ПО, повреждение системных файлов, неполадка внутри комплектующих и ряд других потенциальных факторов.
Сегодня мы рассмотрим ошибку жесткого диска под названием SMART 301. Она может возникнуть вне зависимости от версии операционной системы, которую вы используете — Windows 8, Windows 8.1, Windows 10, и обычно проявляется в момент запуска компьютера.
Дословный текст ошибки выглядит следующим образом:
“The SMART Hard Disk check has detected an imminent failure. To ensure not data loss, please backup the content immediately and run the hard disk test in system diagnostic. Hard Disk 1 (301), want to continue press enter”
Что в переводе означает:
“SMART-проверка жесткого диска обнаружила неизбежный сбой. Чтобы не потерять данные, немедленно сделайте резервную копию содержимого и запустите проверку HDD с помощью системной диагностики. Жесткий диск 1 (301), нажмите Enter, чтобы продолжить”.
Столкнувшись с этой ошибкой, становятся очевидны два фактора:
- Произошел сбой устройства.
- Вероятно, в скором времени жесткий диск окончательно выйдет из строя.
Прежде чем мы приступим к практическому разбору руководств по исправлению ошибки, давайте найдем причину по которой возник сбой. Это позволит лучше понять ее и избежать возникновения такой ситуации в дальнейшем.
Причины возникновения SMART-ошибки 301
Если вы столкнулись с ошибкой жесткого диска 301, следует обязательно обратить внимание на другие комплектующие, поскольку она указывает не только на косвенный сбой накопителя.
Главные причины ошибки:
- Ошибка SMART-проверки жесткого диска.
- Сломанный чип контроллера IDE/SATA на материнской плате.
Вне зависимости от того что именно вызвало сбой, к решению нужно подойти одинаково ответственно. В противном случае это не принесет положительных результатов.
Как исправить ошибку HDD SMART 301?
Всего существует три способа, которые объективно способны решить проблему. Мы расположили их в порядке повышения сложности выполнения, что позволит вам сэкономить время и, возможно, исправить неполадку не доходя до страшного слова “BIOS”.
Способ №1. Проверьте диск на наличие ошибок
1. Откройте Мой компьютер .
2. Щелкните правой кнопкой мыши по физическому диску, который нужно проверить, и перейдите в Свойства .
3. Перейдите в раздел Сервис .
4. Найдите раздел Проверка на наличие ошибок .
5. Щелкните по клавише Проверить .
6. В открывшемся окне выберите команду Проверить диск .
7. Дождитесь завершения сканирования.
8. При обнаружении ошибок исправьте их и завершите работу.
Если это не сработало — не теряйте надежду. Всегда можно попробовать восстановить жесткий диск через командную строку.
Способ №2. Используйте утилиту CHKDSK
Вполне возможно, что ошибка жесткого диска SMART 301 вызвана наличием битых секторов на устройстве. В этом случае вам поможет утилита chkdsk .
1. Откройте командную строку от имени администратора.
2. Введите команду chkdsk /f /r и нажмите Enter .
3. Дождитесь завершения процесса восстановления жесткого диска.
4. Перезапустите компьютер.
5. Еще раз запустите командную строку от имени администратора.
6. Введите команду chkdsk /f /r C: и нажмите Enter . Вместо ( С: введите букву нужного вам диска).
Подтвердите процесс, введя команду Y и перезапустите компьютер.
Примечание:
Запуская утилиту chkdsk, имейте в виду, что в процессе восстановления существует вероятность потери данных. Поэтому настоятельно рекомендуем заблаговременно сделать полное резервное копирование.
Если способ оказался бессилен, попробуйте отремонтировать диск через BIOS.
Способ №3. отремонтировать диск с помощью BIOS
1. Отключите компьютер.
2. Извлеките жесткий диск и переподключите его.
3. Запустите компьютер с частыми нажатиями клавиши F10 , это позволит попасть в меню BIOS. Для ноутбуков могут быть другие клавиши, поэтому сверьтесь с пользовательским руководством.
4. Теперь запустите тест жесткого диска (расположен в разделе Дополнительно или Диагностика ).
5. Совершите обычный запуск компьютера и проверьте не исчезла ли ошибка.
Альтернативное решение
Вполне вероятно, что даже после применения описанных выше способов ошибка никуда не исчезнет. В таком случае единственным действенным решением проблемы становится обращение в сервисный центр.
Обратите внимание на то, что возможной причиной ошибки SMART 301 может оказаться повреждение контроллера IDE/SATA на материнской плате. Поэтому не торопитесь выкидывать диск и сперва установите точную причину сбоя.
Надеемся, статья оказалась для вас полезной и помогла найти ответы на поставленные вопросы.
How to fix «Windows detected a hard disk problem»?
Position: How Tos — Disk Utilities — How to fix «Windows detected a hard disk problem»?
Summary
DiskGenius – Helps to recover lost files & partitions, check bad sectors, clone disk, back up data, etc.
Overview of the problem
Here is one of the stories which may sound familiar to you:
«Hi, there guys, about a week ago I started receiving an error message after system booted. The error keeps popping up saying ‘Windows has detected a hard drive error…’ The hard drive is 500GB Seagate Barracuda. Yesterday, I got all my important photos, documents and other stuff backed up to an external disk. My computer slows down gradually and froze once and still reports the error, so I think it’s time to fix it. Any advice?»
This is one of the frequently asked questions online and it may happen to anyone of us. If your computer is running Windows with the version which is after Windows XP, then you might come across an error message «Windows deleted a hard disk problem» (see picture below) suggesting to backup files immediately to prevent information loss and then contact the computer manufacturer to determine if you need to repair or replace the disk.

This is because hard drive has problem or computer gets other severe errors such as Windows becomes corrupted, operating system slows down or even crashes and freezes. What’s more, it’s really annoying to get this error as it reports continuously after every 5 or ten minutes. In many cases, this error message is the omen of hard disk falling, system crash, file loss, etc. It’s necessary to attach importance to the issue and find out reasons and solutions. This article is going to make a thorough analysis of the problem and come up with solutions. So keep reading.
Possible reasons of error message
There are many reasons why the error happens.
Usually, this error is caused by hard drive failure and yet it can be the generated by system error, such as registry error, RAM decline, fragmented files, excessive startup entries, redundant program installations, virus, malware, system error, etc. As to system problem, we can try a system restore, cleaning system junk files, update, etc. Let’s see what causes hard drive failure.
Mechanical or logical error happens to hard disk.
It’s very likely that hard drive gets problems, say file system corruption, bad sectors, mechanical issue and more. Hard drive is the brain of computer responsible for data storage and hard disk problem threats data security. System reports this message to remind potential information issue to help users prevent file loss.
Virus damage is one if the main reasons.
Once computer infects virus, it becomes different even after anti-virus software has removed virus. Theoretically, your computer won’t infect virus as long as anti-virus is powerful enough, but that doesn’t mean your computer frees from error. Moreover, anti-virus cannot repair damages caused by virus in most case and those damages my harm system. Then system may report message wrongly.
System files damage also should be included.
There are indeed many cases which may lead to system file error, for example, an incomplete program uninstallation, deletion of important system files by mistake, improper computer shutdown, etc. All these actions may give rise to corruption of entries of vital system files. The damaged system file will further result in incorrect or missing link data and information required by system for proper working.
Human error can’t be neglected.
Many improper operations are carried out by users unintentionally, which may bring about serious problem to system though users are trying to improving computer performance. For instance, some users modify system registry setting, change system file properties or location, install improper plugins, etc. Since many users are not very good at maintaining system or computer components, they are more likely to follow wrong instruction and perform incorrect operations. Some false actions will damage system or even hardware.
How to fix the «Windows detected a hard disk problem»
It’s hard to tell the reason simply judging from the error message. It is not necessary hard disk gets damaged, and system or partition problem also causes the problem. Thus here lists several solutions aiming at different causes and you can try them one by one.
Solution 1: Use system file checker
Windows provides basic tools to help fix errors, which is not known to many common users. Many problems appearing serious can be fixed by this simple tool and it’s not complicate to use. Users have no idea which system file is vital and whether it is damaged. System File Checker will check system file and handle integrity issue.
Click start button and enter cmd in the searching box. Then right click it and select the item «Run as administrator»
In the command prompt type sfc /scannow and press Enter key.
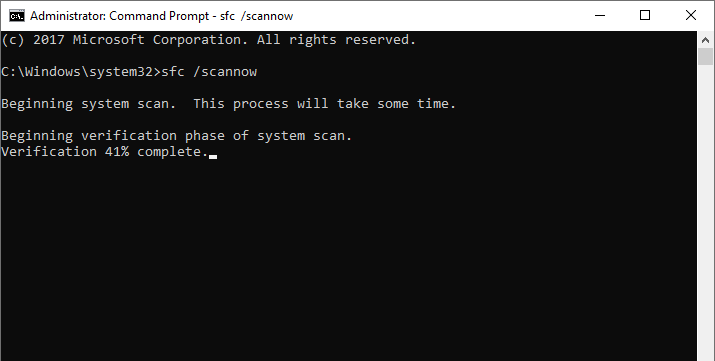
The process is fast and the result will tell whether there is interiority violation. This command scans all protected system files and replaces those corrupted files with a backup copy. Do not close the window before the verification is 100% complete.
Solution 2: Do a ChkDsk
The most important thing to solve any problem is keeping calm. If the first method doesn’t work on your case, then you can perform a ChkDsk.
Still, we need to get the Command Prompt, then enter partition drive letter (c:/d:/e: and so on) you want to chkdsk. If you want to test the default partition, then just leave it as it is.
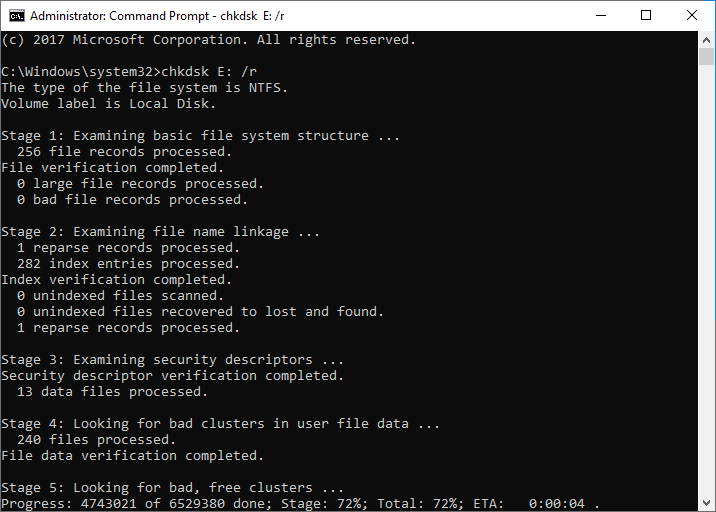
Type «chkdsk» and press «Enter» key. Then ChkDsk begins working.
The main function of chkdsk is checking and repairing errors for NTFS and FAT file systems. Thus, if the error «Windows detected a hard disk problem» is caused by file system error, then the issue will be fixed after chkdsk. You’ll get a better understanding of what is going on with file system or hard disk.
The risk of performing chkdsk is losing data, as the file allocation table will be modified during the process. Thus it’s recommended to backup data before trying the command.
Solution 3: Check bad sectors for hard disk
The first method is testing and repairing system error and the second file system problem. If there is no problem with system or partition file system, then you need to test hard drive health condition. Bad sectors may happen to all hard drive and threat data security. How to check bad sectors?
DiskGenius is free partition manager, file recovery tool and system backup software. It includes the function for bad sector checking and repairing. This is third-party tool and you need to download and install it first.
Launch the program and you can see hard drives and partitions clearly displayed on the main interface with detailed information. Click menu item «Disk» and click «Verity or Repair Bad Sectors».
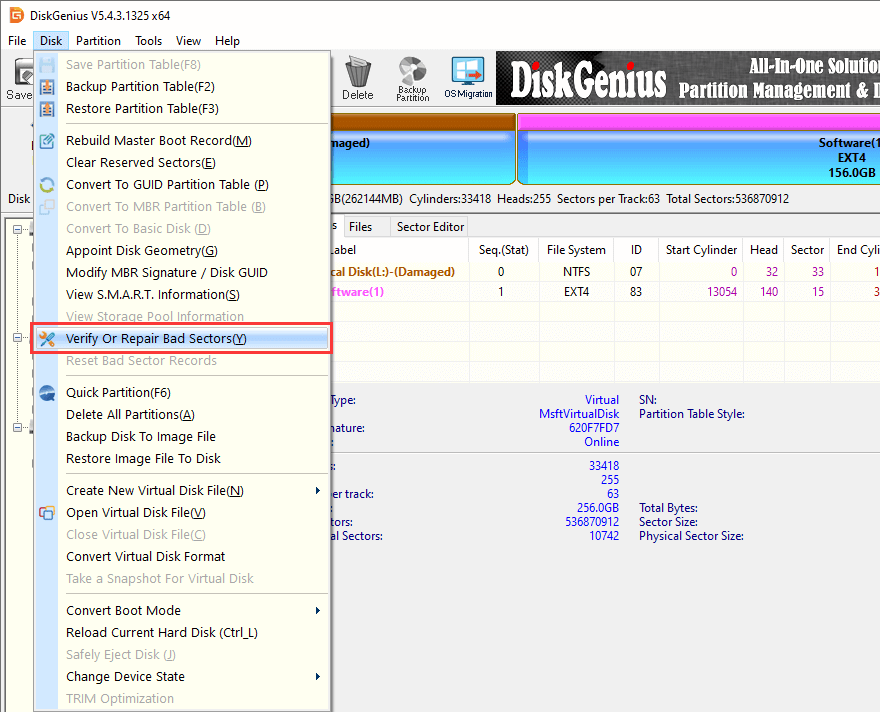
The checking process may take a while if the drive or partition being scanned has large capacity. After the process is done, DiskGenius gives a report of bad sector conditions.
Bad sector repairing damages data stored on and near bad sectors, thus you need to backup important data before starting repairing. The limitation of this feature is that it is unable to repair physical bad sectors.
Solution 4: Contact hard disk support or find a professional repair center
The last thing we want is sending hard drive to repair center or contact support team. Disk repairing needs special machines and some damaged disks can’t be repaired. It’s suggested to contact support team if the drive is within the warranty period.
How to disable the feature that reports error message
The error message pops up when system deems your hard drive has problem and reminds you to backup data. But there are real cases that hard drive has no problem but Windows just reports the message. So the message will be annoying and we can disable the feature with following steps:
Step 1 Get Run window from Start menu and type in gpedit.msc
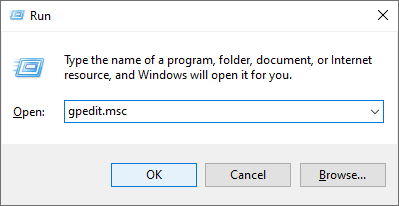
Step 2 Click «Ok» or hit Enter key and you’ll get a new window where you can find Disk Diagnostics: Administrative Templates > System > Troubleshooting and Diagnostics > Disk Diagnostics
Step 3 Click «Disc Diagnostic: Configure execution level» on the right part and a configuration menu will pop up. Modify the execution level to Disable and click «Apply» and «OK». Then restart computer the error message won’t popup.
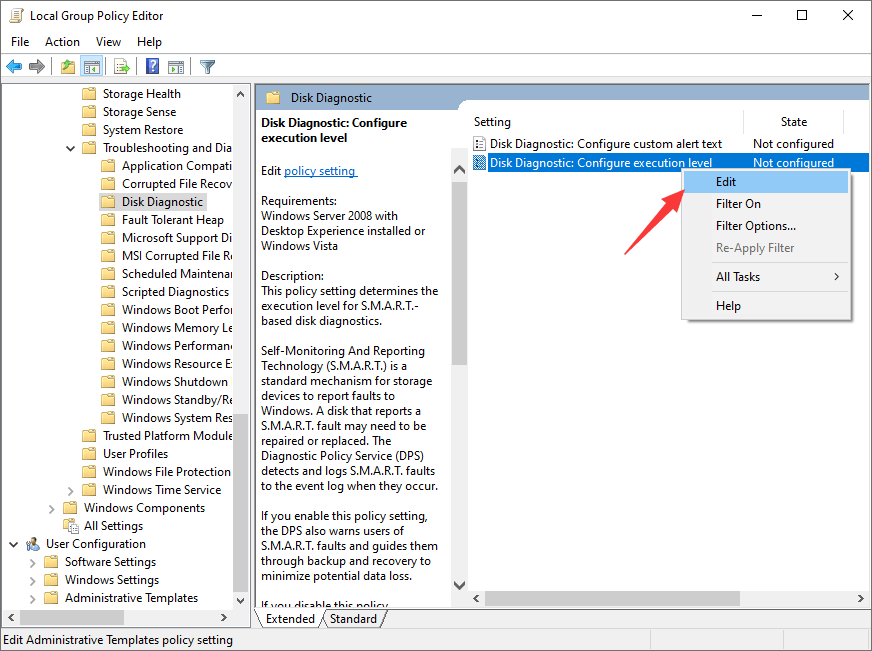
These steps keep Windows from reporting the message only but it can’t repair or fix hard disk or system error. So please make sure your hard drive is indeed in good health.
What to do when computer reports «Windows detected a hard disk problem»?
Potential hard disk or system failure may cause serious file loss problem, for instance, your installed program, documents, photos, movies, songs, email and other personal information will lose. Therefore, it is highly advised to make backup copy for important data once your Windows detects a hard disk problem.
It’s easy to backup data from one drive to another or from partition to partition. Simply, the Copy and Paste operation can backup most data except Windows. DiskGenius provides flexible and overall backup solutions and all solutions are free of charge. It allows you to backup any partition including system partition to an image file, clone partition or entire hard drive to another, migrate Windows to SSD, etc. This backup tool offers three modes for each cloning or imaging feature, for example, it’s able to copy partition or drive sector by sector, which means sectors of the target partition or drive are the same with the original one. Here is a guide of cloning / copying hard drive.
Step 1 Click menu item «Tools» and select «Clone Disk».
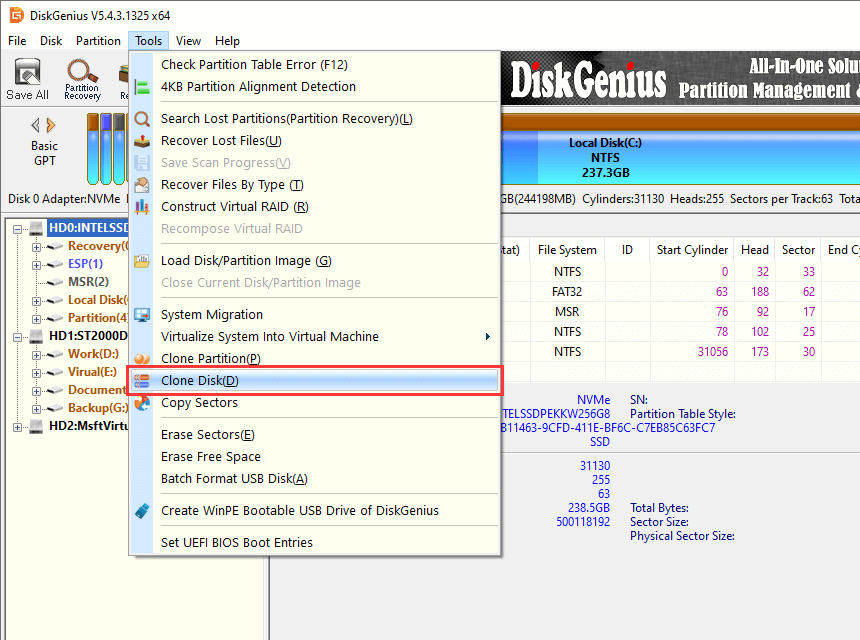
Step 2 On the popup window select source disk and target disk and clone mode. Click «Start» button and disk copy starts.
DiskGenius supports to clone larger hard drive to smaller disk, and yet you need to prepare a hard drive whose capacity shouldn’t be smaller than the used space of source disk. Then install DiskGenius and launch it.
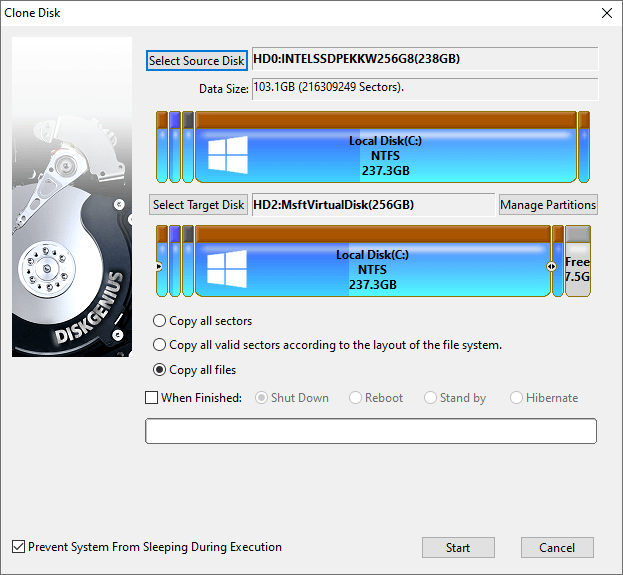
DiskGenius supports file system used by Windows only for the moment, but it’s able to clone hard drives with other file systems such as HFS. The backup module «Copy all sectors» can be used to backup drive with any kind of file system formats. The clone speed mainly counts on disk’s speed, clone mode you choose and the amount of data to be cloned.
Summary
We should pay attention to «Windows detected a hard disk problem» but do not have to be frightened. Calm down first and then follow solutions above to backup data and fix the problem.
DiskGenius – All-round tool to recover deleted files, test hard drive, image disk.


