- Windows Driver Development Services
- What we do
- What’s included?
- Peripheral drivers development
- Virtual device driver development
- Windows service development
- Check out our recent case study
- A Virtual Camera Driver for Using One Webcam in Multiple Applications Simultaneously
- How we work
- Frequently Asked Questions
- What technologies do you use to develop drivers for Windows?
- Can I write part of my driver to run in user mode and part in kernel mode?
- What is meant by driver certification?
- What Windows versions do you write drivers for?
- What input data do you need to write a Windows driver for my device?
- Can you help me with migration from Windows 7 to Windows 10?
- Overview of developing Windows client drivers for USB devices
- Creating a New Software Driver
- Case 1: You want to use KMDF
- Case 2: You want to use the legacy NT model
- Case 3: You want to use WDM
- Write a Hello World Windows Driver (KMDF)
- Create and build a driver
- Write your first driver code
- Build the driver
- Deploy the driver
- Install the driver
- Debug the driver
Windows Driver Development Services
What we do
What’s included?
Peripheral drivers development
Virtual device driver development
Windows service development
Check out our recent case study
Windows driver development  System software development Kernel and driver development Telecom
A Virtual Camera Driver for Using One Webcam in Multiple Applications Simultaneously
The virtual camera is similar to ManyCam. It allows people to use their webcams on various applications whilst simultaneously live streaming or using video chat.
We’ve helped more than 40 companies and individuals build solutions used by millions of people
How we work
AREA OF RESPONSIBILITY
DEDICATED DEVELOPMENT TEAM
WINDOWS DRIVER ARCHITECTURE
Frequently Asked Questions
What technologies do you use to develop drivers for Windows?
We apply the following tools and technologies in our driver development for Windows:
- WDK/DDK – a proper Driver Development SDK provided by Microsoft
- KMDF – Kernel Mode Driver Framework that allows the development of kernel-mode drivers. UMDF – User Mode Driver Framework that allows the creation of a driver in user mode. These drivers have limitations compared to KMDF/WDM drivers and in most cases, you would need to build a Kernel counterpart as well.
- Visual Studio – integrated development environment (IDE)
- VisualDDK – a plugin for Visual Studio which provides the ability to develop and debug drivers directly from Visual Studio.
Can I write part of my driver to run in user mode and part in kernel mode?
Yes, you can. If you split a driver into two parts, one part will be able to access some kernel-mode resources or features, and the other part will run in user mode and receive I/O requests from the kernel-mode driver.
What is meant by driver certification?
Windows devices use digital signatures upon installation. This is done to verify the integrity of driver packages and the identity of the software publisher. Also, according to the kernel-mode code signing policy for 64-bit versions of Windows Vista and later versions of Windows, a kernel-mode driver must be signed with Microsoft’s certificate or a certificate of a Microsoft partner for the driver to load.
What Windows versions do you write drivers for?
We write drivers for the most common Windows versions including Windows 8, 8.1, and 10. We can also provide driver development for Windows 7 if you need it, but this version is no longer supported by Microsoft.
What input data do you need to write a Windows driver for my device?
For your Windows device driver development, you will need to provide us with detailed specifications or data sheets of the hardware for this device.
Can you help me with migration from Windows 7 to Windows 10?
Sure. We can help you move from Windows 7 and provide Windows 10 driver development.
Overview of developing Windows client drivers for USB devices
Purpose
This section describes Universal Serial Bus (USB) support in the Windows operating system, so that you can develop USB device drivers that are interoperable with Windows.
Where applicable
USB devices are peripherals, such as mouse devices and keyboards, that are connected to a computer through a single port. A USB client driver is the software installed on the computer that communicates with the hardware to make the device function. If the device belongs to a device class supported by Microsoft, Windows loads one of the Microsoft-provided USB drivers (in-box class drivers) for the device. Otherwise, a custom client driver must be provided by the hardware manufacturer or a third party vendor. The user installs the client driver for the device when the device is first detected by Windows. After successful installation, Windows loads the client driver every time the device is attached and unloads the driver when the device is detached from the host computer.
You can develop a custom client driver for a USB device by using the Windows Driver Frameworks (WDF) or the Windows Driver Model (WDM). Instead of communicating with the hardware directly, most client drivers send their requests to the Microsoft-provided USB driver stack that makes hardware abstraction layer (HAL) function calls to send the client driver’s request to the hardware. The topics in this section describe the typical requests that a client driver can send and the device driver interfaces (DDIs) that the client driver must call to create those requests.
Developer audience
A client driver for a USB device is a WDF or WDM driver that communicates with the device through DDIs exposed by the USB driver stack. This section is intended for use by C/C++ programmers who are familiar with WDM. Before you use this section, you should understand basic driver development. For more information, see Getting Started with Windows Drivers. For WDF drivers, the client driver can use Kernel-Mode Driver Framework (KMDF) or User-Mode Driver Framework (UMDF) interfaces designed specifically to work with USB targets. For more information about the USB-specific interfaces, see WDF USB Reference and UMDF USB I/O Target Interfaces.
Development tools
The Windows Driver Kit (WDK) contains resources that are required for driver development, such as headers, libraries, tools, and samples.
USB programming reference
Gives specifications for I/O requests, support routines, structures, and interfaces used by USB client drivers. Those routines and related data structures are defined in the WDK headers.
USB driver samples
Use these samples to get started with USB client driver programming.
Related standards and specifications
You can download official USB specifications from the Universal Serial Bus Documents website. This website contains links to the Universal Serial Bus Revision 3.0 Specification and the Universal Serial Bus Revision 2.0 specification.
Documentation sections
Introduces you to USB driver development. Provides information about choosing the most appropriate model for providing a USB driver for your device. Write, build, and install your first skeleton user-mode and kernel-mode USB drivers by using the USB templates included with Microsoft Visual Studio.
Provides an overview of the USB driver stack architecture.
Learn how a client driver builds a variable-length data structure called a USB Request Block (URB) to submit requests to the USB driver stack.
Learn how a client driver builds a variable-length data structure called a USB Request Block (URB) to submit requests to the USB driver stack.
Device configuration refers to the tasks that the client driver performs to select a USB configuration and an alternate interface in each interface. The section shows the methods calls required to select a USB configuration.
Describes USB pipes, URBs for I/O requests, and how a client driver can use the device driver interfaces (DDIs) to transfer data to and from a USB device.
Creating a New Software Driver
In this topic we explain how to use Visual Studio to start writing a new software driver. Software drivers are different from device function drivers, filter drivers, and file system drivers, which we cover in other topics. For more information about software drivers and how they differ from other types of drivers, see What is a Driver? and Choosing a Driver Model.
To begin, first determine which driver model is appropriate for your software driver. The three options are the Kernel Mode Driver Framework (KMDF), the legacy NT driver model, and the Windows Driver Model (WDM). For help determining which model is best for you, see Choosing a Driver Model.
Case 1: You want to use KMDF
- In Visual Studio, on the File menu, choose New | Project.
- In the New Project dialog box, in the left pane, locate and select WDF.
- In the middle pane, select Kernel Mode Driver (KMDF).
- Fill in the Name and Location boxes, and select OK. For more details, see Writing a KMDF Driver Based on a Template.
When you create a new KMDF driver, you must select a driver name that has 32 characters or less. This length limit is defined in wdfglobals.h.
Case 2: You want to use the legacy NT model
In Visual Studio, on the File menu, choose New | Project.
In Visual Studio, in the New Project dialog box, under Windows Driver, select WDM | Empty WDM Driver.
You are not going to write a WDM driver, but you need the Empty WDM Driver template.
Fill in the Name and Location boxes, and select OK.
At this point, you have an empty WDM driver project. In the Solution Explorer window, select and hold (or right-click) your driver project, and choose Add | New Item.
In the Add New Item dialog box, select C++ File (.cpp), enter a name for your file, and select OK.
If you want to create a .c file instead of a .cpp file, enter a name that has the .c extension.
Implement the functions required by your software driver. As you implement and organize your functions, you might decide to add header files and additional .cpp or .c files.
Case 3: You want to use WDM
It is extremely unlikely that you’ll want to use WDM for a software driver. But if you do, follow these steps.
In Visual Studio, on the File menu, choose New | Project.
In Visual Studio, in the New Project dialog box, under Windows Driver, select WDM.
Fill in the Name and Location boxes, and select OK.
At this point, you have an empty WDM driver project. In the Solution Explorer window, select and hold (or right-click) your driver project, and choose Add | New Item.
In the Add New Item dialog box, select C++ File (.cpp), enter a name for your file, and select OK.
If you want to create a .c file instead of a .cpp file, enter a name that has the .c extension.
Implement the functions required by your software driver. As you implement and organize your functions, you might decide to add header files and additional .cpp or .c files.
Write a Hello World Windows Driver (KMDF)
This topic describes how to write a very small Universal Windows driver using Kernel-Mode Driver Framework (KMDF) and then deploy and install your driver on a separate computer.
To get started, be sure you have Microsoft Visual Studio, the Windows SDK, and the Windows Driver Kit (WDK) installed.
Debugging Tools for Windows is included when you install the WDK.
Create and build a driver
Open Microsoft Visual Studio. On the File menu, choose New > Project.
In the New Project dialog box, in the left pane, go to Visual C++ > Windows Drivers > WDF.
In the middle pane, select Kernel Mode Driver, Empty (KMDF).
In the Name field, enter «KmdfHelloWorld» for the project name.
When you create a new KMDF or UMDF driver, you must select a driver name that has 32 characters or less. This length limit is defined in wdfglobals.h.
In the Location field, enter the directory where you want to create the new project.
Check Create directory for solution. Select OK.
![]()
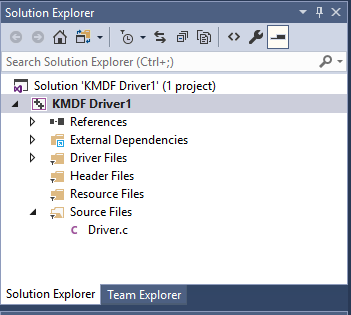
Visual Studio creates one project and a solution. You can see them in the Solution Explorer window, shown here. (If the Solution Explorer window is not visible, choose Solution Explorer from the View menu.) The solution has a driver project named KmdfHelloWorld.

In the Solution Explorer window, select and hold (or right-click) the KmdfHelloWorld project and choose Properties. Navigate to Configuration Properties > Driver Settings > General, and note that Target Platform defaults to Universal. Select Apply, and then select OK..
In the Solution Explorer window, again select and hold (or right-click) the KmdfHelloWorld project, choose Add, and then select New Item.
In the Add New Item dialog box, select C++ File. For Name, enter «Driver.c».
The file name extension is .c, not .cpp.
Select Add. The Driver.c file is added under Source Files, as shown here.
Write your first driver code
Now that you’ve created your empty Hello World project and added the Driver.c source file, you’ll write the most basic code necessary for the driver to run by implementing two basic event callback functions.
In Driver.c, start by including these headers:
If you can’t add Ntddk.h , open Configuration -> C/C++ -> General -> Additional Include Directories and add C:\Program Files (x86)\Windows Kits\10\Include\ \km , replacing with the appropriate directory in your WDK installation.
Ntddk.h contains core Windows kernel definitions for all drivers, while Wdf.h contains definitions for drivers based on the Windows Driver Framework (WDF).
Next, provide declarations for the two callbacks you’ll use:
Use the following code to write your DriverEntry:
DriverEntry is the entry point for all drivers, like Main() is for many user mode applications. The job of DriverEntry is to initialize driver-wide structures and resources. In this example, you printed «Hello World» for DriverEntry, configured the driver object to register your EvtDeviceAdd callback’s entry point, then created the driver object and returned.
The driver object acts as the parent object for all other framework objects you might create in your driver, which include device objects, I/O queues, timers, spinlocks, and more. For more information about framework objects, see Introduction to Framework Objects.
For DriverEntry, we strongly recommend keeping the name as «DriverEntry» to help with code analysis and debugging.
Next, use the following code to write your KmdfHelloWorldEvtDeviceAdd:
EvtDeviceAdd is invoked by the system when it detects that your device has arrived. Its job is to initialize structures and resources for that device. In this example, you simply printed out a «Hello World» message for EvtDeviceAdd, created the device object, and returned. In other drivers you write, you might create I/O queues for your hardware, set up a device context storage space for device-specific information, or perform other tasks needed to prepare your device.
For the device add callback, notice how you named it with your driver’s name as a prefix (KmdfHelloWorldEvtDeviceAdd). Generally, we recommend naming your driver’s functions in this way to differentiate them from other drivers’ functions. DriverEntry is the only one you should name exactly that.
Your complete Driver.c now looks like this:
This example illustrates a fundamental concept of drivers: they are a «collection of callbacks» that, once initialized, sit and wait for the system to call them when it needs something. This could be a new device arrival event, an I/O request from a user mode application, a system power shutdown event, a request from another driver, or a surprise removal event when a user unplugs the device unexpectedly. Fortunately, to say «Hello World,» you only needed to worry about driver and device creation.
Next, you’ll build your driver.
Build the driver
In the Solution Explorer window, select and hold (or right-click) Solution ‘KmdfHelloWorld’ (1 project) and choose Configuration Manager. Choose a configuration and platform for the driver project. For this exercise, we choose Debug and x64.
In the Solution Explorer window, select and hold (or right-click) KmdfHelloWorld and choose Properties. In Wpp Tracing > All Options, set Run Wpp tracing to No. Select Apply and then OK.
To build your driver, choose Build Solution from the Build menu. Visual Studio shows the build progress in the Output window. (If the Output window is not visible, choose Output from the View menu.) When you have verified that the solution built successfully, you can close Visual Studio.
To see the built driver, in File Explorer, go to your KmdfHelloWorld folder, and then to C:\KmdfHelloWorld\x64\Debug\KmdfHelloWorld. The folder includes:
- KmdfHelloWorld.sys — the kernel-mode driver file
- KmdfHelloWorld.inf — an information file that Windows uses when you install the driver
- KmdfHelloWorld.cat — a catalog file that the installer uses to verify the driver’s test signature
If you see DriverVer set to a date in the future when building your driver, change your driver project settings so that Inf2Cat sets /uselocaltime . To do so, use Configuration Properties->Inf2Cat->General->Use Local Time. Now both Stampinf and Inf2Cat use local time.
Deploy the driver
Typically when you test and debug a driver, the debugger and the driver run on separate computers. The computer that runs the debugger is called the host computer, and the computer that runs the driver is called the target computer. The target computer is also called the test computer.
So far you’ve used Visual Studio to build a driver on the host computer. Now you need to configure a target computer.
When you follow the steps to provision the target computer automatically using a network cable, take note of the port and key. You’ll use them later in the debugging step. In this example, we’ll use 50000 as the port and 1.2.3.4 as the key.
In real driver debugging scenarios, we recommend using a KDNET-generated key. For more information about how to use KDNET to generate a random key, see the Debug Drivers — Step by Step Lab (Sysvad Kernel Mode) topic.
On the host computer, open your solution in Visual Studio. You can double-click the solution file, KmdfHelloWorld.sln, in your KmdfHelloWorld folder.
In the Solution Explorer window, select and hold (or right-click) the KmdfHelloWorld project, and choose Properties.
In the KmdfHelloWorld Property Pages window, go to Configuration Properties > Driver Install > Deployment, as shown here.
Check Remove previous driver versions before deployment.
For Target Device Name, select the name of the computer that you configured for testing and debugging. In this exercise, we use a computer named MyTestComputer.
Select Hardware ID Driver Update, and enter the hardware ID for your driver. For this exercise, the hardware ID is Root\KmdfHelloWorld. Select OK.
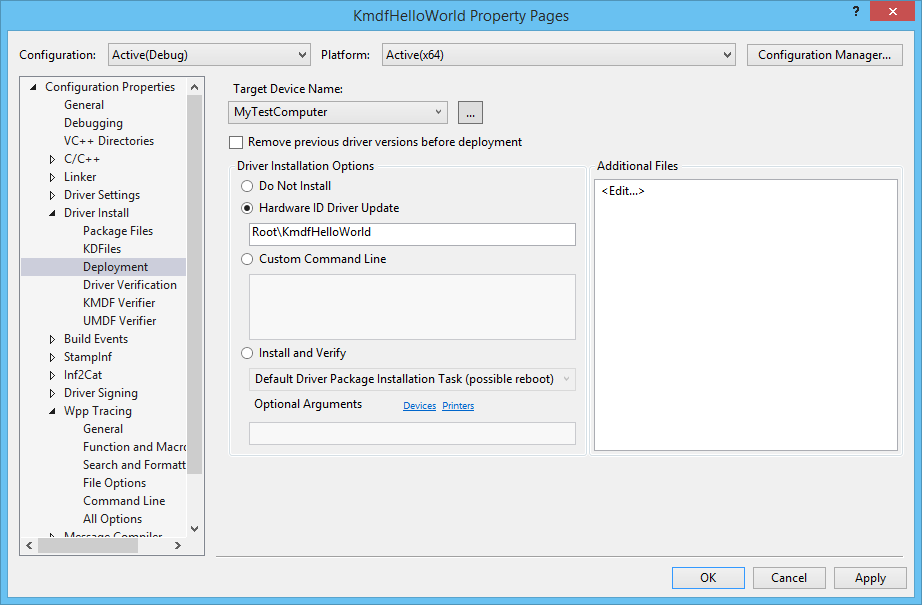
In this exercise, the hardware ID does not identify a real piece of hardware. It identifies an imaginary device that will be given a place in the device tree as a child of the root node. For real hardware, do not select Hardware ID Driver Update; instead, select Install and Verify. You’ll see the hardware ID in your driver’s information (INF) file. In the Solution Explorer window, go to KmdfHelloWorld > Driver Files, and double-click KmdfHelloWorld.inf. The hardware ID is located under [Standard.NT$ARCH$].
On the Build menu, choose Deploy Solution. Visual Studio automatically copies the files required to install and run the driver to the target computer. This may take a minute or two.
When you deploy a driver, the driver files are copied to the %Systemdrive%\drivertest\drivers folder on the test computer. If something goes wrong during deployment, you can check to see if the files are copied to the test computer. Verify that the .inf, .cat, test cert, and .sys files, and any other necessary files, are present in the %systemdrive%\drivertest\drivers folder.
For more information about deploying drivers, see Deploying a Driver to a Test Computer.
Install the driver
With your Hello World driver deployed to the target computer, now you’ll install the driver. When you previously provisioned the target computer with Visual Studio using the automatic option, Visual Studio set up the target computer to run test signed drivers as part of the provisioning process. Now you just need to install the driver using the DevCon tool.
On the host computer, navigate to the Tools folder in your WDK installation and locate the DevCon tool. For example, look in the following folder:
C:\Program Files (x86)\Windows Kits\10\Tools\x64\devcon.exe
Copy the DevCon tool to your remote computer.
On the target computer, install the driver by navigating to the folder containing the driver files, then running the DevCon tool.
Here’s the general syntax for the devcon tool that you will use to install the driver:
The INF file required for installing this driver is KmdfHelloWorld.inf. The INF file contains the hardware ID for installing the driver binary, KmdfHelloWorld.sys. Recall that the hardware ID, located in the INF file, is Root\KmdfHelloWorld.
Open a Command Prompt window as Administrator. Navigate to your folder containing the built driver .sys file and enter this command:
devcon install kmdfhelloworld.inf root\kmdfhelloworld
If you get an error message about devcon not being recognized, try adding the path to the devcon tool. For example, if you copied it to a folder on the target computer called C:\Tools, then try using the following command:
c:\tools\devcon install kmdfhelloworld.inf root\kmdfhelloworld
A dialog box will appear indicating that the test driver is an unsigned driver. Select Install this driver anyway to proceed.

Debug the driver
Now that you have installed your KmdfHelloWorld driver on the target computer, you’ll attach a debugger remotely from the host computer.
On the host computer, open a Command Prompt window as Administrator. Change to the WinDbg.exe directory. We will use the x64version of WinDbg.exe from the Windows Driver Kit (WDK) that was installed as part of the Windows kit installation. Here is the default path to WinDbg.exe:
C:\Program Files (x86)\Windows Kits\10\Debuggers\x64
Launch WinDbg to connect to a kernel debug session on the target computer by using the following command. The value for the port and key should be the same as what you used to provision the target computer. We’ll use 50000 for the port and 1.2.3.4 for the key, the values we used during the deploy step. The k flag indicates that this is a kernel debug session.
WinDbg -k net:port=50000,key=1.2.3.4
On the Debug menu, choose Break. The debugger on the host computer will break into the target computer. In the Debugger Command window, you can see the kernel debugging command prompt: kd>.
At this point, you can experiment with the debugger by entering commands at the kd> prompt. For example, you could try these commands:
To let the target computer run again, choose Go from the Debug menu or press «g,» then press «enter.»
To stop the debugging session, choose Detach Debuggee from the Debug menu.
Make sure you use the «go» command to let the target computer run again before exiting the debugger, or the target computer will remain unresponsive to your mouse and keyboard input because it is still talking to the debugger.
For a detailed step-by-step walkthrough of the driver debugging process, see Debug Universal Drivers — Step by Step Lab (Echo Kernel-Mode).
For more information about remote debugging, see Remote Debugging Using WinDbg.


