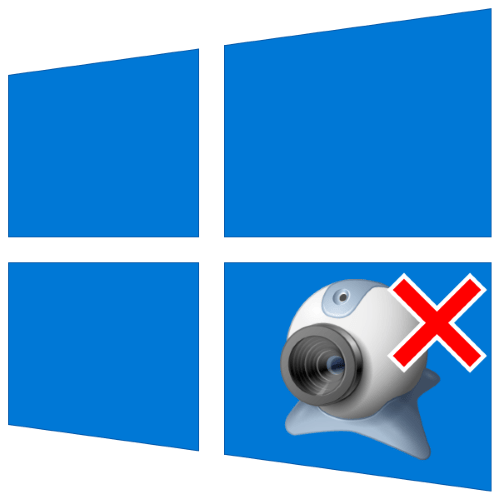
- Что делать, если отсутствует камера в «Диспетчере устройств» в Windows 10
- Способ 1: Включение камеры
- Физическое включение
- Программное включение
- Способ 2: Устранение проблем с драйверами
- Способ 3: Разрешение на использование
- Способ 4: Устранение аппаратных проблем
- Camera doesn’t work in Windows 10
- Before you begin
- Check for a camera switch or button your device
- Check your settings
- Give your apps permission
- Check your antivirus software
- Check your hardware drivers
- Try a different USB port and scan for hardware changes
- Check for an incompatible camera driver
- Roll back the camera driver
- Uninstall your camera driver and scan for hardware changes
- Need more help?
- Find answers in the forums
- Submit feedback
- ONVIF Device Manager 2.2.250
- Информация о программе
- Описание
Что делать, если отсутствует камера в «Диспетчере устройств» в Windows 10
Способ 1: Включение камеры
Самой частой причиной рассматриваемой проблемы является отключение устройства – физическое или программное. Следовательно, девайс требуется включить.
Физическое включение
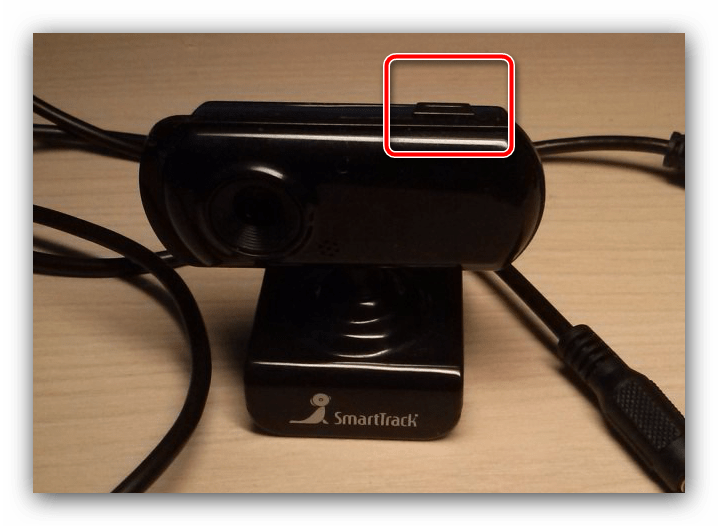
Аппаратно камеру можно активировать следующими методами:
- Если проблема наблюдается на настольном компьютере, проверьте, подключена ли к нему камера. Также попробуйте подсоединить её к другому USB-порту.
- Некоторые вебки имеют выделенную кнопку включения – её потребуется нажать после подключения к ПК.

Программное включение
Девайс может быть деактивирован и программно, через «Диспетчер устройств». Алгоритм проверки и устранения проблемы выглядит так:
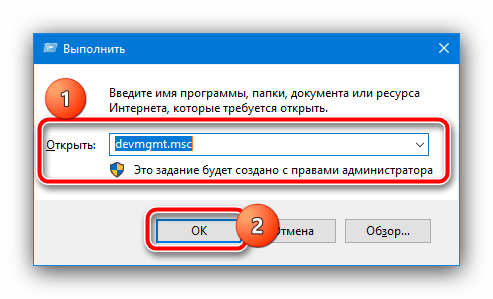
- Вызовите окно «Выполнить» комбинацией клавиш Win+R, введите в него запрос devmgmt.msc и нажмите «ОК».

Читайте также: Запуск «Диспетчера устройств» в Windows 10 - После запуска оснастки раскройте категории «Камеры» и «Устройства обработки изображений» – в каком-то из них должен присутствовать пункт вебки.
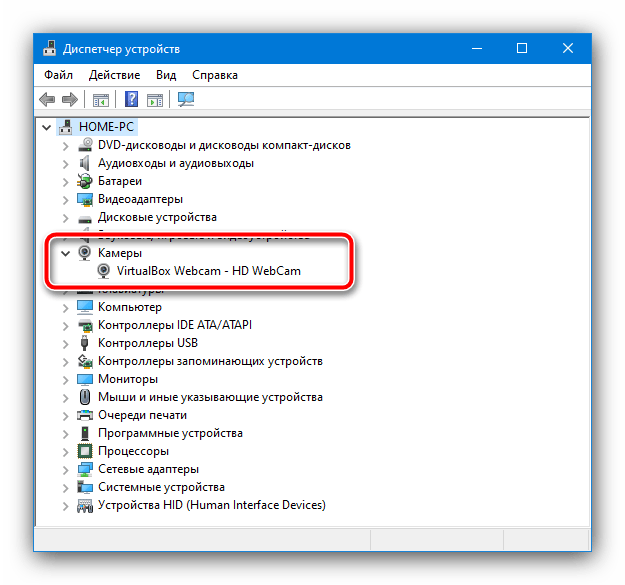
Если там пусто или категории вообще отсутствуют, воспользуйтесь опциями «Вид» – «Показать скрытые устройства» и поищите нужное в спрятанных ранее разделах.
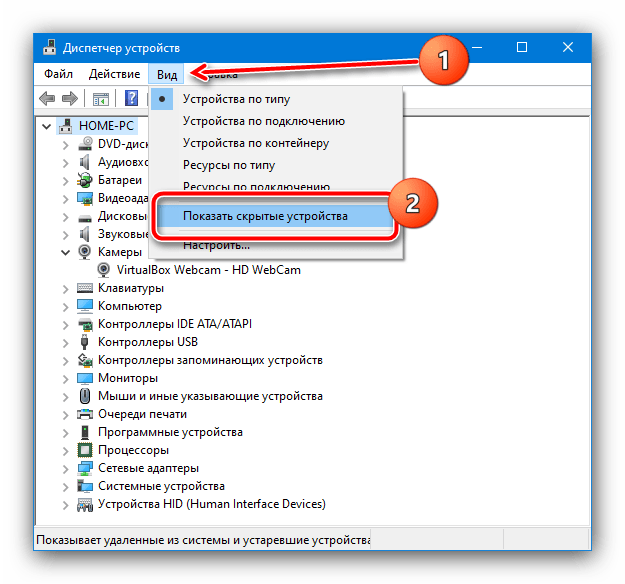
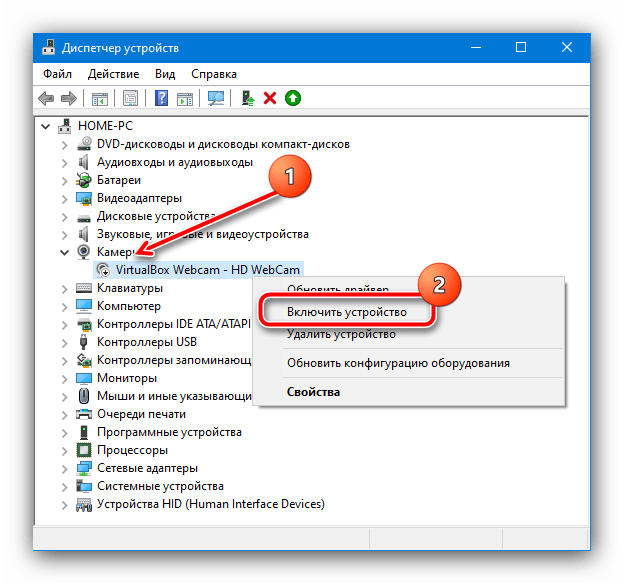
Внимательно посмотрите на иконку девайса – если рядом с ней присутствует значок стрелки вниз на белом фоне, это значит, что камера отключена. Для её активации кликните по записи правой кнопкой мыши и выберите пункт «Включить».
Если же рядом с иконкой есть значок ошибки, после вызова контекстного меню щёлкните по пункту «Свойства».
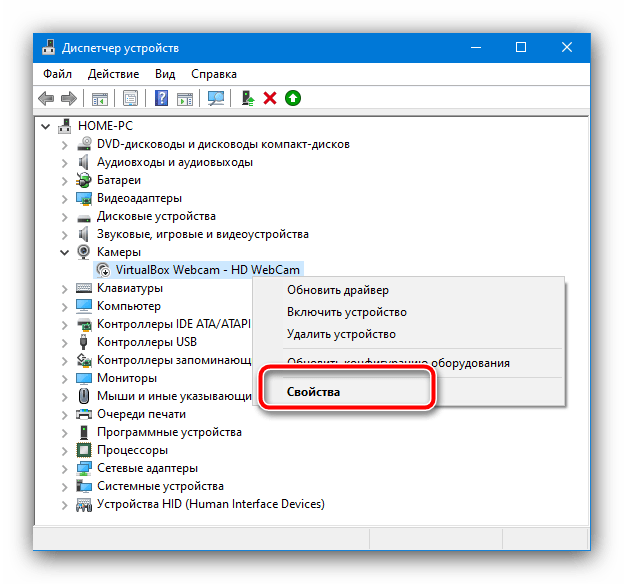
В главном окне свойств можно прочитать код сбоя – от него зависит метод устранения проблемы.
Способ 2: Устранение проблем с драйверами
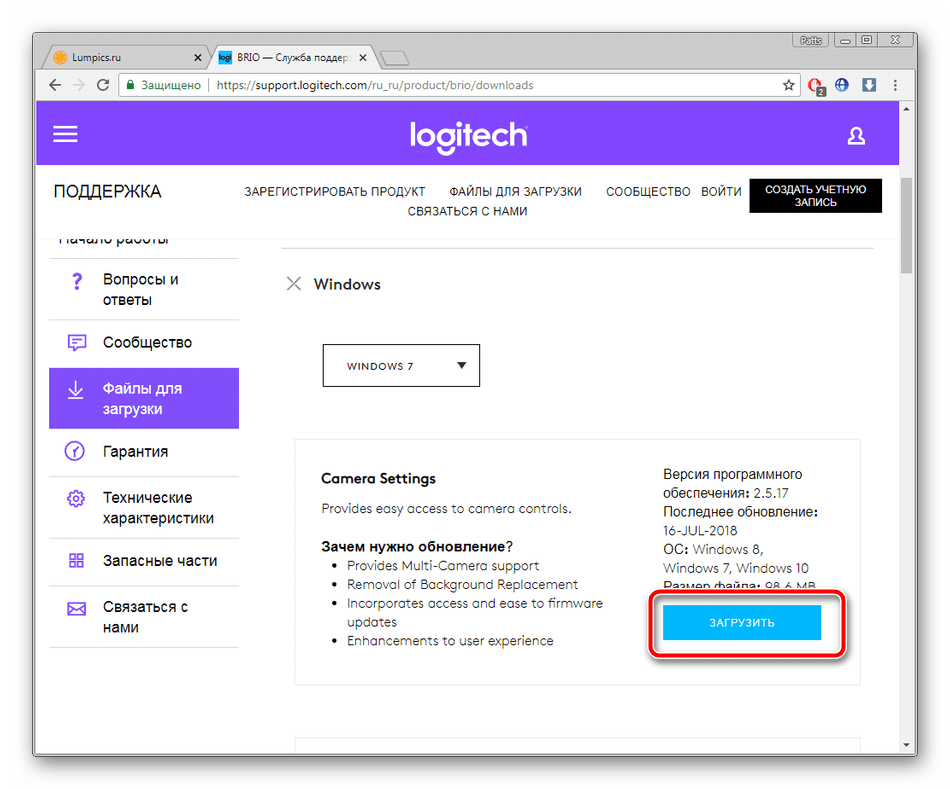
Нередко к рассматриваемому сбою приводят ошибки в драйверах – например, установлена несовместимая версия или файлы оказались повреждены. Их следует инсталлировать заново, уже заведомо работоспособный вариант – о том, как это делается, вы можете узнать из материалов по ссылкам далее.
Подробнее: Установка драйверов для USB-камеры и встроенной в ноутбук
Способ 3: Разрешение на использование
В Windows 10 достаточно много внимания уделено настройкам приватности – доступ программам к тем или иным устройствам требуется предоставлять отдельно. Активный глобальный запрет на её использование может приводить к рассматриваемой проблеме, решение которой следующее:
- Вызовите «Параметры» сочетанием клавиш Win+I, после чего в перечне опций выберите «Конфиденциальность».
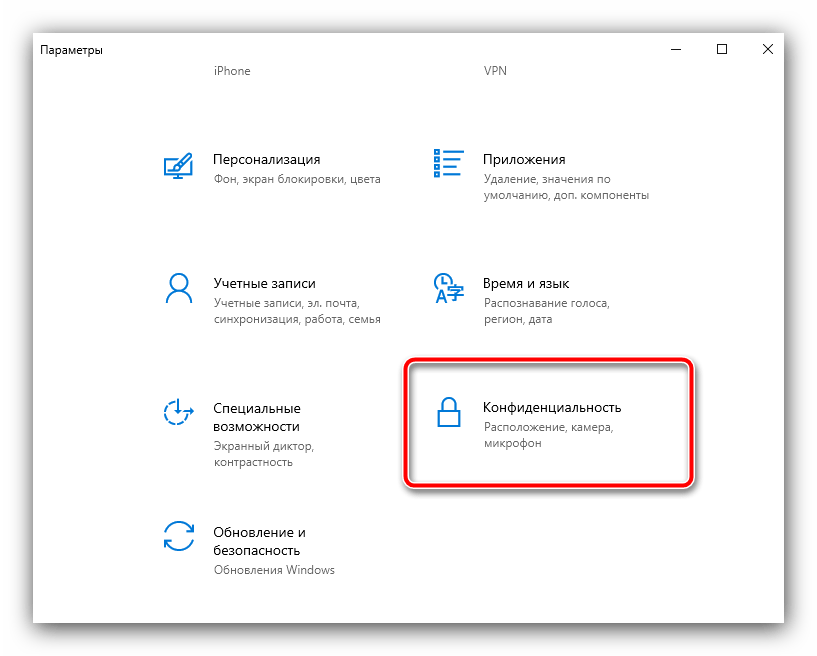
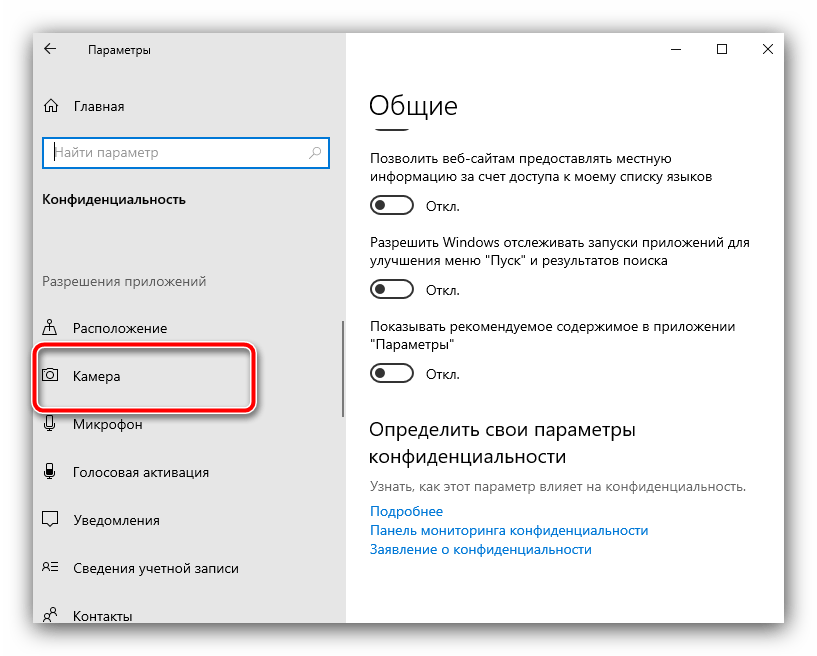
Здесь воспользуйтесь пунктом «Камера».
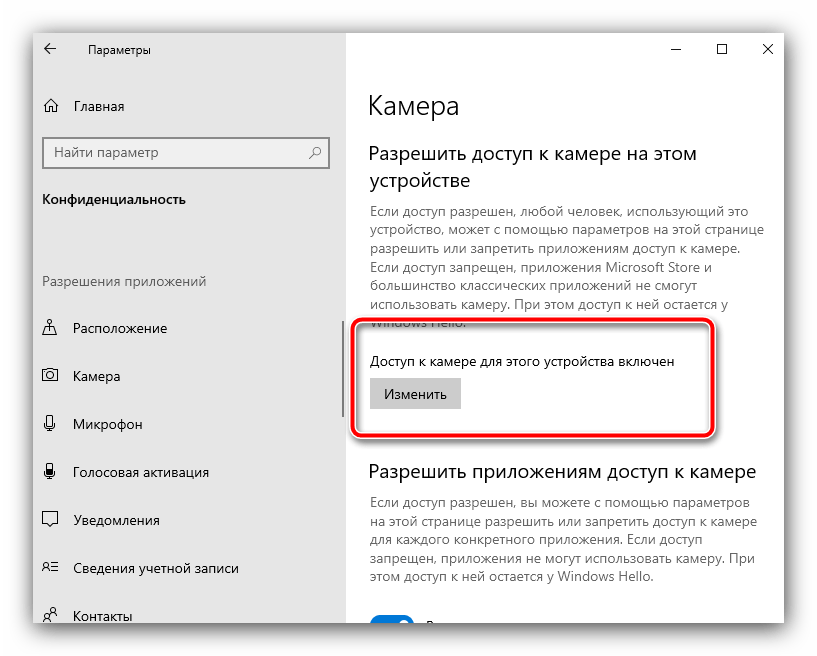
В блоке «Разрешить доступ к камере на этом устройстве» параметр «Доступ к камере для этого устройства» должен быть включён – если это не так, кликните «Изменить» и выберите соответствующую опцию.
Также активируйте пункт «Разрешить приложениям доступ к камере».
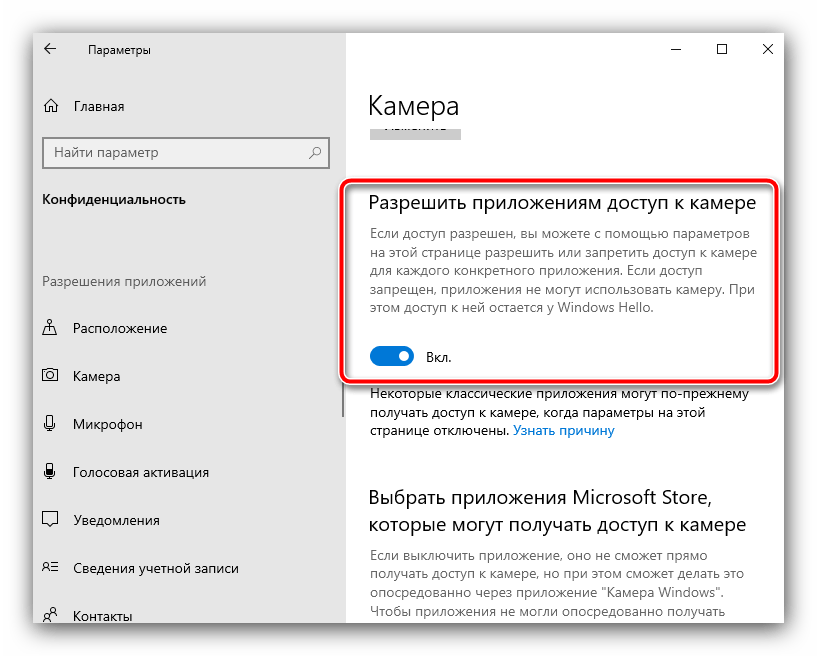
Затем – «Разрешить классическим приложениям доступ к камере».
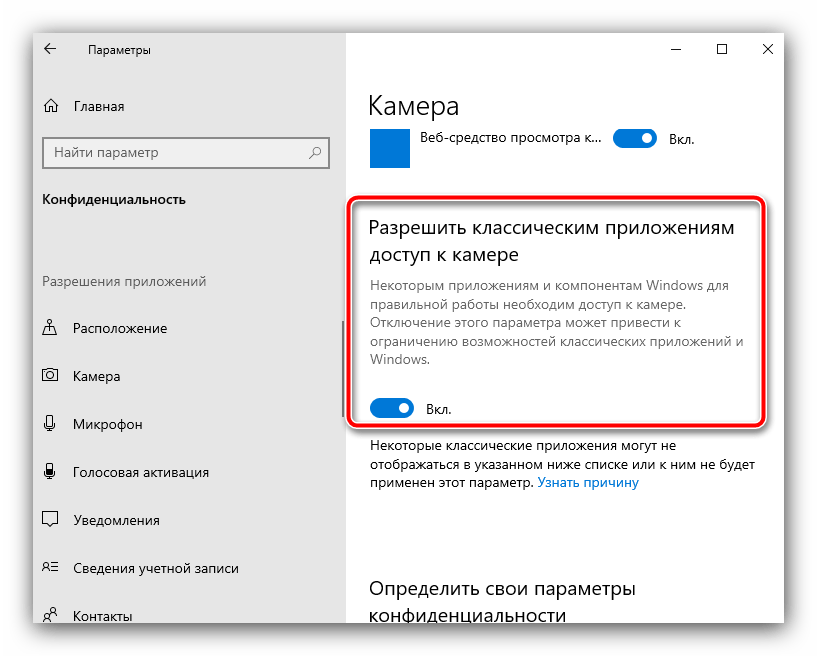
После выполнения этих действий вебка должна появится в «Диспетчере устройств».
Способ 4: Устранение аппаратных проблем
Если ни один из вышеприведённых способов не работает, остаётся только одно предположение – произошла поломка камеры, отчего ОС и не может взять её в работу. Ремонт такого устройства обычно нерентабелен и проще его заменить целиком – приобрести новый в случае с решением для настольного ПК или обратиться в сервисный центр, если проблема наблюдается на ноутбуке.
Camera doesn’t work in Windows 10
When your camera isn’t working in Windows 10, it might be missing drivers after a recent update. It’s also possible that your anti-virus program is blocking the camera, your privacy settings don’t allow camera access for some apps, or there’s a problem with the app you want to use.
Looking for other camera info?
Need more info on missing camera rolls? See Fix a missing Camera Roll in Windows 10.
Curious about importing photos? See Import photos and videos from phone to PC.
Before you begin
Before working through the possible solutions listed, do these first:
Check for updates. Select Start , then select Settings > Update & Security > Windows Update > Check for updates. If you see the option to View optional updates, select it to see if there are updates available for your camera. Allow available updates to install, then restart your device when it’s ready.
Restart your PC. If you haven’t restarted your device since the camera stopped working, you should do so. Select Start , then select Power > Restart. Waking up your device from sleep isn’t the same thing as a restart.
Test your camera with the Camera app. Select Start , then choose Camera from the list of apps. If you’re asked to allow access to the Camera, select Yes. If the camera works in the Camera app, the problem might be with the app you’re trying to use.
If your camera still doesn’t work, here are some other things to try. For best results, try the possible fixes in the order presented.
Check for a camera switch or button your device
Some laptops and portable devices have a physical switch or button that turns the camera on or off. When turned off, your device won’t recognize that there’s a camera installed. If your computer has a switch or button, make sure it’s in the on position before using your camera.
Check your settings
Give your apps permission
If you recently updated Windows 10, you might need to give apps permission to use the camera. In newer versions of Windows 10, some apps don’t have default access to the camera.
To let your device access the camera, select Start , then select Settings > Privacy > Camera . In Allow access to the camera on this device, if Camera access for this device is turned off, select Change and turn on Camera access for this device.
Note: If camera access for the device is turned off and you can’t select Change, you’ll need an administrator on the device to turn on camera access for you.
Before any app can access your camera, make sure camera access is turned on for apps in your user account. Make sure that Allow apps to access your camera is turned on.
After allowing access to the camera, go to Choose which Microsoft Store apps can access your camera and turn on camera access for the apps you want. Only apps installed from the Microsoft Store will show in this list.
If you installed the app from the internet, a disc, a USB drive, or your IT administrator installed the app for you, it might not be a Microsoft Store app. To check, go to Allow desktop apps access to your camera and make sure it’s turned on. Many video conferencing apps, like Microsoft Teams, are desktop apps that require this setting to be turned on.
To learn how you can configure your camera privacy settings in Windows 10, go to this Windows Community (in English) page.
Check your antivirus software
In your antivirus software settings, look for settings that block access to your camera or permission to use your camera. For help, visit your antivirus software company’s website.
Check your hardware drivers
Try a different USB port and scan for hardware changes
If you’re using an external camera, try using it with a different USB port on your device first. If that doesn’t work, or your camera is built-in to your device, try this:
Select Start , enter device manager, then select it from the search results.
Find your camera under Cameras, Imaging devices or Sound, video and game controllers.
If you can’t find your camera, select the Action menu, then select Scan for hardware changes.
Wait for it to scan and reinstall updated drivers, restart your device, then try opening the Camera app again.
If these steps don’t fix your issue, continue to the next steps.
Check for an incompatible camera driver
Some older cameras that were designed for older devices aren’t compatible with Windows 10. Here’s how to check if you have if your camera is compatible:
In Device Manager, look for your camera under Cameras, Imaging devices or Sound, video and game controllers.
Press and hold (or right-click) the name of your camera, and then select Properties.
Select the Driver tab, select the Driver Details button, and look for a file name that includes stream.sys. If it’s there, your camera was designed before Windows 7 and you’ll have to replace it with a newer camera.
If you don’t find a file name that includes stream.sys, continue to the next steps.
Roll back the camera driver
If your camera stopped working after an update, try these steps:
In Device Manager, press and hold (or right-click) your camera, and then select Properties.
Select the Driver tab, select Roll Back Driver, and then choose Yes. (Some drivers don’t provide this option. If your driver doesn’t have Roll Back Driver available, go ahead to the next fix.)
After the roll back is complete, restart your device, and then try opening the Camera app again.
If rolling back didn’t work or isn’t available, continue to the next steps.
Uninstall your camera driver and scan for hardware changes
In Device Manager, press and hold (or right-click) your camera, and then select Properties.
Select the Driver tab, then select Uninstall Device. Select the check box for Delete the driver software for this device, then select OK.
In Device Manager, on the Action menu, select Scan for hardware changes.
Wait for it to scan and reinstall updated drivers, restart your PC, and then try opening the Camera app again.
Note: If your camera still doesn’t work, look for help on the camera manufacturer’s website.
Need more help?
If you’d like to learn about the basics of using the camera, see How to use the Camera app.
Find answers in the forums
If the previous solutions don’t work, try searching for similar problems in the Microsoft Community forum for Windows Camera. If you don’t find a solution, go ahead and share details about your experience there, then check back later for responses.
Submit feedback
If you’ve tried the steps in this article and don’t find a solution that works, use Windows Feedback Hub to file a bug. This helps Microsoft find the root cause of this problem.
Include details about what you were doing, or specific steps you were taking, when the problem occurred. Be sure to use Recreate my problem when you submit your feedback in the Feedback Hub.
For help submitting feedback with Feedback Hub, see Send feedback to Microsoft with the Feedback Hub app.
ONVIF Device Manager 2.2.250
Информация о программе
Описание
ONVIF Device Manager — программное обеспечение для настройки и управления IP-камерами от одноименного производителя, которые работают по протоколу ONVIF. Оно позволяет быстро подключить устройства к системе и отображать картинку на экран монитора. Программа является клиентской частью комплекса и распространяется бесплатно.
При запуске ONVIF Device Manager софт автоматически выполняет поиск камер, работающих по данному протоколу. Для отображения устройств достаточно ввести имя и пароль. Если IP-камера не была распознана, можно вручную указать IP-адрес. Помимо трансляции изображения менеджер отображает основные сведения о девайсе: модель, версию ПО, название, местоположение, ID, MAC и другую информацию.
Кроме того, программа позволяет настроить камеры на реагирование в случае тревожных событий, сбросить настройки и запретить обнаружение по протоколу ONVIF. Последняя функция не допустит обнаружение вашей камеры такой же программой.
Функции и особенности программы ONVIF Device Manager 2.2.250:
- Подключение и настройка IP-камер, работающих по протоколу ONVIF;
- Трансляция изображения с устройств;
- Настройка разрешения, битрейта и других параметров картинки;
- Обновление прошивки подключенных устройств;
- Клиентская часть ПО;
- Доступен на русском языке;
- Совместимость с Windows от XP до 10;
- Бесплатное распространение.
По умолчанию ONVIF Device Manager на английском, русский язык можно включить в настройках программы.


