Babochkinbox
sysadmins; programmers; modding; pc

DHCP деление по вендору производителя.
Для выбора нужных файлов загрузки воспользуемся политиками DHCP. Политики DHCP — это правила, которые позволяют назначать IP-адреса и/или опции DHCP для клиентов, которые соответствуют условиям политики.
При получении запроса от клиента DHCP сервер назначает адреса и опции в следующем порядке:
- Политики, назначенные для диапазона (Scope Policies) в порядке приоритета.
- Опции, назначенные для диапазона (Scope Options)
- Политики, назначенные для сервера (Server Policies) в порядке приоритета.
- Опции, назначенные для сервера (Server Options)

У каждой политики есть приоритет. Приоритеты нумеруются начиная с 1. Чем меньше номер, тем приоритетнее политика. Если в двух политиках определены одинаковые опции, клиенту отправляется та, которая определена в политике с более высоким приоритетом. Приоритет политики можно менять через GUI, кликнув правой кнопкой мыши по названию политики и выбрать «Up» или «Down».
На MAC-адреса, прописанные в резервациях (Reservations) действие политик не распространяется!
Условия применения политик могут быть следующие:
- Vendor Class
- User Class
- MAC-адрес
- PXE GUID клиента
- Доменное имя клиента (опция 12)
- DHCP Relay, обслуживающий запрос клиента.
Нас интересуют в основном Vendor Class. Перед созданием политики надо создать нужные нам Vendor Class.

Надо определить пять классов:
- PXE Client x86
- PXE Client UEFI x64
- PXE Client UEFI BC
- U-boot Raspberry Pi 2
- WTware
Жмем «Add…» чтобы добавить новый Vendor Class.

Заполняем имя класса: PXE Client x86
Заполняем ID класса: PXEClient:Arch:00000
Можно заполнять либо Binary (16-ричные значения), либо ASCII (просто набивать текст). Тут важно не ошибиться, иначе ничего не заработает.

Нажимаем OK и видим:


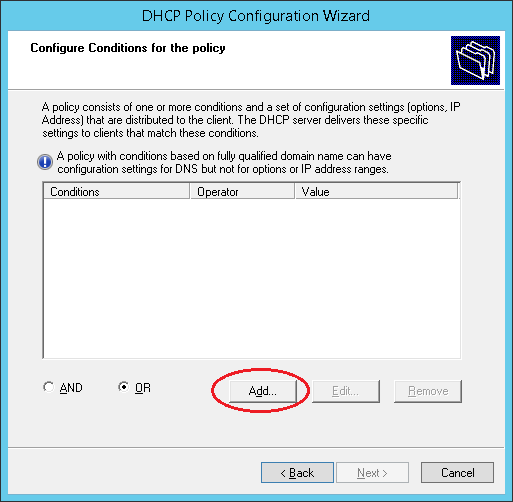
Политика будет определять загрузку BIOS клиентов.

Добавляем условие для нашей политики.
Устанавливаем так, как на картинке:
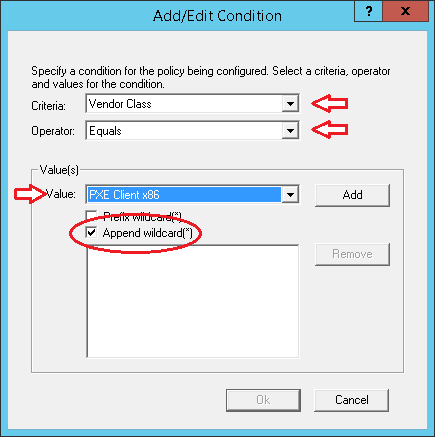
Обратите внимание на чекбокс «Append wildcard(*)». Это означает, что любой Vendor Class, который начинается с «PXEClient:Arch:00000», будет соответствовать условию.

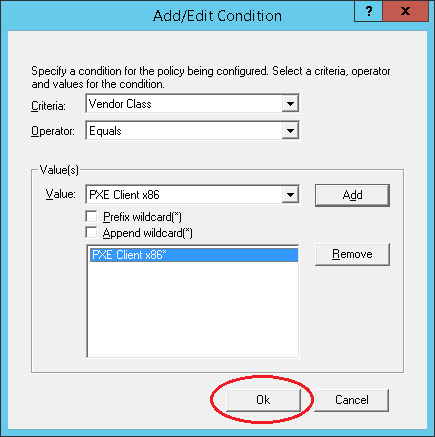
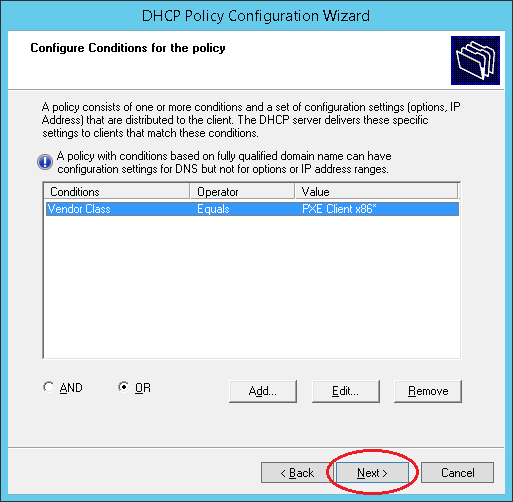
Условие добавлено, жмем Next.
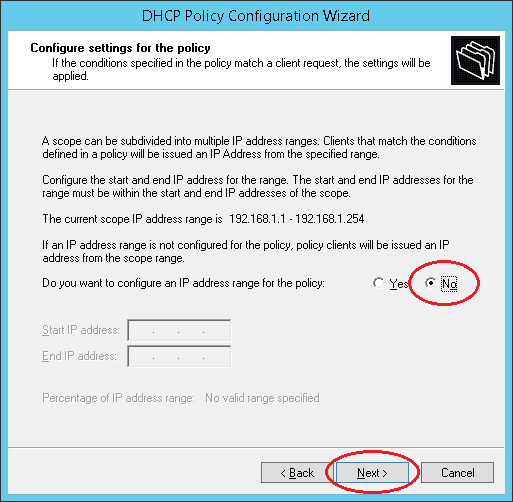
Нам не нужно резервировать IP-адреса, поэтому жмем No и Next.
Конфигурируем опцию 66.
192.168.1.3 — адрес нашего TFTP сервера, на котором лежат загрузочные файлы WTware.

Конфигурируем опцию 67.
Имя загрузочного файла: 5.4.16/wtware.pxe

Жмем Next и завершаем конфигурирование политики.
DHCP Vendor Class Polycom Phones
Bit of a change of pace for me today. No Essentials and No PowerShell.
I am setting up a new DHCP Server for a client. It is a small LAN that has no VLANs or any other advanced configuration, which leads their Polycom phones to sharing the same configuration as the client computers. This is generally OK of course however I wanted to specify specific NTP information to the phones. Of course I could do this with DHCP Reservations tied to MAC addresses, but I decided that after twelve years working in IT, I should probably try out DHCP Vendor Options.
Firstly I tried to google it, but I have to say I found a lot of the instructions confusing and not really step by step to go from no configuration, to fully configured.
So I downloaded Wireshark on my own DHCP Server and setup a filter to monitor DHCP traffic (port 67 or port 68)
I rebooted a single phone I had here in the office and watched the DHCP packets come in.
Finding a DHCP Discover Packet we can see the Vendor class identifier.

Looking at the frame information, we can see the binary data for the Vendor class. Luckily Wireshark helpfully highlights the binary data when you select the relevant piece of the frame.

Even more helpful is when you hover over a binary value it highlights the ASCII value. Here we can see that both P and 50 are highlighted in yellow.

So given this information, we know that the phone in question is a Polycom-VVX400, the Vendor Class identifier is also Polycom-VVX400 which has a binary value of: 50 6f 6c 79 63 6f 6d 2d 56 56 58 34 30 30.
| P | O | L | Y | C | O | M | – | V | V | X | 4 | 0 | 0 |
| 50 | 6F | 6C | 79 | 63 | 6F | 6D | 2D | 56 | 56 | 58 | 34 | 30 | 30 |
We can now use this information to create our Vendor Class in DHCP.
Inside DHCP Management right click your scope type (ipv4) and click on Define Vendor Classes.

In the DHCP Vendor Classes window, click on Add.

Enter a Display Name, a Description if you want to and the Binary Value.
As you type the Binary you will see the ASCII automatically populates and allows you to see what the binary translates to. Enter the Binary data and Click on OK.


Now that we have defined our Vendor Class we can define some options to go with it. Common options for this seem to be option 66 for bootfiles however the process to create an option is the same regardless of which option you are specifying. I want to define option ‘042 NTP Servers’ to make sure I set my phones to use an external NTP Server.
Right click your server name and this time go to Set Predefined Options.

Using the Option Class drop down you can see Polycom-VVX400 listed.

You can see Option Name is currently empty.
Click on Add, and fill out the information required for your option type.
In this case NTP Servers is option 042, it is an array of IP Addresses.

We can now choose to define this option as a server option or a scope option.
I’m going to set it as a scope option, so right click scope options.

Switch to advanced and then use the dropdown to select Polycom-VVX400

As we have only defined one option for our Vendor Class we only have one option listed that we can configure. put a tick in the box and then the fields become available.
For this example I am setting my phones to use an external time server 1.uk.pool.ntp.org. I can enter that and use the resolve button to grab the IP Address. Click on Add to add it to the list and then click on OK.

If you switch back to Scope Options you can now see your new option defined with the Vendor Class and value.

Now if you reboot your Phone it will pickup this information from DHCP.
In addition to this method, Server 2012 introduced a feature called Policies. Without going into too much detail as this post is already long enough, Policies allow you to set conditions based on a number of variables and supports wildcard characters.

Using a wildcard on a Vendor Class requires you to add a Vendor Class with the first portion of the ID, in this case ‘Polycom’ (50 6F 6C 79 63 6f 6D).
Here is a chart to help work out your Binary/ASCII Values.
DHCP User Class and Vendor Class Options
DHCP User Class and Vendor Class Options
Option Classes
Setting Up a User Class Option
Let’s say you want to configure a User Class called HR for all HR clients. Configuring a User Class involves adding a user class at the DHCP server and setting a DHCP user class ID at the client. To add a User Class HR on the DHCP server, highlight the DHCP server in the DHCP console and select Define User Classes on the Action menu, as Screen 1 shows. Click Add, and type HR in the Display name box, as Screen 2 shows. Here’s where it gets tricky. You need to add the Class ID next. Position your cursor directly under the word ASCII (if you click under the word ID, this procedure won’t work). Click in the white box under the word ASCII, and type HR. You’ll see the numbers 48 and 52 appear automatically under ID. Click OK, then click Close. Next, right-click Scope Options in the DHCP console and select Configure Options. Click the Advanced tab. The drop-down box next to the User Class will show the User Class HR that you just added. Select HR and configure the options for the HR group under Available Options. Click OK, and you’re finished with the server portion of the configuration.
Next, you need to set the HR class ID on the client (this requires administrative privileges). Log on to the workstation as a local administrator. Go to the command prompt and type
Now if you type ipconfig, you should see HR listed under the DHCP Class ID. You might have to release and renew your IP address to obtain the updated DHCP options for the HR User Class. To delete the Class ID on the client, simply type ipconfig /setclassid (without the Class ID at the end).
Setting Up a Vendor Class Option
Differences Between User Classes and Vendor Classes
With Win2K’s new option classes, you can better manage client configurations. You now have more control over specific clients within a particular scope, and vendors can offer enhanced functionalities to their own clients.


