- Secure messages by using a digital signature
- What’s the difference between a digital signature and a standard signature?
- Digitally sign a single message
- Digitally sign all messages
- See Also:
- Digitally sign an individual message
- Digitally sign all messages
- How to check Digital Signature for a Program in Windows 10
- Check Digital Signature for a Program in Windows 10
- 1] Via File Explorer
- 2] Using DigiCert Certificate Utility
- 3] Using SignTool
- Related Posts
- How to Turn On or Off Use Speech Recognition in Windows Mixed Reality in Windows 10
- How to change Desktop and Windows Mixed Reality Input Switching in Windows 10
- How to disable Windows Mobility Centre in Windows 10
- [email protected]
- Как отключить проверку цифровых подписей драйверов
- Отключение проверки цифровых подписей драйверов в Windows 8.1 и Windows 8
- Отключение с помощью особых вариантов загрузки
- Отключение с помощью редактора локальной групповой политики
- Как отключить проверку цифровой подписи драйвера в Windows 7
Secure messages by using a digital signature
A digital signature attached to an email message offers another layer of security by providing assurance to the recipient that you—not an imposter—signed the contents of the email message. Your digital signature, which includes your certificate and public key, originates from your digital ID. And that digital ID serves as your unique digital mark and signals the recipient that the content hasn’t been altered in transit. For additional privacy, you also can encrypt email messages.
What’s the difference between a digital signature and a standard signature?
A digital signature isn’t the same as a signature you routinely include with an outgoing message. Anyone can copy an email signature, which essentially is a customizable closing salutation. But a digitally signed message can come only from the owner of the digital ID used to sign it. The digital ID provides verification of the sender’s authenticity, thereby helping to prevent message tampering.
Digitally sign a single message
In the message, on the Options tab, in the Permission group, click Sign Message.
If you don’t see the Sign Message button, do the following:
In the message, click Options.
In the More Options group, click the dialog box launcher  in the lower-right corner.
Click Security Settings, and then select the Add digital signature to this message check box.
Click OK, and then click Close.
If you don’t see the Sign Message button, you might not have a digital ID configured to digitally sign messages, and you need to do the following to install a digital signature.
On the File menu, click Options > Trust Center.
Under Microsoft Outlook Trust Center, click Trust Center Settings > Email Security
Click Import/Export to import a digital ID from a file on your computer, or click Get digital IDs to find a list of services that issue digital IDs for your use.
Compose your message, and then send it.
Digitally sign all messages
On the File tab, click Options > Trust Center.
Under Microsoft Outlook Trust Center, click Trust Center Settings.
On the Email Security tab, under Encrypted Mail, select the Add digital signature to outgoing messages check box.
If available, you can select one of the following options:
If you want recipients who don’t have S/MIME security to be able to read the message, select the Send clear text signed message when sending signed messages check box. By default, this check box is selected.
To verify that your digitally signed message was received unaltered by the intended recipients, select the Request S/MIME receipt for all S/MIME signed messages check box. You can request notification telling you who opened the message and when it was opened, When you send a message that uses an S/MIME return receipt request, this verification information is returned as a message sent to your Inbox.
To change additional settings, such as choosing between multiple certificates to use, click Settings.
Click OK on each open dialog box.
See Also:
Digitally sign an individual message
In the message, on the Message tab, in the Options group, click the Digitally Sign Message button  .
.
Note: If you don’t see this button, click the Options dialog box launcher in the lower-right corner of the Options group to open the Message Options dialog box. Click the Security Settings button. and in the Security Properties dialog box, select the Add digital signature to this message check box. Click OK, and then close the dialog box.
Compose your message and send it.
Digitally sign all messages
On the Tools menu, in the Outlook Mail view, click Trust Center, and then click E-mail Security.
Under Encrypted e-mail, select the Add digital signature to outgoing messages check box.
If available, you can select one of the following options:
If you want recipients who don’t have S/MIME security to be able to read the message, select the Send clear text signed message when sending signed messages check box. This check box is selected by default.
If you want to verify that your digital signature is being validated by recipients and to request confirmation that the message was received unaltered as well as receive notification telling you who opened the message and when it was opened, select the Request S/MIME receipt for all S/MIME signed messages check box. When you send a message with an S/MIME return receipt request, this verification information is returned as a message sent to your Inbox.
To change additional settings, such as choosing a specific certificate to use, click Settings.
How to check Digital Signature for a Program in Windows 10
What are Digital Signatures and why are they useful? In this article, we discuss three methods by which you can find out, check or verify the Digital Signature of programs on Windows 10/8/7.
Whenever files are created digitally no matter if they are media files, executable files, documents, or any other file, they are digitally signed by the source of that data. For example, when the setup file which is an executable file for Google Chrome browser is released by Google, they sign it digitally. So, whenever the file is downloaded directly from the official source, the authenticity of this file can be verified.
In another scenario, someone else can host the same file to their servers as well. That is fine because that file will not be modified by any means. But if that file is torn down and some modifications into the code are made, then the digital signature gets removed automatically, and hence the authenticity of the file will not be verified, as the digital signature is removed automatically which recompiling the tampered setup file. So, this is how it works actually.
Now, we also need to learn about how to verify the digital signatures that come with the file. So, let us just get started.
Check Digital Signature for a Program in Windows 10
We will discuss three methods to check the Digital Signatures of the programs on Windows OS.
1] Via File Explorer
First of all, open Windows File Explorer and navigate to the location where your program is saved.
Right-click on the setup file and then click on Properties.
Navigate to the tab that is labeled as Digital Signatures.
In the Signature List, if you see entries that means that your file is digitally signed.
You can double-click on any of those entries to view additional details about the signing authority.
Hence, you can know if the file is signed by the original distributor of the software or not.
Additionally, in the Detailed view of signature, you can click on a button that says View Certificate to view additional details about the certificate that comes with the signature.
2] Using DigiCert Certificate Utility
Use this link to download the latest version of DigiCert and run the executable file.
Accept the terms of use displayed at the start and then click on the tab that says Code Signing and then in the header section, click on Check Signature.
Select the setup file that you need to check digital signature.
This will lead DigiCert to check the signature and display to whole information summary in a new window that opens.
There are two things that DigiCert verifies. They are as follows:
- If the file was signed and if the signature is valid.
- It checks the timestamp of the signature.
If you get two green checkmarks as shown in the screen snip above, the verification is successful. You have additional information in that window too for your comfort.
3] Using SignTool
Microsoft ships a program with the Windows SDK that is called as SignTool. Windows SDKs or Software Development Kit is not shipped in-built with Windows. It is intended for developers, and they are supposed to install it separately. If you are interested in giving this method a try, make sure you have a suitable SDK for yourself. You can download the Windows 10 SDK from here.
Date: May 24, 2018 Tags: Features
Related Posts
How to Turn On or Off Use Speech Recognition in Windows Mixed Reality in Windows 10
How to change Desktop and Windows Mixed Reality Input Switching in Windows 10
How to disable Windows Mobility Centre in Windows 10
[email protected]
Ayush has been a Windows enthusiast since the day he got his first PC with Windows 98SE. He is an active Windows Insider since Day 1 and is now a Windows Insider MVP. He has been testing pre-release services on his Windows 10 PC, Lumia, and Android devices.
Как отключить проверку цифровых подписей драйверов
 Если вам требуется установить драйвер, который не имеет цифровой подписи, и вы осознаете все риски такого действия, в этой статье покажу несколько способов отключить проверку цифровых подписей драйверов в Windows 8 (8.1) и Windows 7 (См. также: Как отключить проверку цифровой подписи драйверов в Windows 10). Действия по отключению проверки цифровой подписи вы выполняете на свой страх и риск, делать это не рекомендуется, особенно если вы точно не знаете, что и зачем вы делаете.
Кратко о рисках установки драйверов без проверенной цифровой подписи: иногда бывает так, что с драйвером все в порядке, цифровая подпись отсутствует в драйвере на диске, который распространяется производителем вместе с оборудованием, но на самом деле угрозы он не представляет. А вот если вы скачали такой драйвер из Интернета, то он, по сути, может делать все что угодно: перехватывать нажатия клавиш и буфер обмена, модифицировать файлы при копировании на флешку или при загрузке их из Интернета, пересылать информацию злоумышленникам — это лишь несколько примеров, на самом деле, возможностей тут очень много.
Отключение проверки цифровых подписей драйверов в Windows 8.1 и Windows 8
В Windows 8 есть два способа отключить проверку цифровой подписи в драйвере — первый позволяет отключить ее однократно для установки конкретного драйвера, второй — на все последующее время работы системы.
Отключение с помощью особых вариантов загрузки
В первом случае, откройте панель Charms справа, нажмите «Параметры» — «Изменение параметров компьютера». В пункте «Обновление и восстановление» выберите «Восстановление», затем — особые варианты загрузки и нажмите «Перезагрузить сейчас».
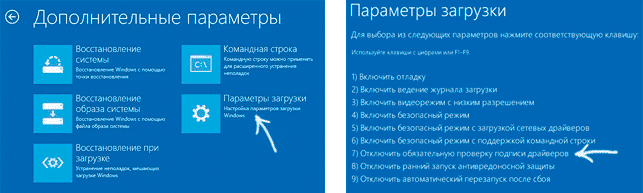
После перезагрузки выберите пункт Диагностика, затем — Параметры загрузки и нажмите «Перезагрузка». На появившемся экране вы сможете выбрать (цифровыми клавишами или F1-F9) пункт «Отключить обязательную проверку подписи драйверов». После загрузки операционной системы, вы сможете установить неподписанный драйвер.
Отключение с помощью редактора локальной групповой политики
Следующий способ отключить проверку цифровой подписи драйвера — использовать редактор локальной групповой политики Windows 8 и 8.1. Для его запуска нажмите клавиши Win + R на клавиатуре и введите команду gpedit.msc
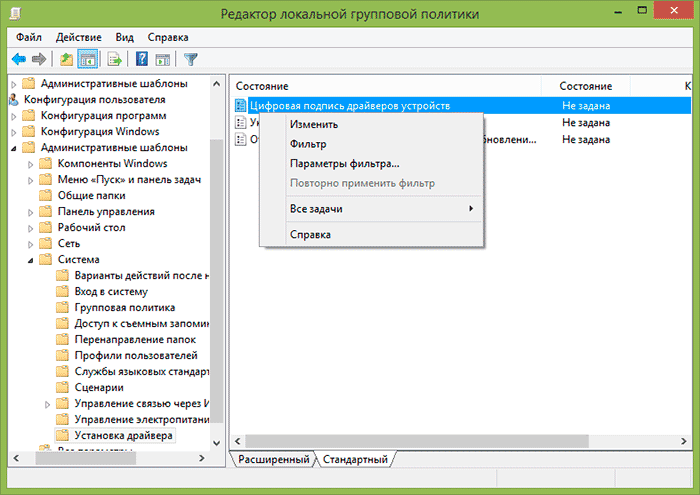
В редакторе локальной групповой политики откройте Конфигурация пользователя — Административные шаблоны — Система — Установка драйвера. После этого кликните дважды по пункту «Цифровая подпись драйверов устройств».
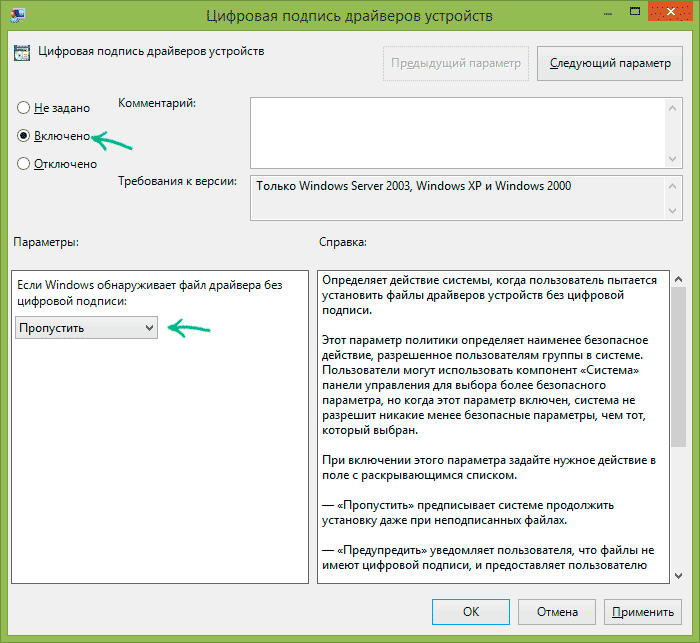
Выберите пункт «Включено», а в поле «Если Windows обнаруживает файл драйвера без цифровой подписи» выберите пункт «Пропустить». На этом все, можете нажать «Ок» и закрыть редактор локальной групповой политики — проверка отключена.
Как отключить проверку цифровой подписи драйвера в Windows 7
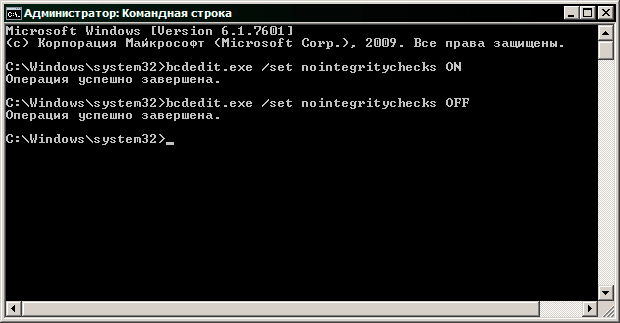
В Windows 7 есть два, по сути одинаковых, способа отключения данной проверки, в обоих случаях для начала вам потребуется запустить командную строку от имени Администратора (для этого можно найти ее в меню Пуск, кликнуть правой кнопкой мыши и выбрать пункт «Запуск от имени Администратора».
После этого в командной строке введите команду bcdedit.exe /set nointegritychecks ON и нажмите Enter (для повторного включения используйте ту же команду, написав вместо ON OFF).
Второй способ — использовать по порядку две команды:
- bcdedit.exe -set loadoptions DISABLE_INTEGRITY_CHECKS и после сообщения о том, что операция выполнена успешно — вторая команда
- bcdedit.exe -set TESTSIGNING ON
Вот, пожалуй, и все, что вам потребуется для установки драйвера без цифровой подписи в Windows 7 или 8. Напомню, что эта операция не вполне безопасна.
А вдруг и это будет интересно:
Почему бы не подписаться?
Рассылка новых, иногда интересных и полезных, материалов сайта remontka.pro. Никакой рекламы и бесплатная компьютерная помощь подписчикам от автора. Другие способы подписки (ВК, Одноклассники, Телеграм, Facebook, Twitter, Youtube, Яндекс.Дзен)
18.04.2016 в 12:59
Способ на 8.1 с изменением политики не работает.
16.11.2020 в 19:06
Таки да, не работает на Вин8.1х64
20.06.2016 в 06:32
не помогло и на windows 7 home premium x64 делал все по инструкции.
11.09.2016 в 15:03
Не работают инструкции для отключения цифровой подписи для драйверов для Windows 7 . Вводил в командной строке с правами администратора
Интересно где ключики реестра отвечающие за отключение цифровой подписи?
12.09.2016 в 10:18
HKEY_CURRENT_USER\ Software\ Policies\ Microsoft\ Windows NT\ Driver Signing
Значение DWORD с именем BehaviorOnFailedVerify и значением 0 (ноль). По умолчанию ключа этого нет.
29.09.2016 в 08:58
на win7 x64 не работает
21.12.2016 в 12:41
Способ для Windows 7. Перезагрузка, при включении тыкаете F8, отключение обязательной проверки подписи драйверов
04.01.2017 в 11:06
на вин7 х64 работает отлично
07.02.2017 в 21:48
Работает, только до перезагрузки. После перезагрузки ПК драйвер слетает! (Код 52)
01.03.2017 в 16:24
Вин 10 х64 домашняя — gpedit.msc пришлось установить со стороны, папки «Установка драйверов» там вообще нет
06.05.2017 в 14:10
На Windows 7 не работает
06.05.2017 в 14:23
Драйвер блокируется и не работает.
07.07.2017 в 17:27
Portatip, все гениальное просто Спасибо
14.07.2017 в 21:35
Не работает, пишет Waiting и так стоит, громкость — не отпускал минут 10, ничего
20.08.2017 в 07:48
Не отключается. Везде написано что отключен, но при установке драйвера сообщает что отсутсвует цифровая подпись.
19.12.2017 в 02:19
утилита driver signature enforcement overrider подписывает. Wndows 64x. Проверено.
16.11.2020 в 19:09
dseo13b на Вин8.1х64 — файлы .inf — НЕ ПОДПИСЫВАЕТ.
13.08.2018 в 20:36
Способ для windows 8 с gpedit также работает на windows 7
16.11.2018 в 16:33
В DDISABLE_INTEGRITY_CHECKS случайно опечатки нет? Может быть одна D впереди лишняя?
17.11.2018 в 09:55
Спасибо, что обратили внимание. Есть опечатка.
09.10.2019 в 13:41
bcdedit -set loadoptions DDISABLE_INTEGRITY_CHECKS
bcdedit -set loadoptions DENABLE_INTEGRITY_CHECKS
social.technet.microsoft.com/Forums/windows/en-US/b97d5faa-11fb-438c-a22b-9c6e76cccf73/enable-or-disable-driver-signing-in-windows-7?forum=w7itprogeneral
31.03.2020 в 20:55
здравствуйте.
за безопасность компьютера и личных данных после отключения проверки цифровой подписи драйверов можно не беспокоится?
01.04.2020 в 12:54
Здравствуйте.
Нельзя. Даже в общем-то и с включенной нельзя, но отключая проверку все-таки вероятность чего-то эдакого увеличивается, хоть и не значительно.
11.01.2021 в 10:40
у меня получилось на вин 7, благодарю автора


