- How to fix: «Windows cannot verify the digital signature for this file» error in Windows 8.1, 8, 7 & Vista.
- How to Disable Driver Signature Enforcement in Windows 8.1, Windows 8, Windows 7, Windows Server 2008, or Windows Vista.
- Step 1. Enter in Advanced Options menu.
- Step 1. Disable Secure Boot in BIOS.
- Step 2. Modify Windows Boot Loader.
- Разбираемся с ошибкой загрузки из-за отсутствующей цифровой подписи драйвера в x64 системе
How to fix: «Windows cannot verify the digital signature for this file» error in Windows 8.1, 8, 7 & Vista.
Last updated on October 29th, 2016
In Windows 8 (& 8.1), 7 & Vista Operating Systems, you cannot load a driver or execute a program that hasn’t a Driver Signature. Driver Signing is a method to verify the identity of the software publisher or the hardware (driver) vendor in order to protect your system from been infected with malware rootkits, that are able to run on the lowest level of Operating System. This means that all drivers and programs must be digitally signed (verified) in order to be installed and run on latest Windows Operating Systems.
Digital Signatures ensure that the software publisher or hardware vendor is trusted and verified by Microsoft. But in real life, publishers and vendors cannot always pay Microsoft to verify all their products or Microsoft cannot verify all the drivers or programs that are published every day. But this becomes a problem in the case that you own an old unsigned legitimate software or driver and you want to install or load it to your computer, because the OS doesn’t allow it to work or load.
Problems-Symptoms that are solved with this guide:
– Windows cannot verify the digital signature for this file. (0xc0000428)
– Windows requires digitally signed driver OR Digitally signed driver is required.
– Digital Signature Not Found.
– Cannot load or install an unsigned driver.
– Cannot run (execute) an unsigned software (program).
– Windows did not find a Microsoft signature associated with the software package you want to install.
In order to resolve digitally signed driver installation errors, follow the steps below:

How to Disable Driver Signature Enforcement in Windows 8.1, Windows 8, Windows 7, Windows Server 2008, or Windows Vista.
Attention: Keep in mind that disabling the Driver Signature Enforcement is a security risk, and you must disable it only if you are sure that the driver or program that you want to install and run is trusted and legitimate.
Solution 1: Disable Driver Signature once.*
* Note: Use this solution to disable driver Signature Enforcement just once in order to install a unsigned driver (e.g. your old printer driver).
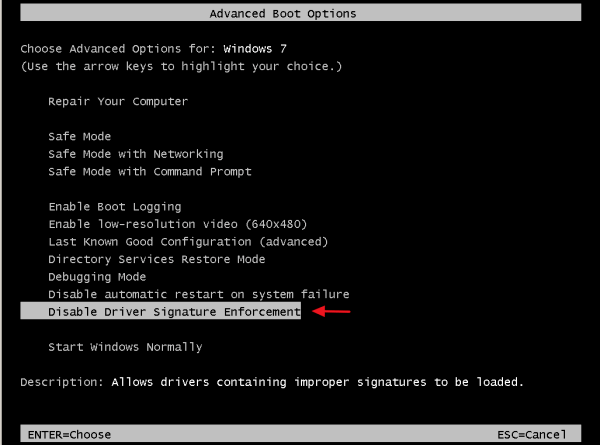
Step 1. Enter in Advanced Options menu.
Windows 7 & Vista
To enter in Advanced Options menu in Windows 7 and Vista OS:
- Close all programs and reboot your computer.
- Press the «F8» key as your computer is booting up, before the appearance of the Windows logo.
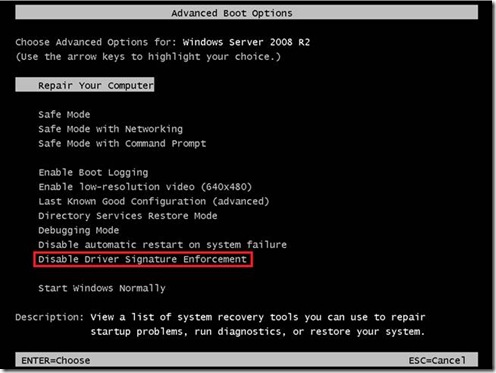
- When the «Windows Advanced Options Menu» appears on your screen, use your keyboard arrow keys to highlight the “Disable Driver Signature Enforcement” option and then press «ENTER«.
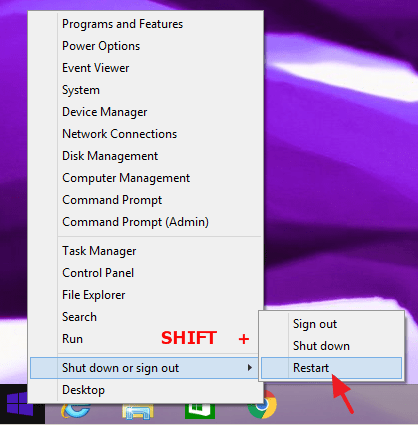
Windows 10, 8 & 8.1
To enter in Advanced Options menu in Windows 10, 8.1 & 8 OS:
1. Right click at the Windows Start button  and select Shut Down or sign out.
2. Press and HOLD down the SHIFT key and then click Restart.
3. When Windows restarts, press “Troubleshoot” .
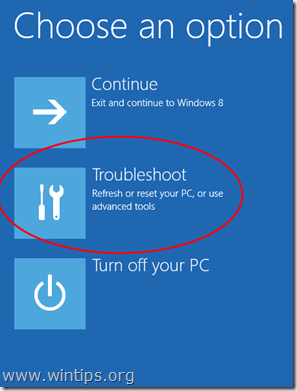
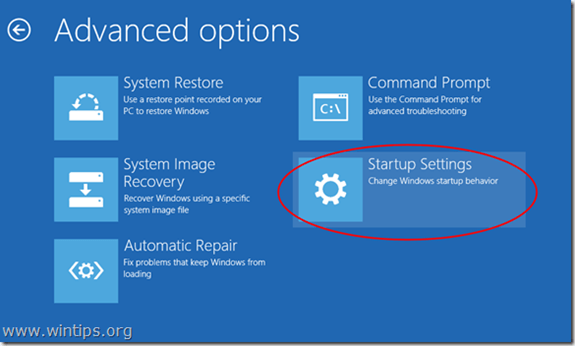
4. In the “Troubleshoot options” screen, choose “Advanced options”.
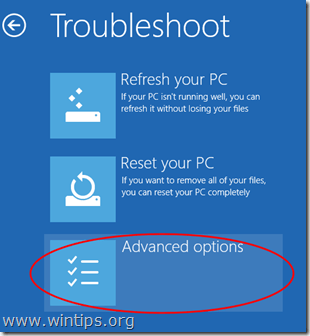
5. In the “Advanced Options” window, choose “Startup Settings”.
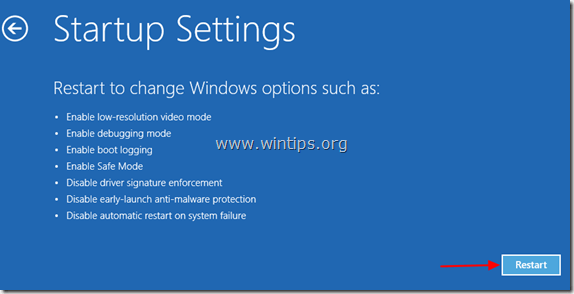
6. In “Startup Settings” screen, click “Restart”.
7. After restart, select the «Disable driver signature enforcement» option and press Enter. *
* Note: If you see the below screen (Startup Settings), press the “F7” (or the “7”) key on your keyboard to select the“Disable driver signature enforcement” option.

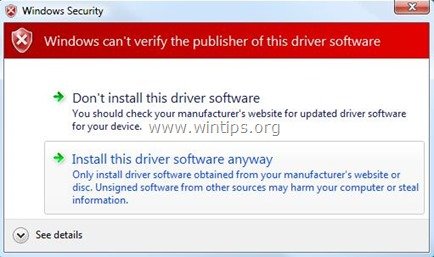
8. Then, proceed to install your unsigned driver. During the installation procedure, Windows will inform you that can’t verify the publisher of this driver software. At this point, ignore the warning message and choose “Install this driver software anyway” to complete the installation.
Normally installation should be done without errors now. Keep in mind that after the restart, the driver signature enforcement will be enabled again to avoid security risks. If you want to keep driver signature enforcement always disabled, then you must apply solution 2.
Solution 2: Disable Driver Signature completely.*
*Note: Use this solution only if you want to keep driver signature enforcement always disabled. (e.g. if you always want to run an old legitimate software).
In this solution, we are going to modify Windows Boot loader options with the BCDEDIT tool.
Step 1. Disable Secure Boot in BIOS.
1. Power On your computer and launch BIOS SETUP settings.
2. In BIOS, disable the Secure Boot option. (the setting is commonly found at Security section or at Boot Options section)
Step 2. Modify Windows Boot Loader.
– In order to modify boot loader, open “Command Prompt” in administrative mode:
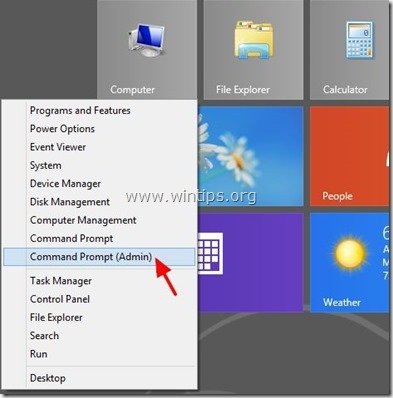
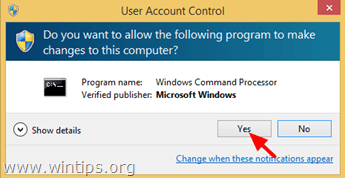
1. Right click at the Windows Start button and choose “Command Prompt (Admin)”.
2. Choose “Yes” at User Account Control” warning message:
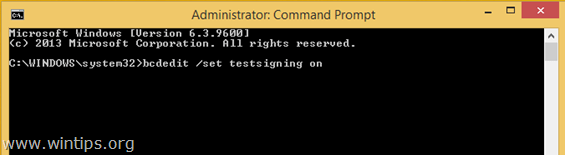
3. Inside the command prompt window, type the following command and press “Enter”:
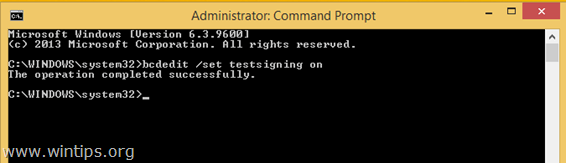
- bcdedit /set testsigning on
You should receive “The operation completed successfully” message.
4. Close command prompt window and restart your computer.
From now on, you will be able to install or run any unsigned driver or program without problems.
How to enable Driver Signature Enforcement.
1. In case that you want to enable driver signature enforcement in the future and avoid security risks, then open “Command Prompt” with elevate rights again.
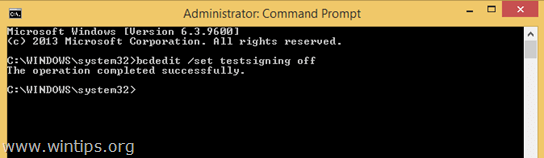
2. Type type the following command and press “Enter”
- bcdedit /set testsigning off

You should receive “The operation completed successfully” message.
3. Close command prompt window and restart your computer.
4. Install the unsigned driver. *
* Note: If you still cannot install unsigned drivers then:
1. Open a command prompt with Administrative privileges and type this command:
- bcdedit /set nointegritychecks ON
2. Restart your computer
3. Install the unsigned driver.
To re-enable device driver signing, again type: bcdedit /set nointegritychecks OFF
Разбираемся с ошибкой загрузки из-за отсутствующей цифровой подписи драйвера в x64 системе
В этой статье постараюсь описать методику диагностики проблем с неподписанными файлами драйверов в x64 битной версии Windows систем, из-за которых компьютер перестает загружаться и при загрузке падает в BSOD. Но систему все-таки можно загрузить, отключив проверку цифровой подписи при загрузке (F8 -> Disable Driver Signature Enforcement). В качестве примера в этой статье я буду работать с Windows Server 2008 R2 (которая, напомню, бывает только в 64-разрядной редакции), но данная методика подойдет так и для Windows 7 x64 и Vista x64.
Если вернуться к предыстории вопроса, то вспомним, что Microsoft приняла решение о том, что в 64-битных системах, начиная с Windows Vista, Windows загружает драйвера в режим ядра только в том случае, если драйвер имеет цифровую подпись. Если же цифровая подпись драйвера отсутствует, то при загрузке системы случается критическая ошибка (зависит от типа драйвера, загрузка которого заблокирована) и появляется экран BSOD. Конкретная ошибка и ее код зависят от конкретного драйвера, который заблокирован в процессе загрузки. Некоторые ошибок прямо на экране BSOD могут указывать на файл неподписанного драйвера.
В моем случае после обновления драйверов на сервере Windows 2008 r2 при обычной загрузки машины появился синий экран смерти с текстом:
STOP: c000021a (fatal System Error)
The initial session process or system process terminated unexpectedly with a status of 0x00000000 (0xc000428 0x00100448). The system has been shut down

Попробуем выяснить что это за ошибка, какой драйвер ее вызывает т определим по драйверу конкретное устройство.
Для декодирования ошибки нам нужен второй параметр (он выделен жирным) — 0xc000428.
Преобразуем hex код ошибки в более удобочитаемую форму. Для этого можно воспользоваться встроенной в Windows утилитой SLUI.EXE или же сопоставить код этой ошибки в файле ntstatus.h, найти который можно в Windows SDK. Воспользуемся первым способом, для чего в командной строке выполним:
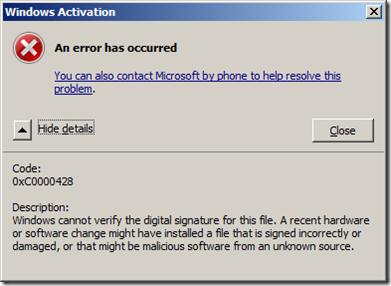
Как вы видите на скриншоте, мы убедились в том, что BSOD вызвана невозможностью проверить цифровую подпись драйвера (“Windows cannot verify digital signature for this file”)
Перезагружаем наш компьютер и при загрузке жмем клавишу F8. В расширенном загрузочном меню (Advanced Boot Options) отключаем проверку цифровой подписи, выбрав Disable Driver Signature Enforcement .
В том случае, если в таком режиме сервер загрузиться, мы точно уверены в том, что некий неподписанный модуль или драйвер не позволяет системе нормально загрузиться.
Следующий шаг – определение файла проблемного модуля или драйвера. Откроем консоль журнал событий (Event Viewer) и перейдем в раздел Applications and Services Logs -> Microsoft -> Windows -> CodeIntegrity -> Operational.
Примечание: если при доступе к логам в этой ветке появляется ошибка “access denied”, создайте на диске c: каталог, предоставив группе Everyone полный доступ. Затем измените путь к файлу ETL на новый каталог, и отключите и заново включите логирование.
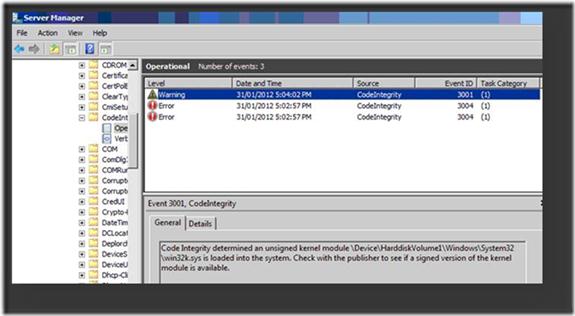
В моем случае, в журнале есть событие EventID 3001 с текстом «Code Integrity determined an unsigned kernel module \Device\HarddiskVolume1\Windows\System32\win32k.sys is loaded into the system. Check with the publisher to see if a signed version of the kernel module is available». Вот мы и нашли проблемный драйвер!
Данный драйвер может быть как родным драйвером Microsoft, так и драйвером стороннего разработчика. Удостоверимся, что данный драйвер действительно не имеет цифровой подписи. Для этого нам понадобится утилита от Sysinternals под названием SIGCHECK.EXE (взять ее можно тут http://technet.microsoft.com/en-us/sysinternals/bb897441).
Проверку наличия цифровой подписи выполним командой:
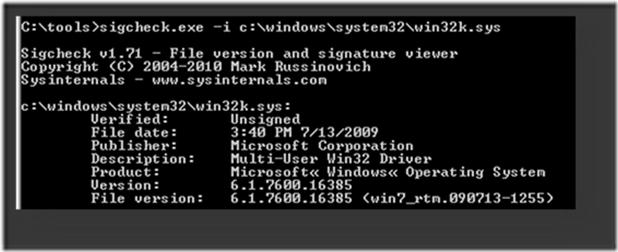
Если подпись отсутствует, то в поле Verified будет указано Unsigned (в противном случае, соответственно Signed).
Перед нами есть два варианта решения проблемы невозможности нормальной загруки системы с неподписанным драйвером:
- Найти подписанную версию драйвера
- Отказаться от использования данного драйвера (и устройства)
- отключить проверку цифровой подписи драйвера в Windows
Третий вариант может не подойти по тем или иным причинам. В первых двух случаях нам нужно определить к какому конкретному устройству относится данный файл драйвера .sys.
Как же определить устройство, зная лишь имя sys-файла? Я использую следующую методику (пусть нам нужно определить устройство, драйвер которого имеет имя HpCISSs2.sys):
1) Открываем редактор реестра и поиском по ветке HKEY_LOAL_MACHINE\SYSTEM\ControlSet001 ищем ключ со значением HpCISSs2.sys
2) В моем случае он нашелся в ветке HKEY_LOAL_MACHINE\SYSTEM\ControlSet001\services\HpCISSs2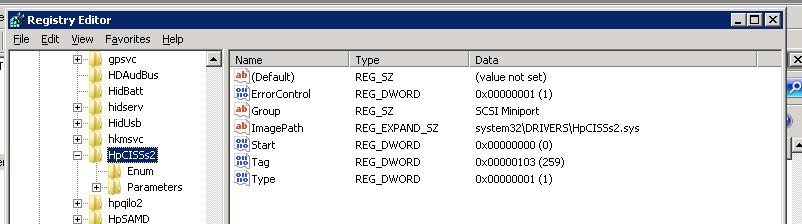
3) Разворачиваем вложенную ветку с названием ENUM, нас интересует значение ключа 0, в моем случае это PCI\VEN_103C&DEV_3230&SUBSYS_3235103C&REV_01\4&3b416f2c&0&0018
4) Определяем, что производитель устройства имеет ID 103C, а код устройства 3230
5) Далее на сайте указываем в полях Vendor Search и Device Search найденные нами коды.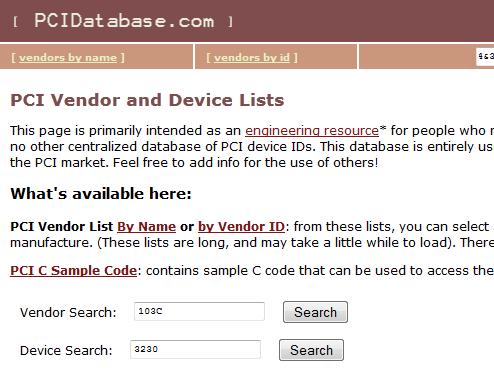
6) Получаем что искомое нами устройство контроллер жестких дисков HP Smart Array P400 Controller.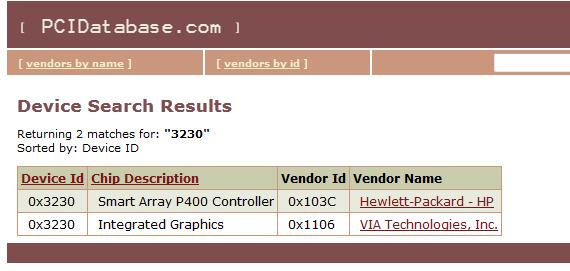
Нам осталось лишь найти новую версию драйвера на сайте производителя оборудования (внимательно смотрите для каких версий ОС подходит нужный вам драйвер) и обновить драйвер на компьютере.


