- How to disable automatic restart in the event of a system failure on Windows 10
- Disable automatic restart in case of system failure
- April 2021 Update:
- 1 : Use the Start and Recovery
- 4 : Use the advanced boot options
- Windows: как перейти в безопасный режим?
- Что такое безопасный режим
- Как загрузить Windows 7 в безопасном режиме
- How to Disable Automatic Restart When System Failure in Windows 10
- 3 Ways to Disable Automatic Restart When System Failure in Windows 10
- 1. Control Panel
- Via Registry Editor
- Through Command Prompt
- Turn Off Automatic Restart on System Failure in Windows 7 & 10
- Pros & Cons of Using Windows 7
How to disable automatic restart in the event of a system failure on Windows 10
If a critical Windows operating system error occurs, the system launches a Blue Screen of Death (BSOD). This blue death screen then inserts the error code in the bottom left corner and restarts the computer. This error is mainly caused by some internal system processes or files that no longer work as expected. Sometimes a DLL or Dynamic Link Library file malfunctions or a critical process in the system returns an error. Well, in this case, the task the user is currently performing is often left and forcibly closed by the system. This means a greater loss of unsecured work by the user on his computer. To solve this problem, we must disable automatic restart.
Disable automatic restart in case of system failure
April 2021 Update:
We now recommend using this tool for your error. Additionally, this tool fixes common computer errors, protects you against file loss, malware, hardware failures and optimizes your PC for maximum performance. You can fix your PC problems quickly and prevent others from happening with this software:
- Step 1 : Download PC Repair & Optimizer Tool (Windows 10, 8, 7, XP, Vista – Microsoft Gold Certified).
- Step 2 : Click “Start Scan” to find Windows registry issues that could be causing PC problems.
- Step 3 : Click “Repair All” to fix all issues.

First, we recommend creating a system restore point. Because we will play with the registry files and change some really important Windows settings. After that, we will continue our efforts to disable the automatic restart of Windows 10 in the event of a system failure.
1 : Use the Start and Recovery
Start with the combination WIN + R to start the Run utility.
Now enter sysdm.cpl and press Enter to start System Properties. Then click on the Advanced tab and under the Start and Restore section , click on the Settings button
- A new pop-up window opens. Under section System error, disable option Auto restart
- Now click on OK then on Apply then again on OK
- Restart your computer now for the changes to take effect.
Start with WIN + X or right-click the Start button and click Command Prompt (Admin) or simply search cmd in the Cortana search box, right-click the Command Prompt icon and click Run as Administrator.
Enter the following command to disable automatic restart in case of system failure:
Or you can enter the following command to enable automatic restart in case of system failure:
Enter i>exit and press Enter to exit the prompt.
Reboot Your computer for the changes to take effect.
First press WINKEY + R to start the utility Run .
Type regedit and press Enter
- Or you can search Registry Editor in the Cortana Search field and select the appropriate option.
- Click Yes for the UAC prompt you receive.
In the registry editor, navigate to the next key location,
Select CrashControl in the left pane, then double-click AutoReboot in the right pane.
A new mini-window appears. In the Value Data field, enter the value as 0 (ZERO). Click OK(2)
Restart your computer for the changes to take effect.
4 : Use the advanced boot options
Start in the Advanced boot options You can learn more about boot in the advanced boot options here in this article.
After starting in the advanced boot options, click Troubleshooting problems.
Then click Advanced Options
of the three options you will receive.
Click Startup Settings. Then click the Restart button Restart
- After the reboot, the system starts at the boot settings, simply press the F9 or 9 button to disable option Automatic reboot after error.
Windows: как перейти в безопасный режим?
Приветствую Вас, уважаемые читатели! В настоящее время на большинстве настольных ПК и ноутбуках установлена операционная система Windows. И наверняка многие из Вас сталкивались с проблемой, что она (Windows) не загружается. Но не все знают, что решить проблему загрузки операционной системы можно в безопасном режиме. Сегодня мы и поговорим о том как загрузиться в безопасном режиме и что это вообще за такой режим.
Что такое безопасный режим
Безопасный режим в Windows (Safe Mode) — это специальный режим работы системы, который служит для устранения неполадок, вызванных некорректной работной программных и аппаратных ресурсов персонального компьютера (ПК). В безопасном режиме Windows загружает минимальный набор драйверов устройств и системных служб.
Поэтому всякий раз, когда у вас не получается загрузить Windows в следствии заражения компьютерными вирусами или после установки нового драйвера и программного обеспечения, то вы всегда можете загрузить ПК в безопасном режиме и устранить неисправности. Загрузившись в Safe Mode у вас появится возможность просканировать компьютер на наличие вирусов, удалить драйвер или программу после установки которых Windows перестала загружаться, либо вообще выполнить откат системы. Обычно этих действий хватает для восстановления работоспособности операционной системы. Кстати о том как удалять программы в безопасном режиме вы можете почитать в этом посте.
Как загрузить Windows 7 в безопасном режиме
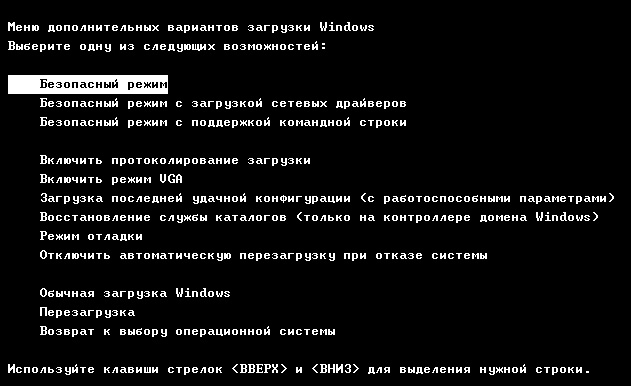
Чтобы загрузить систему в безопасном режиме достаточно несколько раз нажать клавишу F8 при загрузке компьютера. В случае успеха на экране появится меню выбора вариантов загрузки:
Примечание: на некоторых компьютерах если при загрузке нажать клавишу F8 может появиться меню выбора устройства с которого производить загрузку. В этом случае выбираете нужный жесткий диск на котором установлена операционная система, нажимаете Enter и продолжаете нажимать F8. После этого появиться экран с меню выбора дополнительных вариантов загрузки.
В меню выбора способов загрузки есть несколько вариантов:
- Безопасный режим (Safe Mode) — загрузка операционной системы Windows только с основными драйверами и службами необходимыми для запуска системы.
Далее с помощью клавиш со стрелками выбираете «Безопасный режим» и нажимаете клавишу «Enter». В случае необходимости можно выбрать «Безопасный режим с поддержкой командной строки» или «Безопасный режим с загрузкой сетевых драйверов» и также нажать «Enter».
После этого система загрузиться в безопасном режиме — с черным фоном рабочего стола и надписью «Безопасный режим» в углах экрана. Далее проводите необходимые операции: делаете откат системы, удаляете конфликтные драйверы или программы и другие действия.
На этом все! До новых встреч на страницах блога.
How to Disable Automatic Restart When System Failure in Windows 10
Multiple manners to Disable Automatic Restart When System Failure. – A setting exists on Windows 10 (also in earlier editions) which is when in enable state a PC automatically restarts after System failure. As a result, the System unexpectedly starts to reboot after a low voltage or short-lived issues.
This inconvenient situation confuses users often who is unable to detect the real culprit of sudden repeated Restart. So, multiple ways to Disable Automatic Restart When System Failure in Windows 10, we are going to elaborate in further paragraphs.
In addition, when Windows 10 restarts a machine after system failure without a notification ongoing works always remain in danger.
Oppositely, this setting saves machine from possible damage since whenever machine guesses an error, instantly goes into restart mode. Still, the verdict of users indicates to disable it.
The main complicated situation is when the error note that comes with BSOD hardly remains on the screen (less than a second) and before the user can make a note of it, the machine reboots.
But, if you Disable Automatic Restart When System Failure in Windows 10, you can easily note down the error code which will eventually help you in adopting the necessary steps to rectify the crash.
3 Ways to Disable Automatic Restart When System Failure in Windows 10
1. Control Panel
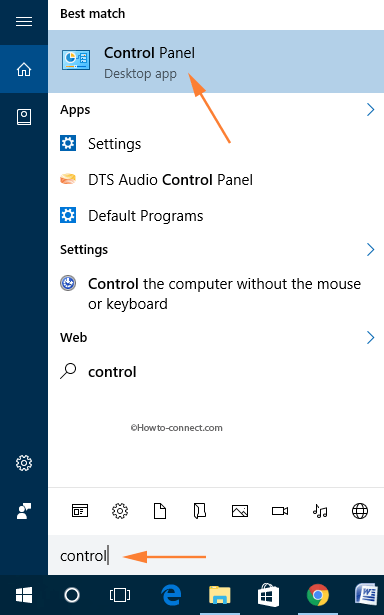
Step 1 – To begin with, open Cortana by tapping Win and S keys. When it arrives on the screen, write in Control panel in the text space. Soon, the Best match will exhibit Control Panel with its icon on the top, hit on it.
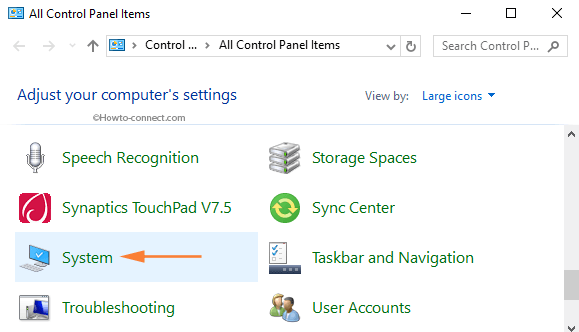
Step 2 – Make the control panel either into small or large icon view, locates System and hit on it.
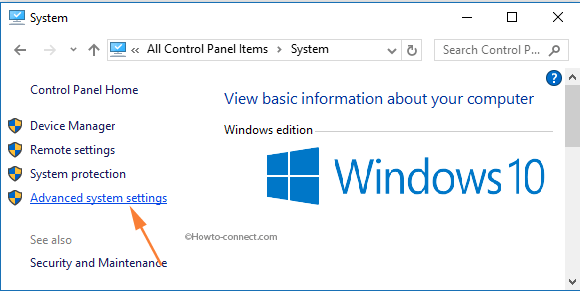
Step 3 – On the left-hand sidebar, click or hit Advanced system settings link.
Step 4 – A separate box with a title System Properties will arrive with the Advanced tab on focus. Stay on that tab and move to the last section termed Startup and Recovery. Click or hit the Settings button, located in that section.
Step 5 – Another dialog of Startup and Recovery will arrive. Look at the second section named System failure. Two options are present in the section, clear off the tick mark from the cell Automatically restart.
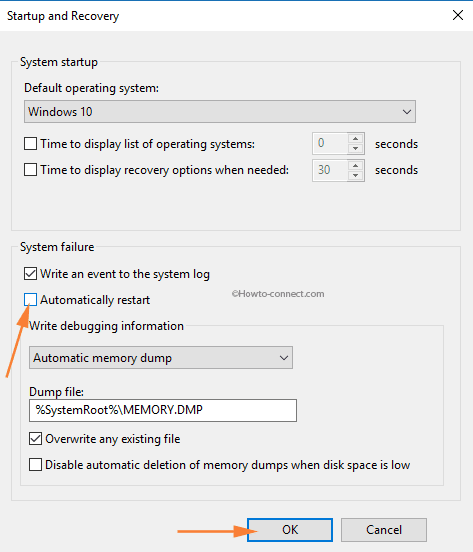
Step 6 – As the last effort, tap or hit Ok button.
Via Registry Editor
Step 1 – The first thing is to write out the code regedit on the Cortana text box. The code regedit Run command will arrive on the topmost part, hit on it.

Step 2 – When the UAC prompt comes out on the screen, affirm it by tapping Yes button.
Step 3 – Once the Registry Editor expands on the screen, navigate to the below-written path – HKEY_LOCAL_MACHINE\SYSTEM\CurrentControlSet\Control\CrashControl
Step 4 – Move to the right pane of the CrashControl key, locate a DWORD labeled AutoReboot and double-click on it.
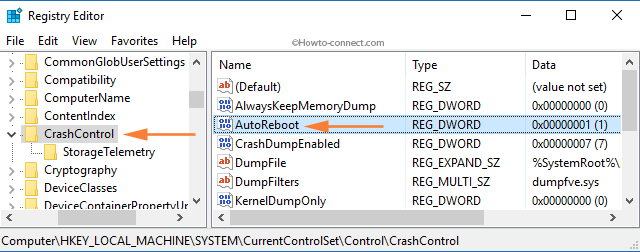
Step 5 – A tiny Edit box appears on the screen, clear off the number 1, type 0 (zero) in Value data text box, and tap Ok button.

Through Command Prompt
Step 1 – First of all, access an elevated Command Prompt with the technique you are convenient with. However, right-click Start and from the pop up that comes out, hit Command Prompt (Admin).
Step 2 – A UAC prompt will strike the screen, tap Yes, and give affirmation to its conditions.
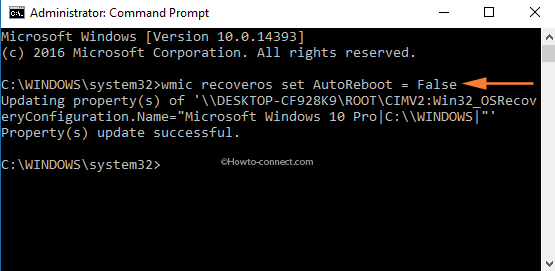
Step 3 – Copy and paste this line of code in the outspread elevated Command Prompt and to implement its effect, hit Enter – wmic recoveros set AutoReboot = False
In order to stay away from an abrupt and unexpected reboot, these are the three familiar methods to Disable Automatic Restart When System Failure in Windows 10.
Turn Off Automatic Restart on System Failure in Windows 7 & 10
Posted on June 19, 2019 by Mona 1 Comment
Any time a Windows operating system encounters a critical problem the system automatically shows the blue screen of death or BSOD for short. By default, the PC restarts automatically. It is generally presumed that a restart will solve the issue and Windows will start running properly when rebooted.
Unfortunately, there is a big problem with this default restart. Just before the restart begins, you are given a moment – less than a second – to read the message explaining the critical error on the screen. It’s nearly impossible to read because the reboot happens too quickly, which means you have little to no time to see what caused the problem.
And, unless you know to look for the message, chances are you won’t even notice it.

Pros & Cons of Using Windows 7
While there are obvious advantages in upgrading to a newer system, such as Windows 10, some users might find more utility from a more stable and less demanding OS, meaning that sticking with Windows 7 would be preferable.
Weigh the advantages and drawbacks compared to your own needs and decide if you want to install Windows 7.
– Stable
– Relatively Lightweight
– Classic UI
– Works with most modern peripherals
– Old Security Protocols
– Not Compatible with Some Modern Hardware
– Not Compatible with Some Modern Software
– Lacks some UI Solutions
You may also purchase Windows 8 Professional from Amazon as a DVD. Not only does it come with one of the best classic systems for the PC, but it might also be a good piece for any IT collector as it will become a relic in the near future.
The following simple steps need to be followed to disable automatic restart on System Failure in Windows 7 so you’ll have more time to assess the issue. It’s an easy task and can be accomplished in less than ten minutes.
1. Click the start button, type “Advanced system settings”, then select “View advanced system settings”.
2. This will show you quite a few options. From these options identify the Startup and Recovery Section which will be there at the bottom of the window and click on the button of Settings.
3. In the Startup and Recovery Window, you will locate a checkbox right next to the option of Automatically Restart. Simply uncheck the checkbox.
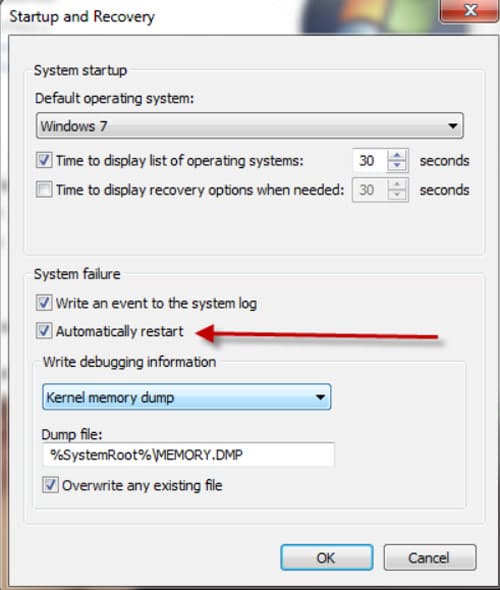
5. OK has to be clicked both the Startup and Recovery Window and System Properties Window individually.
6. Close the System Window.
Once you follow these steps, no matter what the nature of the problem is, Windows 7 will not reboot the system automatically. Instead, whenever a problem arises you will have to reboot the system manually.
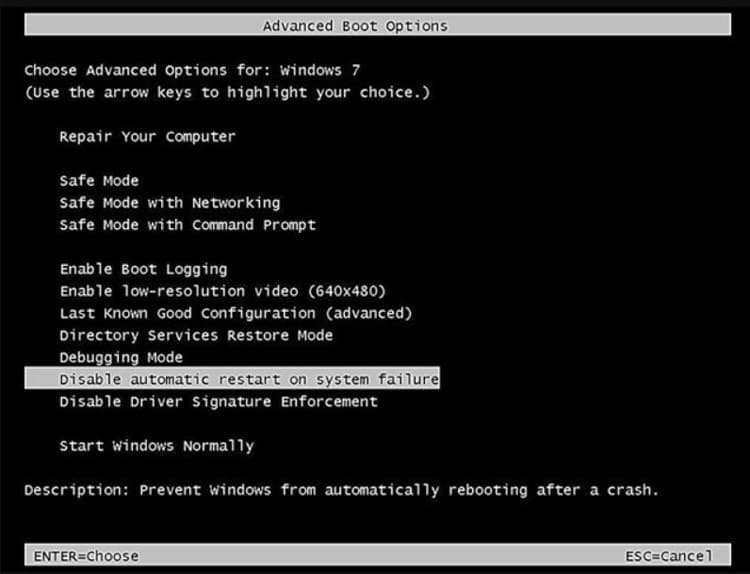
Sometimes, you may not be able to boot your Windows using the aforementioned process. In that case, you may disable automatic restart on system failure in Windows by using Advanced Boot Options.
1. Prior to the appearance of Windows Splash Screen, press F8. This will take you to the Advanced Boot Options.
2. Use the arrow key on the keyboard to highlight your desired option. In this case, your desired option is Disable Automatic Restart on System Failure. Highlight it.
After disabling the automatic restart on system failure, there is a chance Windows 7 may or may not continue the process of loading. This depends on the nature of the problem or the error that Windows is experiencing.
Now that you have successfully disabled automatic restart on system failure, next time your computer encounters a problem it will not restart. Instead, it will show you the problem and will also provide you with the information related to it.


