- How to Fix Corrupted Hard Drive Using CMD in Windows 10/8/7?
- Causes and symptoms of corrupted hard drive
- How to fix corrupted hard drive using CMD?
- Free alternative to CMD: fix damaged hard drive more easily
- 1. Check Partition for errors
- 2. Rebuild MBR of corrupted hard drive
- 3. Reformat the corrupted hard drive
- Conclusion
- Command Prompt: Check Disk Errors and Repair Hard Drive in Windows 10, 8, 7
- The Review of Check Disk tool
- How to run the Check Disk tool for disk repair? [3 Ways]
- Way 1. Run Check Disk from Command Prompt
- Way 2. Run Check Disk from Partition Properties
- Way 3. Launch chkdsk.exe tool with free partition software
- Conclusion
- Использование Diskpart: управление и восстановление жесткого диска, карты памяти или USB-флешки
- Содержание:
- Начало работы с Diskpart
- Как создать разделы и отформатировать стертый диск?
- Как удалить защищенный, активный и системный разделы жесткого диска?
- Удаление через командную строку в работающей ОС
- Удаление любых разделов
- Как восстановить утерянные файлы?
- Часто задаваемые вопросы
How to Fix Corrupted Hard Drive Using CMD in Windows 10/8/7?
This page will demonstrate how to fix corrupted hard drive using CMD elaborately. A reliable tool-AOMEI Partition Assistant, which offers easier ways to repair the corrupted hard drive, will also be introduced.

By Emily  / Last Updated March 26, 2021
Causes and symptoms of corrupted hard drive
Why the hard drive gets corrupted or crashed? Below are some main causes.
▸Logical damage: virus attack, bad sectors, unknown file system, disk is not formatted, raw file system, lost/corrupted partition table…
▸Physical damage: short-circuit failure, damaged chip, corrupted header, dropped from high places, degradation of moving parts in the hard disk over time…
▸Improper human operations: sudden power failure, removed without safe removal, shut down system improperly…
When the hard drive gets corrupted, you will notice the following symptoms or error messages.
в–¶Black screen appears after the system booting screen.
в–¶No bootable device found, computer cannot boot successfully.
в–¶Clicking or grinding sound from hard drive — it is going to die soon, or won’t boot already
в–¶It takes a much longer time for accessing files and folders. Or the files and folders become invisible and corrupt.
в–¶The type of file system is raw, CHKDSK is not available for RAW drives.
How to fix corrupted hard drive using CMD?
When your hard drive is corrupted, you can refer to the following content toВ fix corrupted hard disk using Command Prompt. Before proceeding, you had better recover data from the damaged hard drive, and move them to another safe location.
To start the corrupted hard disk repair process, first of all, you should open Command Prompt as administrator (Click Search box, input Command Prompt, right-click the icon and choose Run as administrator. Or press Win+R, input «cmd» in the elevated Run dialogue and press on Enter).
Then, type the command (“chkdsk g: /f”) and press Enter to start the error checking and fixing process for your corrupted drive:В
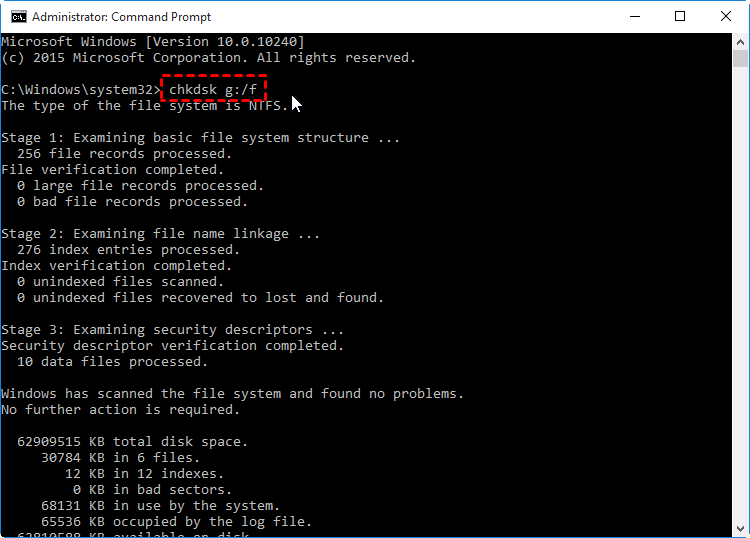
Note: the g: is the drive letter of the damaged hard drive, the f means fixing errors on the disk.
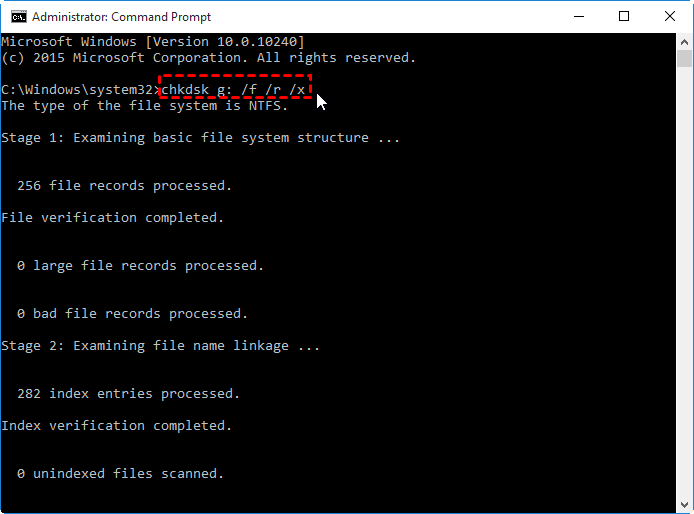
You can add more parameters to the command to make the scan process more rigorous.
“chkdsk g: /f /r /x”: /x locates bad sectors and recovers readable information. /r forces the volume to dismount before the scan if required.
Free alternative to CMD: fix damaged hard drive more easily
If you think the process of how to fix corrupted hard drive using CMD (running CHKDSK.exe) is a little complicated, or you encounter “CHKDSK is not available for RAW drives” error message during the repairing process, you can turn to AOMEI Partition Assistant Standard, which can support Windows 10/8.1/8/7, XP and Vista. It provides you with three different ways to repair damaged hard drive. Free download it and have a try now.
1. Check Partition for errors
Step1. Install and run AOMEI Partition Assistant. Right-click the partition you want to check and select “Advanced”> “Check Partition”.
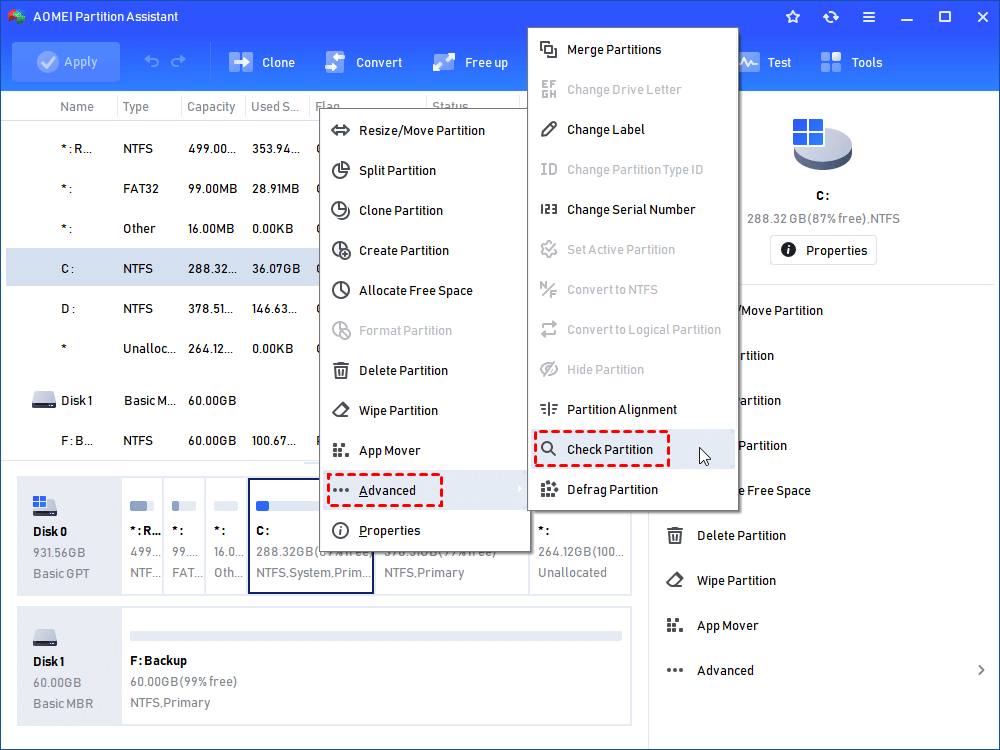
Step 2. In the pop-out window, you have three options available, check and fix error by using chkdsk.exe, check error only using chkdsk.exe, and find bad sectors. Choose one according to your needs and click “OK”. Then wait for the process to complete.

Besides, you can also right-click the disk you want to scan and select the “Surface Test” to check disk error.
If checking and repairing disk/partition by chkdsk.exe fails, then you can consider the option of rebuilding the MBR of the damaged hard drive. Luckily, AOMEI Partition Assistant could also perform this task.
2. Rebuild MBR of corrupted hard drive
Step 1. Open AOMEI Partition Assistant, right-click the corrupted disk and select “Rebuild MBR”.
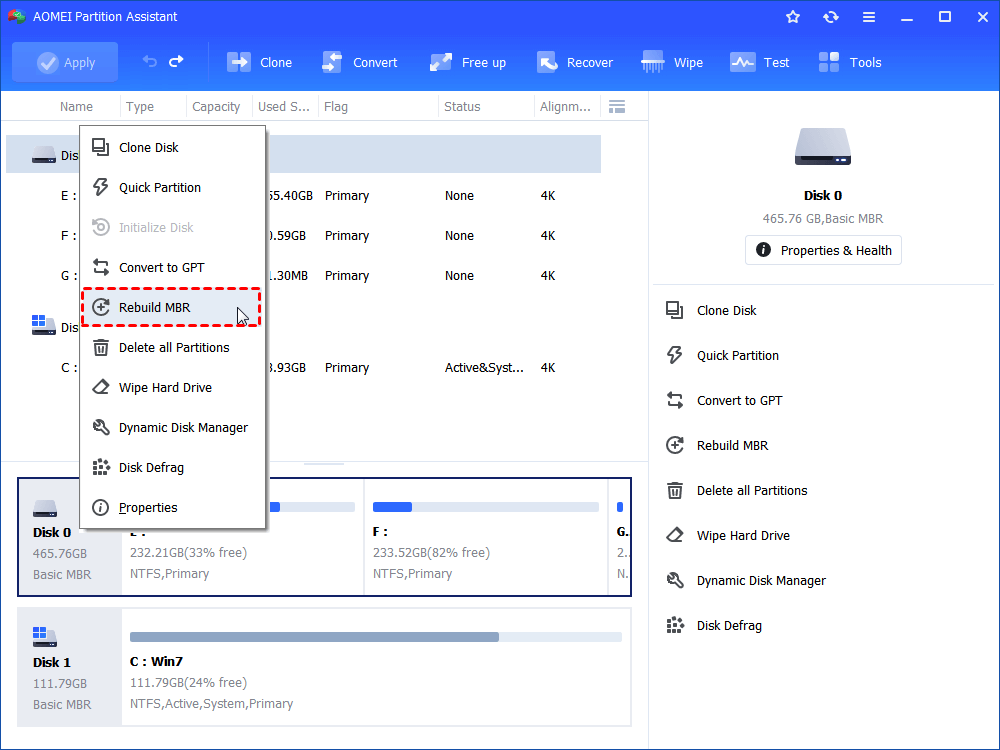
Step 2. Select a proper MBR type for your current operating system and click “OK”.
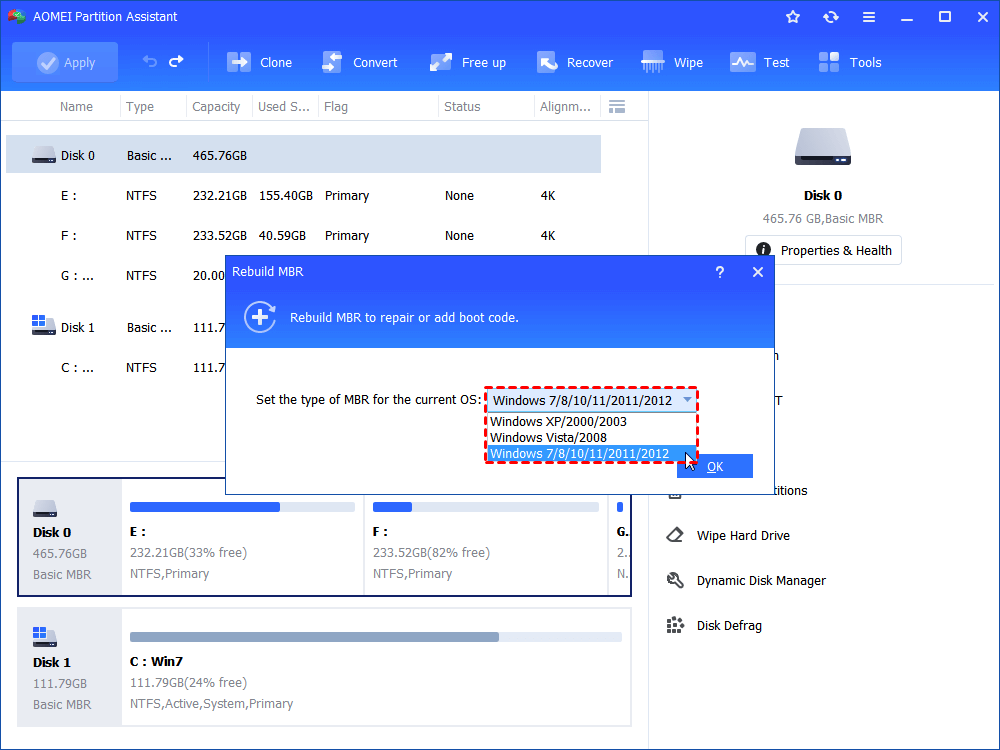
Step 3. In the main interface, click “Apply” on the top left corner to commit the pending operation.
Then, you can check whether the corrupted hard drive can be used normally again. If not, you can try to reformat it via this software.
3. Reformat the corrupted hard drive
Step 1. In the main interface of AOMEI Partition Assistant, right-click any partition of the corrupted disk and select “Format Partition”.
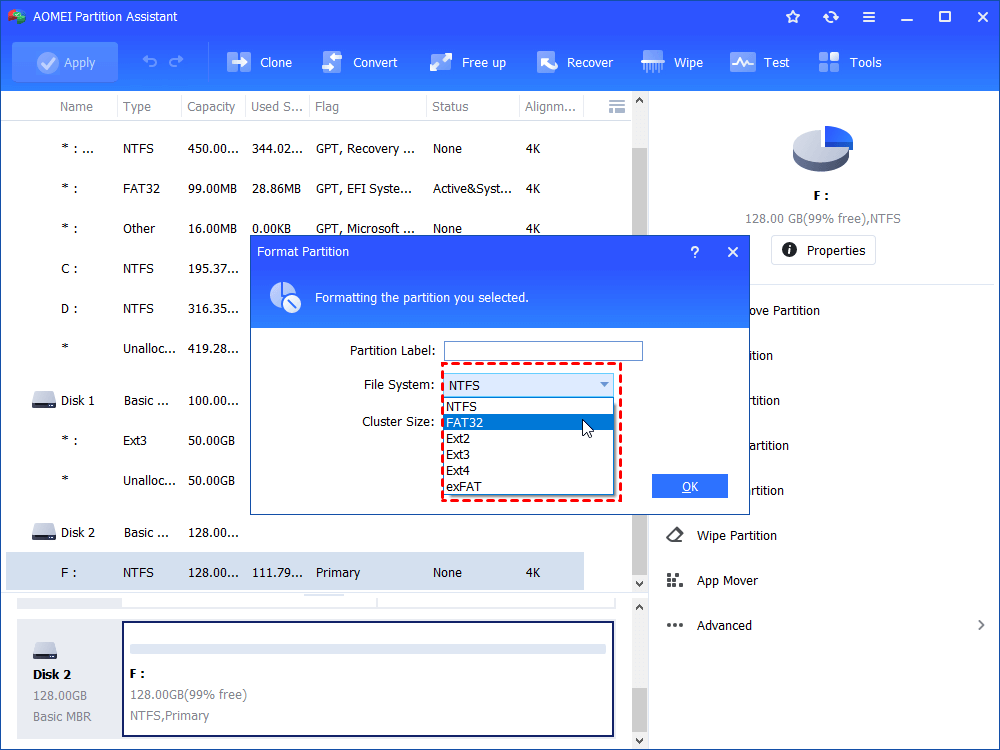
Step 2. Select a file system (ex: FAT32) and click “OK”.
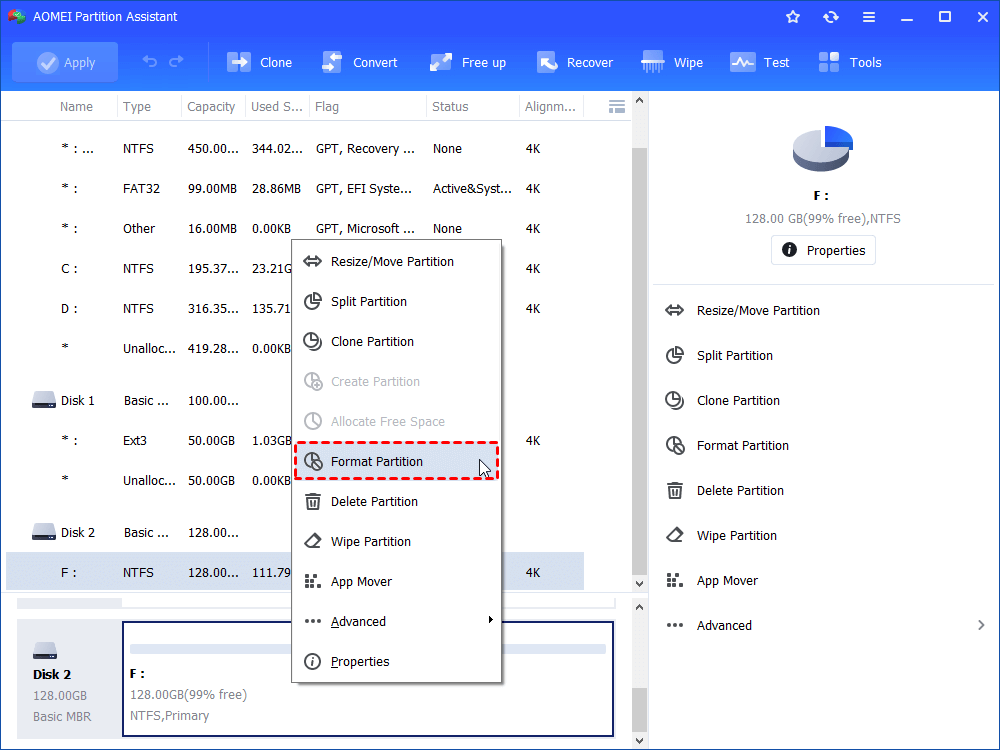
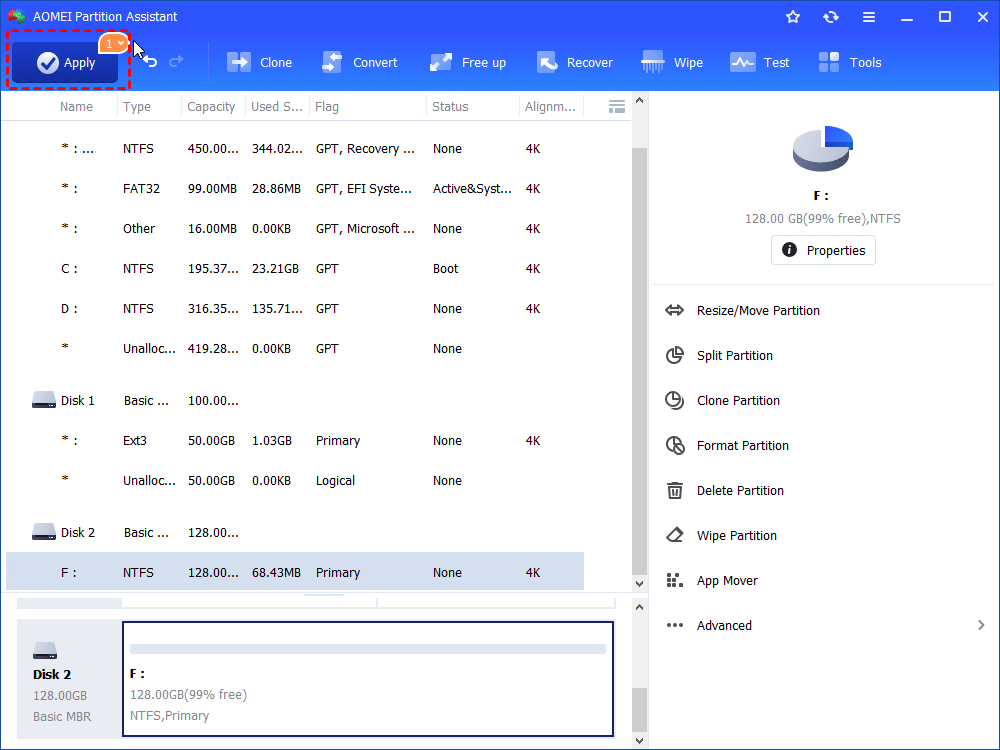
Step 3. Click “Apply” to start formatting the partition.
Conclusion
Now, you know how to fix corrupted hard drive using CMD step by step. If you want to repair the damaged hard drive in an easier way, AOMEI Partition Assistant is a great choice. Moreover, its Professional Edition comes with more advanced functions like securely erasing SSD, clone MBR hard drive to GPT, convert hard drive between MBR and GPT without deleting partitions, optimizing SSD performance by 4K alignment and more.
Command Prompt: Check Disk Errors and Repair Hard Drive in Windows 10, 8, 7
Wanna use Command Prompt to check disk errors and fix them? This article lists 3 methods to launch CHKDSK.exe tool and check hard drive bad sectors and repair them effectively.

By Cherry / Last Updated March 31, 2021
The Review of Check Disk tool
Check Disk, short as “CHKDSK”, is a Windows utility that can check the file system integrity of your hard disk and can fix various file system errors on FAT16, FAT32, and NTFS drives. It is available for Windows XP, Windows Vista, Windows 7, Windows 8/8.1 and Windows 10. The Check Disk utility helps you to check file system errors, bad sectors, lost clusters, and so on.
Sometimes, you need to run chkdsk.exe to solve your problems. For example, if you face the problems ranging from blue screens to inability to open files or folders, you can run the Check Disk tool to check for and fix errors on disks.
How to run the Check Disk tool for disk repair? [3 Ways]
Well, how to run and use Check Disk utility on Windows PC? You can access it from elevated Command Prompt windows, from Windows File Explorer or via a third-party partition manager. Below are details on these three ways. Take a closer look at them and choose a proper way based on your needs.
Way 1. Run Check Disk from Command Prompt
The most common way to access Check Disk is from elevated Command Prompt. There are the corresponding check disk commands to help check and fix errors on the selected partition. To use command prompt check disk, you need to open command prompt as administrator. Take an example of Windows 10:
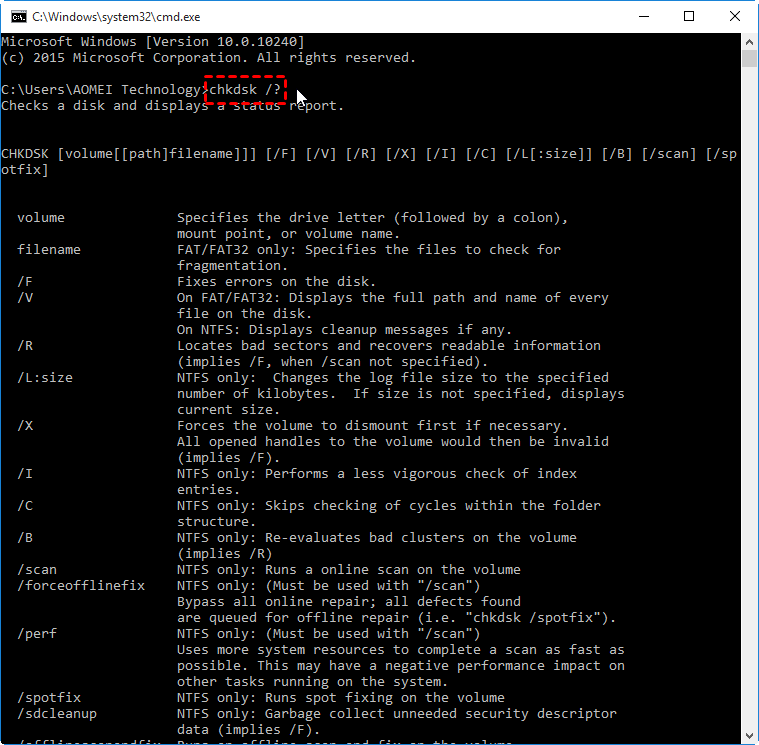
Press Windows + R simultaneously, type cmd, press Enter. Then, you will get into a command prompt and you can start to check disk with command line. If you do not know how to use it, you can type chkdsk /? and hit Enter, which will give you its parameters or switches.
If you cannot boot your computer, you can run check disk from command prompt either by booting the operating system into the recovery mode or by using the original installation disc to run command prompt.
For example, if you want to test the integrity of the G: drive, you can type the command in the prompt: «chkdsk g:», To find and repair any errors that are found in G: drive, type «chkdsk g: /f» instead.
в…в…в… Check Disk can’t repair volumes that are in use. If the volume is in use, it will display a prompt that asks if you want to schedule the volume to be checked the next time you restart the system. Click Yes.
Way 2. Run Check Disk from Partition Properties
Apart from using Command Prompt to launch Check Disk tool, you can also access it from the partition properties. Double click “My Computer/This PC” -> Right-click Drive ->Properties > Tools tab -> Check or Check Now.
Here you will get two options for “Automatically fix file system errors” and “Scan for and attempt recovery of bad sectors”. choose one according to your need, click Start.

в…в…в… If the drive to be checked is in use, you may have to schedule the chkdsk at reboot.
Way 3. Launch chkdsk.exe tool with free partition software
Using Command Prompt Check Disk to scan the drive for errors and fix them is important to Windows users. However, you should know that if you misuse the commands, you risk losing data permanently. So, you’d better make a backup of your data before using command line, or you can find a safe alternative to Check Disk commands.
It is recommended to use the AOMEI Partition Assistant Standard. This great free disk partition manager can help you check for and fix errors on disk partitions. It supports Windows 10, 8.1, 8, 7, Vista, and XP, both 32 bit and 64 bit. You can use it with a concise interface that even a non-technician can operate easily. Here we will show how to check for and fix errors on disk partitions with free AOMEI Partition Assistant.
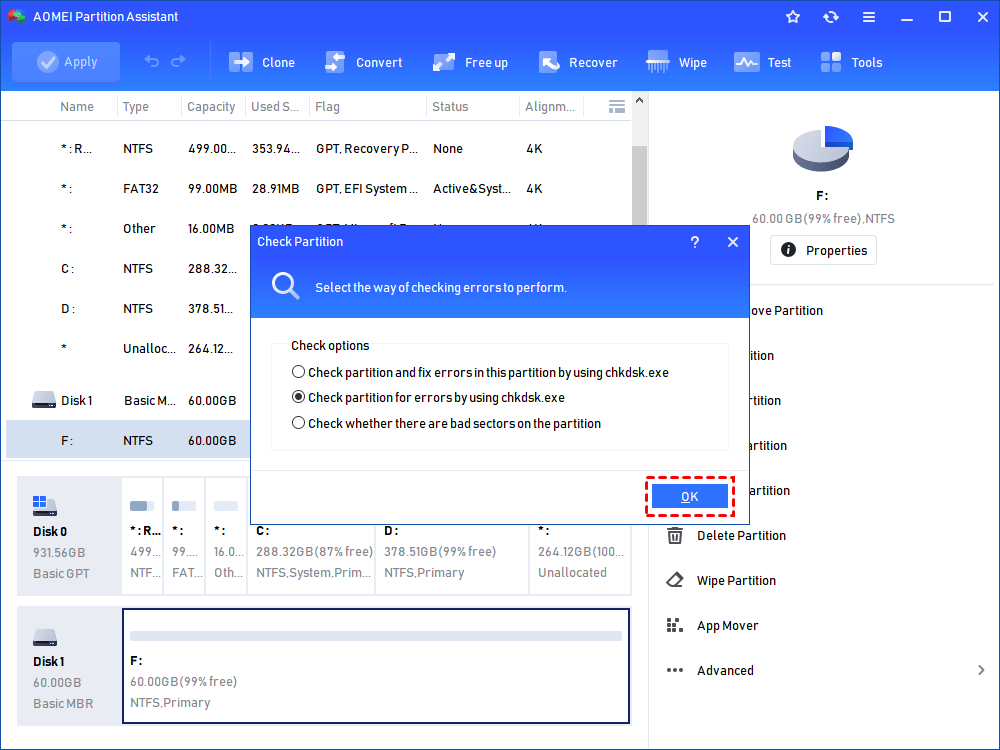
Step 1. Free download the software, install and launch it. It will display you the basic situation of your hard drives. Select the partition that you want to check for, right click it, select Advanced -> Check Partition.

Step 2. It will pop up a small window that you can select the way of checking errors to perform. Choose one according to your needs and click OK. It will proceed immediately.
Notes:
в‘ There are 3 ways you can select to perform: check partition and fix errors in this partition by using chkdsk.exe; check the partition for errors by using chkdsk.exe; check whether there are bad sectors on the partition. Select the one as your command.
②If the partition you selected is being used by another process, you cannot continue the operation. A window will pop up to tell that you can continue the operation again if this partition is dismounted. But it will make all the running programs invalid. When asked “would you like to force a dismount on this partition”. click Yes, it will execute the task, click No, it will cancel the operation.
Conclusion
In this post, we not only tell how to run Check Disk from Command Prompt, but also share another two ways to access chkdsk.exe tool. Apart from checking partition for bad sectors or errors, AOMEI Partition Assistant has many other features that can help you manage your hard drives on Windows 10/8/7 better. For example, you can check the entire hard disk for errors via “Surface Test”, merge two partitions, move partitions, clone partitions, etc.
To unlock and enjoy more advanced features such as allocate free space from one partition to another, convert system disk between MBR and GPT without deleting partitions, recover lost partitions, and more, you can upgrade to AOMEI Partition Assistant Professional.
Использование Diskpart: управление и восстановление жесткого диска, карты памяти или USB-флешки
Встроенная утилита Diskpart — эффективное средство для исправления логических ошибок и восстановления жестких дисков, флешек и других запоминающих устройств.
Содержание:
Некорректная работа накопителей, неправильное отображение размера в проводнике, невозможность форматирования и другие неполадки – все эти проблемы значительно затрудняют использование флешек и жестких дисков, поэтому при обнаружении вышеуказанных неполадок следует сразу прибегнуть к их устранению.
Важно! Перед началом работы, следует позаботиться о сохранности информации на проблемном накопителе, поскольку для исправления проблемных дисков потребуется полное стирание, а также удаление таблицы разделов, что непременно приведет к удалению всей информации.
Начало работы с Diskpart
Для начала следует подключить проблемную флешку к компьютеру или точно определить необходимый накопитель. Это нужно для того, чтобы случайно не стереть нормально работающий диск с важной информацией. В нашем случае проблемным диском будет выступать флешка объемом 14.4 гигабайт.

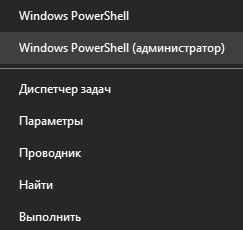
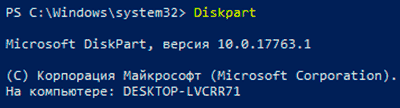
После этого следует запустить командную строку или Windows PowerShell с правами администратора. Это можно сделать, нажав правой кнопкой мыши по «Пуск» и выбрав соответствующий пункт (командная строка(администратор) или Windows PowerShell(администратор)).
В открывшемся окне командной строки следует ввести команду «Diskpart» и нажать Enter (кнопка Enter подтверждает команды, поэтому её следует нажимать после каждой новой команды) для начала работы с утилитой.
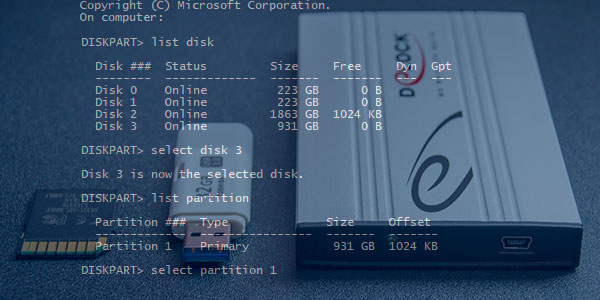
Теперь необходимо точно определить проблемный диск в утилите. Для этого нужно ввести команду «list disk», отображающую весь список подключенных носителей.
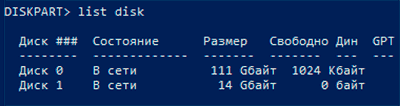
Как видно из скриншота, утилита определила два диска: Диск 0 размером 111 гигабайт и диск 1 размером 14 гигабайт. Поскольку системный диск с большим размером работает нормально, а проблемы имеются именно с USB-флешкой объемом 14 гигабайт, запоминаем что в Diskpart она носит название «Диск 1».
Важно! В данном пункте следует точно определить необходимый диск, чтобы не удалить всю информацию с системного накопителя.
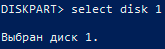
Выбираем проблемный накопитель командой «select disk 1» (если у пользователя установлены дополнительные диски, после команды select disk следует ввести число, соответствующее проблемному носителю).
Следующий шаг является финальным, поэтому рекомендуем еще раз перепроверить правильность выбранного диска. После выполнения команды все данные будут стерты. Для выполнения стирания выбранного диска, вводим команду «Clean» и подтверждаем Enter.

После стирания диска, Diskpart выдаст сообщение «Очистка диска выполнена успешно». После этого можно закрыть окно «Windows PowerShell».
Стоит отметить, что для нормальной работы стертого диска, на нем необходимо создать разделы и провести форматирование.
Как создать разделы и отформатировать стертый диск?
Стертый диск нуждается в создании на нем разделов и форматировании в нужной файловой системе. Для этого необходимо выполнить следующее:
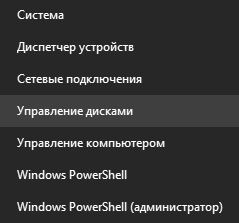
Открываем меню «Управление дисками», нажав ПКМ по кнопке «Пуск» и выбрав соответствующий пункт.
В открывшемся окне находим стертый диск. Как правило, он не имеет буквы или вовсе не отображается в меню, но его можно обнаружить как нераспределенную область в нижней части окна. Нажимаем ПКМ по блоку область не распределена и выбираем первый пункт «Создать простой том».
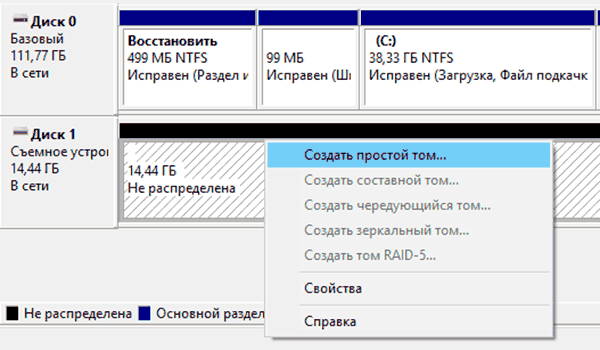
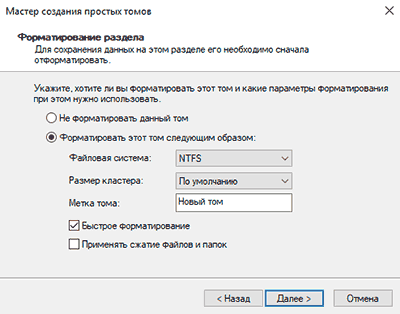
В открывшихся окнах следует выбрать букву, а также файловую систему и размер диска. По умолчанию система сама выбирает максимальный размер, букву, а также файловую систему NTFS, поэтому в данном пункте можно просто нажимать «Далее».
Как удалить защищенный, активный и системный разделы жесткого диска?
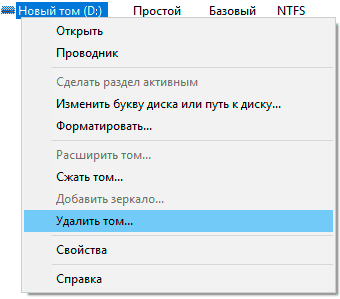
Для удаления разделов жесткого диска можно воспользоваться функционалом встроенной утилиты «Управление дисками», где для удаления следует просто нажать по необходимому разделу правой кнопкой мыши и выбрать пункт «Удалить том…».
В некоторых случаях это может не сработать, поскольку:
- Логический диск имеет поврежденную файловую систему (можно исправить проверкой Chkdsk).
- На нем присутствуют сбойные сектора и бед блоки (решить проблему можно при помощи проверки бесплатной программой Victoria).
- Логический диск защищен от удаления (от удаления защищены системные разделы, скрытые и служебные разделы и т.д.).
Тем не менее существует несколько способов позволяющих удалить абсолютно любой раздел.
Удаление через командную строку в работающей ОС
Для удаления ненужных защищенных разделов в работающей Windows можно воспользоваться командой строкой и встроенной утилитой Diskpart. Данный способ позволит удалить все проблемные разделы, кроме системных и служебных.
Шаг 1. Открываем командную строку от имени администратора и вводим поочередно команды: diskpart, list disk, select disk 0 (в нашем случае раздел расположен на диске 0), list part (команда открывает список разделов на диске).
Шаг 2. Выбираем необходимый раздел командой select partition 4, после этого вводим команду delete partition для удаления раздела.
Шаг 3. Финальным этапом станет создание нового раздела и его форматирование. Вводим поочередно: create partition primary, format fs=ntfs quick, assign letter Z (команда присваивает букву созданному разделу) и exit.
После выполнения данных действий, раннее заблокированный раздел будет готов к использованию, удалению и другим манипуляциям в меню «Управление дисками».
Удаление любых разделов
Чтобы провести удаление системных, зарезервированных и скрытых разделов, пользователю понадобиться загрузочная флешка или установочный диск. Загружаемся с них и в меню выбора языка нажимаем сочетание клавиш Shift+F10 для открытия командной строки.
В командной строке, аналогично с предыдущим способом, вводим команды: diskpart, list disk, select disk 0, lis part, select partition 2 (или любой другой раздел, который невозможно удалить) и удаляем его командой del par override.
Стоит отметить, что команда del par override удаляет абсолютно любой раздел, независимо от его атрибутов.
Важно! Удаление некоторых разделов диска может повлиять на его работу, поэтому мы настоятельно не рекомендуем прибегать к удалению защищенных разделов.
Как восстановить утерянные файлы?
Если на каком-то из этапов пользователем была допущена ошибка и ценная информация была удалена, рекомендуем воспользоваться специализированной программой для восстановления данных RS Partition Recovery. Данная утилита способна в кратчайшие сроки вернуть удаленную, отформатированную или уничтоженную вирусами важную информацию. Таким образом можно восстанавливать фотографии, видеофайлы, звуковые дорожки, документы, файлы программ и любые другие данные.
Отметим, что RS Partition Recovery имеет продвинутые алгоритмы работы, позволяющие проводить глубокий анализ диска и восстанавливать давно удаленные файлы. Рекомендуем ознакомиться со всеми возможностями и функциями утилиты для быстрого восстановления данных RS Partition Recovery на официальной странице RS Partition Recovery.
Часто задаваемые вопросы
Это сильно зависит от емкости вашего жесткого диска и производительности вашего компьютера. В основном, большинство операций восстановления жесткого диска можно выполнить примерно за 3-12 часов для жесткого диска объемом 1 ТБ в обычных условиях.
Если файл не открывается, это означает, что файл был поврежден или испорчен до восстановления.
Используйте функцию «Предварительного просмотра» для оценки качества восстанавливаемого файла.
Когда вы пытаетесь получить доступ к диску, то получаете сообщение диск «X: \ не доступен». или «Вам нужно отформатировать раздел на диске X:», структура каталога вашего диска может быть повреждена. В большинстве случаев данные, вероятно, все еще остаются доступными. Просто запустите программу для восстановления данных и отсканируйте нужный раздел, чтобы вернуть их.
Пожалуйста, используйте бесплатные версии программ, с которыми вы можете проанализировать носитель и просмотреть файлы, доступные для восстановления.
Сохранить их можно после регистрации программы – повторное сканирование для этого не потребуется.


