- Управление дисками из командной строки Windows
- 6 Ways to Use Disk Management Commands like a Pro
- Open Disk Management from command prompt
- Delete partition using disk management command
- Extend partition or create new partition
- Convert to GPT or MBR from command prompt
- Convert FAT32 to NTFS files system from command prompt
- Disk management software
- How to Open Disk Management in Windows 10/7/8/XP/Vista?
- What is Disk Management?
- How to open Disk Management?
- A better disk management tool
- Как управлять дисками в Windows
- Преимущества
- Запуск утилиты
- Увеличение (уменьшение) объема раздела
- Создание виртуального раздела жесткого диска
- Преобразование диска в GPT
Управление дисками из командной строки Windows
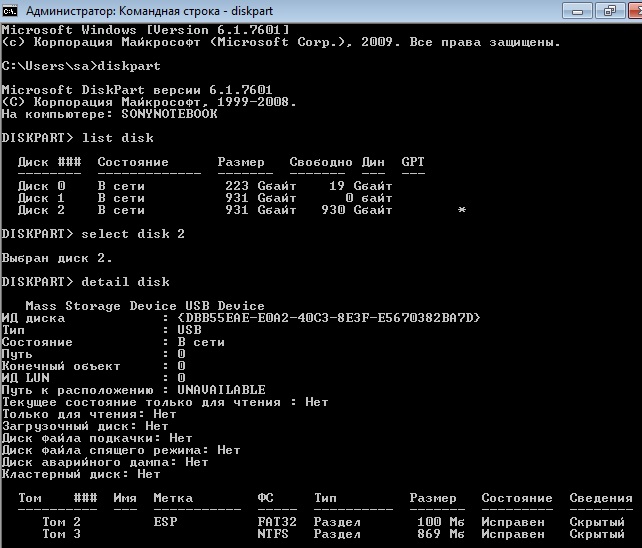
Для работы с DISKPART требуются права администратора системы. Утилита является мощным и небезопасными инструментом для работы с дисковыми данными. Для примера, имеем жесткий диск от ноутбука с зашифрованными разделами, которые нельзя удалить с помощью стандартных средств управления дисками в Windows.

Запускаем командную строку от имени администратора, в ней запускаем утилиту управления дисками
Для получения списка дисков используется команда:
В результате получаем список дисков, присутствующих в системе. Далее выбираем нужный диск
Можно посмотреть информацию о выбранном диске
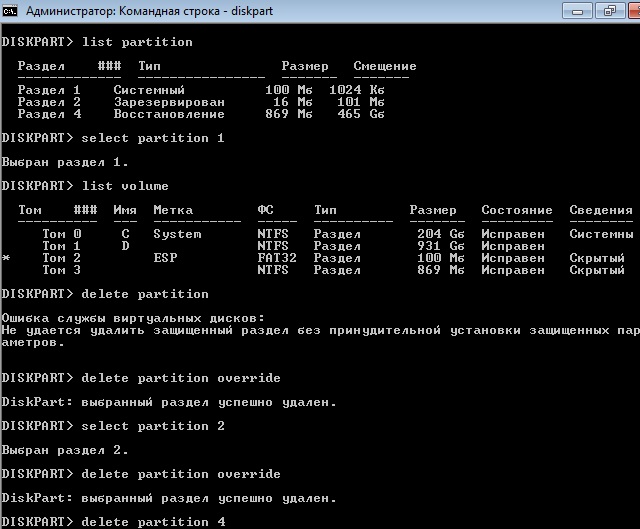
Для получения списка логических томов используется команда
Получение списка разделов
Выбираем нужный раздел и пробуем его удалить
Удалить выбранный раздел независимо от его защиты
Повторяем команды select partition и delete partition override для всех разделов диска.
Дальше можно разметить диск штатными средствами консоли управления дисками в Windows, или здесь же.
Для быстрого форматирования раздела с использованием метки тома Disk_D и файловой системы NTFS:
Раздел готов к использованию и ему можно присвоить букву
6 Ways to Use Disk Management Commands like a Pro
Disk management commands are very helpful for managing your hard drive partitions. There are 6 useful commands that you should know.

By AOMEI  / Last Updated July 3, 2017
Open Disk Management from command prompt
In Windows 10/8/7, there is a very useful built-in tool for managing disk and volume related tasks. Some users may not know of this tool because it is buried deep down in Windows. Luckily, you can open Disk Management from command prompt in all versions of Windows and it is really quick.
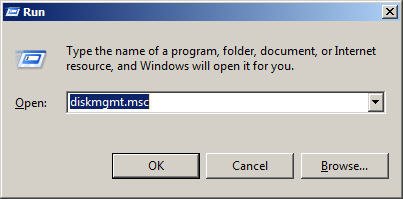
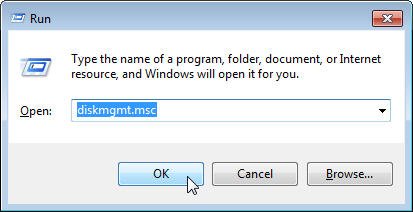
Press Windows + R key to bring out the Run window. From there, type in “diskmgmt.msc” and press Enter.
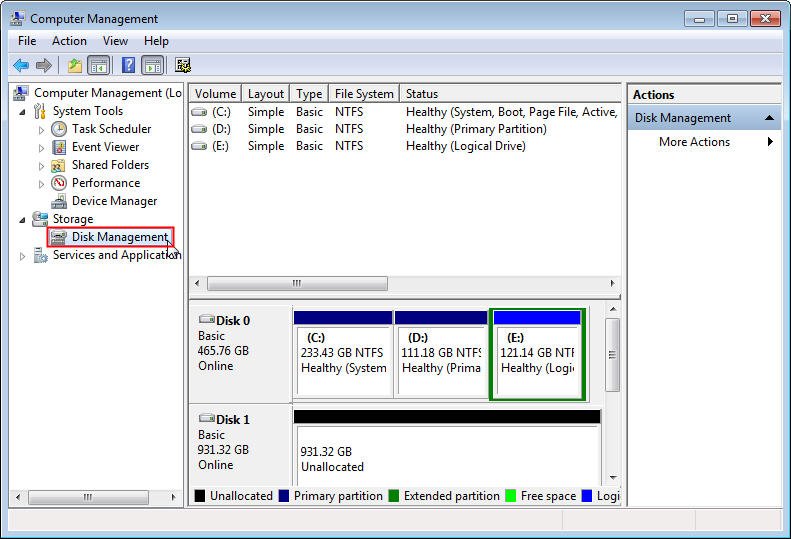
Then you will see Disk Management with all the disks and partitions listed. If you right click on a partition or disk, it will bring out many available options. You can shrink volume, extend volume, delete volume, convert to GPT/MBR, convert to dynamic disk, etc.
Some of the options may be grayed out due to various reasons. For example, Disk Management will not allow you to delete recovery partition, but you can delete recovery partition from command prompt. For managing disk partitions, you can do more with Windows built-in command utility DiskPart.exe.
Delete partition using disk management command
In case you may accidentally delete some crucial partitions, some partitions (for example recovery partition) cannot be deleted in Disk Management. When you right click on it in Disk Management, you will see the option Delete Volume is greyed out.
Some computer manufacturer has made a factory recovery partition on the hard drive that allows you to restore computer to factory default settings. It may also be called OEM partition. Microsoft has mentioned that the factory recovery partition will not be available after upgrading to Windows 10.
If you need to delete the OEM partition to free up a few gigabytes of space, then you can use Diskpart commands.
1. Type “diskpart.exe” in the Run box and press Enter to open DiskPart command window.
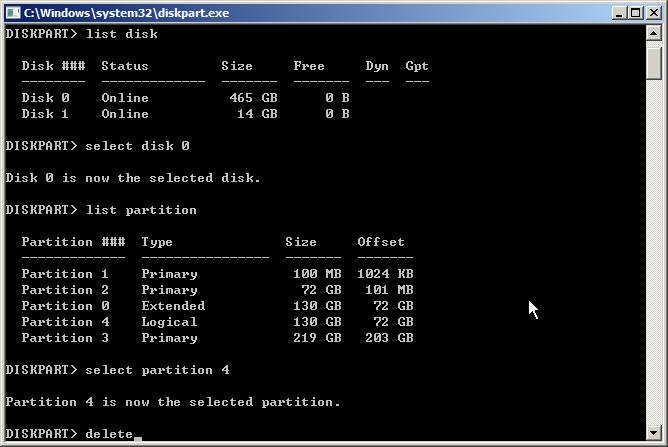
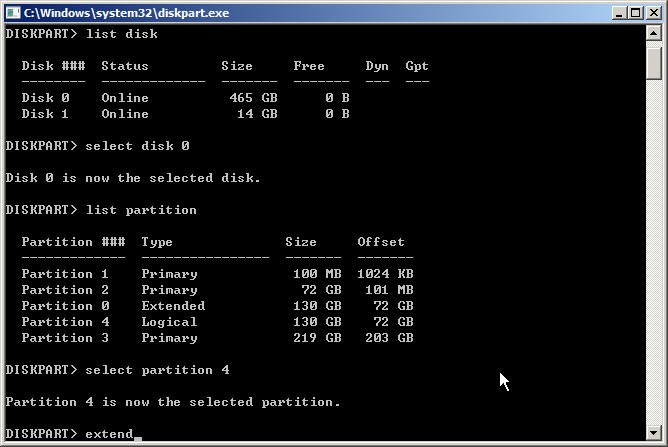
2. Type “list disk”
3. Type “select disk [disk number]”
4. Type “list partition”
5. Type “select partition [partition number]”
When the operation complete successfully, you can exit DiskPart.
Extend partition or create new partition
If you delete a partition or shrink a partition, it will generate some unallocated space. To make use of the unallocated space, you can either add it to the contiguous partition or create a new partition.
To extend partition from command line, open Diskpart window and type the following:
Select disk [disk number]
Select partition [partition number]
Extend size=n (if you do not specify the extend size, all unallocated space will be added to the contiguous partition)
To create a new partition from command prompt, type the following:
Select disk [number]
create partition primary [size=n] or create partition logical [size=n]
assign letter=H (you can assign any unused drive letter to the new partition)
If your hard drive was initialized as MBR partition style, then it can only have 4 primary partitions or 3 primary partitions plus many logical partitions. Therefore, if your hard drive already has 3 primary partitions and you need more partitions, then you can create a logical partition.
Convert to GPT or MBR from command prompt
GPT partition style is more advanced than MBR. If you want to break the 2TB hard drive limit, you can convert MBR to GPT. As you may know, GPT and MBR disks use different boot mode. If you want to boot from MBR disk, you need to make sure BIOS based Legacy mode is enabled. If you want to install Windows 10/8/7 on GPT disk, you need to enable UEFI boot mode.
If you do not configure it right, Windows will fail to boot. If you receive the error “Windows cannot be installed on this disk. The selected disk is of GPT partition style”, then you need to either change Legacy to UEFI or convert the disk to MBR disk.
To convert GPT/MBR during Windows installation:
1. Press Windows and F10 key simultaneously to open a command prompt.
3. Type”list disk”
4. Type “select disk [disk number]”
5. Type “clean”
6. Type “convert mbr”
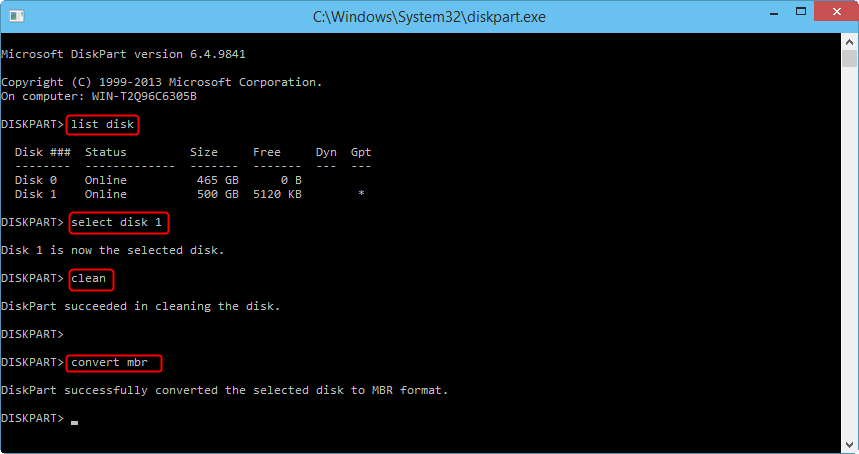
This operation will clear all the data on the drive. If there is valuable data on it, you should create a backup before applying this. If you want to convert MBR to GPT disk, you just need to change the last command to “convert gpt”.
Convert FAT32 to NTFS files system from command prompt
Fat 32 is the most compatible file system, so most of the USB is formatted with FAT32 by default. When you try to move a file that is larger than 4 GB, you will receive an error “the file is too large for the destination file system”. In that case, you can convert FAT32 to NTFS without data loss.
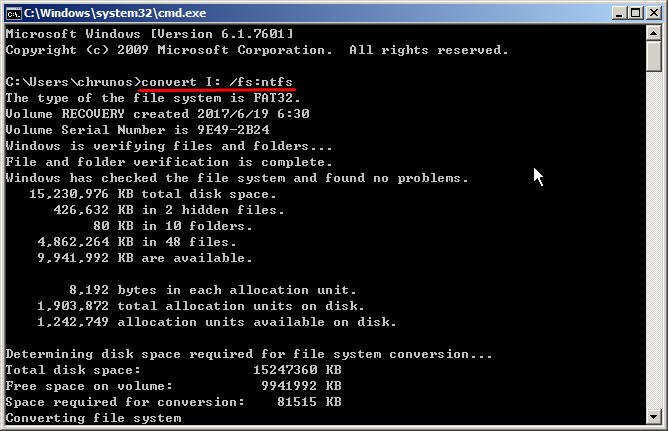
You can type “cmd” in a Run box and press Enter to open a command line window.
In the command prompt window, type: convert [drive letter:] /fs:ntfs
After converting to NTFS, you cannot convert back to NTFS unless you try third party tools.
Disk management software
If you need to more advanced features regarding disk and partition management, you can use AOMEI Partition Assistant. It is available both in GUI and command prompt. It provides more features than Windows built-in disk management tools. For example, you can use it to convert disk to MBR/GPT without data loss, convert dynamic to basic without affecting OS.
It is very easy to use, just like Disk Management. You can just right-click on a partition or disk and all the available operations will be listed. It provides 8 wizards to guide you every step of the way. It also allows you to preview the partition layout before you actually apply any changes to your hard drive. You can see the interface below:
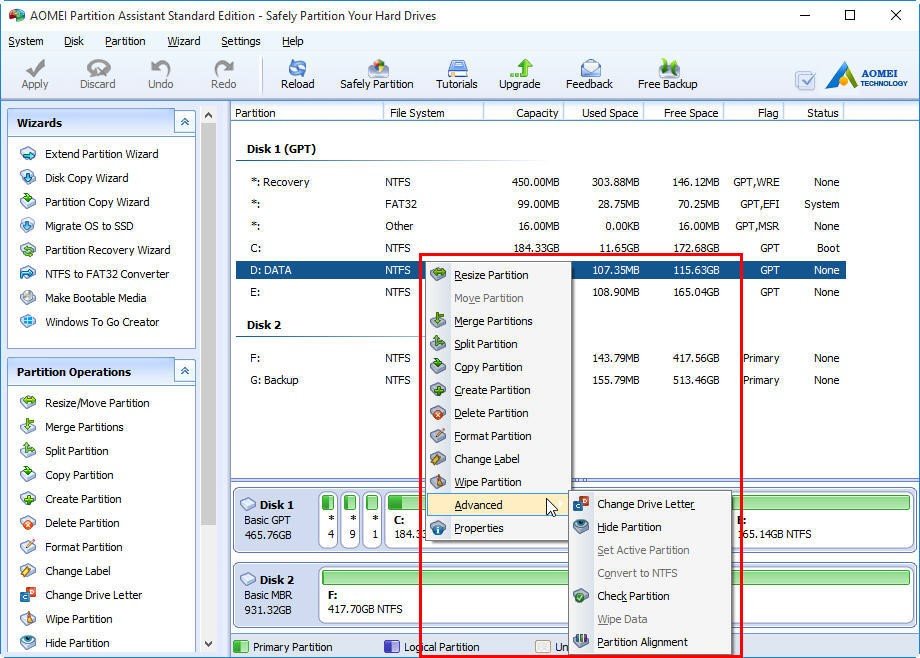
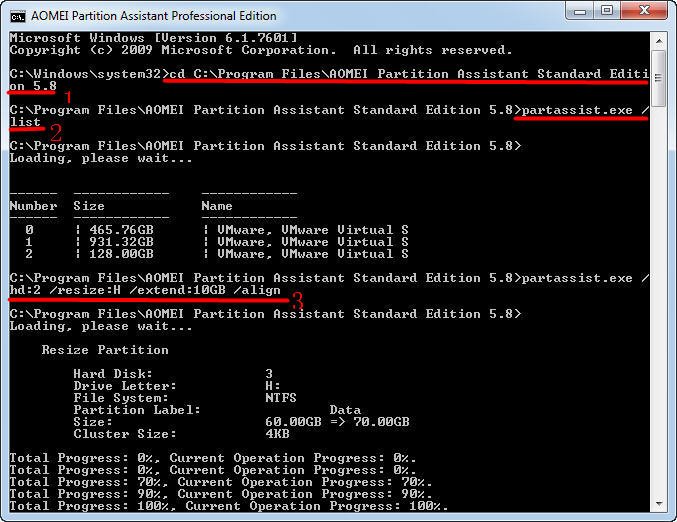
As you probably know that Windows built-in disk management commands have some limitations. For example, you can only extend volume when there is contiguous unallocated space, and converting to GPT/MBR will wipe out all data on the disk. Therefore, to perform advanced operations on disk partitions, you can use AOMEI Partition Assistant.
How to Open Disk Management in Windows 10/7/8/XP/Vista?
If you have no idea how to open Disk Management in Windows 10/8/7 PC system, have a look of this article. There are several ways that you can choose.
By AOMEI / Last Updated February 25, 2020
What is Disk Management?
Disk Management is a Microsoft Windows utility first introduced in Windows XP as a replacement for the fdisk command. It enables you to view and manage hard disks that installed in the computer as well as the partitions associated with those drives. You can initialize disks, create volumes, format volumes as FAT32 or NTFS file systems, etc with this tool. Many people must be familiar with the earlier version of Disk Management. Anyway, some new features are added since the appearance of Windows 7.
Extend and shrink volumes: Shrink a volume to get some unallocated space which can be used to create or extend another one.
Simpler partition creation: You’re able to choose whether to create a basic, spanned or striped partition directly.
Convert disk: If you add more than 4 partitions to a basic disk, it will prompt you to convert the disk to dynamic or GPT (GUID partition table) style.
How to open Disk Management?
There’s no shortcut to Disk Management in the Windows start menu or on the desktop because it’s not a program in the same sense as most of other software. So here will display several ways to open Disk Management in Windows PC systems.
в—Џ Through Computer Management.
Step 1: Right click Computer в†’Manage.
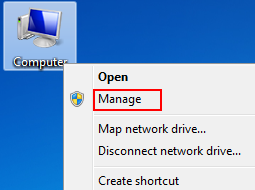
Step 2: Choose Disk Management on the left.
Step 1: PressWindows+R.
Step 2: Type diskmgmt.msc в†’ OK.
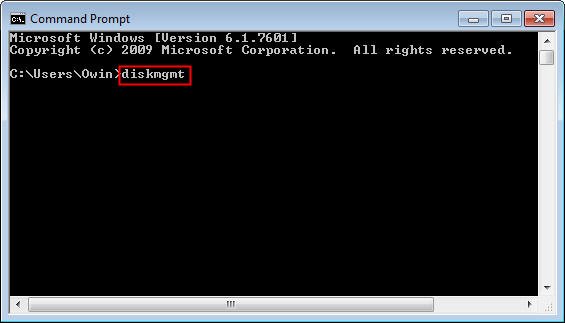
в—Џ By Command Prompt
Step 1: Click start menu в†’ input cmd in the search box в†’ Enter.
Step 2: Type diskmgmt в†’ Enter.
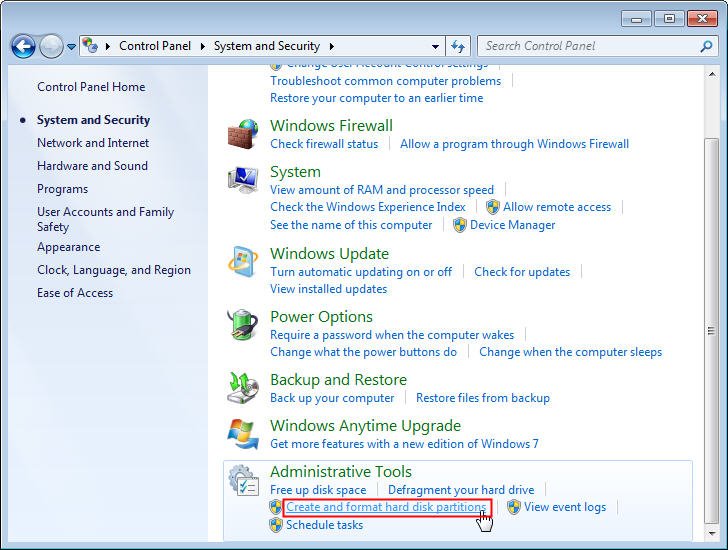
в—Џ From Control Panel
Step 1: Click start menu в†’ Control Panel.
Step 2: Select System and Security.
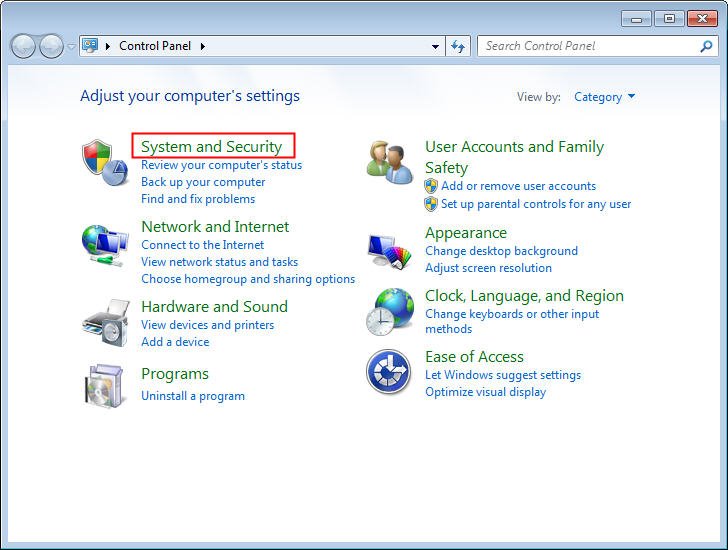
Note: System and Security is only found in Windows 10/8/7. In Windows Vista it’s calledSystem and Maintenance while Performance and Maintenance in Windows XP.
Step 3: Under Administrative Tools, click the option as shown below. That’s it!
By the way, if you’re using Windows 10 or Windows 8, just right click the Start button then choose Disk Management option to open the same. Generally, among these methods, there should be at least one that suits you.
A better disk management tool
As extending and shrinking volumes are often used, many users may find these two options greyed out in Disk Management sometimes. Why? Actually, some limitations exist in Windows built-in Disk Management. For example, if you increase the size of a partition, you can only use the unallocated space next to it and just on the right side. But the feature «Shrink Volume» always makes the unallocated space locates behind the volume you shrink. Therefore, in many cases, you have to delete a partition before you can extend one. What’s worse,you can’t shrink a volume beyond the point where any unmovable files are located. Thus, it seems that you need hire a better disk management tool.
AOMEI Partition Assistant Standard Editionis a free disk partition management software which comes with a lot of powerful functions that enables you to control hard disks and partitions easily.
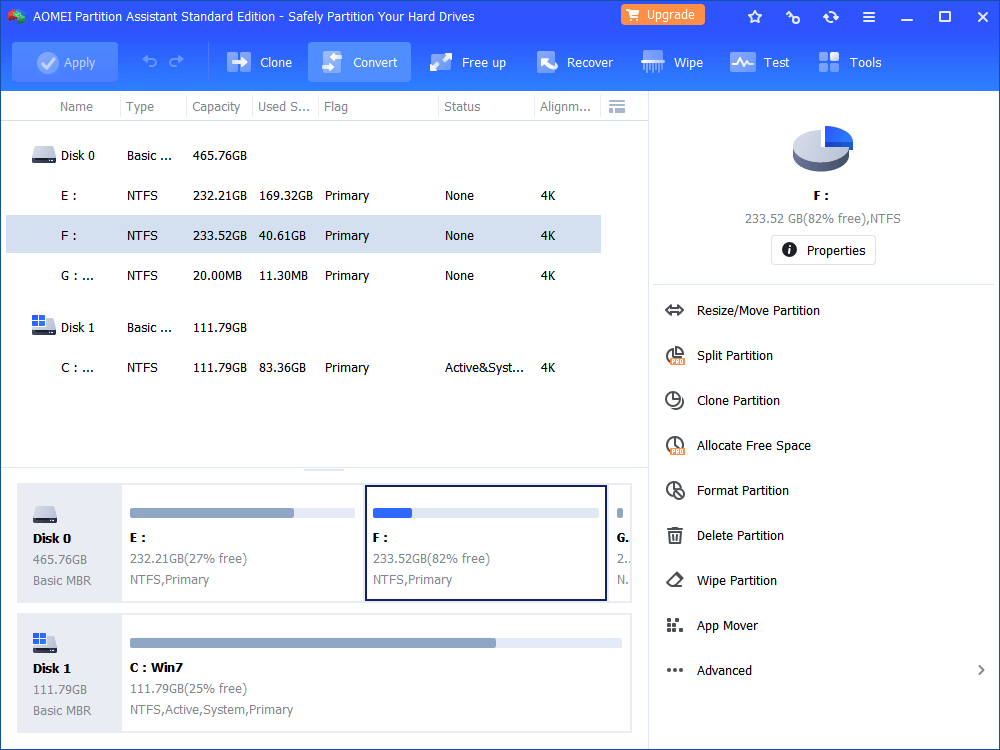
With the concise main interface, it’s convenient for you to view statues of every partition. Many utilities like Resize Partition, Merge Partitions, etc break the limitations that Windows built-in Disk Management has. Besides, most operations can be completed simply by a few of clicks without losing data!
Как управлять дисками в Windows
Управление дисками ( Disk Management ) — это удобная утилита в Windows 10 (и более ранних версиях ОС), которая позволяет пользователям просматривать жесткий диск своего компьютера и выполнять любые исправления.
Инструмент, встроенный в операционную систему Виндовс, может использоваться для:
- создания;
- удаления;
- форматирования;
- увеличения;
- согласования разделов.
Также его можно использовать для инициализации нового раздела HDD при помощи редактирования структуры разделов MBR (главной загрузочной записи) и GPT — таблицы разделов GUID.
Преимущества
Некоторые пользователи считают, что средства обслуживания дисковых накопителей могут выполнять только простые задачи, такие как проверка дискового пространства, дефрагментация жестких дисков или объединение разделов, для формирования более крупного тома.
Однако, Disk Management имеет более расширенный набор функций.
Пользователь сможет использовать утилиту, чтобы получить информацию о наличии не занятого места на диске, например, узнать, сколько объема памяти в системе имеется в общей сложности, а также о том, сколько осталось неиспользуемого дискового пространства.
Запуск утилиты
Для открытия утилиты Disk Management воспользуйтесь одним из предложенных ниже вариантов:
- На рабочем столе, нажмите правой кнопкой мыши по значку « Пуск » (или одновременно клавиши « Windows » + « X »). В открывшемся меню выберите « Управление дисками ».
- Еще одним вариантом запуска станет открытие через функцию «Выполнить». Наберите комбинацию клавиш « Windows » + « R ». Введите последовательность « Diskmgmt.msc ». Нажмите кнопку « Ок » или « Enter » на клавиатуре.
- Через функцию управления компьютера – войдите в Панель управления (например, через меню « Пуск »). Найдите закладку:
В открывшемся окне « Система и безопасность » нажмите « Администрирование », расположенное в нижней части окна. Запустите ссылку « Управление дисками » или « Disk Management »
Обратите внимание, на некоторых сборках ОС закладка « Администрирование » может быть вынесена на Панель управления. В этом случае переход по ссылке « Система и безопасность » не нужен.
Увеличение (уменьшение) объема раздела
Для изменения размера раздела вашего HDD, находясь в окне утилиты « Управление дисками », нажмите правой кнопкой мышки на выбранный участок диска. С помощью открывшегося меню пользователь сможет:
- увеличить размер тома. Иногда пользователь может заметить, что параметр «Расширить том» выделен серым цветом — это связано с тем, что операционная система дает возможность увеличения лишь в случае наличия на HDD нераспределенного пространства;
Обратите внимание – не пустого, а именно нераспределенного .
- уменьшить размер тома;
- удалить раздел тома;
- сжать данные в разделе и т.д.
То же самое можно проделать, нажав меню « Действие »>« Все задачи ».
Создание виртуального раздела жесткого диска
Утилита позволяет также создавать виртуальные жесткие диски. Для его создания в верхнем меню нажмите « Действие » > « Создать виртуальный жесткий диск ».
В открывшемся диалоговом окне укажите:
- путь, по которому он будет располагаться;
- размер тома;
- выберите тип – динамический или фиксированный (зависит, сразу ли Windows зарезервирует максимально указанный объем или будет «расширять» его по мере загрузки файлов).
Подтвердите создание, нажав « Ок ».
Преобразование диска в GPT
Для преобразования (изменение разметки) из MBR в GPT или наоборот выберите « Действие » > « Преобразовать в GPT-диск ». Диск будет изменен и в состоянии отобразится статус « В сети ».
Обратите внимание – строка меню преобразования будет активна только на удаленных разделах диска.


