- Обзор средства управления дисками Overview of Disk Management
- О дополнительных разделах восстановления About those extra recovery partitions
- Create and format a hard disk partition
- Windows disk partitioning server
- How to Effectively Use Disk Management in Windows Server 2016пјџ
- Content
- Open Disk Management in Windows Server 2016
- Method 1: Open it from the Quick Start Menu
- Method 2: Launch Disk Management from Run box
- Method 3: Access Disk Management from Computer Management
- How to use Windows Server 2016 Disk Management?
- Windows 2016 Disk Management alternative
Обзор средства управления дисками Overview of Disk Management
Относится к: Windows 10, Windows 8.1, Windows 7, Windows Server (Semi-Annual Channel), Windows Server 2019, Windows Server 2016, Windows Server 2012 R2, Windows Server 2012 Applies To: Windows 10, Windows 8.1, Windows 7, Windows Server (Semi-Annual Channel), Windows Server 2019, Windows Server 2016, Windows Server 2012 R2, Windows Server 2012
Управление дисками — это системная служебная программа Windows, дающая возможность выполнять дополнительные задачи хранилища. Disk Management is a system utility in Windows that enables you to perform advanced storage tasks. Ниже приведены некоторые задачи, которые хорошо подходят для управления дисками. Here are some of the things Disk Management is good for:
- Чтобы настроить новый диск, см. раздел Инициализация нового диска. To setup a new drive, see Initializing a new drive.
- Чтобы расширить том в пространство, которое пока не является частью тома на том же диске, см. раздел Расширение базового тома. To extend a volume into space that’s not already part of a volume on the same drive, see Extend a basic volume.
- Чтобы сжать раздел (обычно для того, чтобы расширить соседний), см. раздел Сжатие базового тома. To shrink a partition, usually so that you can extend a neighboring partition, see Shrink a basic volume.
- Чтобы изменить или назначить букву диска, см. раздел Изменение буквы диска. To change a drive letter or assign a new drive letter, see Change a drive letter.
Если отобразится сообщение об ошибке или что-то не сработает при выполнении этих процедур, рекомендуем заглянуть в раздел Устранение неполадок при управлении дисками. If you get an error or something doesn’t work when following these procedures, take a peek at the Troubleshooting Disk Management topic. Если и это не поможет, сохраняйте спокойствие! If that doesn’t help — don’t panic! Есть множество сведений на сайте сообщества Майкрософт: попробуйте поиск в разделе Файлы, папки и хранилища; если вам по-прежнему нужна помощь, опубликуйте там вопрос и Майкрософт или другие члены сообщества попытаются вам помочь. There’s a ton of info on the Microsoft community site — try searching the Files, folders, and storage section, and if you still need help, post a question there and Microsoft or other members of the community will try to help. Если у вас есть отзыв о том, как улучшить эти разделы, мы будем рады узнать ваше мнение! If you have feedback on how to improve these topics, we’d love to hear from you! Просто ответьте на запрос Помогла ли вам эта страница? , оставив свои комментарии на открывшейся странице или в открытой цепочке комментариев в нижней части этого раздела. Just answer the Is this page helpful? prompt, and leave any comments there or in the public comments thread at the bottom of this topic.
Ниже приведены некоторые распространенные задачи, которые можно выполнить с помощью других средств в Windows. Here are some common tasks you might want to do but that use other tools in Windows:
- Чтобы освободить место на диске, см. раздел Освобождение места на диске в Windows 10. To free up disk space, see Free up drive space in Windows 10.
- Чтобы провести дефрагментацию дисков, см. раздел Дефрагментация компьютера с Windows 10. To defragment your drives, see Defragment your Windows 10 PC.
- Чтобы объединить несколько жестких дисков аналогично RAID, см. раздел Дисковые пространства. To take multiple hard drives and pool them together, similar to a RAID, see Storage Spaces.
О дополнительных разделах восстановления About those extra recovery partitions
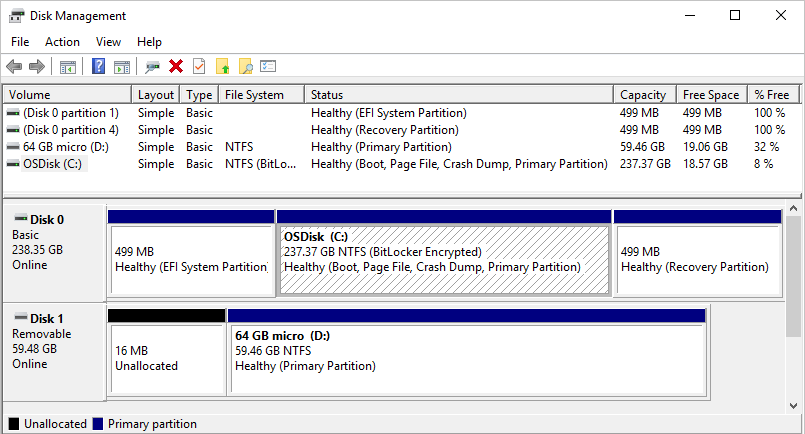
Если вам интересно (мы прочитали ваши комментарии!), Windows обычно включает три раздела на основном диске (обычно это диск C): In case you’re curious (we’ve read your comments!), Windows typically includes three partitions on your main drive (usually the C:\ drive):

- Системный раздел EFI — на современных ПК используется для запуска (загрузки) компьютера и операционной системы. EFI system partition — This is used by modern PCs to start (boot) your PC and your operating system.
- Диск операционной системы Windows (C:) — здесь установлена система Windows и обычно размещены остальные приложения и файлы. Windows operating system drive (C:) — This is where Windows is installed, and usually where you put the rest of your apps and files.
- Раздел восстановления — служит для хранения специальных средств восстановления Windows, если возникают проблемы с запуском или чем-то еще. Recovery partition — This is where special tools are stored to help you recover Windows in case it has trouble starting or runs into other serious issues.
Несмотря на то что управление дисками может показывать системный раздел EFI и раздел восстановления как свободные на 100 %, это не точно. Although Disk Management might show the EFI system partition and the recovery partition as 100% free, it’s lying. Эти разделы обычно заполнены действительно важными файлами, которые нужны для правильной работы компьютера. These partitions are generally pretty full with really important files your PC needs to operate properly. Лучше всего оставить их в покое, чтобы вы могли запускать ПК и восстановить его в случае проблем. It’s best to just leave them alone to do their jobs starting your PC and helping you recover from problems.
Create and format a hard disk partition
To create a partition or volume (the two terms are often used interchangeably) on a hard disk, you must be logged in as an administrator, and there must be either unallocated disk space or free space within an extended partition on the hard disk.
If there is no unallocated disk space, you can create some by shrinking an existing partition, deleting a partition, or by using a third-party partitioning program.
Open Computer Management by selecting the Start button. The select Control Panel > System and Security > Administrative Tools, and then double-click Computer Management.
In the left pane, under Storage, select Disk Management.
Right-click an unallocated region on your hard disk, and then select New Simple Volume.
In the New Simple Volume Wizard, select Next.
Enter the size of the volume you want to create in megabytes (MB) or accept the maximum default size, and then select Next.
Accept the default drive letter or choose a different drive letter to identify the partition, and then select Next.
In the Format Partition dialog box, do one of the following:
If you don’t want to format the volume right now, select Do not format this volume, and then select Next.
To format the volume with the default settings, select Next.
Review your choices, and then select Finish.
Note: When you create new partitions on a basic disk, the first three will be formatted as primary partitions. Beginning with the fourth, each one will be configured as a logical drive within an extended partition.
Windows disk partitioning server
Partition Table Doctor
Сообщение отредактировал Яр Всеслав — 24.05.16, 22:28
EASEUS Partition Master
Сообщение отредактировал Яр Всеслав — 24.05.16, 22:38
Norton Partition Magic
Сообщение отредактировал Яр Всеслав — 24.05.16, 23:10
Сообщение отредактировал Яр Всеслав — 24.05.16, 23:42
Загрузочный диск на базе Windows 8.1 с Acronis Backup 11.5
и Paragon Hard Disk Manager 14 с интегрированными драйверами SATA/SCSI/RAID UEFIx32 для планшетов.
Пересобрал Windows 8.1 PE с Acronis Backup 11.5 для загрузки на планшетах с флешки.
просто распаковать образ на флешку нфтс.
скачать:
обе программы открываются поверх друг друга — сначало акронис и поверх неё парагон, можно свернуть парагон под ним будет акронис сервер.
кроме всего прочего диск позволяет сравнить работу акрониса и парагона — очевидно, что акронис не видит 2 раздела на планшетах, а парагон видит.
Сообщение отредактировал Яр Всеслав — 28.05.16, 14:41

первоначально написанные для линукс
портированы и под виндовс
скачать:
https://sourceforge.net/projects/qtparted/
Сообщение отредактировал Яр Всеслав — 27.06.16, 15:46
Macrorit Disk Partition Expert 4.9.3
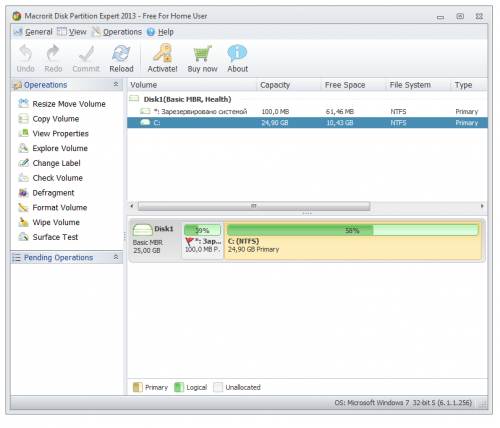
Бесплатная версия отличной программы, которая позволит вам вести управление вашими жесткими дисками, скачать Macrorit Disk Partition Expert можно ниже. Разработчики пишут о том, что эта единственная программа не требующая от вас денег, которая обладает передовой технологией отключения защиты и аварийного восстановления данных. Вы сможете работать с разделами дисков не переживая за то, что будет потеряна информация, стоит выделить отличный мастер по работе с разделами. Macrorit Disk Partition Expert может работать с дисками объемом свыше 2ТБ и MBR/GPT дисками.
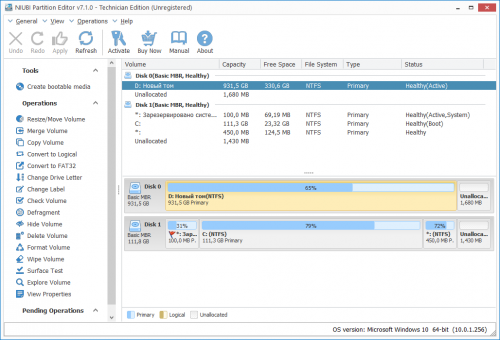
NIUBI Partition Editor Technician Edition 7.1.0
Управления разделами дисков. Это программное обеспечение совместимо с Windows Server 2016/2012/2008/2003 и Windows 10/8/7/Vista/XP. Поддерживаются локальные/съемные жесткие диск, VMware, Hyper-V и все типы аппаратного RAID. NIUBI Partition Editor интегрировал уникальную технологию защиты данных Roll-Back, которая может откатить компьютер до состояния, прежде чем автоматически изменить размер, если возникла какая-либо проблема с оборудованием, поэтому вам не нужно беспокоиться о безопасности данных. Кроме того, встроенный уникальный алгоритм перемещения файлов позволяет изменять размер раздела на 30% — на 300% быстрее, чем другие инструменты.
Сообщение отредактировал Яр Всеслав — 18.04.18, 13:03
NIUBI Partition Editor Repack Diakov
Управления разделами дисков. Это программное обеспечение совместимо с Windows Server 2016/2012/2008/2003 и Windows 10/8/7/Vista/XP. Поддерживаются локальные/съемные жесткие диск, VMware, Hyper-V и все типы аппаратного RAID. NIUBI Partition Editor интегрировал уникальную технологию защиты данных Roll-Back, которая может откатить компьютер до состояния, прежде чем автоматически изменить размер, если возникла какая-либо проблема с оборудованием, поэтому вам не нужно беспокоиться о безопасности данных. Кроме того, встроенный уникальный алгоритм перемещения файлов позволяет изменять размер раздела на 30% — на 300% быстрее, чем другие инструменты.
Сообщение отредактировал Яр Всеслав — 18.04.18, 13:38
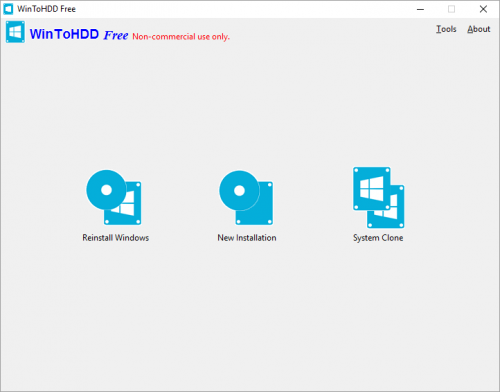
Утилита для установки, переустановки и клонирования текущей операционки Windows без использования CD/DVD-дисков или USB-накопителей. Программа очень проста в настройке и не требует каких-то специальных знаний. Главное меню представляет собой окошко с тремя основными операциями:
Reinstall Windows (переустановка Windows),
New Installation (новая установка операционной системы),
System Clone (клонирование операционки).
Теперь если вы захотите переустановить свою ОС, то просто кликните на соответствующую иконку, укажите путь к iso-файлу с требуемой системой, выберите раздел установки и дождитесь окончания процесса. Все проходит аналогично и с новой инсталляцией «оси».
При клонировании вы дополнительно увидите всю информацию о текущей операционной системе, после чего сможете перенести ее на другой диск (HDD или SSD).
Если вам необходимо установить (или клонировать) операционную систему Windows на USB-диск, то для этого стоит воспользоваться приложением WinToUSB.
Partition Wizard
10.2.2 Portable
Программа для работы с разделами жесткого диска. Вы сможете изменить их размер, можно создать новый раздел, удалить или отформатировать разделы, скачать Partition Wizard Home Edition можно ниже. Можно работать с дисками, которые объединены с RAID массивами.
Также вы сможете конвертировать файловую систему FAT в NTFS, можно работать с жесткими дисками размером более 2 ТБ, можно копировать разделы, тестировать диска на работоспособность, вести установку активного раздела и так далее.
How to Effectively Use Disk Management in Windows Server 2016пјџ
What is Disk Management Windows Server 2016? How to open Server 2016 Disk Management? Or how to use Disk Management to manage hard disk partition? You can get all information in this post..

By AOMEI  / Last Updated October 27, 2020
Content
Open Disk Management in Windows Server 2016
First introduced in Windows XP, Disk Management is a Windows built-in utility that enables you to manage hard disk drives and the associating partitions or volumes. To partition hard drive with Disk Management in Windows Server 2016 is very convenient. You can access it via one of the following methods:
Method 1: Open it from the Quick Start Menu
Right-click the bottom-left corner (or Start button) on the desktop to open Quick Access Menu, and then choose Disk Management.
Method 2: Launch Disk Management from Run box
Press Windows+R to open Run, type “diskmgmt.msc” in the box and press Enter.
Method 3: Access Disk Management from Computer Management
1. Right-click the Start menu and select Server Manager.
2. In the Server Manager interface, under Tools tab, choose Computer Management.
3. In the next screen, click Disk Management on the left panel.
How to use Windows Server 2016 Disk Management?
To manage disks in Windows Server, Disk Management can be of great help. The main features of Disk Management are listed below:
Connect and initialize disks.
Create a basic, spanned, or striped partition.
Format a volume or partition with exFAT, NTFS, FAT32 or ReFS.
Convert the empty basic disk to dynamic or to GPT/MBR partition style.
Extend and shrink NTFS volumes or partitions.
In the main interface of Disk Management, you can right-click on a disk or partition, and then it will display a menu listing all the options for the item. Disk Management allows you to do most of the operations without reboot or interruption, and it is quite relatively effective.
For example, to shrink partition with Disk Management:
1. Within the Disk Management interface, right-click on a partition and select Shrink Volume in the drop-down menu.
2. Enter the amount of shrink space that you need and click “OK”.
It will generate a block of unallocated space, which you can use to extend partition.
To extend partition:
1. Right-click on the partition which needs extending and select “Extend Volume”.
2. In the Extend Volume Wizard window, select the unallocated space and click “Next”.
In seconds, Disk Management will complete resizing partitions. However, there is much more to be desired. Sometimes, you will find out the option grayed out, which is because Disk Management can only extend a partition when there is contiguous unallocated space at the right side of the target partition.
Since the Move Partition feature is still missing in Windows Server 2016, generally, you may have to delete a partition before you can extend a partition. Besides, it has some other restrictions: it can only convert an empty disk (without any partitions on) to MBR or GPT, otherwise, the Convert to GPT disk will greyed out. Disk Management won’t allow you to delete any system related partitions, so to convert system disk to MBR/GPT is not possible. Fortunately, there is a third party free partition manager software for Windows Server that lifts all the restrictions of Disk Management and provides many other excellent features.
Windows 2016 Disk Management alternative
AOMEI Partition Assistant Server i s a disk partition tool for Windows Server 2019, 2016, 2012 R2, 2012, 2008 R2, 2008, 2003. Compared with Disk Management, AOMEI Partition Assistant provides a more flexible and convenient way of managing disks and partitions.
This tool enables you to preview the partition layout before applying any changes to a hard drive so that you don’t need to worry about accidental file deletion. Besides, It brings the user-friendly interface, so managing disks and partitions or volumes can be easy for you. And here is the example of resizing partition with AOMEI Partition Assistant:
в†’ You can download its demo version to have a try.
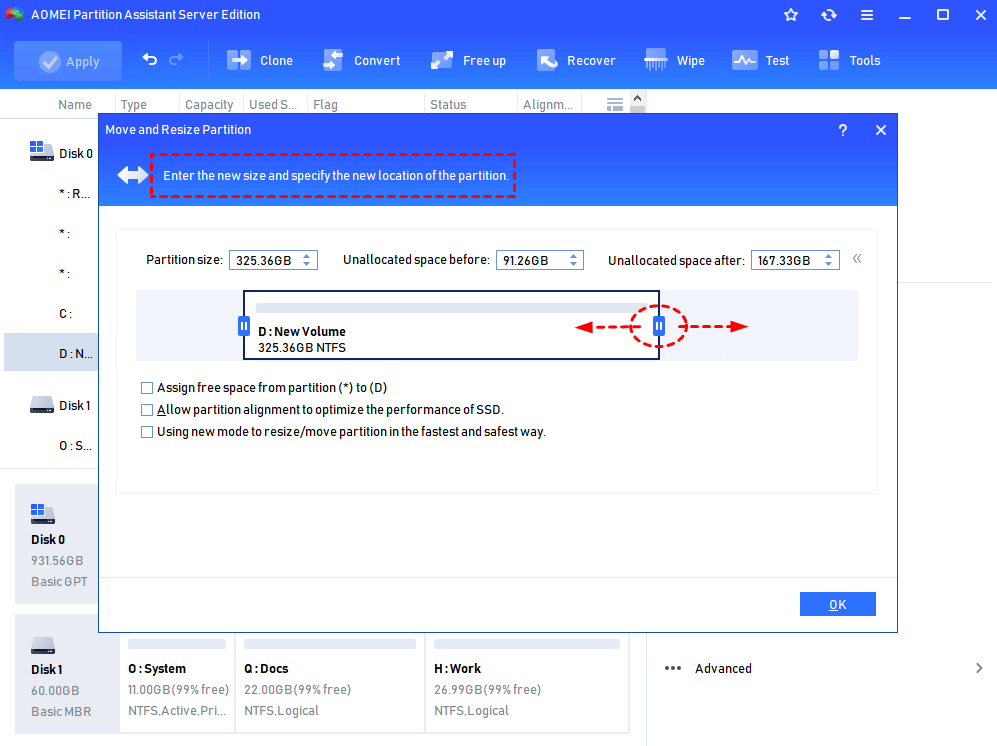
Step 1. Install and run the software. On the main interface, right-click on the partition to be shrunk and select “Resize Partition”.

Step 2. In the next screen, you can shrink the partition from either end of the partition by dragging the slider.
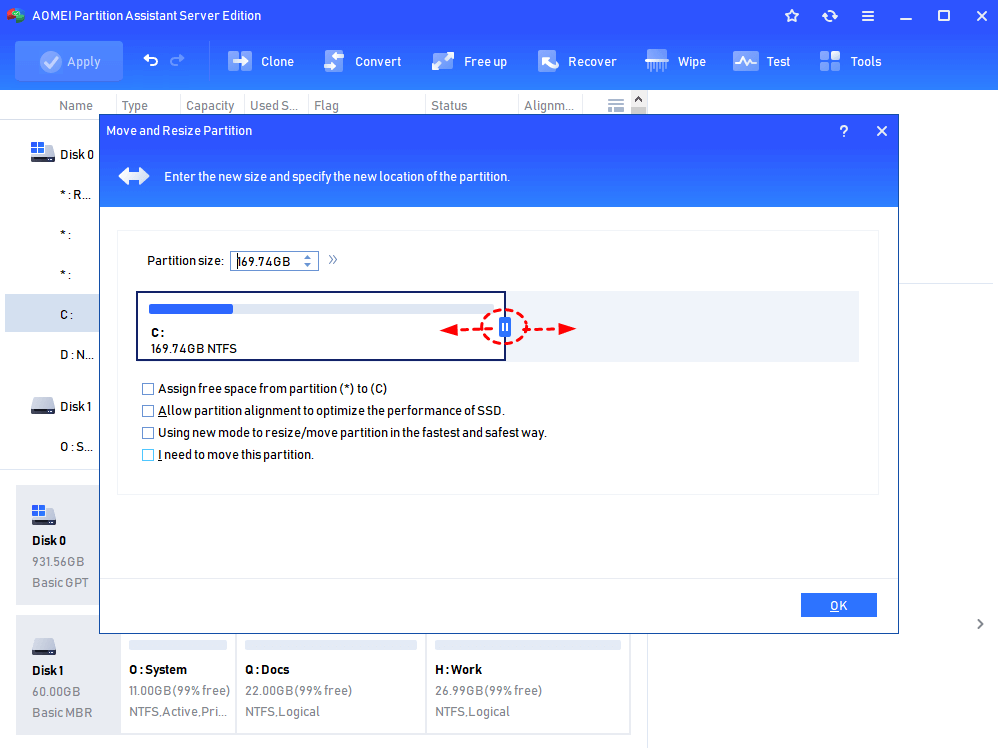
Step 3. Right-click on the partition you want to extend and select “Resize Partition” as before.
Step 4. In the pop-out window, drag the slider to decide how much father you want to extend the partition.
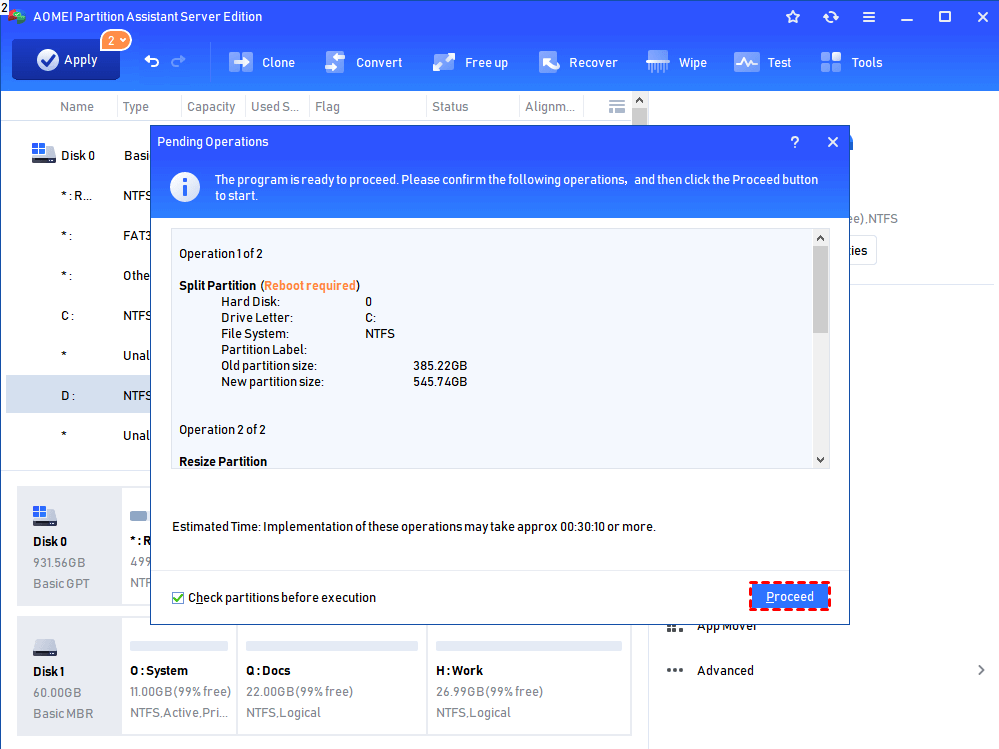
Step 5. Preview the partition layout, and click “Apply” to apply these operations if it contents you.
Besides that, AOMEI Partition Assistant also has many other useful features listed below:
вњ” Allocate free space from one partition to another.
вњ” Convert disks between GPT and MBR without deleting partitions/data loss.
вњ” Convert dynamic disk to basic disk without affecting OS.
вњ” Migrate OS to SSD without reinstalling windows.
вњ” Copy disk to another storage devices to save data in the case of system crash.
вњ” Quickly partition a hard drive with the preset partition size, type, and volume label.
✔ Delete or wipe partitions on the hard drive, even the partitions like recovery partition that Disk Management doesn’t have permission to delete.
вњ” Create Windows 10/8 to Go disk, so you can boot windows 10 or 8 from an external hard drive.
вњ” Run disk surface test to find and fix bad sectors.
вњ” More other useful features .
Therefore, if you think the Disk Management in Windows Server 2016 is not enough for you or you need even more advanced features regarding disk and partition management, be free to try AOMEI Partition Assistant Server. If you need to install this software on multiple PCs and Servers, you can consider the AOMEI Partition Assistant Technician or Unlimited edition based on your needs.


