- Locate and correct disk space problems on NTFS volumes
- Summary
- Cluster size is too large
- File attributes or NTFS permissions
- Invalid file names
- NTFS Master File Table (MFT) expansion
- Alternate data streams
- NTFS file system corruption
- Other NTFS features that may cause file allocation confusion
- How to Increase C Drive Space in Windows 10/8/7?
- About increasing C drive space
- How to increase C drive free space in Windows 10/8/7?
- Method 1: Increase C drive space in Disk Management
- Method 2: How to extend C drive with free disk partition software?
- Method 3: Increate system partition size using diskpart command
- Method 4: How to increase C drive space by adding unallocated space?
- Conclusion on resizing Windows partition
Locate and correct disk space problems on NTFS volumes
This article discusses how to check an NTFS file system’s disk space allocation to discover offending files and folders or look for volume corruption in Microsoft Windows Server 2003-based computers.
Original product version: В Windows Server 2003
Original KB number: В 814594
Summary
NTFS supports many volume and file-level features that may lead to what appear to be lost or incorrectly reported free disk space. For example, an NTFS volume may suddenly appear to become full for no reason, and an administrator cannot find the cause or locate the offending folders and files. This may occur if malicious or unauthorized access to an NTFS volume where large files or a high quantity of small files are secretly copied has occurred. These files then have their NTFS permissions removed or restricted. This behavior may also occur after a computer malfunction or power outage occurs that cause volume corruption.
The disk space allocation of an NTFS volume may appear to be misreported for any of the following reasons:
- The NTFS volume’s cluster size is too large for the average-sized files that are stored there.
- File attributes or NTFS permissions prevent Windows Explorer or a Windows command prompt from displaying or accessing files or folders.
- The folder path exceeds 255 characters.
- Folders or files contain invalid or reserved file names.
- NTFS metafiles (such as the Master File Table) have grown, and you cannot de-allocate them.
- Files or folders contain alternate data streams.
- NTFS corruption causes free space to be reported as in use.
- Other NTFS features may cause file-allocation confusion.
The following information can help you to optimize, repair, or gain a better understanding of how your NTFS volumes use disk space.
Cluster size is too large
Only files and folders that include internal NTFS metafiles like the Master File Table (MFT), folder indexes, and others can consume disk space. These files and folders consume all the file space allocations by using multiples of a cluster. A cluster is a collection of contiguous sectors. The cluster size is determined by the partition size when the volume is formatted.
When a file is created, it consumes a minimum of a single cluster of disk space, depending on the initial file size. When data is later added to a file, NTFS increases the file’s allocation in multiples of the cluster size.
To determine the current cluster size and volume statistics, run a read-only chkdsk command from a command prompt. To do so, follow these steps:
Click Start, click Run, type cmd, and then click OK.
At the command prompt, type the command: chkdsk d: .
Where d: is the letter of the drive that you want to check.
Click OK.
View the resulting output. For example:
4096543 KB total disk space. /a switch to specify the appropriate allocation. For example: format D: /a:2048 (This example uses a 2-KB cluster size).
Alternately, you can enable NTFS compression to regain space that you lost because of an incorrect cluster size. However, this may result in decreased performance.
File attributes or NTFS permissions
Both Windows Explorer and the directory list command dir /a /s display the total file and folder statistics for only those files and folders that you have permissions to access. By default, Files hidden files and protected operating system files are excluded. This behavior may cause Windows Explorer or the dir command to display inaccurate file and folder totals and size statistics.
To include these types of files in the overall statistics, change Folder Options. To do so, follow these steps:
- Click Start, click My Computer, and then double-click the drive letter (for example: D) of the volume. This opens the volume and displays the folders and files that the root contains.
- On the Tools menu, click Folder Options, and then click the View tab.
- Select the Show Hidden Files and Folders check box, and then click to clear the Hide protected operating system files check box.
- Click Yes when you receive the warning message, and then click the Apply button. This change permits Windows Explorer and the dir /a /s command to total all the files and folders that the volume contains that the user has permissions to access.
To determine the folders and files that you cannot access, follow these steps:
At the command prompt, create a text file from the output of the dir /a /s command.
For example: At the command prompt, type the following command: dir d: /a /s >c:\d-dir.txt .
Start the Backup or Restore Wizard.
- Click Start, click Run, type ntbackup, and then click OK.
- Click Advanced Mode.
Click Options on the Tools menu, click the Backup Log tab, click Detailed, and then click OK.
In the Backup Utility, click the Backup tab, and then select the check box for the whole volume that is affected (for example: D:), and then click Start Backup.
After the backup is complete, open the backup report and compare folder for folder the NTBackup log output with the d-dir.txt output that you saved in step 1.
Because backup can access all the files, its report may contain folders and files that Windows Explorer and the dir command do not display. You may find it easier to use the NTBackup interface to locate the volume without backing up the volume when you want to search for large files or folders that you cannot access by using Windows Explorer.
After you locate the files that you do not have access to, you can add or change permissions by using the Security tab while you view the properties of the file or folder in Windows Explorer. By default, you cannot access the System Volume Information folder. You must add the correct permissions to include the folder in the dir /a /s command.
You may notice folders or files that do not have a Security tab. Or, you may not be able to re-assign permissions to the affected folders and files. You may receive the following error message when you try to access them:
If you have any such folders, contact Microsoft Product Support Services for additional help.
Invalid file names
Folders or files that contain invalid or reserved file names may also be excluded from file and folder statistics. Folders or files that contain leading or trailing spaces are valid in NTFS, but they are not valid from a Win32 subsystem point of view. Therefore, neither Windows Explorer nor a command prompt can reliably work with them.
You may not be able to rename or delete these files or folders. When you try to do so, you may receive one of the following error messages:
Error renaming file or folder
Cannot rename file: Cannot read from the source file or disk.
Error deleting file or folder
Cannot delete file: Cannot read from the source file or disk.
If you have folders or files that you cannot delete or rename, contact Microsoft Product Support Services.
NTFS Master File Table (MFT) expansion
When an NTFS volume is created and formatted, NTFS metafiles are created. One of these metafiles is named the Master File Table (MFT). It is small when it is created (approximately 16 KB), but it grows as files and folders are created on the volume. When a file is created, it is entered in the MFT as a File Record Segment (FRS). The FRS is always 1024 bytes (1 KB). As files are added to the volume, the MFT grows. However, when files are deleted, the associated FRSs are marked as free for reuse, but the total FRSs and associated MFT allocation remains. That is why you do not regain the space used by the MFT after you delete a large number of files, .
To see exactly how large the MFT is, you can use the built-in defragmenter to analyze the volume. The resulting report provides detailed information about the size and number of fragments in the MFT.
Master File Table (MFT) fragmentation
Total MFT size = 26,203 KB
MFT record count = 21,444
Percent MFT in use = 81 %
Total MFT fragments = 4
However, for more complete information about how much space (overhead) the whole NTFS is using, run the chkdsk.exe command, and then view the output for the following line:
Currently, only third-party defragmenters consolidate unused MFT FRS records and reclaim unused MFT allocated space.
Alternate data streams
NTFS permits files and folders to contain alternate data streams. With this feature, you can associate multiple data allocations with a single file or folder. The use of alternate data streams on files and folders has the following limitations:
- Windows Explorer and the dir command do not report the data in alternate data streams as part of the file size or volume statistics. Instead, they show only the total bytes for the primary data stream.
- The output from chkdsk accurately reports the space that a user’s data files use, including alternate data streams.
- Disk quotas accurately track and report all data stream allocations that are part of a user’s data files.
- NTBackup records the number of bytes backed up in the backup log report. However it does not show which files contain alternate data streams. It also does not show accurate file sizes for files that include data in alternate streams.
NTFS file system corruption
In rare circumstances, the NTFS Metafiles $MFT or $BITMAP may become corrupted and result in lost disk space. You can identify and fix this issue by running the chkdsk /f command against the volume. Toward the end of chkdsk, you receive the following message if you must adjust the $BITMAP:Correcting errors in the master file table’s (MFT) BITMAP attribute. CHKDSK discovered free space marked as allocated in the volume bitmap. Windows has made corrections to the file system.
Other NTFS features that may cause file allocation confusion
NTFS also supports hard links and reparse points that permit you to create volume mount points and directory junctions. These additional NTFS features may cause confusion when you try to determine how much space a physical volume is consuming.
A hard link is a directory entry for a file regardless of where the file data is located on that volume. Every file has at least one hard link. On NTFS volumes, each file can have multiple hard links, and therefore a single file can appear in many folders (or even in the same folder with different names). Because all the links refer to the same file, programs can open any of the links and modify the file. A file is deleted from the file system only after all the links to it are deleted. After you create a hard link, programs can use it like any other file name.
Windows Explorer and a command prompt show all linked files as being the same size, even though they all share the same data and do not actually use that amount of disk space.
Volume mount points and directory junctions permit an empty folder on an NTFS volume to point to the root or subfolder on another volume. Windows Explorer and a dir /s command follow the reparse point, count any files and folders on the destination volume, and then include them in the host volume’s statistics. This may mislead you to believe that more space is being used on the host volume than what is actually being used.
In summary, you can use chkdsk output, NTBackup GUI or backup logs, and the viewing of disk quotas to determine how disk space is being used on a volume. However, Windows Explorer and the dir command have some limitations and drawbacks when used for this purpose.
How to Increase C Drive Space in Windows 10/8/7?
Position: How Tos — Partition Management — How to Extend C Drive Space in Windows 10/8/7?
Summary
DiskGenius — Disk partition freeware to resize, extend and split partition without losing data.
Table of Contents:
About increasing C drive space
How to increase C drive space in Windows 10/8/7? This is one of the most frequently asked questions when you browse technical forums or communities. Computer will slow down and reduce performance if C drive where operating system is installed is running out of free space. Here is one of the posts found on related forums.
«Hello everyone, I would like to ask whether it is possible to increase space for C drive without formatting my laptop or losing any data. I bought this laptop with 4 partitions, system (C:), document (D:), photos (E) and local (F:) and they are built in volume by default. The C drive has 85GB space and there other with 200, 350 and 350 in order. The C drive is almost full of data and I cannot install any other applications. I’ve deleted everything that I can from C drive. It is way too complicate to reparation the disk and reinstall Windows. I want to resize Windows partition so as to increate system partition size without disturbing existing data. Thanks.»
Low disk space is one of the issues that many users may encounter. With the passage of time, Windows C drive is not large enough to install application and it is running out of space. You receive error message from system:
«Low disk space. You are running out of disk space on system (C:). To free space on this drive by deleting old or unnecessary file, click here…»
«Low Disk Space. You are running out of disk space on Local Disk (C:). Click here to see if you can free space on this drive.»
In many causes, the partition layout on hard drive seems reasonable when computer was originally set up. It is for sure that a majority of users allocates disk space based on specific requirement, and all of them have tried best to make sure system partition is well configured in order to achieve best performance. However, unfortunately, C drive still runs out of space much earlier than other volumes. You might have installed too many applications and stored large amount of data on C drive. Anyway, system partition does not have much free space now, and computer slows down a lot. It is difficult to for most users to reinstall Windows again, as the process is kind of complicated and time-consuming. Thus, the ideal solution is increasing C drive space without affecting existing data.
How to increase C drive free space in Windows 10/8/7?
There are several ways you can try to increase free space in Windows 10/9/7, and you have a try.
- Free up disk space in C drive: You can delete unnecessary files from C drive and uninstall non-frequently used programs. Thus method cannot free up enough space, and you will face low disk space issue soon.
- Run the Disk Cleanup utility: Disk Cleanup removes temporary files, clears the cache, empties your Recycle Bin, and removes a variety of other files and items you no longer need.
- Extend C drive: You can increase C drive space by extending C drive : add free disk space to system partition or move free space of other partition to C drive. Resizing partition in Windows is common operation and it does not cause data loss.
- Repartition hard drive: hard drive repartitioning can reallocate disk space, and you can arrange large space for system drive. However, the process removes all partitions on the disk, and you need to backup data in advance.
Method 1: Increase C drive space in Disk Management
Windows Disk Management provides extend volume feature which is able to increase partition size by adding unallocated disk space and the process does not cause data loss. But not all partition can be extended in Disk Management, for instance, unallocated space can only be added to adjacent partition.
Step 1 Right-click on Windows Start button and select Disk Management. This will launch Disk Management console.
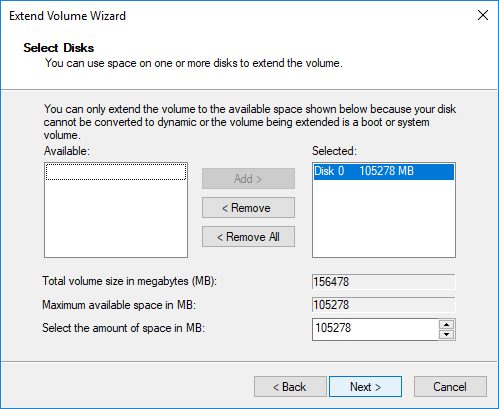
Step 2 Right-click on C drive in Disk Management and choose Extend Volume option. Then the Extend Volume Wizard shows up.
Step 3 Click Next button on the Extend Volume Wizard welcome interface.

Step 4 Set disk space to be added to C drive and click Next button.
Note: the volume size you enter here is in megabytes (MB) and you can follow the default setting if you do not have other requirements.
Step 5 Click Finish button when the process completes and you’ll return to Disk Management and the C drive will be extended successfully.
Limitation on Disk Management to increase C drive space:
- Extend Volume option is available for NTFS partition, and FAT32 partition and exFAT partition are not supported.
- There should be unallocated disk space next to the partition you want to expand and the unallocated space is on the right side in order.
Thus, if there is not free disk space next to C drive (usually on the right-side), the Extend Volume option will be grayed out. In that case, you can delete the adjacent partition to get unallocated space and then add it to C drive, or you can move disk space from other partition to C drive using third-party software.
Method 2: How to extend C drive with free disk partition software?
If you find the Extend Volume option is grayed out in Windows Disk Management, you will need to delete D drive which is the partition on the right side of C drive, so that you can create unallocated space and add it to C drive. You need to transfer data of D drive to other partition or external hard drive before deleting it. However, there is an ideal alternative solution to increase C drive space without deleting any partition.
DiskGenius Free provides the function to extend partition and it is able to move free disk space from other partition to C drive directly. Apart from extending partition, it is able to resize volume, create partition, wipe partition, hide partition, clone & image partition, check bad sectors, recover lost data, etc. The follow steps shows how to extend C drive in Windows 10.
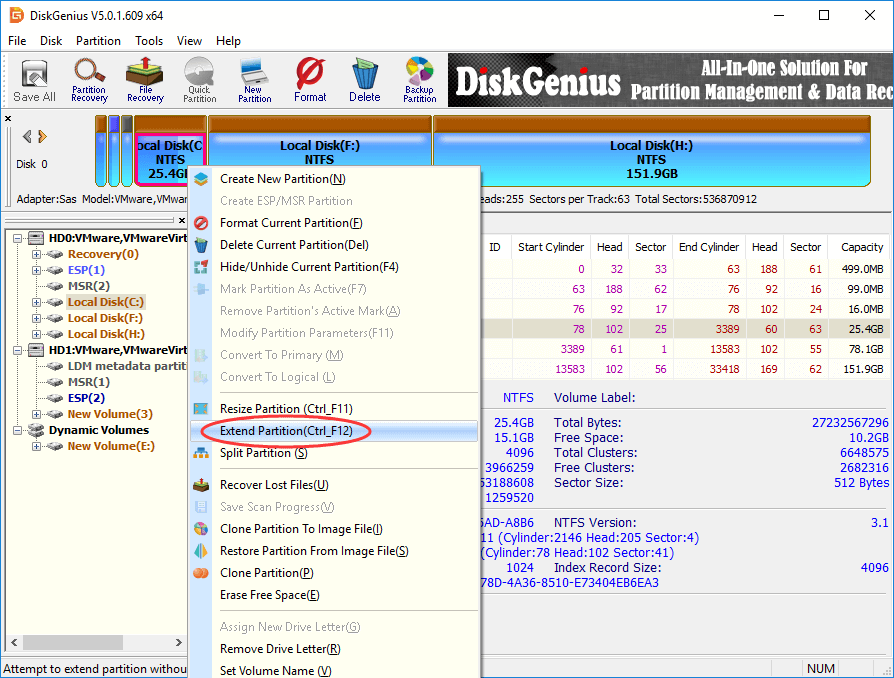
Step 1 Download and launch DiskGenius Free Edition after installing on your computer. Right-click on the C drive you want to increase space and choose Extend Partition.
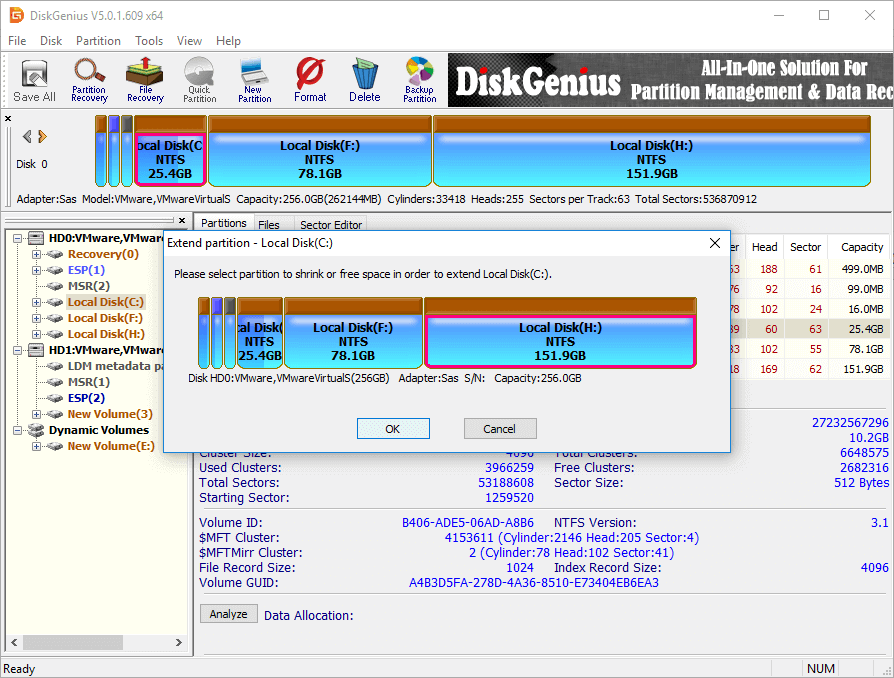
Step 2 The Extend Partition window shows up, and you need to choose a partition which contains large free space and click OK button.
Partition selected in this step should contain enough free space, as the software will move free space from this partition to C drive.
Step 3 Set the disk space to be moved to C drive and click Start button. You can drag the partition bar to set partition size or type in the exact size in the column.
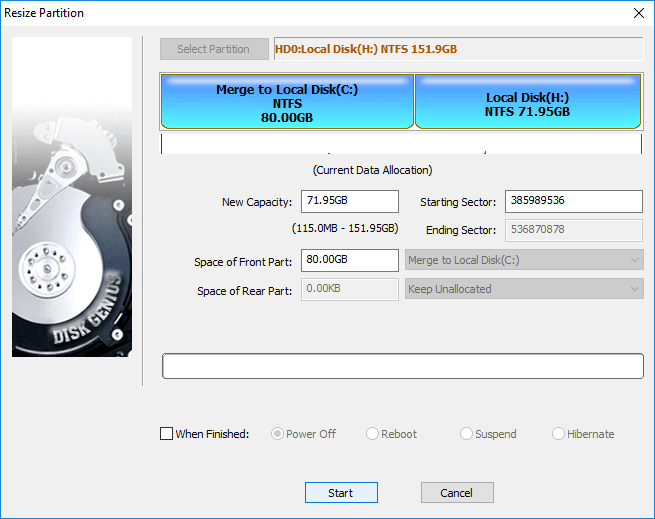
DiskGenius lists steps to be done during the resizing process and things you need to note. Click Yes button to continue.
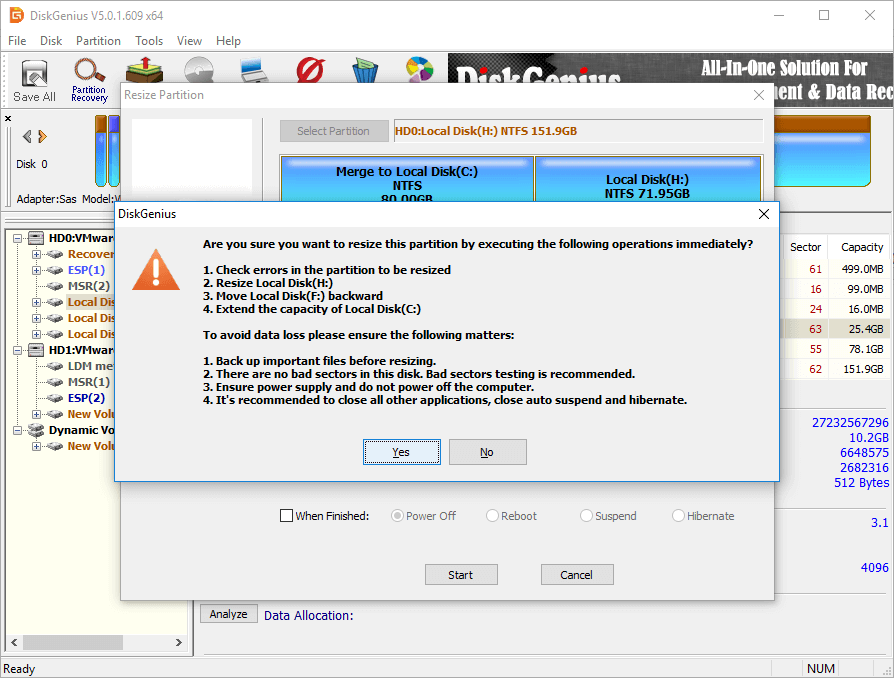
Note:
Changing partition size involves too many operations, such as modify partition start and end location, change parameters in MBR and DBR, move data, etc. therefore, the process is not risk free even if the partition manager software is stable. This it is advised to ensure follow matters to guarantee the process completes successfully:
- There are not bad sectors on the disk, especially related partitions.
- Make sure power supply works well and do not shut down computer before the partition resizing finishes.
- Close all other programs that accessing the partitions to be moved space.
- Disable system hibernate so that computer won’t go hibernate during extending C drive.
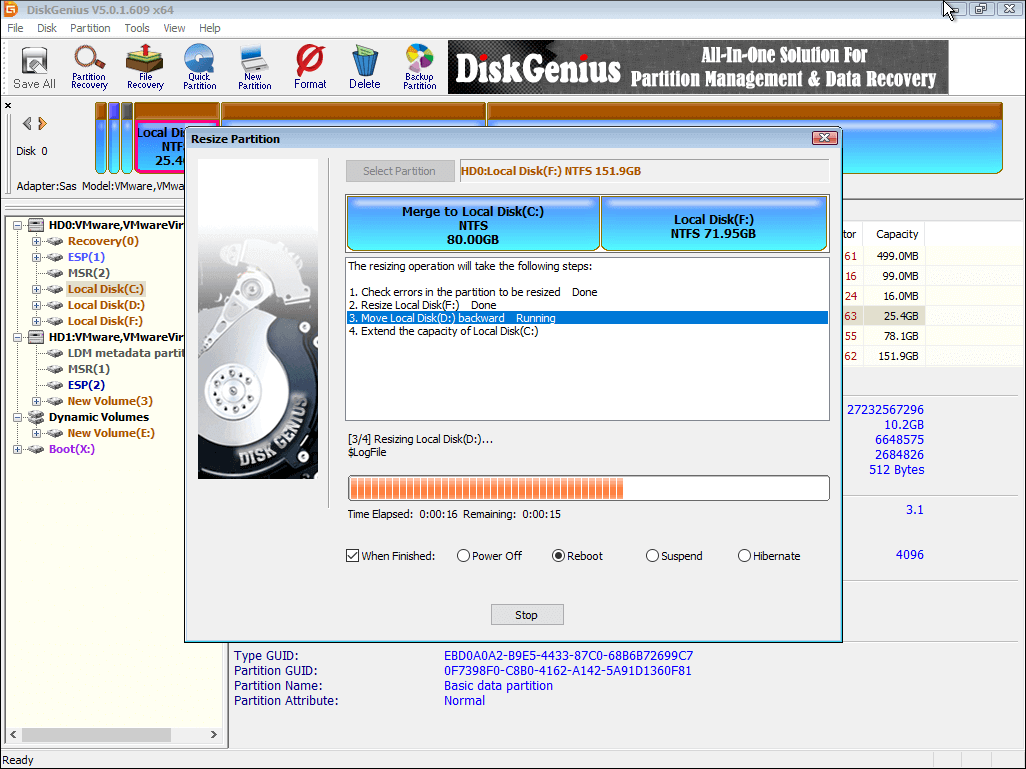
Due to the partition to be extended is system volume, DiskGenius will boot to its WinPE edition to complete rest operations. Now it is preparing for the WinPE environment for DiskGenius WinPE edition, after which computer will reboot to the WinPE edition automatically.

Now DiskGenius WinPE edition is launched automatically and continues to extend C drive, as below. When the resizing process completes, computer will restart to Windows automatically.
Method 3: Increate system partition size using diskpart command
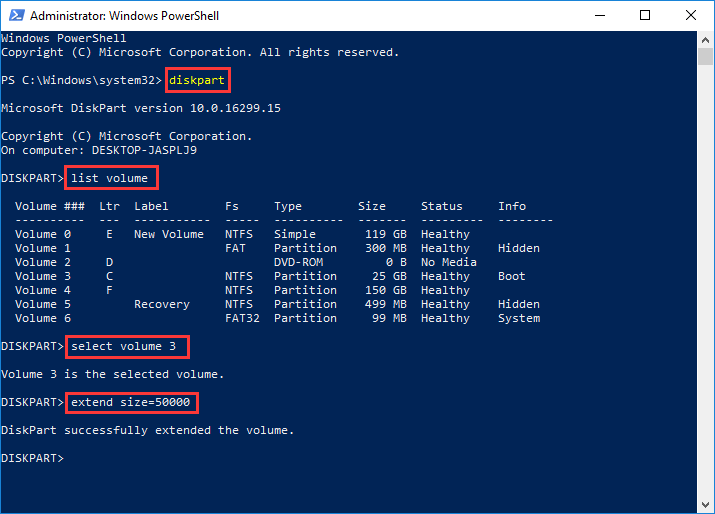
Diskpart is Windows built-in utility and it includes functions to manage disks and partitions via commands. Here are steps to increate C drive space via diskpart command:
Step 1 Right-click Windows 10 Start button and select Windows PowerShell (Admin) option.
Step 2 Type diskpart in Windows PowerShell and press Enter key.
Step 3 Type follow commands in turn and press Enter key after each command.
List volume
Select volume # (Replace # with the volume number of C drive)
Extend size=xxxx (replace XXXX with disk size in MB you want to add to C drive)
Limitations on diskpart when increasing partition size:
- The partition to be extended should be in NTFS file system.
- There should be contiguous unallocated space on the right side of partition to be extended.
- Users who are not familiar with using command prone to making mistakes and leading to data loss.
Method 4: How to increase C drive space by adding unallocated space?
What to do if there is unallocated disk space which is not adjacent to system partition? Do you know how to add unallocated space to C drive so as to increase C drive space without losing data? Here is any easy solution:
Step 1 Launch DiskGenius from your computer and locate the free disk space from system disk.
Step 2 Right-click on the free disk space and select Allocate Free Space To, as follows. Then you can select a target partition to add the unallocated space. In this example, we want to increate system partition size, thus we need to select C drive.
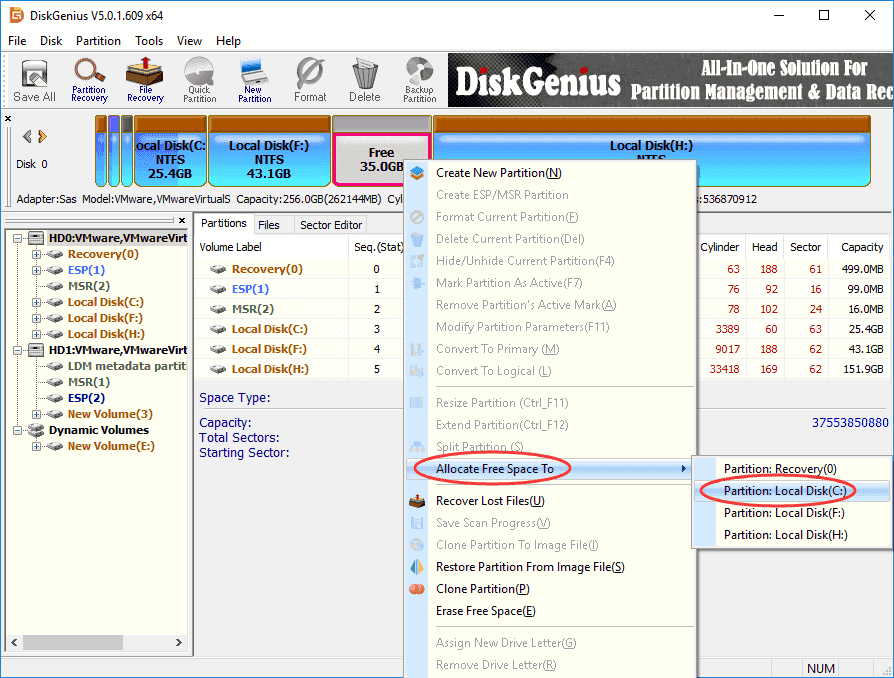
Step 3 Partition resizing wizard will pop up and you can follow prompts to complete following actions.
Conclusion on resizing Windows partition
In conclusion, this tutorial presents four solutions to increase C drive space without formatting computer or losing any data in Windows 10, Windows 8, Windows 7, Windows Vista and Windows XP. Disk Management works in very few situations, and you can use third-party disk partition software in most cases to extend C drive. DiskGenius Free is free tool to manage disks and partitions and helps make best of disk space. If you have any questions or need any help in using DiskGenius, please feel to contact our technical support team.
DiskGenius — Free partition manager software to resize partition, clone disk, backup Windows, etc.


