- Display INF File Sections
- DDInstall.SoftwareSettings Section
- Disabling AGP Transfer Rates and Sideband Addressing
- ftype
- Syntax
- Parameters
- Remarks
- Examples
- How to Change File Type in Windows 10
- Showing file extensions and changing the file format
- File Types
- Public and Private File Types
- Registering a File Type
- Setting Optional Subkeys and File Type Extension Attributes
- Deleting Registry Information During Uninstallation
- File Types That Support Open Metadata
Display INF File Sections
This section tells you how to write the setup information file (INF) sections that specifically apply to a graphics-adapter installation. For more general information about INF files, see INF File Sections and Directives.
DDInstall.SoftwareSettings Section
A DDInstall.SoftwareSettings section contains an AddReg directive and/or a DelReg directive. Each directive points to a separate, writer-defined INF section that contains registry entries for the installer to add or delete.
For example, the following code shows an AddReg directive that points to a writer-defined add-registry section named ACME-1234_SoftwareDeviceSettings. The DelReg directive points to a delete-registry section named ACME-1234_DeleteSWSettings.
The add-registry section adds four entries to the registry and sets their values, as shown in the following code.
The preceding code first sets the value of the InstalledDisplayDrivers entry to the name of the display driver. The code then sets the value of the OverRideMonitorPower entry to 0 (in other words, FALSE). This entry, which should be used only by OEM system vendors, controls the power behavior of the monitor device (for example, the LCD, CRT, or TV). When set to 1, OverRideMonitorPower limits the possible power states of the monitor device to D0 and D3.
Third, the code sets the value of the MultiFunctionSupported entry to 1 (in other words, TRUE), which is the required value for an adapter that supports multiple PCI functions. Last, the code sets the value of the VideoDebugLevel entry, which controls the global debug level that checked builds use for debug messages. This value ranges from 0 (no debug messages) to 3 (the most verbose messages). For more information about global debug levels, see VideoDebugPrint.
Most video miniport drivers are not VGA-compatible and require no VgaCompatible entry in the registry. If your video miniport driver is VGA-compatible, add the VgaCompatible entry to the registry and set its value to 1 (TRUE) in the add registry section, as shown here:
For more information about VGA-compatible video miniport drivers, see VGA-Compatible Video Miniport Drivers (Windows 2000 Model).
The following delete-registry section deletes three registry entries: GraphicsClocking, MemClocking, and CapabilityOverride.
The CapabilityOverride entry specifies the capabilities that the system turns off for the display driver. For example, even if the display driver implements a DrvEscape function, that capability cannot be used if the 0x10 flag is set in the CapabilityOverride entry.
The value of the CapabilityOverride registry entry is a bitwise OR of one or more of the flags that are listed in the following table.
| Flag | Meaning | |||||||||||||||||||||||||||||
|---|---|---|---|---|---|---|---|---|---|---|---|---|---|---|---|---|---|---|---|---|---|---|---|---|---|---|---|---|---|---|
| Flag | Value | Meaning | |||||||||||||||||||||||||
|---|---|---|---|---|---|---|---|---|---|---|---|---|---|---|---|---|---|---|---|---|---|---|---|---|---|---|---|
| Parameter | Description |
|---|---|
| Specifies the file type to display or change. | |
| Specifies the open command string to use when opening files of the specified file type. | |
| /? | Displays help at the command prompt. |
Remarks
The following table describes how ftype substitutes variables within an open command string:
| Variable | Replacement value |
|---|---|
| %0 or %1 | Gets substituted with the file name being launched through the association. |
| %* | Gets all of the parameters. |
| %2 , %3 , . | Gets the first parameter ( %2 ), the second parameter ( %3 ), and so on. |
| % | Gets all of the remaining parameters starting with the nth parameter, where n can be any number from 2 to 9. |
Examples
To display the current file types that have open command strings defined, type:
To display the current open command string for the txtfile file type, type:
This command produces output similar to the following:
To delete the open command string for a file type called example, type:
To associate the .pl file name extension with the PerlScript file type and enable the PerlScript file type to run PERL.EXE, type the following commands:
To eliminate the need to type the .pl file name extension when invoking a Perl script, type:
How to Change File Type in Windows 10
With our increasing use of computers in our daily life, it may get necessary even for a simple user to change the file type of a file from one format to another. Each file format has their own properties. For example a ‘.txt’ file will probably get opened by the text editor while an ‘html’ file will get launched in your default browser.
 File format analogy
Even though the contents inside the files might be the same, the file type matters a lot. The process of changing file type is quite simple and straightforward. However, there are some cases whereby changing the file type, the file becomes unusable. Hence it is recommended that you know exactly what you’re doing and also make an additional copy of the file.
Showing file extensions and changing the file format
By default, Windows doesn’t have the file format displayed alongside every file. For example, if a file is a text file, its name wouldn’t display ‘ap puals.txt’. Instead, it will only display ‘appuals’. First, we will enable the file extensions and then through basic rename, we will change the file extension. You can also choose to rename files in bulk if there are a lot of files that you need to change the type for.
- Press Windows + E, click View from the top-most ribbon. Now click Options and select the option Change folder and search options.
 Change folder and search options – Windows Explorer
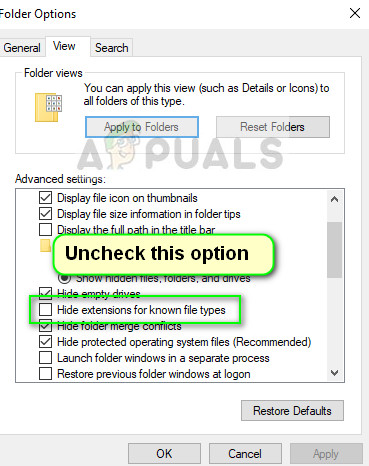
- Now uncheck the option Hide extensions for known file types. Now all the files will have their file extensions displayed alongside their names.
 Enabling File Extensions – Windows Explorer
- Now navigate to the file for which you want to change the file format. Right-click on it and select Rename.
- Now change the file’s extension to the extension of the type which you want to change into. In this example, we change a ‘text’ file to a ‘python’ file. The extensions for a text file are ‘txt’ and for python ‘py’.
 Process of changing a file type
Here is a list of common file extensions used in the world of computing. We have listed them according to their type.
File Types
This topic explains how to create new file types and how to associate your app with your file type and other well-defined file types. Files with a shared common file name extension (.doc, .html, and so on) are of the same type. For example, if you create a new text editor, then you can use the existing .txt file type. In other cases, you might need to create a new file type.
This topic is organized as follows:
Additional information can be found on the following topics:
Public and Private File Types
Public file types are also known as popular or contentious types because competing applications might want to be associated with these file types. Characteristics of public file types include:
- They are typically defined by standards bodies, and/or are promoted by their defining organizations as interchange formats.
- They are often exchanged between computers and users for diverse purposes.
- They need to be supported on many different platforms.
- Applications from multiple vendors are likely to handle them.
Some examples of file types that are considered public are the image file types .png, .gif, .jpg, and .bmp, and the audio types .wav, .mp3, and .au.
Unlike public file types, private or proprietary file types typically have a format that is implemented and understood by only one application or vendor. As a result, private file types are typically not prone to conflicts between applications. Some file types can start as private file types but later become public file types.
Windows does not differentiate between public and private file types. The distinction is relevant only in making decisions about your choice of file type registration.
Registering a File Type
To associate the file type with an existing application, locate the application ProgID in the registry. To associate the file type with a new application, define a ProgID for your application. For information about defining a new ProgID, see Programmatic Identifiers.
File name extension subkeys have the following general form: extension=ProgID. File name extension subkeys are stored in the HKEY_CLASSES_ROOT subtree.
It is important to include the leading period (.) when creating file type subkeys in the registry. For example, if you want a file type with the short extension .myp and the long extension .myp-file to be opened with an application called MyProgram, use the following syntax:
As demonstrated in the preceding example, if you also register a short file name extension (.myp), you should create a subkey for the long extension (.myp-file) as well. For more information, see File Type Handlers.
Setting Optional Subkeys and File Type Extension Attributes
File type extension entries in the registry have several optional subkeys and attributes.
The file type extension entries that are used by file associations are described in the following table. All values are of the REG_SZ type.
| Registry entry | Action |
|---|---|
| Default | Set the default value of the extension subkey to the ProgID to which it is linked. |
| Content Type | Set the Content Type value to the file type’s MIME content type. |
| OpenWithList | Do not use. This subkey contains one or more application subkeys for applications that appear in the Open with dialog box entry for the file type and is intended only for .exe applications on operating systems prior to WindowsВ XP. Use OpenWithProgIds instead. |
| OpenWithProgIds | This subkey contains a list of alternate ProgIDs for this file type. The programs for these ProgIDs appear in the Open with menu and are available as default Windows Store apps for the file type. Whenever an application takes over this file type by changing the default value, it should also add an entry to this list. |
| PerceivedType | Set the PerceivedType value to the PerceivedType to which the file belongs, if any. This string is not used by Windows versions prior to WindowsВ Vista. For more information, see Perceived Types and Application Registration. |
The general form of a file name extension subkey is as follows. All entry types are of the REG_SZ type.
Important considerations about file types include:
The HKEY_CLASSES_ROOT subtree is a view formed by merging HKEY_CURRENT_USER\Software\Classes and HKEY_LOCAL_MACHINE\Software\Classes
In general, HKEY_CLASSES_ROOT is intended to be read from but not written to. For more information, see the HKEY_CLASSES_ROOT article.
To register a file type globally on a particular computer, create an entry for the file type in the HKEY_LOCAL_MACHINE\Software\Classes subkey.
To make a file type registration visible to the current user only, create an entry for the file type in the HKEY_CURRENT_USER\Software\Classes subkey.
An application can provide its own implementation of a verb, such as open or play, as shown in the following registry example.
Subkeys of the verb subkey include the command line and the drop target method: command and DropTarget.
When you create or change a file association, it is important to notify the system that you have made a change. Do so by calling SHChangeNotify and specifying the SHCNE_ASSOCCHANGED event. If you do not call SHChangeNotify, the change may not be recognized until after the system is rebooted.
To retrieve registry information regarding a file association, use the IQueryAssociations interface. For a scenario that illustrates this procedure, see File Association Sample Scenario.
Both the App Paths and Applications registry subkeys are used to register and control the behavior of the system on behalf of applications. For more detailed information about this functionality, see Application Registration.
Deleting Registry Information During Uninstallation
When uninstalling an application, the ProgIDs and most other registry information associated with that application should be deleted as part of the uninstallation. However, applications that have taken ownership of a file type (by setting the Default value of the file type’s HKEY_CLASSES_ROOT\.extension subkey to the ProgID of the application) should not attempt to remove that value when uninstalling. Leaving the data in place for the Default value avoids the difficulty of determining whether another application has taken ownership of the file type and overwritten the Default value after the original application was installed. Windows respects the Default value only if the ProgID found there is a registered ProgID. If the ProgID is unregistered, it is ignored.
Note that other file-type ownership information is stored in the HKEY_CURRENT_USERsubtree and also is used only when the application that it references is registered. Therefore, this data does not need to be removed when uninstalling an application.
As an example, the following shows the state of the registry before an application is uninstalled:
The following shows the state of those same registry entries after the application has been uninstalled.
File Types That Support Open Metadata
In WindowsВ 7 and later, the following file types support open metadata.


