Windows display installed drivers

Windows display installed drivers

Versions History

  • Version 1.05:
    • Added ‘Open In RegEdit’ option, which opens the Registry key of the driver in RegEdit.
  • Version 1.01:
    • Added secondary sorting support: You can now get a secondary sorting, by holding down the shift key while clicking the column header. Be aware that you only have to hold down the shift key when clicking the second/third/fourth column. To sort the first column you should not hold down the Shift key.
    • Fixed to display local date/time values according to daylight saving time settings.
  • Version 1.00 — First release.

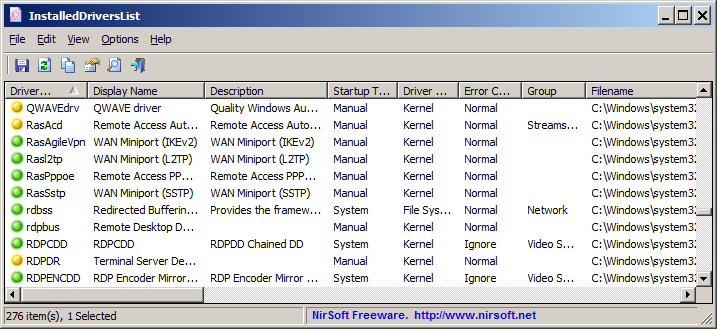
Start Using InstalledDriversList

After running it, the main window of InstalledDriversList displays the list of all drivers installed on your system. You can select one or more items (or select all items with Ctrl+A), and then copy them to the clipboard (Ctrl+C) and paste them into Excel or other spreadsheet application. You can also use the ‘Save Selected Items’ option (Ctrl+S) to export the selected items into csv/tab-delimited/xml/html file.

Meaning of green/yellow/red icons

  • Green Icon — The driver is running on Windows kernel.
  • Yellow Icon — The driver is not running on Windows kernel.
  • Red Icon — The driver is not running on Windows kernel, but it should be loaded automatically when Windows starts. When you see a red icon, it’s possible that something is wrong with the driver. Be aware that on Windows 8, there are 2 drivers of the operating system that are normally displayed with red icon.

Command-Line Options

/stext Save the installed drivers list into a regular text file.
/stab Save the installed drivers list into a tab-delimited text file.
/scomma Save the installed drivers list into a comma-delimited text file (csv).
/stabular Save the installed drivers list into a tabular text file.
/shtml Save the installed drivers list into HTML file (Horizontal).
/sverhtml Save the installed drivers list into HTML file (Vertical).
/sxml Save the installed drivers list into XML file.
/sort This command-line option can be used with other save options for sorting by the desired column. If you don’t specify this option, the list is sorted according to the last sort that you made from the user interface. The parameter can specify the column index (0 for the first column, 1 for the second column, and so on) or the name of the column, like «Display Name» and «Driver Name». You can specify the ‘

‘ prefix character (e.g: «

Visit Time») if you want to sort in descending order. You can put multiple /sort in the command-line if you want to sort by multiple columns.

Microsoft Basic Display Driver

In Windows 8, The Microsoft Basic Display Driver (MSBDD) is the in-box display driver that replaces the XDDM VGA Save and VGA PnP drivers.

The key benefits of using MSBDD are as follows:

  • MSBDD helps to enable a consistent end user and developer experience because it is compatible with DirectX APIs and technologies such as the Desktop Composition.
  • Server scenarios can benefit from the higher functionality (specifically, features like reboot-less updates, dynamic start and stop, and so on) that are provided by the WDDM driver model.
  • MSBDD supports Unified Extensible Firmware Interface (UEFI) Graphics Output Protocol (GOP).
  • MSBDD works on both XDDM and WDDM hardware.

MSBDD is the default in-box display driver that is loaded during setup, in safe mode, in the absence of an IHV graphics driver, or when the inbox installed graphics IHV driver is not working or is disabled. The primary purpose of this driver is to enable Windows to write to the display controller’s linear frame buffer.

MSBDD can use the video BIOS to manage modes and resolutions on a single monitor. On UEFI platforms, MSBDD inherits the linear frame buffer that is set during boot; in this case, no mode or resolution changes are possible. As shown in Figure 1 Scenarios supported by Microsoft Basic Display Driver, MSBDD is used in the following scenarios:

Server: Server configurations that lack WDDM-capable graphics hardware can use MSBDD.

Windows setup: In the early phases of Windows setup, just before the final boot, only the MSBDD is loaded.

For example, a user has an older platform that is currently in working condition although it has no in-box graphics driver support for Windows 8. The user upgrades to Windows 8 and uses MSBDD for the setup, installation, and to retrieve an IHV driver if one is available.

Driver installation, in the following cases:

  • When a user is installing a new WDDM IHV driver, MSBDD is used during the transition (from the point when the old WDDM IHV driver is uninstalled to the point before the new IHV driver is installed).
  • When a user encounters problems installing the latest WDDM IHV driver, the user or system can disable the current graphics driver and fallback to using MSBDD.

Driver upgrade: By using MSBDD, there is no need to go through a system reboot when upgrading to the IHV-recommended driver.

Safe mode: In this mode, only trusted drivers get loaded; this includes MSBDD.

Figure 1 Scenarios Supported by Microsoft Basic Display Driver

Display Driver Uninstaller

О программе

Что нового

Новое в версии 18.0.3.8 :

Системные требования

  • Windows Vista SP2 – Windows 10 May 2019 update 1903 (18362.xx)
  • Видеокарты NVIDIA, AMD, Intel
  • Microsoft .NET Framework 4.6 или выше

Полезные ссылки

Подробное описание

Display Driver Uninstaller (DDU) — это инструмент удаления драйверов, который может помочь полностью удалить графические драйверы AMD (ATI), NVIDIA и Intel из вашей системы, не оставляя остатков (таких как ключи реестра, папки, файлы, хранилище драйверов). Со временем эти оставшиеся файлы могут привести к проблемам совместимости, снижению производительности или сбою системы. Используя DDU, вы можете удалить остатки старых драйверов и решить многие распространенные проблемы, связанные с графическими драйверами.

Программа предлагает три режима работы:

  • Удалить и перезагрузить. Удаление выбранных драйверов графического процессора и перезагрузка. Эта опция рекомендуется в большинстве случаев, если у вас установлена видеокарта только одного производителя. После перезагрузки, вы сможете начать установку новых драйверов.
  • Удалить без перезагрузки. Этот вариант удаления предназначен если у вас было установлено несколько разных графических процессоров. Удалите по очереди каждый драйвер и затем выполните перезагрузку.
  • Удалить и выключить. Удалит выбранные драйверы и выключит компьютер. Это удобно, если вы планируете поменять свою видеокарту.

Рекомендации по использованию:

  • Запускайте программу в безопасном режиме Windows.
  • Отключите интернет на время работы с утилитой. Это позволит избежать авто установки драйверов службой Windows Update.
  • Создайте резервную копию или точку восстановления системы.

Оценка пользователей

Другие программы

AMD Driver Autodetect
Приложение для поиска и установки драйверов для видеокарт AMD

Intel Driver & Support Assistant
Программа для поиска и обновления драйверов Intel

NVIDIA GeForce Experience
Автоматическое обновление драйверов для видеокарт NVIDIA

How To Update Reinstall Display Driver In Windows 10, 8.1 and 7

On certain causes We need to update Reinstall The Display Driver to Fix most of the Startup problems such As Black Screen with white cursor, Frequent blue Screen Error (Video TDR Failure, DRIVER_OVERRAN_STACK_BUFFER, Thread stuck in device driver etc ). Also Some Times you get “Display driver stopped responding and has recovered”. This is one of the common errors that you get when the video driver is not working properly. And you must Update Reinstall Display Driver to fix this problem. If you don’t Aware of How To Install Update Display Driver? This post we discuss How To Update Display Driver using Windows update or completely Reinstall Display Driver in Windows 10, 8.1 and 7.

Most of the time’s users report After Install Windows Updates or Upgrade to Windows 10 2004 update. Windows Start misbehaving at startup such as stuck at the black screen or frequently Restart with BSOD error. Mostly this happens because the installed Display driver is not compatible with the current windows version or The driver gets corrupted while upgrade process. That cause we need either update the Display driver or Completly reinstall the Device driver to fix this problem.

Update Display Driver Windows 10

To Update Display Driver on Windows 10, 8.1 or 7 first you need to open Device Manager. To do this press Windows + R key, type devmgmt.msc and hit the enter key. This will open Device manage where you get installed device driver list.

Now Expand Display adapters to see your Installed Display driver/ graphics card details. In my case below, you will see NVIDIA GeForce entry. Simply right-click on it and select Update Driver. On next screen select Search Automatically for updated driver software and let windows to check and install the latest available display driver for that. If a windows update found any latest version of the Display driver this will automatically download and install it for you.

Also, you can choose the second option Browse my computer for Driver software -> Let me pick from a list of Available Drivers on my computer. Here check mark on Show compatible hardware option and Select the Driver from the list click next to install the same. Restart your computer and your driver will be updated!

Let me pick from a list of Available Drivers

Manually update NVIDIA Geforce Driver

There is another way to update NVIDIA GeForce drivers. Type GeForce in Start search and select GeForce experience. After this NVIDIA GeForce experience app is launched, you can right-click on its system tray icon and select Check for updates.

Geforce check for updates

If updates are available, you will see a popup notification to this effect.

update Geforce Graphics Drivers

Click on it and NVIDIA GeForce experience UI will open. Clicking on the green Download driver button will commence its download and installation. This should give you a smooth experience.

Reinstall graphics driver in Windows 10

To Re-install Device driver Open Device manager by Right-click on the Windows Start button and click Device Manager to open the same. Or you can press Windows + R, type devmgmt.MSC and hit the enter key to open Device Manager.

In the Device Manager, expand Display adapters to see your graphics, video or display card entry. If you have multiple video cards, all of them will appear here.

Note down the video or graphics card name and model number. Visit the graphics card manufacturer’s website or your PC manufacturer’s website and download the latest version of the driver for your video card or PC model. And Save it to your local drive. Be sure to check if you are running 32-bit or 64-bit Windows 10 and download the right type of driver.

Download graphic Driver

Uninstall The Display Driver

In the Device Manager, right-click on the graphics card entry and then click the Uninstall device option. Again, if you have multiple video cards, right-click on the one whose driver you want to reinstall. When you get the following confirmation dialog, select Delete the driver software for this device check box and then click Uninstall button.

uninstall Graphic Driver

Once the driver is uninstalled, reboot your computer once. Please note that it’s important to reboot your PC to uninstall the device driver completely.

Re-install the Display Driver

Now after rebooting your computer, run the setup file of the video driver that you downloaded from the Device manufacturer website. And Follow the on-screen instructions to complete the installation. Restart your computer if the setup file asks you to do so.

Install Graphic Driver

That’s all! You have successfully reinstalled the video, graphics or display driver in Windows 10, 8.1 and 7 PC.

Following these steps, you can update reinstall any Device driver (Network adapter, Display driver, Audio Driver etc) on all windows 10, 8.1 and 7computers. Hope This post help to Update Reinstall Display Driver on Windows 10, 8.1 and 7 computer. Face any difficulty while performing these steps feel free to discuss in the comments below.

Читайте также:  Настройка epsxe для windows 10
Оцените статью
Разработчик: Wagnardsoft
Лицензия: Бесплатно
Версия: 18.0.3.8
Обновлено: 2021-03-28
Системы: Windows 10 / 8.1 / 8 / 7 / Vista32|64-bit
Интерфейс: русский / английский
Рейтинг:
Ваша оценка: