- How To Change Theme in Windows 10 (All Ways)
- Where Windows 10 stores themes
- Change the theme in Windows 10 using the Control Panel
- Apply a High Contrast theme using Settings
- Change the Windows theme from File Explorer
- Change your theme with Winaero Theme Switcher
- About Sergey Tkachenko
- Windows 10 — where are custom themes’ pictures stored
- Replies (19)
- Theme File Format
- Creating a Theme File
- Description of a Theme File
- [Theme] Section
- [Control Panel\Colors] Section
- [Control Panel\Cursors] Section
- [Control Panel\Desktop] Section
- [Slideshow] Section
- [Metrics] Section
- [Visual Styles] Section
- [Sounds] and [AppEvents] Sections (Sounds)
- [Boot] Section
- [MasterThemeSelector] Section
- Example of a Theme File
- Installing Theme Files
- Theme Packs
How To Change Theme in Windows 10 (All Ways)
Windows 10 supports themes which may include custom desktop backgrounds, sounds, mouse cursors, desktop icons, and an accent color. There are a number of methods you can use to change a theme in Windows 10. Let’s review them all.
In Windows 10, you can get extra themes using Windows Store or install them from a themepack file. Themes may include:
- Desktop background: An image, a set of images, or a solid color which can be used as a wallpaper.
- Colors. Windows 10 allows changing the color of the window frame, window borders, active elements and selected items.
- Sounds. A set of sounds that are assigned to various events like notifications, message dialogs, window operations, emptying the Recycle Bin, and so on.
- Screen Saver. Screen savers were created to save very old CRT displays from being damaged by issues like screen burn-in. These days, they are mostly used to personalize the PC with entertaining visuals or improve its security with additional password protection.
- Pointers. By default, Windows 10 comes with no custom cursors bundled and uses the same cursors as Windows 8. Users who love customizing their OS may want to change them.
- Desktop Icons. Themes can change icons like This PC, Recycle Bin, and so on.
Where Windows 10 stores themes
Windows 10 stores themes under different folders.
- Themes that you’ve installed manually, saved, or synced from your Microsoft account are stored in the folder %LocalAppData%\Microsoft\Windows\Themes .
- Default themes are the ones that come pre-installed with Windows 10. They can be found in the folder C:\Windows\Resources\Themes .
- High Contrast Themes. — Themes that make items on your screen easier to see. They are part of the Ease of Access feature of Windows 10. They can be found in the folder C:\Windows\Resources\Ease of Access Themes .
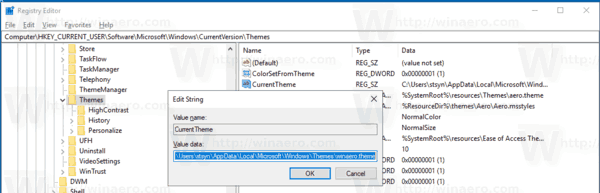
The current theme can be found in the Registry. See the CurrentTheme string (REG_SZ) value under the following key:
See the following screenshot:
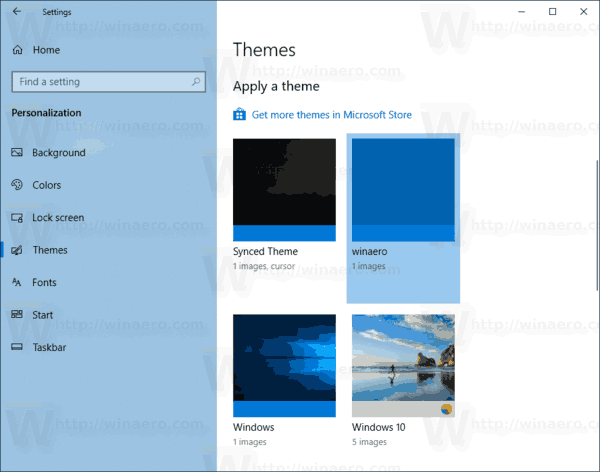
To change the theme in Windows 10, do the following.
- Open the Settings app.

- Go to Personalization ->Themes.
- On the right, click on a theme you like under Apply a theme.
- The theme is now applied.

Alternatively, you can use the classic Control Panel applet to quickly apply a custom theme, or any of the default themes, or the High Contrast theme.
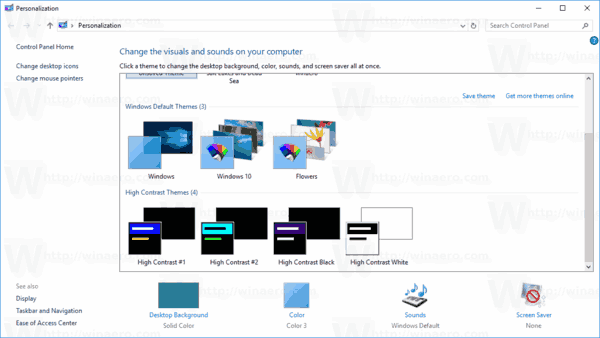
Change the theme in Windows 10 using the Control Panel
- Press the Win + R keys on the keyboard.
- Type or copy-paste the following command in the Run box: explorer.exe shell.
. - This will open the classic Personalization applet. Click on the desired theme in the list to install it.
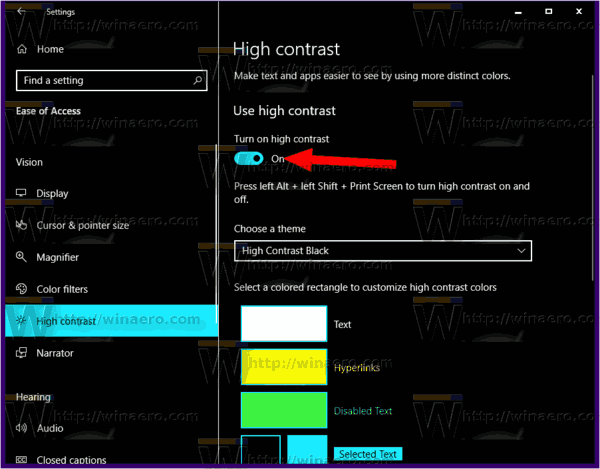
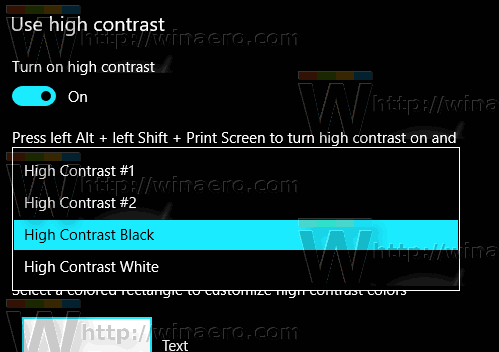
Apply a High Contrast theme using Settings
- Open the Settings app.
- Go to Ease of Access -> High Contrast.
- On the right, set the option Turn on high contrast.
- From the Choose a theme drop down list, choose one of the four pre-installed High Contrast themes.
Finally, you can apply a theme from a file manager app like File Explorer.
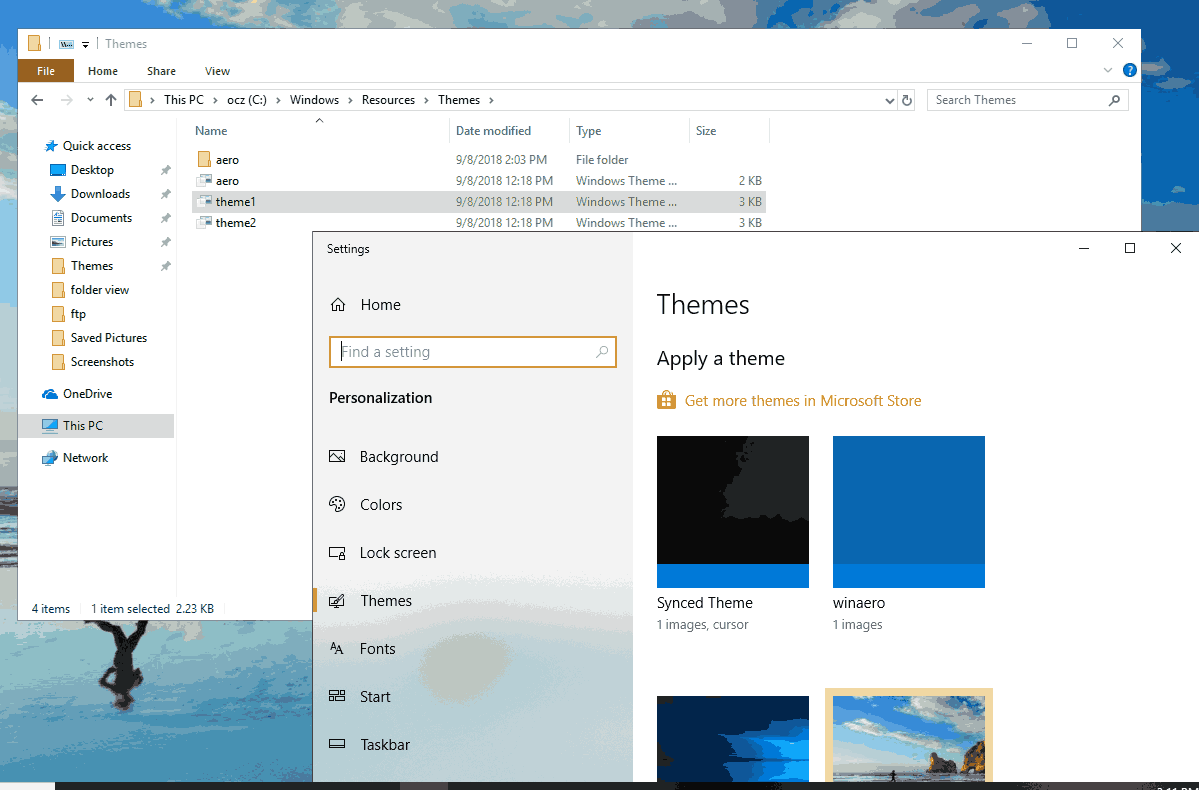
Change the Windows theme from File Explorer
- Open File Explorer app.
- Navigate to the folder which contains the *.theme file of the theme you want to apply. The default folders are mentioned in the beginning of this article. e.g., visit the folder C:\Windows\Resources\Themes .
- Double-click on the *.theme file to apply the theme. The theme will be applied. Also, Windows 10 will open the Themes page of the Settings app.
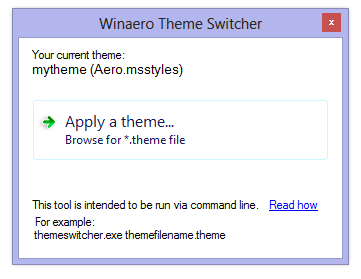
Change your theme with Winaero Theme Switcher
Winaero Theme Switcher is an application which allows you to change a Windows theme from the command line. It is primarily intended to be used with the command prompt or in a batch file where you want to automate the applying of a custom theme.
The syntax is as follows:
To apply one of the default themes, you can run the following command:
Running the app without parameters will open the following GUI.
Please refer to the following article to learn useful tips and tricks about this app:
Winaero greatly relies on your support. You can help the site keep bringing you interesting and useful content and software by using these options:
Share this post
About Sergey Tkachenko
Sergey Tkachenko is a software developer from Russia who started Winaero back in 2011. On this blog, Sergey is writing about everything connected to Microsoft, Windows and popular software. Follow him on Telegram, Twitter, and YouTube.
Windows 10 — where are custom themes’ pictures stored
I just upgraded to windows 10 from windows 8.1. I had created my own theme in windows 8.1 with my own pictures, I would occasionally add or remove pictures from my custom theme. In windows 10, my theme is still there but I can’t figure out how to add or remove certain photos. I also don’t have the original pictures on my computer because I dragged and dropped them into the theme on windows 8.1Where are the themes’ pictures files stored? Or how can I edit my theme like I did in windows 8.1?
Replies (19)
* Please try a lower page number.
* Please enter only numbers.
* Please try a lower page number.
* Please enter only numbers.
![]()
Welcome and thank you for posting your query in Microsoft Community.
I suggest you to refer to the following article and check if it helps.
(Applies to Windows 10 as well)
Let us know if you have any further query on Windows, we are glad to assist you further.
15 people found this reply helpful
Was this reply helpful?
Sorry this didn’t help.
Great! Thanks for your feedback.
How satisfied are you with this reply?
Thanks for your feedback, it helps us improve the site.
How satisfied are you with this reply?
Thanks for your feedback.
It would have been nice had you actually answered the question. The Windows 8 Theme instructions no longer apply to Windows 10.
Where are the themes’ pictures files stored (in Windows 10)? Or how can I edit my theme like I did in windows 8.1?
Here is the actual answer:
Go to File Explorer:
Which will take you to wherever your default themes are saved.
And there you can access the folders containing the pictures for each theme and add/delete and so forth.
I had to ask a friend since the Microsoft answers were lacking, pointing to old information or nonexistent.
1580 people found this reply helpful
Was this reply helpful?
Sorry this didn’t help.
Great! Thanks for your feedback.
How satisfied are you with this reply?
Thanks for your feedback, it helps us improve the site.
How satisfied are you with this reply?
Thanks for your feedback.
41 people found this reply helpful
Was this reply helpful?
Sorry this didn’t help.
Great! Thanks for your feedback.
How satisfied are you with this reply?
Thanks for your feedback, it helps us improve the site.
How satisfied are you with this reply?
Thanks for your feedback.
Nope! I search my entire computer running Windows 10 for the file location for themes.
it search for over 2 hours and never found the location.
23 people found this reply helpful
Was this reply helpful?
Sorry this didn’t help.
Great! Thanks for your feedback.
How satisfied are you with this reply?
Thanks for your feedback, it helps us improve the site.
How satisfied are you with this reply?
Thanks for your feedback.
You added in a «/» there. You need to enter exactly
as the path you’re trying to go to in the File Explorer address bar if you want to do it that way. Or you can run exactly:
control /name Microsoft.Personalization /page pageWallpaper
from a Win+R (Run) prompt to select/unselect sub-photos in the theme.
72 people found this reply helpful
Was this reply helpful?
Sorry this didn’t help.
Great! Thanks for your feedback.
How satisfied are you with this reply?
Thanks for your feedback, it helps us improve the site.
How satisfied are you with this reply?
Thanks for your feedback.
You added in a «/» there. You need to enter exactly
as the path you’re trying to go to in the File Explorer address bar if you want to do it that way. Or you can run exactly:
control /name Microsoft.Personalization /page pageWallpaper
from a Win+R (Run) prompt to select/unselect sub-photos in the theme.
18 people found this reply helpful
Was this reply helpful?
Sorry this didn’t help.
Great! Thanks for your feedback.
How satisfied are you with this reply?
Thanks for your feedback, it helps us improve the site.
How satisfied are you with this reply?
Thanks for your feedback.
%localappdata% isn’t a specific path — it’s an environment variable that will map out to be «c:\users\JaniceLarson\appdata\local» or something like that. So — «c:\users\JaniceLarson\appdata\local\Microsoft\Windows\themes» would probably the location on your system. Except replace «JaniceLarson» with your account name.
If you’re still stumped, look for custom.theme and/or roamed.theme — they should be there as well. 🙂
54 people found this reply helpful
Was this reply helpful?
Sorry this didn’t help.
Great! Thanks for your feedback.
How satisfied are you with this reply?
Thanks for your feedback, it helps us improve the site.
How satisfied are you with this reply?
Thanks for your feedback.
%localappdata% isn’t a specific path — it’s an environment variable that will map out to be «c:\users\JaniceLarson\appdata\local» or something like that. So — «c:\users\JaniceLarson\appdata\local\Microsoft\Windows\themes» would probably the location on your system. Except replace «JaniceLarson» with your account name.
If you’re still stumped, look for custom.theme and/or roamed.theme — they should be there as well. 🙂
I can confirm this is correct. You simply change in your windows explorer to SHOW HIDDEN FILES, FOLDERS and OBJECTS. Then you can drill down to the themes folder. And I can confirm that you can copy THEMES from one computer to another and they work (This was tested copying from a Windows 10 32bit system to Windows 10 32bit system). After you copy the themes to the new system you can then go into PERSONALIZATION/THEMES in your Windows 10 Settings and you will see all your themes on your new computer. This alleviates having to find and download them again and the reason I researched this was because one of my favorite themes was no longer available for download but with the advent of this I will now simply copy the Themes to a new computer rather than download. Much faster.
Theme File Format
This document discusses the format of Theme (.theme) files. A .theme file is a .ini text file that is divided into sections, which specify visual elements that appear on a Windows desktop. Section names are wrapped in brackets ([]) in the .ini file.
A new file format, .themepack, was introduced with Windows 7 to help users share themes. Themes can be selected in the Personalization Control Panel only in Windows 7 Home Premium or higher, or only on Windows Server 2008 R2 when the Desktop component is installed.
The following topics are discussed in this article.
Creating a Theme File
A .theme file enables you to change the appearance of certain desktop elements. You can create or modify a .theme file in two ways:
- Modify personalization or display settings in Control Panel and save the settings as a .theme file. See your Windows Help for instructions.
- Create a .theme file manually for a greater level of control over the details of your theme.
To make your theme available to other users, you must supply your .theme file, as well as the background picture, screen saver, and icons files. You can do this with a theme pack.
Description of a Theme File
Theme files have a number of required and optional sections. The following describe the sections of .theme files and provide examples of how to specify changes for the different elements.
[Theme] Section
This section is optional. If you do not include this section in your .theme file, the system uses default settings.
The [Theme] section identifies the name of your custom theme and specifies your theme’s brand logo and desktop icons.
The first part of the [Theme] section contains the following two elements:
| Element | Description |
|---|---|
| DisplayName=name or DisplayName=@module,-stringId example: DisplayName=@themeui.dll,-2013 | DisplayName is the theme name that will show up in the Personalization Control Panel. It can be a string or a reference to a localized name. This field is optional. If it is missing, the theme filename is used as the theme name. |
| BrandImage=path to image example: BrandImage=c:\Fabrikam\brand.png | Windows 7 and laterBrandImage specifies the path to a branded graphic file that is incorporated in the theme preview in the Personalization Control Panel. The icon graphic must be a PNG file. The graphic is scaled to 80×240 pixels, so it is recommended that you provide an image of that size. The Theme gallery respects the transparent regions of your brand icon. This field is optional. If it is missing, no logo is displayed as the theme icon. |
The rest of the [Theme] section specifies custom icons for desktop features like Computer, My Documents, Network, and Recycle Bin. If you do not specify custom desktop icons, the desktop displays the system default desktop icons.
The following are two examples of how a .theme file sets the Computer icon.
The following are values for the default desktop icons in Windows 7.
[Control Panel\Colors] Section
This section is optional. If you do not include this section in your .theme file, the system uses default settings. If your theme uses the Aero visual style, you should avoid overriding the default values in this section.
The color of elements, such as scroll bars, text, and buttons, are customizable. The .theme file specifies the RGB values to change for these elements. The values override the default values of the visual style and are used when your theme is based on Windows Classic, Windows 7 Basic, or High Contrast themes.
Following is an example of how colors are set.
[Control Panel\Cursors] Section
This section is optional. If you do not include this section in your .theme file, the system uses default cursors.
A theme can also change the appearance of cursors. To do so, you create .cur files to replace the default Windows cursors. The following example is from a .theme file that defines the cursors for a theme called Sports.
[Control Panel\Desktop] Section
This section is required. If you do not include this section in your .theme file, the system ignores your Theme and does not display the Theme in Control Panel.
You can create a custom desktop background and specify a path to the image file. The following example shows how to modify the desktop appearance.
[Slideshow] Section
Windows 7 and later.
This section is optional. If you do not include this section in your .theme file, the system uses the desktop background image specified in the [Control Panel\Desktop] section. If you include this section, you must specify slide show settings here.
Your theme’s background can be a slide show either of images stored locally or of images served by an RSS feed. The [Slideshow] section of the file contains the following attributes:
| Attribute | Description |
|---|---|
| Interval=number of milliseconds | Required. Interval is a number that determines how often the background changes. It is measured in milliseconds. |
| Shuffle=0 or 1 | Required. Shuffle identifies whether the background shuffles. 0 = Disabled 1 = Enabled |
| RSSFeed=URL to RSS feed | Required if ImagesRootPath is not specified. RSSFeed specifies an RSS feed to use as the background slide show. For the feed to work, you need to reference high-resolution images adhering to the «enclosures» standard used by the Windows RSS Platform. Because of this limitation, .theme files that include an RSS feed must be created manually.
|
| ImagesRootPath=path to image folder | Required if RSSFeed is not specified. ImagesRootPath specifies a path to a set of images you want to use as the background slide show. Images in subfolders are not included in the slide show. ImagesRootPath supports Environment Variable substitutions in the path.
|
| ItemNPath=path(s) to specific image(s) | For use with ImagesRootPath. ItemNPath specifies paths to specific images, so that you can limit the slide show to particular images instead of all images in a folder. If no paths are specified, all images in the ImagesRootPath path are used in the slide show, including images added after creating and installing the theme. ItemNPath supports Environment Variable substitutions in the path. N is 0, 1, 2, and so on. |
The following examples show how a .theme file specifies the slide show to include a set of images stored locally.
The following example is a template for a .theme file that creates a desktop background slide show using images from an RSS feed. Follow these steps to customize the template:
- Copy the following example and paste it into a text editor.
- Replace
with the name you want to appear in the Personalization Control Panel themes gallery. - Replace
with the full path to a compatible RSS feed. - Save the changes as a file with the «.theme» extension.
[Metrics] Section
This section is optional. If you do not include this section in your .theme file, the system uses default visual style settings.
You can specify system metrics in a .theme file. System metrics are the dimensions of various display elements, such as the window border width, icon height, or scroll bar width. The NonclientMetrics and IconMetrics values are binary structures defined by NONCLIENTMETRICS and ICONMETRICS in winuser.h. Following is an example of how to change system metrics.
[Visual Styles] Section
This section is required. If you do not include this section in your .theme file, the system ignores your Theme and does not display the Theme in Control Panel.
You can supply specific information concerning the size and color of desktop elements in .msstyles files. The color and size sections of .theme files can be replaced by .msstyles files which enable you to modify desktop elements in more detail. These files are specified in the visual styles section of a .theme file. Following is an example of a visual styles section.
Adding a Path element to a .msstyles file is optional. If you supply a path, you should remove the metrics and color sections from the .theme file. When these sections are removed, the colors, fonts, and sizes for a theme come from the .msstyles file and match the .msstyles author’s intent. Failing to remove the metric and color sections can cause Windows or applications to have drawing problems.
Windows Vista / Windows 7: When the path points to Aero.msstyles, you can specify the desired Glass Color, as shown in the following example.
Windows 7: When the path points to Aero.msstyles, you can also specify the desired Transparency value, as shown in the following example.
If the ColorizationColor and Transparency values exactly match a system color, the Personalization Control Panel displays the system name for the color. Otherwise, the color is labeled «Custom.»
The following shows a VisualStyles section for the Windows 7 Basic theme.
The following shows a VisualStyles section for the Windows Classic theme.
The following shows a VisualStyles section for a High Contrast Black theme.
[Sounds] and [AppEvents] Sections (Sounds)
This section is optional. If you do not include this section in your .theme file, the system uses default sound settings.
The user can select the Sound icon in Control Panel to associate sounds with events that occur in applications. For example, a .wav file can play when an application is opened. A .theme file can specify .wav files to replace the default ones. The following example shows how to do this.
Windows 7 and later: A sound scheme name can be specified instead of listing each sound separately.
The SchemeName value specifies the sound scheme name or the localized sound scheme name, as shown in the example above.
[Boot] Section
Screen Savers are deprecated in the Windows 10 Anniversary Update and beyond.
This section is optional. If you do not include this section in your .theme file, no screen saver is used.
In the .theme file, you can specify the screen saver for Windows to use. The following example shows this.
[MasterThemeSelector] Section
This section is required. If you do not include this section in your .theme file, the system ignores your Theme and does not display the Theme in Control Panel.
The master theme selector section of the .theme file should always be included as a tag that indicates the file is valid. You do not have a choice of values for this parameter. The following shows this.
Example of a Theme File
The following example shows a complete .theme file.
Installing Theme Files
When Windows is initialized, the operating system enumerates the first-level subdirectories of %WinDir%\Resources\ to identify available themes. The system default theme files are located in %WinDir%\Resources\Themes. The user theme files are stored in %WinDir%\Users\\AppData\Local\Microsoft\Windows\Themes.
A .theme file has file associations; therefore, theme installer applications can call ShellExecute on a .theme file to open the Personalization window in Control Panel to the specified theme.
Theme Packs
Windows 7 and later. A theme pack is a .cab file that contains not only the .theme file but also the files needed to implement the theme on another computer, such as sound files and images. Users can create theme packs through the Personalization Control Panel.
Supported file types include the following:


