- How to Configure a Domain User or Group
- How to Add a Domain User or Group
- How to Remove a Domain User or Group
- How to Set Permissions for a User or a Group
- List of user groups command line
- Добавление пользователей в локальную группу администраторов через GPO
- Особенности использования группы локальных администраторов в домене Active Directory
- Добавление пользователей в локальную группу администраторов через Group Policy Preferences
- Управление локальными администраторами через Restricted Groups
- Предоставление прав администратора на конкретном компьютере
How to Configure a Domain User or Group
The deployment settings enable you to control which users or groups can access the MED-V workspace, as well as how long the MED-V workspace can be utilized and whether it can be used offline. You can also configure additional rules to control access between the MED-V workspace and the host.
All MED-V workspace permissions are configured in the Policy module, on the Deployment tab.
To allow users to utilize the MED-V workspace, you must first add domain users or groups to the MED-V workspace permissions. You can then set permissions for each user or group.
How to Add a Domain User or Group
To add a domain user or group
In the Users / Groups window, click Add.
In the Enter User or Group names dialog box, select domain users or groups by doing one of the following:
In the Enter User or Group names field, type a user or group that exists in the domain or as a local user or group on the computer. Then click Check Names to resolve it to the full existent name.
Click Find to open the standard Select Users or Groups dialog box. Then select domain users or groups.
Click OK.
The domain users or groups are added.
Note
Users from trusted domains should be added manually.
How to Remove a Domain User or Group
To remove a domain user or group
In the Users / Groups window, select a user or group.
Click Remove.
The user or group is deleted.
How to Set Permissions for a User or a Group
To set permissions for a user or a group
Click the user or group for which you are setting the permissions.
Configure the MED-V workspace properties as described in the following table.
On the Policy menu, select Commit.
Workspace Deployment Properties
Property Description General
Enable Workspace for
Select this check box to enable the MED-V workspace for this user or group.
Workspace expires on this date
Select this check box to assign an expiration date for the permissions set for this user or group.
When selected, the date box is enabled. Set the date, and permissions will expire at the end of the date specified.
Offline work is restricted to
Select this check box to assign a time period in which the policy must be refreshed for this user or group. When selected, the time period box is enabled. Set the number of days or hours, and at the end of the specified time period, the user or group will not be able to connect if the policy is not refreshed.
Workspace deletion options
Click to set the MED-V workspace deletion options. For more information, see How to Set MED-V Workspace Deletion Options.
Support clipboard between host and Workspace
Select this check box to enable copying and pasting between the host and the MED-V workspace.
Support file transfer between the host and Workspace
Select this check box to enable transferring files between the host and MED-V workspace. Select one of the following options from the File Transfer box:
Both—Enable transferring files between the host and the MED-V workspace.
Host to Workspace—Enable transferring files from the host to the MED-V workspace.
Workspace to Host—Enable transferring files from the MED-V workspace to the host.
Note
If a user without permissions attempts to transfer files, a window will appear prompting him to enter the credentials of a user with permissions to perform the file transfer.
Important
To support file transfer in Windows XP SP3, you must disable offline file synchronization by editing the registry as follows:
REG ADD HKLM\software\microsoft\windows\currentversion\netcache /V Enabled /T REG_DWORD /F /D 0
Click to set the advanced file transfer options. For more information, see How to Set Advanced File Transfer Options.
Enable printing to printers connected to the host
Select this check box to enable users to print from the MED-V workspace using the host printer.
Note
The printing is performed by the printers defined on the host.
Enable access to CD / DVD
Select this check box to allow access to a CD or DVD drive from this MED-V workspace.
Multiple Memberships
If the user is part of a group and permissions are applied to the user as well as to the group they are part of, all permissions are applied.
If the user is a member of two different groups, the least restrictive permissions are applied.
List of user groups command line
On Windows OS we can find the list of local user groups created on a system from Contorl Panel -> User Accounts. This information can be obtained from command line also using net command. Syntax is shown below.
Example: Running this command shows the following local groups on my system.
How to list the users in a local group?
Use the below command to know the list of members of a group from command line.
For example to get the list of all remote desktop users on a system we can run the below command.
How to find the list of all groups a user is member of?
You can run the below command to list the groups a user is member of. This command prints the details of the given user account. You can find the group membership information in the last two line of this command output.
Useful references, however “net use username” should be changed to “net user username”
Thank you Kennedy. Corrected the command.
Please get me a command which will display all local users as: LOGIN, FULL NAME, DESCRIPTION, GROUP etc..
I’d just like to express my frustration with this API. As you can see in these examples, thet net API localgroups functionality will happily list all members of a group. However the net user code completely ignores system accounts, as does most of the rest of what Windows makes available. Internally they are organized as a subclass of Win32_Account but not Win32_UserAccount. So it’s possible to retrieve a bunch of useless information from the Windows API. This happens with LookupAccountSid as well. If you give it an SID like S-1-5-20, it will give you an answer. But the answer it gives you can’t be used as input for anything else, which is obnoxious.
You can query if users exist by doing
SET /P query_user=What user do i look for?
::Take out /domain if you want to look on the local computer
Net User %query_user% /domain
if NOT %errorlevel% == 0 goto s_error_1
if %errorlevel% == 0 goto s_success_1
“net user /domain username” lists only the groups to which the username is a direct member. It can’t show nested groups. I was doing a quick check to see if a username was a member of a group:
net user /domain username | find “Group Name”
That fails since the user is not directly a member of “Group Name”. In reality, they are a member, as they’re a member of a nested group.
Any idea of a command line that will expand groups to look for a particular member? I’ve used the “dsquery” and “dsget” commands, but they are only present if the AD tools are installed.
Very useful thanks, didn’t worked for me the first time.
The command is not case sensitive.
For example “NET USER /DOMAIN MYDOMAIN/MyUser” Didn’t worked.
But “NET USER /DOMAIN MyUser” works fine!
So not necessary to put explicitly the domain.
By the way it means also you can’t query another domain than the main one you are logged on to ?
Is there any option where we can get the multiple user’s output in excel for local computer and remote computer
net user userName
Добавление пользователей в локальную группу администраторов через GPO
С помощью доменных групповых политик вы можете добавить необходимых пользователей AD (или группы) в локальную группу администраторов на серверах или рабочих станциях. Так можно предоставить права локального администратора на компьютерах домена сотрудникам техподдержки, службе HelpDesk, определенным пользователям и другим привилегированным аккаунтам. В этой статье мы покажем насколько способов управления членами локальной группы администраторов на компьютерах домена через GPO.
Особенности использования группы локальных администраторов в домене Active Directory
При добавлении компьютера в домен AD в группу Administrators автоматически добавляется группы Domain Admins, а группа Domain User добавляется в локальную Users.
Самый простой способ предоставить права локального администратора на определенном компьютере – добавить пользователя или группу в локальную группу безопасности Administrators через локальную оснастку “Локальные пользователи и группы” (Local users and groups — lusrmgr.msc). Однако такой способ очень неудобен, если компьютеров много и со временем в группах локальных администраторов обязательно окажутся лишние личности. Т.е. при таком способе предоставлении прав неудобно контролировать состав группы локальных администраторов.
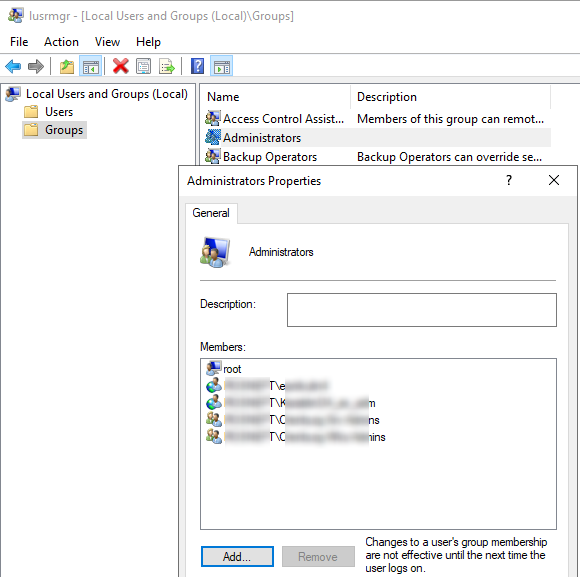
В классических рекомендациях по безопасности Microsoft рекомендуется использовать следующие группы для разделения полномочиями администраторов в домене:
- Domain Admins – администраторы домена, используются только на контроллерах домена;
Допустим, нам нужно предоставить группе сотрудников техподдержки и HelpDesk права локального админа на компьютерах в конкретном OU. Создайте в домене новую группу безопасности с помощью PowerShell и добавьте в нее учетные записи сотрудников техподдержки:
New-ADGroup «mskWKSAdmins» -path ‘OU=Groups,OU=Moscow,DC=winitpro,DC=ru’ -GroupScope Global –PassThru
Add-AdGroupMember -Identity mskWKSAdmins -Members user1, user2, user3
Откройте консоль редактирования доменных групповых политик (GPMC.msc), cоздайте новую политику AddLocaAdmins и назначьте ее на OU с компьютерами (в моем примере это ‘OU=Computers,OU=Moscow,dc=winitpro,DC=ru’).
В групповых политиках AD есть два метода управления локальными группами на компьютерах домена. Рассмотрим их по-очереди:
- Ограниченные группы (Restricted Groups)
- Управление локальным группами через предпочтения групповых политик (Group Policy Preferences)
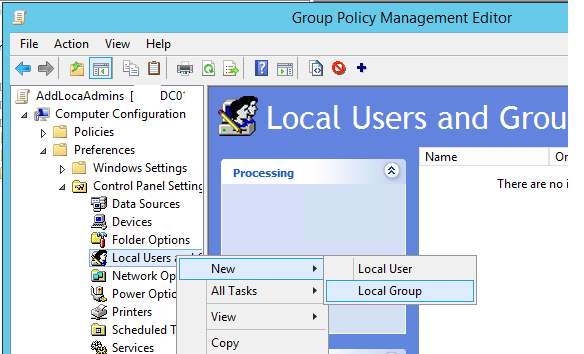
Добавление пользователей в локальную группу администраторов через Group Policy Preferences
Предпочтения групповых политик (Group Policy Preferences, GPP) предоставляют наиболее гибкий и удобный способ предоставления прав локальных администраторов на компьютерах домена через GPO.
- Откройте созданную ранее политику AddLocaAdmins в режиме редактирования;
- Перейдите в секцию GPO: Computer Configuration –> Preferences –> Control Panel Settings –> Local Users and Groups;
- Щелкните ПКМ по правому окну и добавите новое правило (New ->Local Group);

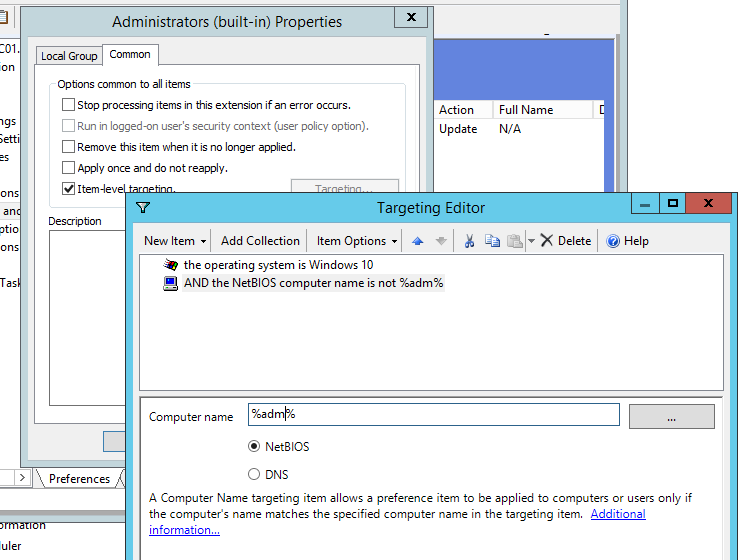
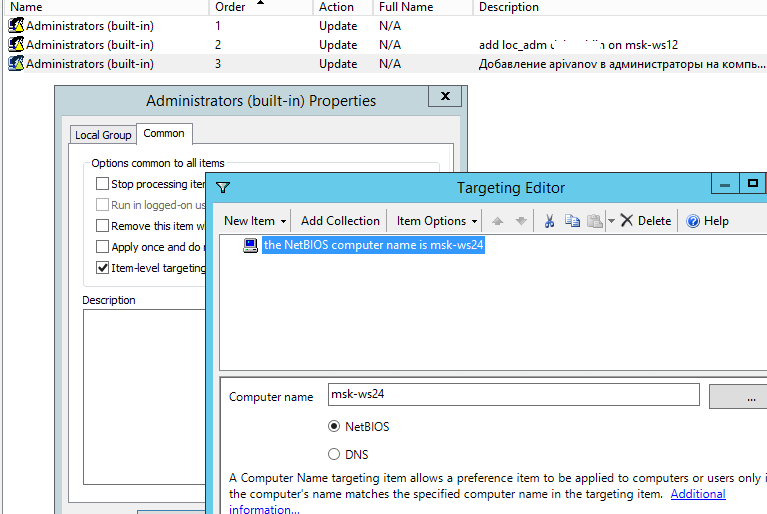
- В поле Action выберите Update (это важная опция!);
- В выпадающем списке Group Name выберите Administrators (Built-in). Даже если эта группа была переименована на компьютере, настройки будут применены к группе локальных администраторов по ее SID — S-1-5-32-544;
- Нажмите кнопку Add и укажите группы, которые нужно добавить в локальную группу администраторов (в нашем случае это mskWKSAdmins)
Вы можете настроить дополнительные (гранулярные) условия нацеливания данной политики на конкретные компьютеры с помощью WMI фильтров GPO или Item-level Targeting. Во втором случае перейдите на вкладку Common и отметьте опцию Item-level targeting. Нажмите на кнопку Targeting. Здесь вы можете указать условия, когда данная политика будет применяться. Например, я хочу, чтобы политика добавления группф администраторов применялась только к компьютерам с Windows 10, чьи NetBIOS/DNS имена не содержат adm . Вы можете использовать свои условия фильтрации.
Не рекомендуется добавлять в этой политики индивидуальные аккаунты пользователей, лучше использовать доменные группы безопасности. В этом случае, чтобы предоставить права администраторов очередному сотруднику тех. поддержки, вам достаточно добавить его в доменную группу (не придется редактировать GPO),
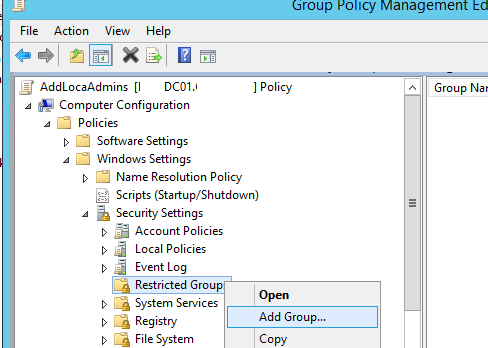
Управление локальными администраторами через Restricted Groups
Политика групп с ограниченным доступом (Restricted Groups) также позволяет добавить доменные группы/пользователей в локальные группы безопасности на компьютерах. Это более старый способ предоставления прав локального администратора и сейчас используется реже (способ менее гибкий, чем способ с Group Policy Preferences).
- Перейдите в режим редактирования политики;
- Разверните секцию Computer Configuration -> Policies -> Security Settings -> Restrictred Groups (Конфигурация компьютера -> Политики -> Параметры безопасности -> Ограниченные группы);
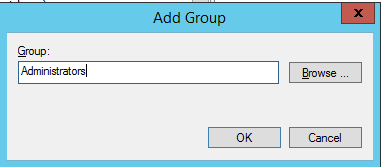
- В контекстном меню выберите Add Group;
- В открывшемся окне укажите Administrators -> Ok;
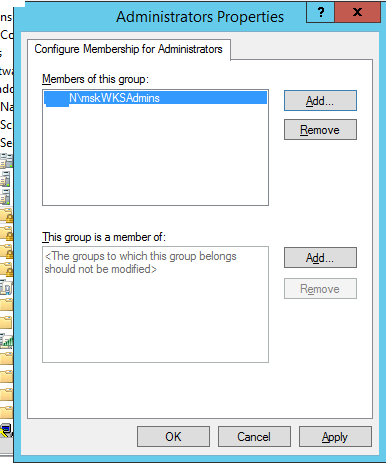
- В секции “Members of this group” нажмите Add и укажите группу, которую вы хотите добавить в локальные админы;
- Сохраните изменения, примените политику на компьютеры пользователей и проверьте локальную групп Administrators. В ней должна остаться только указанная в политике группа.
Предоставление прав администратора на конкретном компьютере
Иногда нужно предоставить определенному пользователю права администратора на конкретном компьютере. Например, у вас есть несколько разработчиков, которым периодически необходимы повышенные привилегии для тестирования драйверов, отладки, установки на своих компьютерах. Нецелесообразно добавлять их в группу администраторов рабочих станций на всех компьютерах.
Чтобы предоставить права лок. админа на одном конкретном компьютере можно использовать такую схему.
Прямо в созданной ранее политике AddLocalAdmins в секции предпочтений (Computer Configuration –> Preferences –> Control Panel Settings –> Local Users and Groups) создайте новую запись для группы Administrators со следующими настройками:
- Action: Update
- Group Name: Administrators (Built-in)
- Description: “Добавление apivanov в лок. администраторы на компьютере msk-ws24”
- Members: Add -> apivanov
- На вкладке Common ->Targeting указать правило: “the NETBIOS computer name is msk-ws24”. Т.е. данная политика будет применяться только на указанном здесь компьютере.

Также обратите внимание на порядок применения групп на компьютере – Order. Настройки локальных групп применяются сверху вниз (начиная с политики с Order 1).
Первая политика GPP (с настройками “Delete all member users” и “Delete all member groups” как описано выше), удаляет всех пользователей/группы из группы локальных администраторов и добавляет указанную доменную группу. Затем применится дополнительная политика для конкретного компьютера и добавит в администраторы указанного пользователя. Если нужно изменить порядок применения членства в группе Администраторы, воспользуйтесь кнопками вверху консоли редактора GPO.


