- Transferring Shell Objects with Drag-and-Drop and the Clipboard
- How Drag-and-Drop Works with Shell Objects
- Clipboard Data Transfers
- Drag-and-Drop Data Transfers
- DragQueryFileA function (shellapi.h)
- Syntax
- Parameters
- Return value
- Remarks
- Cannot drag/drop or copy/paste files to disc in dvd/cd drive.
- Replies (5)
- Set the default drag and drop action in Windows 10, Windows 8 and Windows 7
- About Sergey Tkachenko
- 23 thoughts on “ Set the default drag and drop action in Windows 10, Windows 8 and Windows 7 ”
Transferring Shell Objects with Drag-and-Drop and the Clipboard
Many applications allow users to transfer data to another application by dragging and dropping the data with the mouse, or by using the Clipboard. Among the many types of data that can be transferred are Shell objects such as files or folders. Shell data transfer can take place between two applications, but users can also transfer Shell data to or from the desktop or Windows Explorer.
Although files are the most commonly transferred Shell object, Shell data transfer can involve any of the variety of objects found in the Shell namespace. For instance, your application might need to transfer a file to a virtual folder such as the Recycle Bin, or accept an object from a non-Microsoft namespace extension. If you are implementing a namespace extension, it must be able to behave properly as a drop source and target.
This document discusses how applications can implement drag-and-drop and Clipboard data transfers with Shell objects.
How Drag-and-Drop Works with Shell Objects
Applications often need to provide users with a way to transfer Shell data. Some examples are:
- Dragging a file from Windows Explorer or the desktop and dropping it on an application.
- Copying a file to the Clipboard in Windows Explorer and pasting it into an application.
- Dragging a file from an application to the Recycle Bin.
For a detailed discussion of how to handle these and other scenarios, see Handling Shell Data Transfer Scenarios. This document focuses on the general principles behind Shell data transfer.
Windows provides two standard ways for applications to transfer Shell data:
- A user cuts or copies Shell data, such as one or more files, to the Clipboard. The other application retrieves the data from the Clipboard.
- A user drags an icon that represents the data from the source application and drops the icon on a window owned by the target.
In both cases, the transferred data is contained in a data object. Data objects are Component Object Model (COM) objects that expose the IDataObject interface. Schematically, there are three essential steps that all Shell data transfers must follow:
- The source creates a data object that represents the data that is to be transferred.
- The target receives a pointer to the data object’s IDataObject interface.
- The target calls the IDataObject interface to extract the data from it.
The difference between Clipboard and drag-and-drop data transfers lies primarily in how the IDataObject pointer is transferred from the source to the target.
Clipboard Data Transfers
The Clipboard is the simplest way to transfer Shell data. The basic procedure is similar to standard Clipboard data transfers. However, because you are transferring a pointer to a data object, not the data itself, you must use the OLE clipboard API instead of the standard clipboard API. The following procedure outlines how to use the OLE clipboard API to transfer Shell data with the Clipboard:
- The data source creates a data object to contain the data.
- The data source calls OleSetClipboard, which places a pointer to the data object’s IDataObject interface on the Clipboard.
- The target calls OleGetClipboard to retrieve the pointer to the data object’s IDataObject interface.
- The target extracts the data by calling the IDataObject::GetData method.
- With some Shell data transfers, the target might also need to call the data object’s IDataObject::SetData method to provide feedback to the data object on the outcome of the data transfer. See Handling Optimized Move Operations for an example of this type of operation.
Drag-and-Drop Data Transfers
While somewhat more complex to implement, drag-and-drop data transfer has some significant advantages over the Clipboard:
- Drag-and-drop transfers can be done with a simple mouse movement, making operation more flexible and intuitive to use than the Clipboard.
- Drag-and-drop provides the user with a visual representation of the operation. The user can follow the icon as it moves from source to target.
- Drag-and-drop notifies the target when the data is available.
Drag-and-drop operations also use data objects to transfer data. However, the drop source must provide functionality beyond that required for Clipboard transfers:
- The drop source must also create an object that exposes an IDropSource interface. The system uses IDropSource to communicate with the source while the operation is in progress.
- The drag-and-drop data object is responsible for tracking cursor movement and displaying an icon to represent the data object.
Drop targets must also provide more functionality than is needed to handle Clipboard transfers:
- The drop target must expose an IDropTarget interface. When the cursor is over a target window, the system uses IDropTarget to provide the target with information such as the cursor position, and to notify it when the data is dropped.
- The drop target must register itself with the system by calling RegisterDragDrop. This function provides the system with the handle to a target window and a pointer to the target application’s IDropTarget interface.
For drag-and-drop operations, your application must initialize COM with OleInitialize, not CoInitialize.
The following procedure outlines the essential steps that are typically used to transfer Shell data with drag-and-drop:
- The target calls RegisterDragDrop to give the system a pointer to its IDropTarget interface and register a window as a drop target.
- When the user starts a drag-and-drop operation, the source creates a data object and initiates a drag loop by calling DoDragDrop.
- When the cursor is over the target window, the system notifies the target by calling one of the target’s IDropTarget methods. The system calls IDropTarget::DragEnter when the cursor enters the target window, and IDropTarget::DragOver as the cursor passes over the target window. Both methods provide the drop target with the current cursor position and the state of keyboard modifier keys such as CTRL or ALT. When the cursor leaves the target window, the system notifies the target by calling IDropTarget::DragLeave. When any of these methods return, the system calls the IDropSource interface to pass the return value to the source.
- When the user releases the mouse button to drop the data, the system calls the target’s IDropTarget::Drop method. Among the method’s parameters is a pointer to the data object’s IDataObject interface.
- The target calls the data object’s IDataObject::GetData method to extract the data.
- With some Shell data transfers, the target might also need to call the data object’s IDataObject::SetData method to provide feedback to the source on the outcome of the data transfer.
- When the target is finished with the data object, it returns from IDropTarget::Drop. The system returns the source’s DoDragDrop call to notify the source that the data transfer is complete.
- Depending on the particular data transfer scenario, the source might need to take additional action based on the value returned by DoDragDrop and the values that are passed to the data object by the target. For instance, when a file is moved, the source must check these values to determine whether it must delete the original file.
- The source releases the data object.
While the procedures outlined above provide a good general model for Shell data transfer, there are many different types of data that can be contained in a Shell data object. There are also a number of different data transfer scenarios that your application might need to handle. Each data type and scenario requires a somewhat different approach to three key steps in the procedure:
- How a source constructs a data object to contain the Shell data.
- How a target extracts Shell data from the data object.
- How the source completes the data transfer operation.
The Shell Data Object provides a general discussion of how a source constructs a Shell data object, and how that data object can be handled by the target. Handling Shell Data Transfer Scenarios discusses in detail how to handle a number of common Shell data transfer scenarios.
DragQueryFileA function (shellapi.h)
Retrieves the names of dropped files that result from a successful drag-and-drop operation.
Syntax
Parameters
Identifier of the structure that contains the file names of the dropped files.
Index of the file to query. If the value of this parameter is 0xFFFFFFFF, DragQueryFile returns a count of the files dropped. If the value of this parameter is between zero and the total number of files dropped, DragQueryFile copies the file name with the corresponding value to the buffer pointed to by the lpszFile parameter.
The address of a buffer that receives the file name of a dropped file when the function returns. This file name is a null-terminated string. If this parameter is NULL, DragQueryFile returns the required size, in characters, of this buffer.
The size, in characters, of the lpszFile buffer.
Return value
A nonzero value indicates a successful call.
When the function copies a file name to the buffer, the return value is a count of the characters copied, not including the terminating null character.
If the index value is 0xFFFFFFFF, the return value is a count of the dropped files. Note that the index variable itself returns unchanged, and therefore remains 0xFFFFFFFF.
If the index value is between zero and the total number of dropped files, and the lpszFile buffer address is NULL, the return value is the required size, in characters, of the buffer, not including the terminating null character.
Remarks
The shellapi.h header defines DragQueryFile as an alias which automatically selects the ANSI or Unicode version of this function based on the definition of the UNICODE preprocessor constant. Mixing usage of the encoding-neutral alias with code that not encoding-neutral can lead to mismatches that result in compilation or runtime errors. For more information, see Conventions for Function Prototypes.
Cannot drag/drop or copy/paste files to disc in dvd/cd drive.
I recently lost the ability to drag/drop or copy/paste files to a disc in the dvd/cd drive. I get a little red circle with a slash through it when I try to drag/copy it to the disc.
I was able to do this before, but don’t know before what or when it started occuring. I have tried all file types. docs, pics, etc. I see via google search that there are many others having this problem, but no resolution has been found as of yet.
Does anyone have a clue as to a fix for this. It’s VERY frustrating & has taken up a lot of my time. This is the way it’s been done in several windows versions & to now no longer have that ability. you really don’t know what you have till it’s GONE.
I am running Windows 7 Pro 64bit w/SP1
AMD Phenom Quad cor processor 1.80 GHz
Thanks in advance for any help.
Replies (5)
Is the issue specific to a CD/DVD? What happens when you use a different writable disc?
You may try the following methods and check the status of the issue.
Run the fix-it from the article ‘Your CD or DVD drive can’t read or write media’.
Run the hardware troubleshooter:
Restore the computer to a previous state when it was working fine using ‘System Restore’.
Note : When you perform System Restore to restore the computer to previous state, programs and updates you installed are removed.
1 person found this reply helpful
Was this reply helpful?
Sorry this didn’t help.
Great! Thanks for your feedback.
How satisfied are you with this reply?
Thanks for your feedback, it helps us improve the site.
How satisfied are you with this reply?
Thanks for your feedback.
Hi & thanks for your reply.
I have tried several differents cds & dvds.
I have also tried the suggestions above, to no avail. No problems found when I ran the fix-it & no problems found during hardware troubleshooter.
I have tried system restore to 3 different restore points, but all failed due to some windows file,(C:/Windows/servicing/Packages/PA1F43
1.CAT) & I have lost those restore points due to damage or deletion during restore.
When I insert any blank media, when autoplay opens, all I get is general options to open folder to view files. No other options are available.
I have also recently started having problems with my printer. So unfortunatly, I’m going to have to do a recovery, which may prove to be more difficult because my computer came with windows vista home & I upgraded to windows 7 pro.
Set the default drag and drop action in Windows 10, Windows 8 and Windows 7
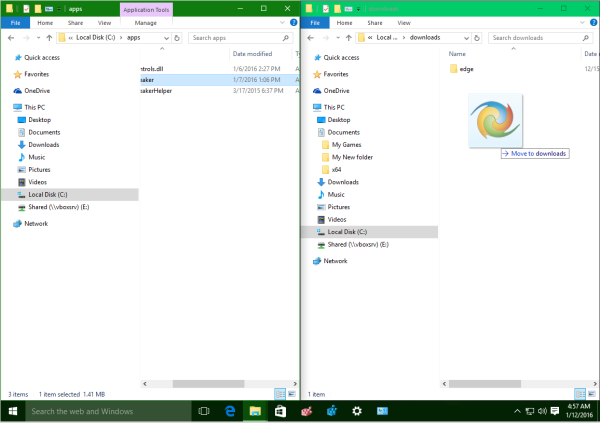
When you drag a file or a folder from one location to another in File Explorer, it will offer you to move it or copy it depending on whether you are dragging it to another folder on the same drive, or to another drive. If you would like to customize the default action, it is possible. In this article, we will see how it can be done.
- Hold the Ctrl key while you are dragging a file or a folder to copy it.
- Hold the Shift key while you are dragging a file or a folder to move it.

- Hold the Alt key while you are dragging a file or a folder to create a shortcut.
If you prefer to change the desired action permanently without using any modifier keys, you need to apply a simple Registry tweak.
- Open Registry Editor.
- Go to the following Registry key:
- 0 — no action will be performed,
- 1 — by default, the dragged file or folder will be copied,
- 2 — the dragged object will be moved,
- 4 — a shortcut will be created for the dragged file or folder.
In the following screenshot, I set the default action to «copy», i.e. DefaultDropEffect = 1: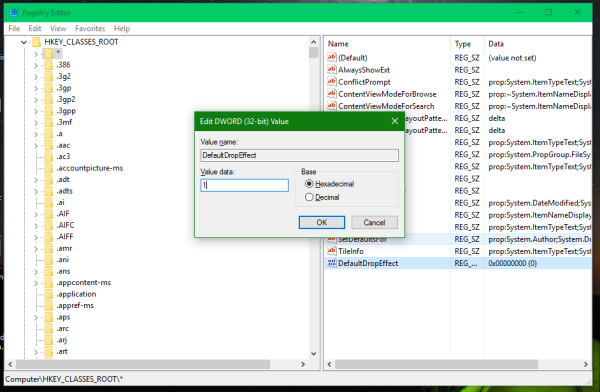
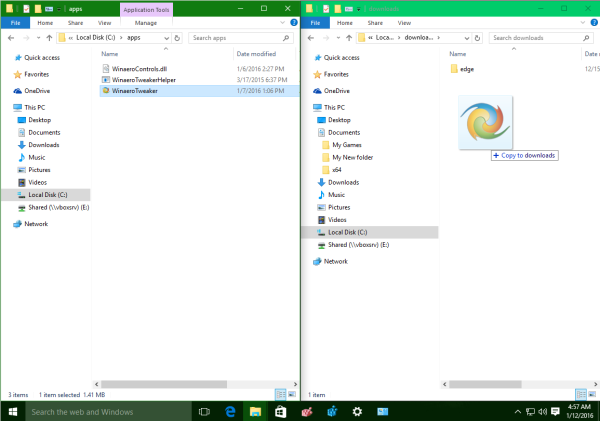
You are done. You can always revert this tweak by deleting the DefaultDropEffect value. And of course, you can still use modifier keys to change the action. Or you can simply use the right mouse button to drag and drop and Windows will show you a context menu asking you what you want to do.
To avoid Registry editing for this tweak, you can use Winaero Tweaker. It allows you to set the default drag-n-drop action with just one click! Check the appropriate option under Behavior\Default Drag-n-Drop action: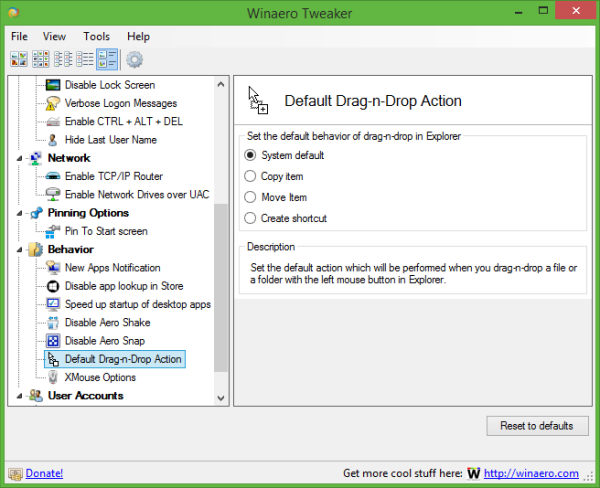
Winaero greatly relies on your support. You can help the site keep bringing you interesting and useful content and software by using these options:
Share this post
About Sergey Tkachenko
Sergey Tkachenko is a software developer from Russia who started Winaero back in 2011. On this blog, Sergey is writing about everything connected to Microsoft, Windows and popular software. Follow him on Telegram, Twitter, and YouTube.
23 thoughts on “ Set the default drag and drop action in Windows 10, Windows 8 and Windows 7 ”
THANK YOU – whoever you are… For saving me from a lot of logistic and emotional trouble by not only explaining the drag&drop change in Win10 in a VERY understandable way, but also making me feel like an IT hero by changing the registry by myself. 🙂 You are awesome and your work affects other people’s lives in a very positive way.
A huge “Danke” from Germany… Niels
Many thanks for the registry tweak, it has removed the annoying pop-up that asks whether you want to move or copy when dragging and dropping on the desktop – MS make tweaks for no reason – in my opinion there was nothing wrong with the original default behaviour of drag and drop to move, and ctrl drag and drop to copy – now it’s back. Cheers.
Very helpful! Especially the Ctrl and Shift – copy and move! I never thought of that! Very clever. 😉 THANK YOU!
You are welcome 🙂
I’ve put the registry keys in a self renaming batch file. copy the code in a text editor and save anywhere as .bat-file.
:: start .
@echo off
set scriptNameCopy=always move files
set scriptNameMove=always copy files
if “%currentName%” == “%scriptNameCopy%” (
REG ADD HKCR\* /v DefaultDropEffect /t REG_DWORD /d 1 /f
REG ADD HKCR\AllFilesystemObjects /v DefaultDropEffect /t REG_DWORD /d 1 /f
ren %0 “%scriptNameMove%.bat”
) else (
REG ADD HKCR\* /v DefaultDropEffect /t REG_DWORD /d 2 /f
REG ADD HKCR\AllFilesystemObjects /v DefaultDropEffect /t REG_DWORD /d 2 /f
ren %0 “%scriptNameCopy%.bat”
)
:: end .
Nice. Thanks for sharing Peter!
This tweak doesn’t work for me at all. I’ve used Winaero Tweaker and registry editor to change the settings to move files since I have multiple partitions but when I’m moving files around, it only asks me the default operation. I’m currently running in Windows 10 Pro Insider Preview build 16188 (rs_prerelease branch).
Go to HKEY_CLASSES_ROOT\AllFileSystemObject\
Add 32-bit DWORD name: DefaultDropEffect – and set it to 2.
The change will take effect without reboot, so you can immediately test it.
Sorry for the late reply but it’s still not working for me. As of this writing, I’m running in build 16125.
I had the same problem using DND after changing Explorer settings to leave only This PC setting.
If you keep Quick access then you can DND on left and right and between the two.
since I installed the tweak
I cannot DRAG&DROP anymore in explorer (win 10 1709 64b)
I looked up the registry where the 2 DefaultDropEffect keys are on 2
rebooting has no effect whatsoever
I seem to accidentally activate a “tweak” with my common settings which I really don’t want.
Somehow in windows-explorer the drag’n’drop- function from file-section to the left folder-panel is blocked. When I drag something to the left pane (to move/copy it to a drive or expanded folder), the pointer changes to a red “X”.
It’s totally annoying and I have no idea where I activated this, or how I can revert it.
Restore the Quick Access item in the Navigation Pane. Thanks to Microsoft for making it annoying.
To set the default drag and drop action in windows 10 you have to follow some instructions. Otherwise, you might get into trouble. In this article, the whole procedures are explained in a proper way.
Drag and Drop is the old process that is Invented from Windows 7. How to activate the Drag and Drop process by default that is explained in this site. To activate this process you can follow step by step from the site.
Brilliant, easy to follow instructions, works a treat, thank you very much
Thank you so much. This worked wonders for moving files.
But I was wondering…
I used to be able to highlight text drag and drop a copy of the text. However, now with the latest update of Win10 2020/06, this doesn’t work for me anymore. Tried your settings and thought it might do the same but without any luck.
Any help would be appreciated
This tweak works fine on windows explorer but I found it is not working when I am using a third party explorer like ACDsee.
Could you please confirm it will work on all file explorers.
total commander here, apparently it doesnt support external file viewers. in explorer works just fine
win 7 here, it doesnt work
delete the comment, it works in explorer, although i kinda expected it to work in at least total commander
Doesn’t work in latest Windows 10 20H2 build 19042.746


