- How to Fix Folder Keeps Reverting to Read Only on Windows 10
- What causes the folder to revert to read-only on Windows 10?
- Solution 1: Disabling Controlled Access
- Solution 2: Login as an Administrator
- Solution 3: Changing the Attribute of the Folder
- Solution 4: Changing Permissions of the Drive
- Solution 5: Disabling your Third-party antivirus
- How to Solve External Hard Drive Read Only in Windows 7/8/10?
- WD external hard drive becomes read only in Windows 7
- How to disable read only for external hard drive?
- Way 1. Disable read only from Diskpart
- Way 2. Modify WriteProtect Key via Registry Editor
- Way 3. Check and fix errors using Check Disk Tool
- Way 4. Fix external hard drive read only by formatting
- Conclusion
- Fix ‘This Drive Is Read Only’ on SD Card/USB/Hard Drive [5 Methods]
- About This Drive Is Read-Only Error
- How to Remove ‘This Drive Is Read-Only’ Error
- #1. Login as Administrator and Access Read-Only Drive Again
- #2. Clear Disk Read-Only Error from Hard Drive/SD Card/USB
- #3. Change Permission to Make a Drive notВ Read-Only
- #4. Take Ownership of Folder and Gain Write Permission
- #5. Clear Write Protection toВ Remove Read-Only State
- Bonus Tip: Recover Data from Removing «Drive Is Read Only» Error
- Conclusion
How to Fix Folder Keeps Reverting to Read Only on Windows 10
If your folder keeps reverting to read-only it could be due to a recent Windows 10 upgrade. Many users have reported that when upgraded their system to Windows 10, they encountered this error. Read-only is a file/folder attribute which lets only a specific group of users read or edit the files or folder. This can get really infuriating, however, the fix is quite simple and easy but may differ depending on the scenario that caused it.
Generally, when you encounter such an issue, you can easily overcome it by unchecking the read-only attribute box found in the properties of the file/folder. However, this case is not that simple. You won’t be able to change the read-only attribute of the file/folder which gets annoying. Nevertheless, this article will teach you how to access your files/folders again — just follow through the instructions.
What causes the folder to revert to read-only on Windows 10?
This might be happening to you due to various reasons, nonetheless, the most generic ones are —
- Windows upgrade. If you’ve recently upgraded your system to Windows 10, this might be occurring due to that as your account permissions may have been altered.
- Account permissions. Sometimes, the error could be simply because of your account permissions which is the most common cause without you realizing it.
The possible and effective solutions for this problem are: –
Solution 1: Disabling Controlled Access
Before we try other technical solutions, we will first try to disable the Controlled Folder Access in your settings. This is a hotfix and you may proceed with other solutions if this doesn’t work for you.
- Press and hold the “Windows Key + I” button to launch Windows Settings.
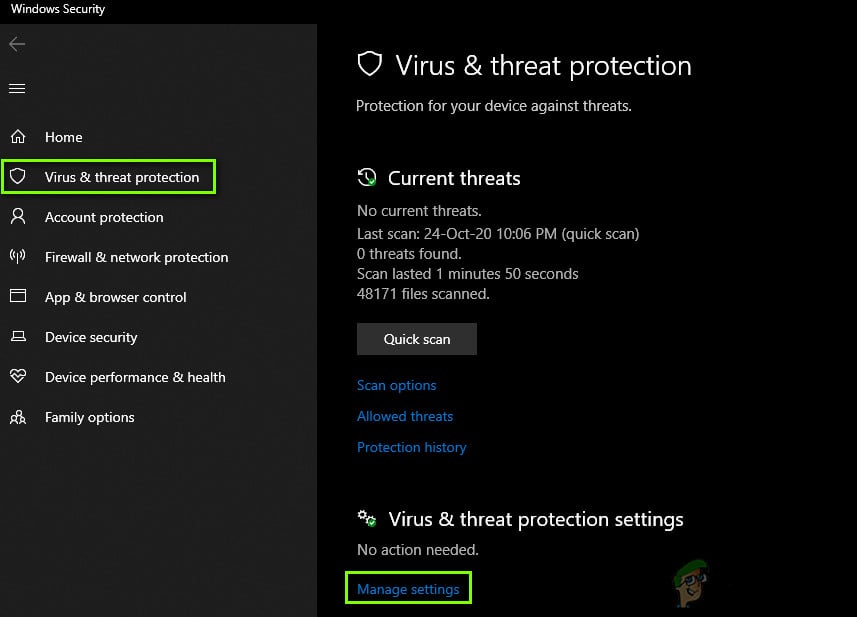
- Once the Settings are opened, navigate to Update & Security and then click on Windows Security.
- Now, under the Virus & threat protection settings, click on Manage settings.
 Virus & threat protection settings
 - Under Controlled folder access, select Manage Controlled folder access and switch the access to Off. Manage Controlled folder access to Off
- Restart your computer completely and then check if the issue is resolved.
 Virus & threat protection settings
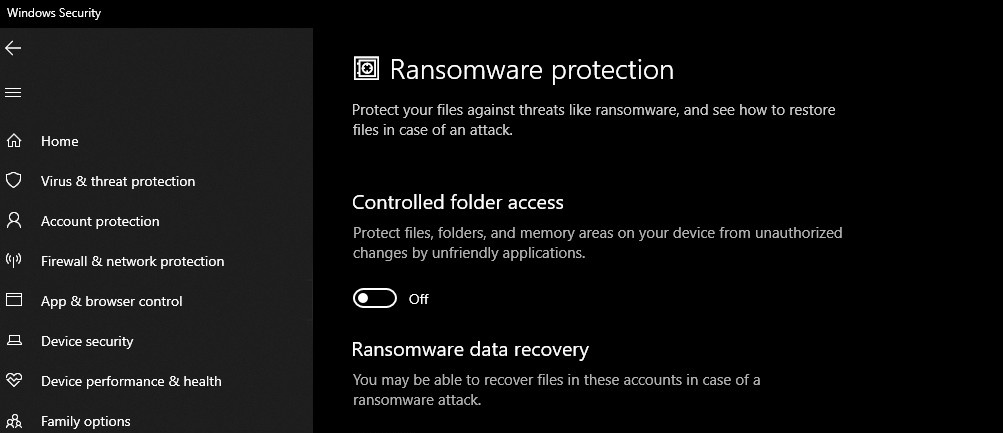 Manage Controlled folder access to Off
Solution 2: Login as an Administrator
To start off with the common mistake, if you have created multiple accounts on your system, make sure you are signed in as an administrator while accessing the file. The reason you are not able to read or edit the file/folder could be that the file/folder was created using an administrator account and you are trying to access it using a guest account or any other. Hence, before you move into the solutions mentioned below, make sure you are using the administrative account.
Solution 3: Changing the Attribute of the Folder
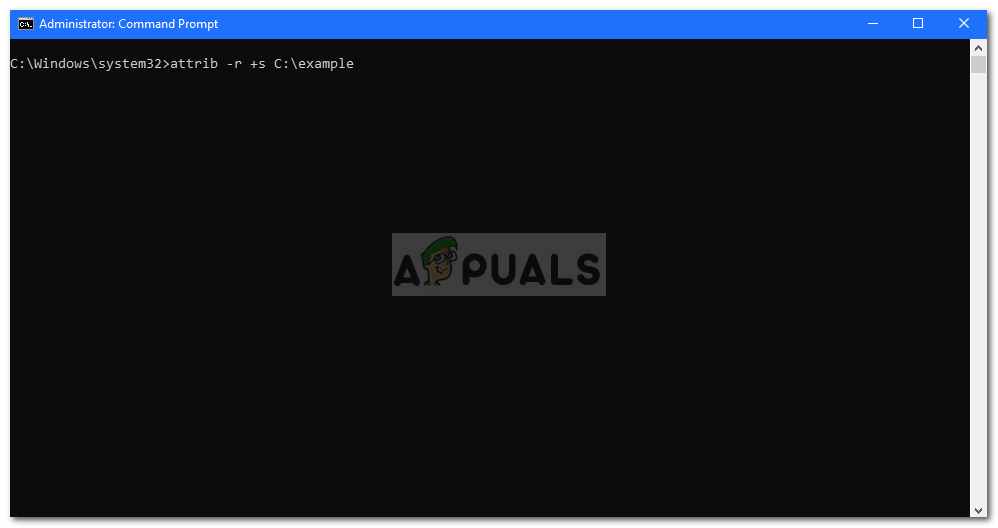
If you are logged in as an administrator and still unable to access the files, then in such a case, you’ll have to change the attribute of the file using the command prompt. To do this, follow the given instructions:
- Press Winkey + X and select Command Prompt (Admin) from the list.
- In order to remove the read-only attribute and set a new attribute, use the following command: Enter the command to remove Read-only Attribute
 Enter the command to remove Read-only Attribute
- The above command will remove the read-only attribute of the file and change it to a system attribute. However, some files/folders do not operate properly in the system attribute so use the following command if you want to remove the system attribute:
Solution 4: Changing Permissions of the Drive
If you are facing this issue after upgrading your system to Windows 10, then changing the permissions of the drive could fix your problem. There have been several reports according to which the issue has been solved via this method. Here’s how to do it:
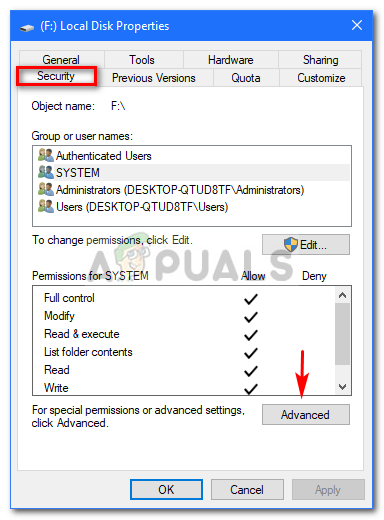
- Right-click on the drive where your files/folders are located.
- Select Properties.
- Navigate to the Security tab. Local Disk Properties (Security)
- Click Advanced and then select Change permissions. Select change permissions
- Highlight your user and then click Edit. Highlight your user and click Edit
- Select This folder, subfolders and files from the drop-down list.
- Check the Full Control box under Basic Permissions. Check the Full Control Box
- Click OK.
 Local Disk Properties (Security)
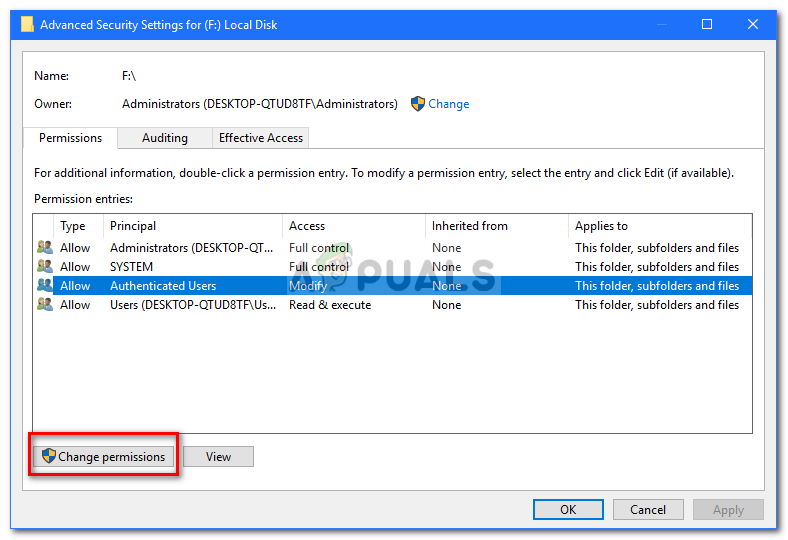 Select change permissions
 Highlight your user and click Edit
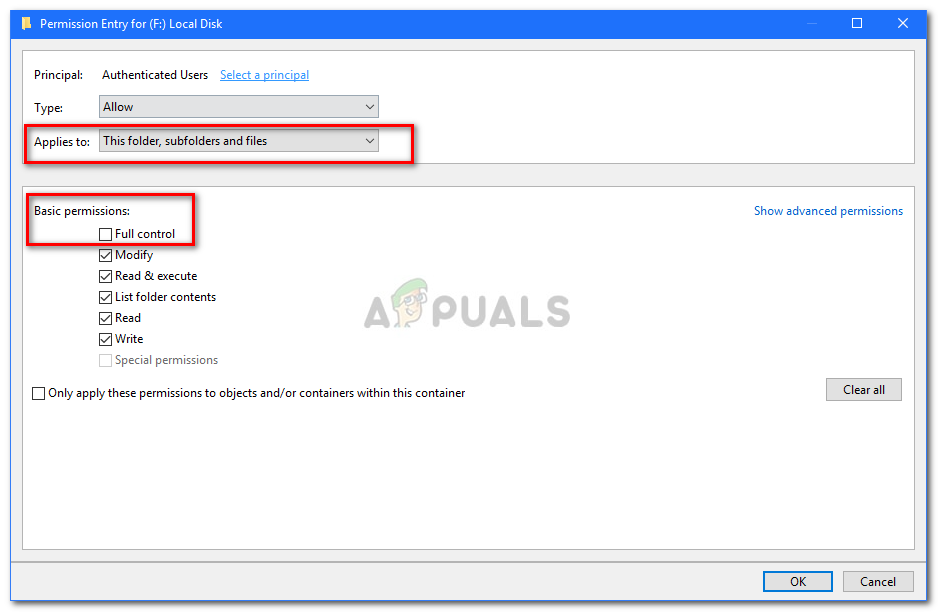 Check the Full Control Box
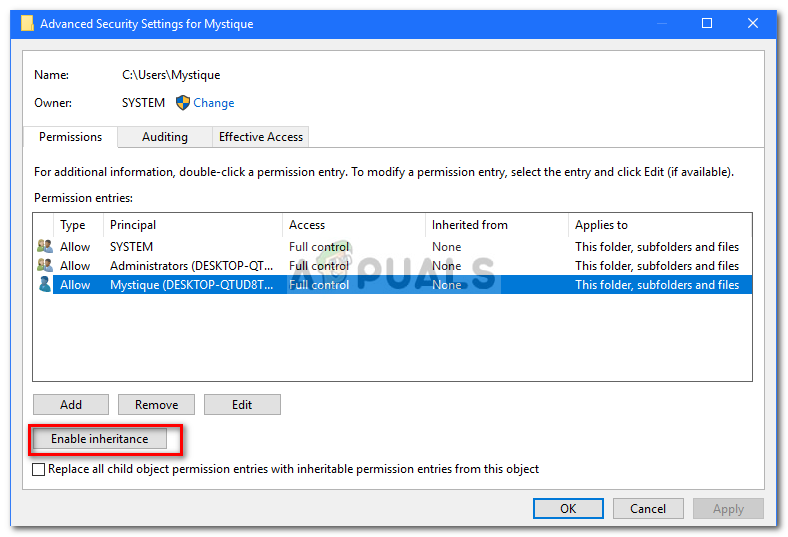
If you have more than one account on the system, then you’ll have to enable inheritance first. Here’s how to do it:
- Go to your System drive (where your Windows is installed).
- Go to the Users folder.
- Right-click on your username and click Properties.
- In the Security tab, click Advanced.
- Hit Enable Inheritance. Highlight your user and click Enable Inheritance
 Highlight your user and click Enable Inheritance
Solution 5: Disabling your Third-party antivirus
If the error persists whenever your system restarts, it could be due to your third-party antivirus software. Your antivirus might be detecting the files as a threat and consequently, stopping you from accessing them. In such a case, you’ll have to disable your antivirus software, change the attributes of the files/folders as mentioned above and restart your system to see if the files/folders still revert to read-only. If they don’t, this means your antivirus is causing the issue and you should probably uninstall it.
How to Solve External Hard Drive Read Only in Windows 7/8/10?
External hard drive becomes read only in Windows 7/8/10? Refer to this paper to get solutions to solve external hard drive read only issue, so that you can make write operation to it.

By Bryce  / Last Updated July 17, 2020
WD external hard drive becomes read only in Windows 7
“I want to copy some files from Windows 7 based Dell desktop to my WD external hard drive. But I can’t copy files to it and get an error message saying – The disk is write-protected. Remove the write protection or use another disk. How can I change the WD external hard drive from read only to normal status? Is there any suggestion? Thanks!”
How to disable read only for external hard drive?
External hard drive write-protected (read only) issue can occur out of various elements like virus infection, corrupted file system and etc. To settle out this issue effectively, you can refer to the following methods.
Way 1. Disable read only from Diskpart
If external hard drive gets write-protected as it has been added read only attributes in Diskpart, you can use Diskpart to disable read only attributes as follows:
1. Run Diskpart as administrator
2. Input commands given below and every command should be followed by hitting Enter key.
attributes disk clear read only
![]()
3. After a while, a message – Diskpart attributes cleared successfully will appear. You can type exit and press Enter to close this program.
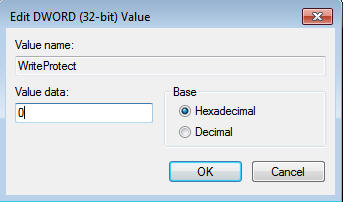
Way 2. Modify WriteProtect Key via Registry Editor
If external hard drive shows as read only status as Registry key is set to enable write protection on it, you can adjust WriteProtect Key from Register Editor. Here are detailed steps.
1. Open Windows Registry Editor (Press Windows+R at the same time, input regedit and hit Enter).
2. Go to the following path:
Computer\HKEY_LOCAL_MACHINE\SYSTEM\CurrentControlSet\Control\StorageDevicePolicies
3. Double click WriteProtect and set the Value Data to 0.
Way 3. Check and fix errors using Check Disk Tool
If your external hard drive is still being read only in Windows 7, you can try Check Disk Tool to check and fix error for it.
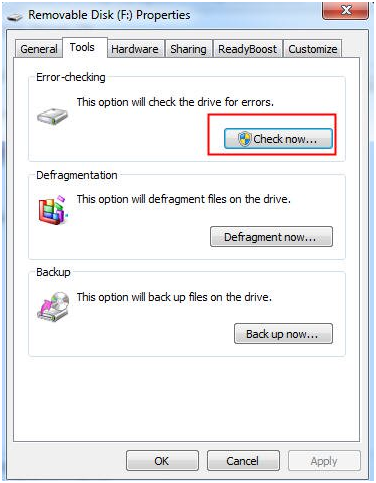
1. Double click computer to open File Explorer, locate the drive on read-only external hard drive and right click it.
2. In the pop-up menu, choose Properties and click Check Now.
3. Check automatically fix file system errors and click Start.
Way 4. Fix external hard drive read only by formatting
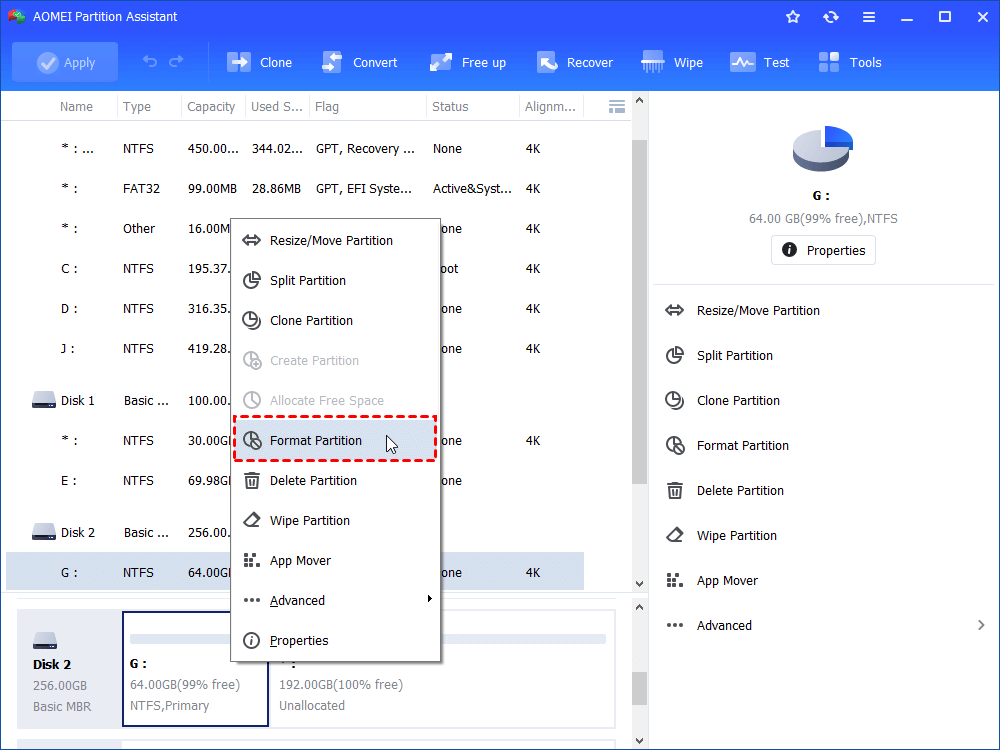
If all the solutions aforementioned are not working, you can try to fix read only issue via formatting external hard drive with a partition tool – AOMEI Partition Assistant Standard. Free download it and have a closer look at how it works:
Warning: This operation will erase all data on the external hard drive partition; you’d better backup important files at first.
1. Install and open it. In the main user interface, click the partition on the external hard drive and choose Format Partition.
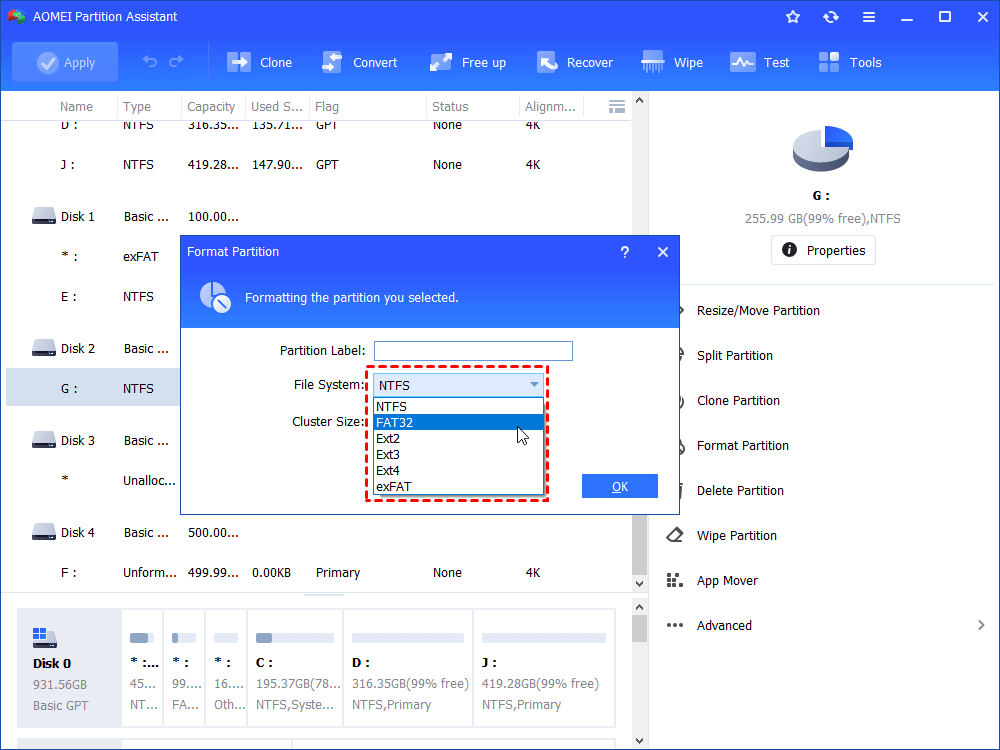
2. In this screen, choose a wanted file system for the partition and click OK.
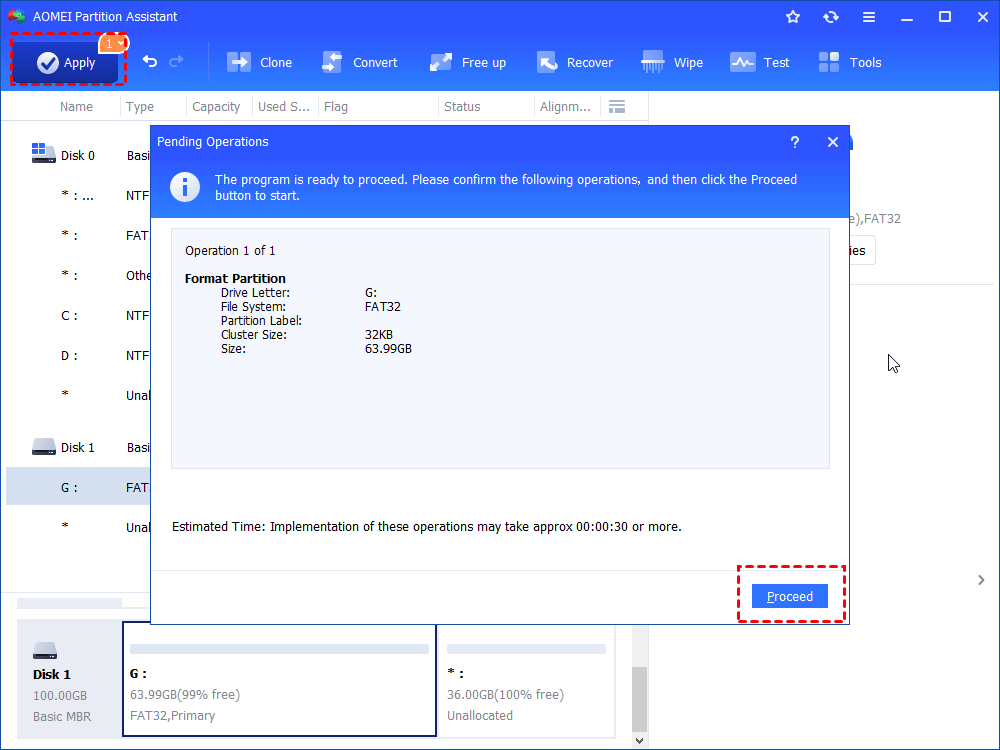
3. You’ll return to the main interface and you can preview the operation result. Click Apply and Proceed to commit it.
Notes:
AOMEI Partition Assistant Standard is compatible with Windows 7/8/8.1/10 XP and Vista.
It owns various other functions like copying external hard drive, making external hard drive bootable and so on.
For more demands, such as recovering lost partition on external drive, you can use AOMEI Partition Assistant Professional.
Conclusion
It is a very simple task to fix external hard drive being read only in Windows 7/8/10 issue. Apart from what covered above, you can run anti-virus to check whether external hard drive is infected; and make sure that there is enough space on external hard drive for you to save files.
Fix ‘This Drive Is Read Only’ on SD Card/USB/Hard Drive [5 Methods]
SD memory card, USB pen drive, internal hard disk drive (HDD) or external hard drive cannot be modified because of Read-Only Memory (ROM), take it easy. This page teaches you how to use the attributes command to remove SD card read-only, so you can apply it to any other drives like in Windows 10/8.1/8/7. And as a supplementary, EaseUS Data Recovery Wizard is available when data loss happens during the course.
Table of Contents
About the Author
Reviews and Awards
Case 1 — USB drive is in read-only mode, how do I change this?
«My USB is read-only, help! I ran DiskPart and looked at the attributes of the disk, and I found that the Current Read-only State was set to yes, but the Read-only was set to No. Where do I start to clear the read-only mode?»
Case 2 — What does it mean when Steam says this drive is read-only?

«Tried to create a new folder in the Steam library, but it failed to create a folder, saying this drive is read-only. What does it mean? And how do I fix this issue?«
Is your SD Card, USB, hard disk drive, or external HDD having a «this drive is read-only» error that you can neither access nor modify the drive at all? If it’s so, stay here. On this page, you will learn:
- What does it mean when a drive is read-only?
- How to make a drive not read-only?
- Why is my drive read-only?
If you are looking for a way to change drive from read-only to read and write again, follow the fixes as presented below:
About This Drive Is Read-Only Error
To get rid of the drive is read-only error from your SD card, USB, or hard disks, you should first understand: 1. What is the «drive read-only» error? 2. What causes the drive read-only?
Being similar to the write protection error, «Drive is read-only» is a permission error that users can only read or copy saved data on a storage device, but not allowed to write new information or edit the saved data. The «Read-only» state could be on a single file, a folder, or even an entire disk like a memory card, USB flash drive, pen drive, hard disk drive, solid-state drive, and external HDD.
According, the causes of this error are various. Here we collect the most reasons that may lead to a storage device read-only:
- Device is locked
- No write permission to the current disk
- Device file system permission is set to be read-only
- Drive or file is set with read-only permission
- Drive is write-protected
How to Remove ‘This Drive Is Read-Only’ Error
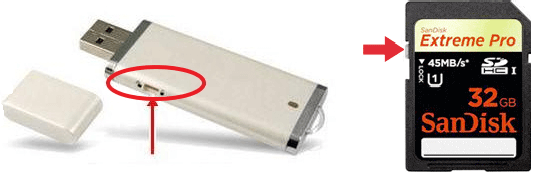
If it’s an SD card or USB flash drive showing read-only, first you can check the lock switch is on or not. Like the below picture demonstrates:
For hard disks and other types of memory cards and flash drives, the following troubleshooting will show you how to remove the error and make your device readable and writeable again:
You can follow the guide step by step to open and make full use of the read-only drives without any obstacles.
#1. Login as Administrator and Access Read-Only Drive Again
Applies to: Remove read-only state from the hard drive by logging in as administrator.
Sometimes, when you log in to computer with another user account, but not as the administrator, you may have a problem in gaining permission to read and write on storage devices. So, if you are having a read-only state drive on your computer, you can first try to log in as an administrator first.
Here are the steps:
Step 1.В Click the Windows icon and click your username at the top.
Step 2.В Select the other visible account on the list, click to switch to Administrator.
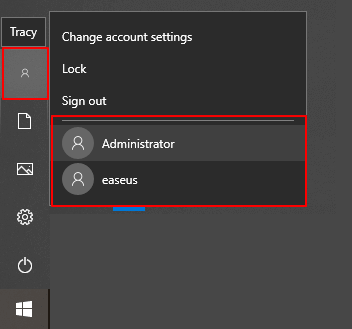
Step 3.В Sign in with the password of your administrator account.
After this, you can try to open the drive which was with a read-only state and check if you can write to the drive. If yes, congratulations. If not, don’t worry. Try the other four presented fixes, one can help you out.
#2. Clear Disk Read-Only Error from Hard Drive/SD Card/USB
Applies to: Remove read-only state from hard drive, USB, SD card, etc.
To clear the Read-only state from your hard drive, you’ll need to turn to DiskPart command lines for help. This is how to list the disk in read-only status and how to clear read-only from it:
Step 1. Connect the drive to a Windows computer, and Windows will assign a drive letter to it.
If it’s a memory card or USB flash drive, it should be a removable disk.
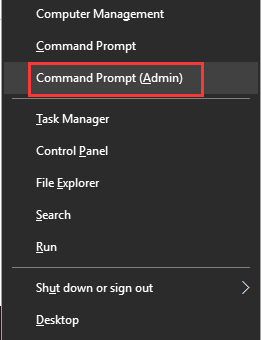
Step 2. Press Windows + X keys to bring up a dialogue and click «Command Prompt (Admin)».
Step 3. On the Command Prompt windows, type DiskPart and hit Enter.
Step 4. Type list disk and hit Enter.
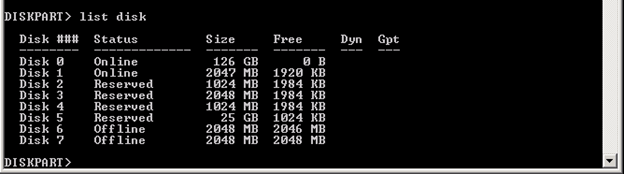
Step 5. Continue typing selectВ disk n and hit Enter.
N stands for the drive number of the drive you see from the step 4 result, e.g. select disk 1.

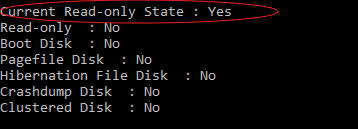
Step 6. Type attributes disk to see the attributes of Disk 1.
As you can see, the Current Read-only State and Read-only are both set to Yes.

Step 7. To clear the Read-only attribute, typeВ attributes disk clear readonly and hit Enter.
![]()
Step 8. Soon the attributes are set to No. Type exit to close the Command Prompt.
To sum it up, to remove SD card read-only as well as other storage memory, you must run DiskPart commands including:
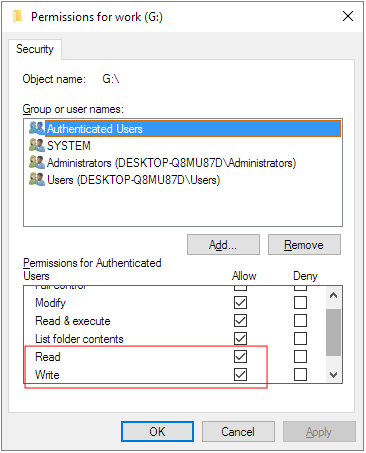
#3. Change Permission to Make a Drive notВ Read-Only
Applies to: Change hard drive, SD, USB from read-only to read and write state in Windows Property settings.
Mostly, it happens to a folder or a specific file that may set to be read-only state on Windows PC or a game drive. When you tend to create a new folder or add a new file to the specific location, Windows will warn you that the drive is read-only.
You can simply set the device to read and write state via its Properties settings with the following steps:
Step 1. Open Windows File Explorer in Windows 10/8/7.
Step 2. Connect the read-only drive to PC, right-click on the drive, and select «Properties».
Step 3. Under the Security tab, tick «Read» and «Write» in the Allow column. Click «Apply».
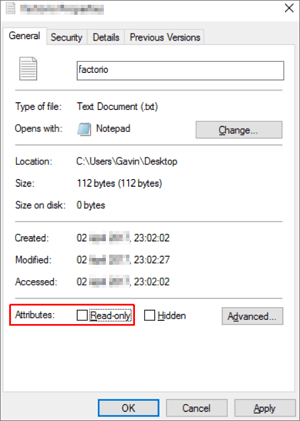
If it’s a read-only folder that leads to your drive unwritable, take the operation as listed here:
Right-click on the folder > go to Properties > On General tab, uncheck «Read-only» next to the Attributes sectioin > Click «OK».
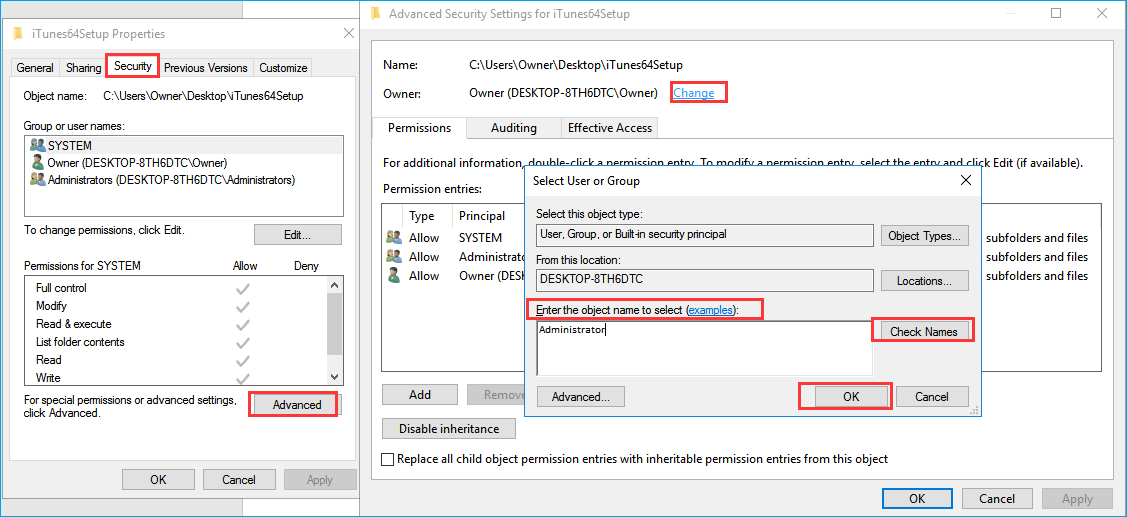
#4. Take Ownership of Folder and Gain Write Permission
Applies to: Take ownership of a specific folder or drive so as to gain the write permission.
Sometimes, when your current user account doesn’t have the permission to write on a specific file, folder, or drive, you’ll encounter a read-only issue. To resolve this error, you can follow steps here to take ownership of your drive:
Step 1. Right-click on the read-only folder or drive, click «Properties» from Context Menu.
Step 2. Click «Security» > «Advanced», and click the «Owner» tab.
Step 3. Click «Change» on the popped up screen, enter Administrators or your user name under the Enter the object name to select section.
Then, click the «Check Names».
If all goes well, the input will change. Click «OK» to save changes.
Step 4. Check «Replace owner on sub containers and objects» and click «Apply» and «OK» to save changes.
Or you can check the «Replace all child object permission entries» option.В
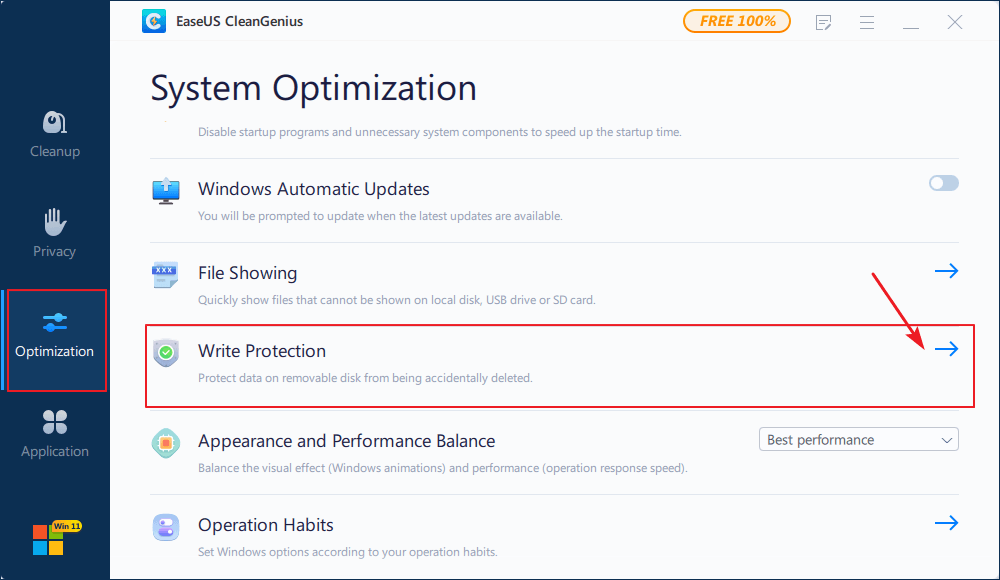
#5. Clear Write Protection toВ Remove Read-Only State
Applies to: Remove write-protection from the drive, USB, or SD which seems to be with the read-only error.
If you are not a professional in computing management and not familiar with command lines, don’t worry. EaseUS R&D team has promoted a fresh kit for helping you resolve the write-protection issue on your hard drive, external hard drive, USB or SD card, etc., devices.
EaseUS Tools M is a practical computer fixing tool that is safe and light-weighted. It’s a perfect alternative to the command line.В
Use this one-click tool to solve the write-protection issues on your own:
If you are not professional in computing management and not familiar with command lines, don’t worry. EaseUS R&D team has promoted a fresh kit for helping you resolve the write-protection issue on your hard drive, external hard drive, USB or SD card, etc., devices.
EaseUS Tools M is a practical computer fixing tool that is safe and light-weighted. It’s a perfect alternative to the command line.В
Use this one-click tool to solve the write-protection issues on your own:
Step 1: оњљ DOWNLOADВ and install EaseUS Tools MВ for free.
Step 2: Run EaseUS Tools M on your PC, choose the «Write Protection» mode.
Step 3: Select the device which is now «Write-Protected» and click «Disable» to remove the protection.
After following through with all the above solutions, hopefully, you have cleared the read-only error from the storage devices, and be able to use the drive again as normal. Now, you may open the drive to access and save new data to your drive.
Don’t worry if you see now files show up or you cannot open saved data. The supplementary data recovery solution as presented in the next part can help.
Bonus Tip: Recover Data from Removing «Drive Is Read Only» Error
Applies to: Recover data after removing the read-only error from a drive, SD card, USB, etc.
After removing the read-only error, some people may find their files are not visible or accessible. Formatting will make the device viable for data storage again but data will get erased.
Fortunately, EaseUS Data Recovery Wizard is available when data loss happens during the course of troubleshooting. You don’t need to pay a penny to test its capability of finding lost data. For an attempt, we suggest you download the free version, which allows for 2GB file recovery for free.
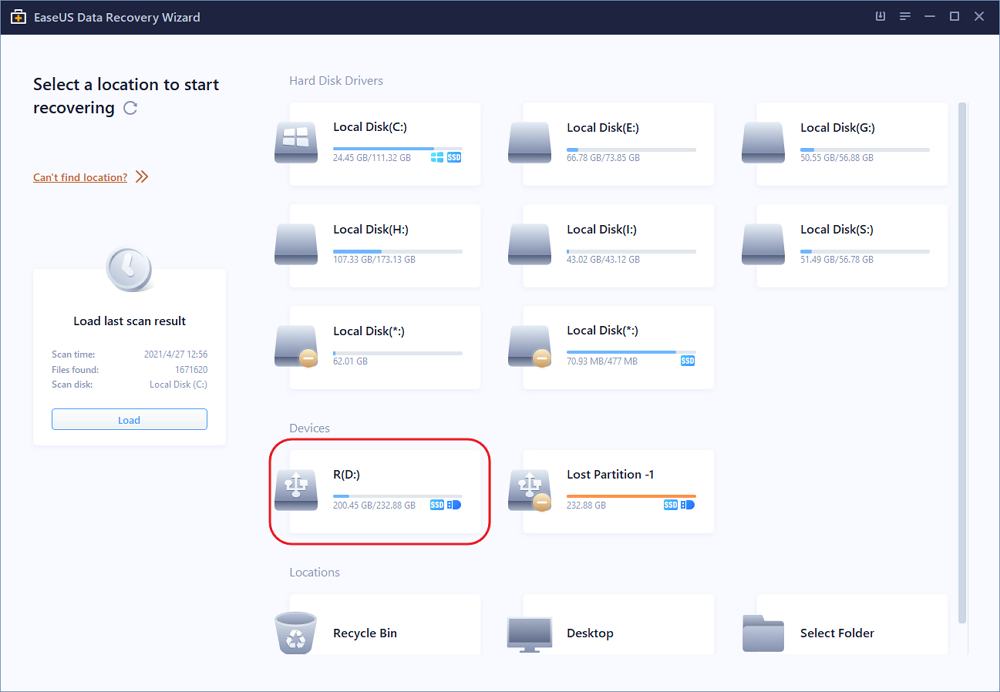
For example, to recover data from an external hard drive, follow the steps:
Step 1. Choose the external hard drive
Since you’re going to recover data from the external hard drive, run EaseUS Data Recovery Wizard and choose the exact drive where you lost data. Click Scan.
Step 2. Scan for lost data
The software will start immediately to scan all over the selected drive for all lost data. During the scan, you could see more and more data showing up in the results.
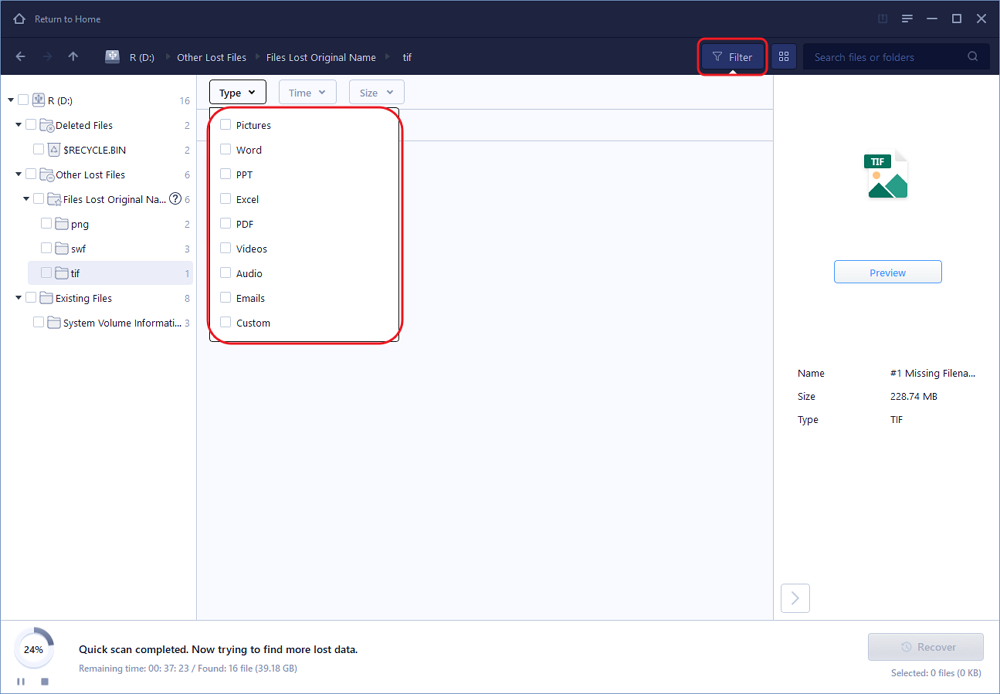
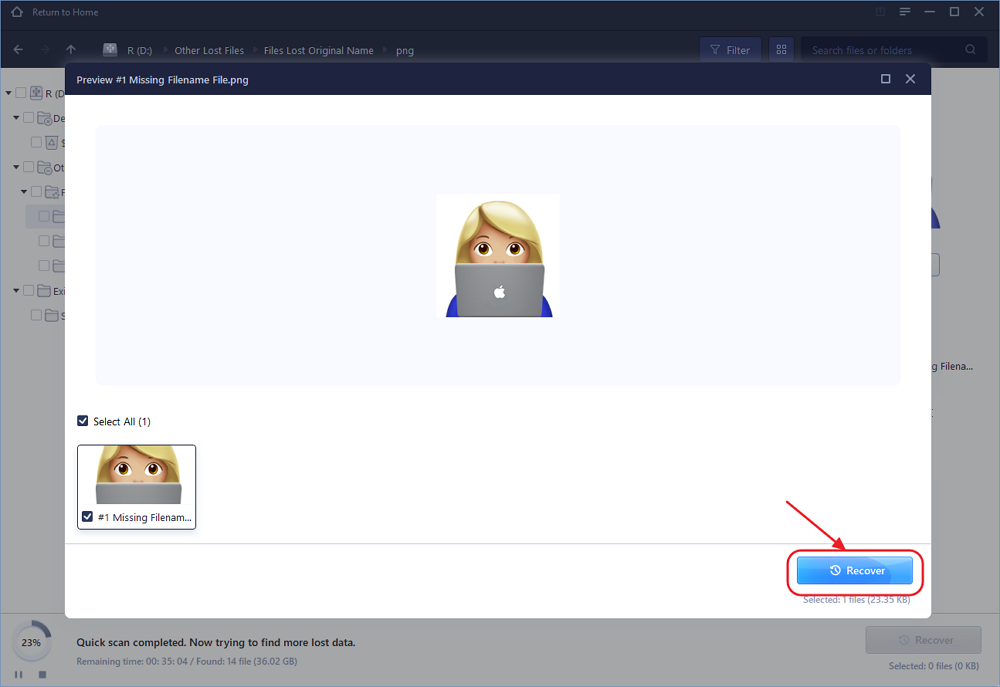
Step 3. Preview and recover data
After the scan is over, check the scan results for the desired data. You can preview the file by double-clicking on it. Click Recover and choose another location to save the recovered data.
Conclusion
On this page, we explained what is Read-only error, what causes this error, and how to fully remove read-only from hard drive, USB, SD card, etc., storage devices.
If you are having a similar issue on your hard drive, check if you are logging as administrator first. If not, switch to the administrator account. If the drive is still read-only, try to take ownership of your drive. Then you can turn to DiskPart cmd command — attributes disk clear readonly to remove this issue.
After this, you can try to open your drive and modify the saved data again. If you lost data, turn to EaseUS Data Recovery Wizard for help. Besides restoring lost files, you can also apply this software to scan a whole disk or even lost partition for retrieving vital files.


