- Update drivers in Windows 10
- Before you begin
- Update the device driver
- Reinstall the device driver
- More help
- Snappy Driver Installer для Windows
- Driver Development Tools
- Add and Remove Drivers to an offline Windows Image
- Driver types
- Add drivers to an offline Windows image
- Remove drivers from an offline Windows image
- Add drivers to an offline Windows image by using an unattended answer file
- Installing a File System Driver
- About Driver Installation
- Creating an INF File for a File System Driver
- Sections in a File System Driver INF File
- Version Section (required)
- DestinationDirs Section (optional but recommended)
- SourceDisksNames Section (required)
- SourceDisksFiles Section (required)
- DefaultInstall Section (required)
- DefaultInstall.Services Section (required)
- ServiceInstall Section (required)
- DefaultUninstall Section (optional)
- DefaultUninstall.Services Section (optional)
- Strings Section (required)
Update drivers in Windows 10
Before you begin
Driver updates for Windows 10, along with many devices, such as network adapters, monitors, printers, and video cards, are automatically downloaded and installed through Windows Update. You probably already have the most recent drivers, but if you’d like to manually update or reinstall a driver, here’s how: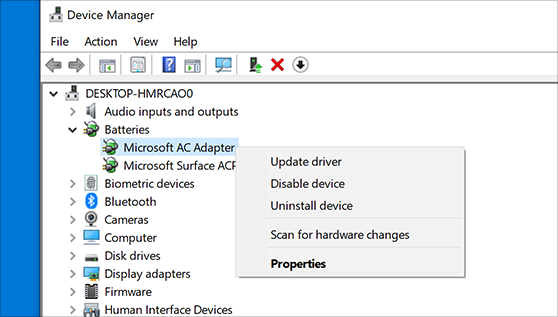
Update the device driver
In the search box on the taskbar, enter device manager, then select Device Manager.
Select a category to see names of devices, then right-click (or press and hold) the one you’d like to update.
Select Search automatically for updated driver software.
Select Update Driver.
If Windows doesn’t find a new driver, you can try looking for one on the device manufacturer’s website and follow their instructions.
Reinstall the device driver
In the search box on the taskbar, enter device manager, then select Device Manager.
Right-click (or press and hold) the name of the device, and select Uninstall.
Restart your PC.
Windows will attempt to reinstall the driver.
More help
If you can’t see the desktop and instead see a blue, black, or blank screen, see Troubleshoot blue screen errors or Troubleshoot black or blank screen errors.
Snappy Driver Installer для Windows
| Оценка: |
3.91 /5 голосов — 407 |
| Лицензия: | Бесплатная |
| Версия: | 1.21.2 (R2102) | Сообщить о новой версии |
| Обновлено: | 11.02.2021 |
| ОС: | Windows 10, 8.1, 8, 7, XP |
| Интерфейс: | Английский, Русский |
| Разработчик: | BadPointer |
| Категория: | Программы для драйверов |
| Загрузок (сегодня/всего): | 65 / 354 780 | Статистика |
| Размер: | 5,13 Мб |
| СКАЧАТЬ | |

Snappy Driver Installer (SDI) — мощный инструмент для поиска, установки и обновления драйверов оборудования Вашего ПК, который не требует подключения к интернету.
Эта программа является одной из лучших в своем роде, позволяя быстро, качественно и точно находить именно тот драйвер, который необходим системе — практически отсутствуют проблемы при подборе «дров» для тачпадов, звуковых устройств, USB v3.0 и т.д., что наблюдается у аналогичных программ. При этом, если найдено несколько драйверов для какого-либо железа ПК, то программа сама выберет наиболее приемлемый и подходящий, даже если в наличии более новая версия — это сводит к минимуму риски сбоя в работе оборудования.
Перед использованием рекомендуется создать точку восстановления системы. Благо это доступно прямо из этого приложения — поставьте соответствующую метку.
После запуска, программа SDI просканирует систему и найдет все драйвера, требующие обновления — появится надпись «Доступны обновления из интернета». Останется только нажать на эту запись и отметить нужные для установки драйвера, после чего начнется непосредственно сам процесс установки. Если же драйвера не требуют обновления (или установки), то вы увидите сообщение «Драйверы в актуальном состоянии».
Что касается интерфейса, то он прост и не содержит каких-либо сложных настроек. Есть упоминавшаяся уже метка создания точки восстановления системы, перезагрузки ПК после установки драйверов, несколько визуальных тем оформления и режим эксперта. Помимо этого, стоит отметить, что програма имеет маленький размер и полностью портативна, что позволяет разместить ее на флешке и иметь всегда под рукой, где бы Вы ни находились.
Основные особенности SDI:
- Наиболее совершенный алгоритм подбора драйверов.
- Высокое быстродействие при индексации, поиске драйвера, установке.
- Портативность — можно запускать с флешки, инсталляция не требуется.
- Возможность обновить программу и драйверпаки через интернет.
Driver Development Tools
Purpose
The Windows Driver Kit (WDK) provides a set of tools that you can use to develop, analyze, build, install, and test your driver. The WDK includes powerful verification tools that are designed to help you detect, analyze, and correct errors in driver code during the development process. Many of these tools can be used very early in the development process where they are most critical and can save you the most time and effort.
Overview
The Windows Driver Kit (WDK) is fully integrated with Microsoft Visual Studio 2015. The WDK uses the same compiler and build tools that you use to build Visual Studio projects. The code analysis and verification tools can now be easily configured and launched from the Visual Studio development environment, so that you can find and fix problems in your driver source early in the development cycle.
The WDK provides a sophisticated driver test framework and a set of device fundamental tests that you can use to automatically build, deploy, and test your driver on remote test systems. The WDK provides the tools to make testing and debugging drivers more convenient and effective than before.
Driver Development Tools Documentation
This section describes the tools and techniques that can help you during development:
Resources
Universal Windows drivers allow developers to create a single driver that runs across multiple different device types, from embedded systems to tablets and desktop PCs. Hardware developers can use their existing components and device drivers across different form factors.
You can convert projects and solutions that you created with WDK 8 or Windows Driver Kit (WDK) 8.1 to work with Windows Driver Kit (WDK) 10 and Visual Studio 2015. Before you open the projects or solutions, run the ProjectUpgradeTool. The ProjectUpgradeTool converts the projects and solutions so that they can be built using WDK for Windows 10.
You can use the ApiValidator.exe tool to verify that the APIs that your driver calls are valid for a Universal Windows driver. The tool returns an error if your driver calls an API that is outside the set of valid APIs for Universal Windows drivers. This tool is part of the WDK for Windows 10.
More information and tips for driver developers about using the WDK and the Visual Studio build environment.
For specific information about building drivers, and using the verification tools and tests in the Visual Studio development environment.
Add and Remove Drivers to an offline Windows Image
You can use DISM to install or remove driver (.inf) files in an offline Windows or WinPE image. You can either add or remove the drivers directly by using the command prompt, or apply an unattended answer file to a mounted .wim, .ffu, .vhd, or .vhdx file.
When you use DISM to install a device driver to an offline image, the device driver is added to the driver store in the offline image. When the image is booted, Plug and Play (PnP) runs and associates the drivers in the store to the corresponding devices on the computer.
To add drivers to a WindowsВ 10 image offline, you must use a technician computer running WindowsВ 10, Windows ServerВ 2016, or Windows Preinstallation Environment (WinPE) for WindowsВ 10. Driver signature verification may fail when you add a driver to a WindowsВ 10 image offline from a technician computer running any other operating system.
To learn how to add a driver on a running Windows PC, see Add a driver online in audit mode or Install a plug and play device. To learn how to add a driver to a PC running WinPE, see Drvload command line options.
Driver types
- .inf-style drivers: Many drivers include an information file (with an .inf extension) to help install the driver. These can be installed using tools described in this topic.
- .exe-style drivers: Drivers without an .inf file often must be installed like typical Windows desktop applications. To learn how to add these, see Add a driver online in Audit Mode
- Boot-critical drivers: Graphics and storage drivers may sometimes need to be added to the Windows image (as shown in this topic), as well as the Windows PE image, and in the Windows recovery (WinRE) image.
Add drivers to an offline Windows image
To add drivers to an offline image, you have to mount an image prior to adding drivers.
If you’re adding drivers to a WinPE image, you can add them to the WinPE image in the output folder you specified when you ran copype, for example: C:\WinPE_amd64\media\sources\boot.wim . This ensures that drivers will be included in WinPE each time you build WinPE media from that folder.
- Mount a Windows image. For example:
- Add a driver to the image.
To install all of the drivers from a folder and all its subfolders, point to the folder and use the /Recurse option.
To see all DISM driver servicing command line options, see DISM driver servicing command-line options.
Using /Recurse can be handy, but it’s easy to bloat your image with it. Some driver packages include multiple .inf driver packages, which often share payload files from the same folder. During installation, each .inf driver package is expanded into a separate folder. Each individual folder has a copy of the payload files. We’ve seen cases where a popular driver in a 900MB folder added 10GB to images when added with the /Recurse option.
To install an unsigned driver, use /ForceUnsigned to override the requirement that drivers installed on X64-based computers must have a digital signature.
- Check to see if the driver was added. Drivers added to the Windows image are named Oem*.inf. This guarantees unique naming for newly added drivers. For example, the files MyDriver1.inf and MyDriver2.inf are renamed Oem0.inf and Oem1.inf.
- Commit the changes and unmount the image.
Remove drivers from an offline Windows image
- At an elevated command prompt, mount the offline Windows image:
- Remove a specific driver from the image. Multiple drivers can also be removed on one command line.
Removing a boot-critical driver package can make the offline Windows image unbootable. For more information, see DISM Driver Servicing Command-Line Options. пїЅ
- Commit the changes and unmount the image.
Add drivers to an offline Windows image by using an unattended answer file
- Gather the device driver .inf files that you intend to install on the Windows image.
All drivers in the directory and subdirectories that are referenced in the answer file are added to the image. You should manage the answer file and these directories carefully to address concerns about increasing the size of the image with unnecessary driver packages.
- Use WindowsВ System Image Manager (WindowsВ SIM) to create an answer file that contains the paths to the device drivers that you want to install.
- Add the Microsoft-Windows-PnpCustomizationsNonWinPE\DriverPaths\PathAndCredentials\Credentials component to your answer file in the offlineServicing configuration pass.
For each location that you intend to access, add a separate PathAndCredentials list item by right-clicking on DriverPaths in the Answer File pane and clicking Insert New PathAndCredentials.
See Configure components and settings in an answer file for information on how to modify an answer file.
- For each path in Microsoft-Windows-PnpCustomizationsNonWinPE , specify the path to the device driver and the credentials that are used to access the file, if the file is on a network share.
When you include multiple device driver paths by adding multiple PathAndCredentials list items, you must increment the value of Key for each path. For example, you can add two separate driver paths where the value of Key for the first path is equal to 1 and the value of Key for the second path is equal to 2.
- Save the answer file and exit WindowsВ SIM. The answer file must resemble the following sample.
- Mount the Windows image that you intend to install the drivers to by using DISM:
If you’re working with a VHD or FFU, specify /Index:1 .
- Apply the answer file to the mounted Windows image:
For more information about how to apply an answer file, see DISM Unattended Servicing Command-Line Options.
The .inf files referenced in the path in the answer file are added to the Windows image.
- Check to see if the driver was added. Drivers added to the Windows image are named Oem*.inf. This guarantees unique naming for newly added drivers. For example, the files MyDriver1.inf and MyDriver2.inf are renamed Oem0.inf and Oem1.inf.
For example, type:
- Unmount the .wim file and commit the changes. For example, type:
If you need drivers for WinPE to see the local hard disk drive or a network, you must use the windowsPE configuration pass of an answer file to add drivers to the WinPE driver store and to reflect boot-critical drivers required by WinPE. For more information, see Add Device Drivers to Windows During Windows Setup.
Installing a File System Driver
About Driver Installation
The Setup application programming interface (SetupAPI) provides the functions that control Windows setup and driver installation, including the installation of file system and file system filter drivers.
The installation process is controlled by INF files. For more information about INF files:
For file system driver-specific INF file information, see below
For more information about general driver installation (including information about driver packages, INF files, and driver signing), see Device and Driver Installation.
After creating an INF file, you will typically write the source code for your setup application. The setup application calls user-mode setup functions to access the information in the INF file and perform installation operations.
The following information regarding installing and uninstalling file system filter drivers also applies to file system drivers:
Creating an INF File for a File System Driver
A file system driver’s INF file provides instructions that SetupAPI uses to install the driver. The INF file is a text file that specifies the files that must be present for your driver to run and the source and destination directories for the driver files. An INF file also contains driver configuration information that SetupAPI stores in the registry, such as the driver’s start type and load order group.
You can create a single INF file to install your driver on multiple versions of the Windows operating system. For more information about creating such an INF file, see Creating INF Files for Multiple Platforms and Operating Systems and Creating International INF Files.
Starting with 64-bit versions of Windows Vista, all kernel-mode components, including non-PnP (Plug and Play) drivers such as file system drivers (file system, legacy filter, and minifilter drivers), must be signed in order to load and execute. For these versions of the Windows operating system, the following list contains information that is relevant to file system drivers.
INF files for non-PnP drivers, including file system drivers, are not required to contain [Manufacturer] or [Models] sections.
The SignTool command-line tool, located in the \bin\SelfSign directory of the WDK installation directory, can be used to directly «embed sign» a driver SYS executable file. For performance reasons, boot-start drivers must contain an embedded signature.
Given an INF file, the Inf2Cat command-line tool can be used to create a catalog (.cat) file for a driver package.
With Administrator privileges, an unsigned driver can still be installed on x64-based systems starting with Windows Vista. However, the driver will fail to load (and thus execute) because it is unsigned.
For detailed information about the driving signing process, including the driving signing process for 64-bit versions of Windows Vista, see Kernel-Mode Code Signing Walkthrough.
All kernel-mode components, including custom kernel-mode development tools, must be signed. For more information, see Signing Drivers during Development and Test (Windows Vista and Later).
INF files cannot be used to read information from the registry or to launch a user-mode application.
Sections in a File System Driver INF File
To construct your own file system driver INF file, use the following information as a guide. You can use the InfVerif tool to check the syntax of your INF file.
An INF file for a file system driver generally contains the following sections.
Version Section (required)
The Version section specifies the driver version information, as shown in the following code example.
The following table shows the values that file system filter drivers should specify in the Version section.
| Entry | Value |
|---|---|
| Signature | «$WINDOWS NT$» |
| Provider | In your own INF file, you should specify a provider other than Microsoft. |
| DriverVer | See INF DriverVer directive |
| CatalogFile | Leave this entry blank. In the future, it will contain the name of a WHQL-supplied catalog file for signed drivers. |
DestinationDirs Section (optional but recommended)
The DestinationDirs section specifies the directories where the file system driver files will be copied.
In this section and in the ServiceInstall section, you can specify well-known system directories by using system-defined numeric values. For a list of these values, see INF DestinationDirs Section. In the following code example, the value «12» refers to the Drivers directory (%windir%\system32\drivers).
SourceDisksNames Section (required)
The SourceDisksNames section specifies the distribution media to be used.
In the following code example, the SourceDisksNames section lists a single distribution media for the file system driver. The unique identifier for the media is 1. The name of the media is specified by the %Disk1% token, which is defined in the Strings section of the INF file.
SourceDisksFiles Section (required)
The SourceDisksFiles section specifies the location and names of the files to be copied.
In the following code example, the SourceDisksFiles section lists the file to be copied for the file system driver and specifies that the files can be found on the media whose unique identifier is 1 (This identifier is defined in the SourceDisksNames section of the INF file.)
DefaultInstall Section (required)
In the DefaultInstall section, a CopyFiles directive copies the file system driver’s driver files to the destination that is specified in the DestinationDirs section.
The CopyFiles directive should not refer to the catalog file or the INF file itself; SetupAPI copies these files automatically.
You can create a single INF file to install your driver on multiple versions of the Windows operating system. This type of INF file is created by creating additional DefaultInstall, DefaultInstall.Services, DefaultUninstall, and DefaultUninstall.Services sections for each operating system version. Each section is labeled with a decoration (for example, .ntx86, .ntia64, or .nt) that specifies the operating system version to which it applies. For more information about creating this type of INF file, see Creating INF Files for Multiple Platforms and Operating Systems.
In the following code example, the CopyFiles directive copies the files that are listed in the ExampleFileSystem.DriverFiles section of the INF file.
DefaultInstall.Services Section (required)
The DefaultInstall.Services section contains an AddService directive that controls how and when the services of a particular driver are loaded.
In the following code example, the AddService directive adds the file system service to the operating system. The %ServiceName% token contains the service name string, which is defined in the Strings section of the INF file. ExampleFileSystem.Service is the name of the file system driver’s ServiceInstall section.
ServiceInstall Section (required)
The ServiceInstall section adds subkeys or value names to the registry and sets values. The name of the ServiceInstall section must appear in an AddService directive in the DefaultInstall.Services section.
The following code example shows the ServiceInstall section for the file system driver.
The DisplayName entry specifies the name for the service. In the preceding example, the service name string is specified by the %ServiceName% token, which is defined in the Strings section of the INF file.
The Description entry specifies a string that describes the service. In the preceding example, this string is specified by the %ServiceDesc% token, which is defined in the Strings section of the INF file.
The ServiceBinary entry specifies the path to the executable file for the service. In the preceding example, the value 12 refers to the Drivers directory (%windir%\system32\drivers).
The ServiceType entry specifies the type of service. The following table lists the possible values for ServiceType and their corresponding service types.
| Value | Description |
|---|---|
| 0x00000001 | SERVICE_KERNEL_DRIVER (Device driver service) |
| 0x00000002 | SERVICE_FILE_SYSTEM_DRIVER (File system or file system filter driver service) |
| 0x00000010 | SERVICE_WIN32_OWN_PROCESS (Microsoft Win32 service that runs in its own process) |
| 0x00000020 | SERVICE_WIN32_SHARE_PROCESS (Win32 service that shares a process) |
The ServiceType entry should always be set to SERVICE_FILE_SYSTEM_DRIVER for a file system driver.
The StartType entry specifies when to start the service. The following table lists the possible values for StartType and their corresponding start types.
| Value | Description |
|---|---|
| 0x00000000 | SERVICE_BOOT_START |
| 0x00000001 | SERVICE_SYSTEM_START |
| 0x00000002 | SERVICE_AUTO_START |
| 0x00000003 | SERVICE_DEMAND_START |
| 0x00000004 | SERVICE_DISABLED |
For detailed descriptions of these start types to determine which one is appropriate for your file system driver, see What Determines When a Driver Is Loaded.
Starting with x64-based Windows Vista systems, the binary image file of a boot-start driver (a driver that has a start type of SERVICE_BOOT_START) must contain an embedded signature. This requirement ensures optimal system boot performance. For more information, see Kernel-Mode Code Signing Walkthrough.
For information about how the StartType and LoadOrderGroup entries determine when the driver is loaded, see What Determines When a Driver Is Loaded.
The ErrorControl entry specifies the action to be taken if the service fails to start during system startup. The following table lists the possible values for ErrorControl and their corresponding error control values.
| Value | Description |
|---|---|
| 0x00000000 | SERVICE_ERROR_IGNORE (Log the error and continue system startup.) |
| 0x00000001 | SERVICE_ERROR_NORMAL (Log the error, display a message to the user, and continue system startup.) |
| 0x00000002 | SERVICE_ERROR_SEVERE (Switch to the registry’s LastKnownGood control set and continue system startup. |
| 0x00000003 | SERVICE_ERROR_CRITICAL (If system startup is not using the registry’s LastKnownGood control set, switch to LastKnownGood and try again. If startup still fails, run a bug-check routine. Only the drivers that are needed for the system to startup should specify this value in their INF files.) |
The LoadOrderGroup entry must always be set to «File System» for a file system driver. This is different from what is specified for a file system filter driver or file system minifilter driver where the LoadOrderGroup entry is set to one of the file system filter load order groups. For more information about the load order groups that are used for file system filter drivers and file system minifilter drivers, see Load Order Groups for File System Filter Drivers and Load Order Groups and Altitudes for Minifilter Drivers.
The AddReg directive refers to one or more INF writer-defined AddRegistry sections that contain any information to be stored in the registry for the newly installed service.
If the INF file will also be used for upgrading the driver after the initial install, the entries that are contained in the AddRegistry section should specify the 0x00000002 (FLG_ADDREG_NOCLOBBER) flag. Specifying this flag preserves the registry entries in HKLM\CurrentControlSet\Services when subsequent files are installed. For example:
DefaultUninstall Section (optional)
The DefaultUninstall section is optional but recommended if your driver can be uninstalled. It contains DelFiles and DelReg directives to remove files and registry entries.
In the following code example, the DelFiles directive removes the files that are listed in the ExampleFileSystem.DriverFiles section of the INF file.
The DelReg directive refers to one or more INF writer-defined DelRegistry sections that contain any information to be removed from the registry for the service that is being uninstalled.
DefaultUninstall.Services Section (optional)
The DefaultUninstall.Services section is optional but recommended if your driver can be uninstalled. It contains DelService directives to remove the file system driver’s services.
In the following code example, the DelService directive removes the file system driver’s service from the operating system.
The DelService directive should always specify the 0x200 (SPSVCINST_STOPSERVICE) flag to stop the service before it is deleted.
There are certain classes of file system products that cannot be completely uninstalled. In this situation, it is acceptable to just uninstall the components of the product that can be uninstalled and leave installed the components of the product that cannot be uninstalled. An example of such a product is the Microsoft Single Instance Store (SIS) feature.
Strings Section (required)
The Strings section defines each %strkey% token that is used in the INF file.
For example, the file system driver defines the following strings in its INF file.
You can create a single international INF file by creating additional locale-specific Strings.LanguageID sections in the INF file. For more information about international INF files, see Creating International INF Files.


