- How to stop Windows 7 automatically installing drivers
- Summary
- Methods 1: Change device installation setting
- Methods 2: Configure group policy settings
- Device Installation Files
- Roadmap for Device and Driver Installation
- Алгоритм установки драйвера в Windows
- How to: Install and Update Hardware Drivers in Windows 10
- Comments (163)
How to stop Windows 7 automatically installing drivers
Summary
Be default, Windows 7 automatically installs drivers for the devices that are connected to the computer. However, if you do not want Windows 7 to automatically install the drivers, you can use one of the methods listed in this article.
Methods 1: Change device installation setting
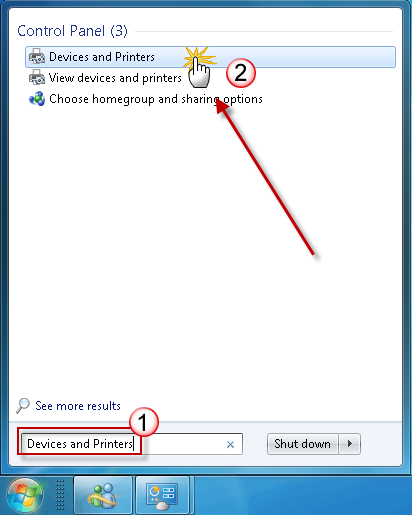
Click Start, type devices and printers in the search box, and then click Devices and Printers.
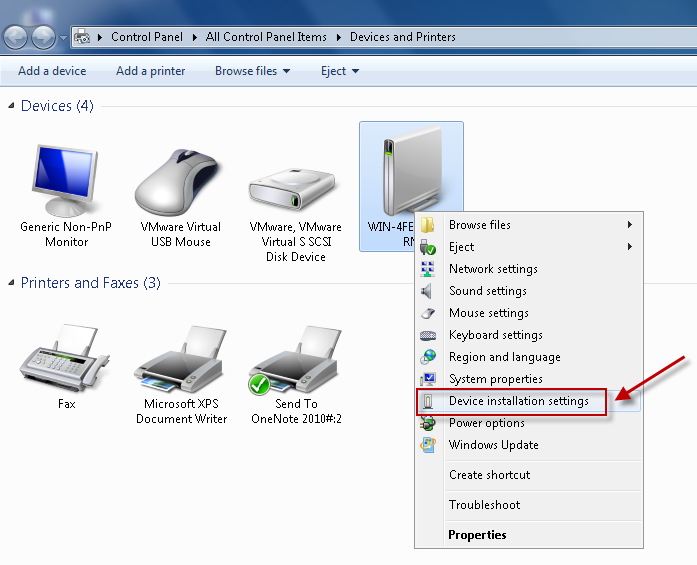
All the devices connected to the computer are listed, including monitor, keyboard, mouse, printer, and so on.
Under Devices, right-click the icon for the computer, and then click Device installation settings.
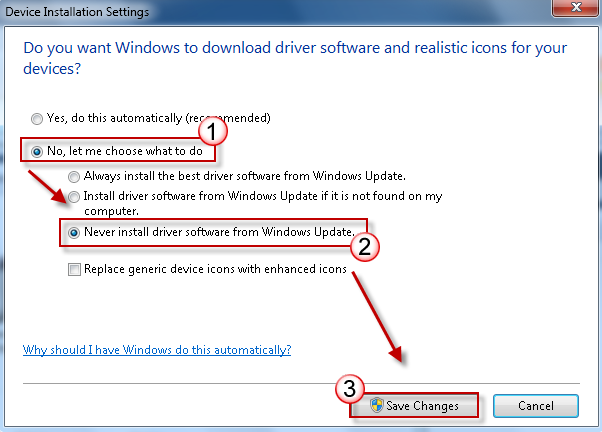
A new window pops up asking you whether you want Windows to download driver software.
Click to select No, let me choose what to do, select Never install driver software from Windows update, and then click Save Changes.
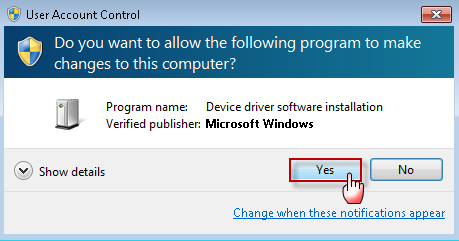
Click Yes when you are prompted for confirmation.
Methods 2: Configure group policy settings
Note This method only applies to Windows 7 Professional, Windows 7 Ultimate, and Windows 7 Enterprise.
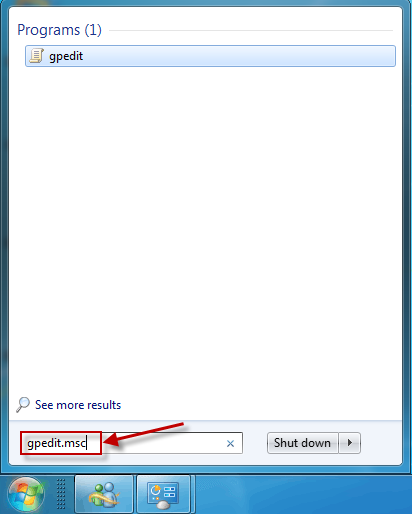
Click Start, type gpedit.msc in the search box, and then press ENTER. This step opens the Local Group Policy Editor.
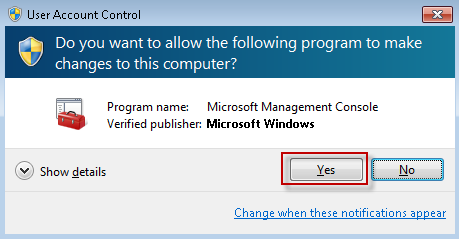
(Click Yes if you are prompted.)
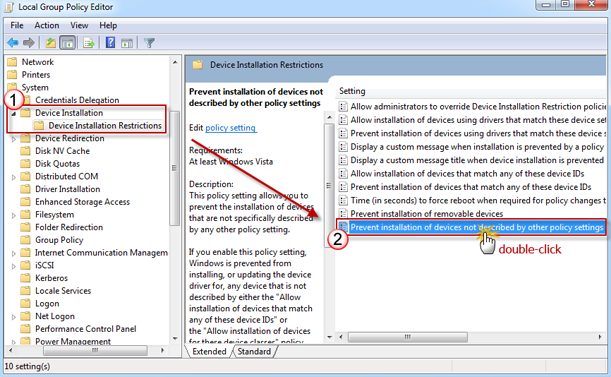
Expand Computer Configuration, expand Administrative Templates, expand System, expand Device Installation, and then click Device Installation Restrictions.
In the right window, double-click Prevent installation of devices not described by other policy settings.
Click to select Enabled, and then click OK.
Device Installation Files
The software that is required to support a particular device depends on the kind of device and the ways in which the device is used. Typically, a vendor provides the following software in a driver package to support a device:
A device setup information file (INF file)
An INF file contains information that the system Windows components use to install support for the device. Windows copies this file to the %SystemRoot%\inf directory when it installs the driver. This file is required.
For more information, see Creating an INF File.
One or more drivers for the device
A .sys file is the driver’s image file. Windows copies this file to the %SystemRoot%\system32\drivers directory when the driver is installed. Drivers are required for most devices.
Digital signatures for the driver package (a driver catalog file)
A driver catalog file contains digital signatures. All driver packages should be signed.
A vendor obtains digital signatures by submitting its driver package to the Windows Hardware Quality Lab (WHQL) for testing and signing. WHQL returns the package with a catalog file (.cat file).
Other files
A driver package can contain other files, such as a custom device installation application, a device icon, or a driver library file (such as for video drivers).
Also, see the device-type-specific documentation in the WDK.
The WDK includes various sample installation files. For more information, see Sample Device Installation Files
Roadmap for Device and Driver Installation

To install a device and driver in the WindowsВ operating system, follow these steps:
Step 1: Learn the fundamentals of device and driver installation in Windows.
You must understand the fundamentals of device and driver installation in the Windows family of operating systems. This will help you to make appropriate design decisions and will allow you to streamline your development process. For more information, see Overview of Device and Driver Installations.
Step 2: Learn about driver packages and their components.
A driver package consists of all the components that you must supply to install your device and support it under Windows.
To install a device or a driver, you must have system-supplied and vendor-supplied components. The system provides generic installation software for all device classes. Vendors must supply one or more device-specific components within the driver package.
For more information, see Driver Packages.
Step 3: Learn about information (INF) files.
An INF file contains the information and device settings which the system-provided device installation components use to install your driver package, such as the driver for the device and any device-specific applications.
For more information, see INF Files.
Step 4: Create a driver package for your device and drivers.
Your driver package must provide an INF file, the device’s driver files, as well as optionally provide additional software components. You may refer to the sample Toaster driver package to determine which components are needed for your driver package.
For more information about the components of a driver package, see Creating a Driver Package.
For more information about driver packages, see the Toaster Sample.
Step 5: Test-sign your driver package during development and testing.
Test-signing refers to using a test certificate to sign a prerelease version of a driver package for use on test computers. In particular, this allows developers to sign driver packages by using self-signed certificates, such as those the MakeCert tool generates. This capability allows developers to install and test driver packages in Windows with driver signature verification enabled.
Step 6: Release-sign your driver package for distribution.
After you have tested and verified your driver package, you should release-sign the driver package. Release-signing identifies the publisher of a driver package. While this step is optional, driver packages should be release-signed for the following reasons:
Ensure the authenticity, integrity, and reliability of driver packages. Windows uses digital signatures to verify the identity of the publisher and to verify that the driver has not been altered since it was published.
Provide the best user experience by facilitating automatic driver installation.
Run kernel-mode drivers on 64-bit versions of Windows Vista and later versions of Windows.
Playback certain types of next-generation premium content.
Driver packages are release-signed through either:
A WHQL Release Signature obtained through the Windows Hardware Compatibility Program (for Windows 10), or the Windows Hardware Certification Program (for Windows 8/8.1 and older operating systems).
A release signature created through a Software Publisher Certificate (SPC).
Step 7: Distribute your driver package.
The final step is to distribute the driver package. If your driver package meets the quality standards that are defined in the the Windows Hardware Compatibility Program (for Windows 10), or the Windows Hardware Certification Program (for Windows 8/8.1 and older operating systems), you can distribute it through Microsoft Windows Update program. For more information, see Publishing a driver to Windows Update.
These are the basic steps. Additional steps might be necessary based on the installation needs of your individual device and driver.
Алгоритм установки драйвера в Windows
Очевидно, что у каждого пользователя персонального компьютера, время от времени возникает необходимость подключить к своей станции какое-либо устройство. Причина, по которой это происходит, нас сейчас не сильно то и интересует, это может быть и хорошо знакомый многим апгрейд (в целях увеличения производительности отдельных узлов, и как следствие общей производительности системы), это может быть и просто добавление нового оборудования для расширения функционала существующей конфигурации, как, например, в случае с подключением нового игрового манипулятора, это может быть и потребность в использовании данных с флеш-накопителя. Вне зависимости от того, каким именно образом мы подключаем новое устройство, операционная система Windows вынуждена реагировать на появление нового оборудования, производя определенные манипуляции для обеспечения поддержки нового оборудования на программном уровне. Во многих операционных системах для обеспечения программного взаимодействия с устройствами используются интерфейс между оборудованием и программным слоем под названием драйвер .
Именно поэтому операционная система пытаемся всеми доступными ей методами обеспечить функционирование устройства в своей среде, для этого производится попытка установки для вновь подключаемого устройства соответствующего драйвера, дабы тем самым предоставить функции нового устройства для доступа программам пользовательского режима и коду режима ядра, ведь без этого самого пресловутого драйвера оборудование в системе работать попросту не сможет.
Я не случайно упомянул в определении логические устройства, поскольку существует отдельная категория драйверов, которые не занимаются обслуживанием аппаратного обеспечения, а интегрируются для расширения реализации (расширения, дополнения) функциональных особенностей различных модулей системы. Но кого сейчас удивишь установкой драйверов? Этот процесс настолько уже хорошо знаком всем пользователям ПК по многолетней практике, что некоторые, я уверен, могут делать это с закрытыми глазами 🙂 Но задумывались ли мы о деталях этого процесса, размышляли ли когда-нибудь над алгоритмом установки драйвера? Задавались ли вопросом, какие именно действия выполняет операционная система в момент подключения нового устройства и инсталляции драйверов?
Согласитесь, что с точки зрения пользователя процесс установки драйвера в Windows, в большинстве случаев, выглядит достаточно прозаично. В системном трее появляется привычный анимированный значок мастера установки, и система через некоторое время может выдать отчет об успешном, либо неудачном завершении процедуры инсталляции в системе драйвера нового устройства. Более того, зачастую мастер установки кроме этой самой иконки в трее вовсе не выдает никаких визуальных подтверждений о попытках инсталляции нового устройства, при этом «тихо» добавляя новое оборудование в список устройств и (в случае неудачи) маркируя его специальным значком в диспетчере устройств, предлагая пользователю в ручном режиме продолжить конфигурирование оборудования. Все эти внешние процессы, хорошо уже знакомые как Вам так и мне, в той или ином виде присутствуют во всех версиях операционных систем Windows практически с момента появления этой операционной системы, незначительно отличаясь между собой лишь в деталях. Они стали настолько знакомыми и привычными, что я даже никогда и не задумывался, а что же происходит «по ту сторону экрана», в недрах операционной системы, что скрывается под этой мнимой простотой? Как Вы увидите далее, установка драйвера Windows для физического либо логического устройства скрывает под собой довольно сложные и чрезвычайно интересные процессы. Алгоритм установки драйвера в Windows можно разбить на перечисленные ниже ключевые глобальные задачи:
- Копирование двоичного файла драйвера в соответствующий каталог в системе;
- Регистрация драйвера в системе Windows с указанием метода загрузки;
- Добавление необходимой информации в системный реестр;
- Копирование/установка связанных вспомогательных компонентов из пакета драйвера;
Помимо основных задач, выполняемых в рамках алгоритма установки драйвера в Windows, неплохо было бы классифицировать и условия, по которым стартует процесс установки драйвера Windows:
- Пользователь инсталлирует в выключенный компьютер новое устройство. В этом случае, сам процесс обнаружения нового устройства и инсталляции драйвера начинается уже на этапе загрузки операционной системы.
- Пользователь с правами локального администратора, при помощи оснастки «Диспетчер устройств» инициирует установку либо обновление драйвера для какого-либо уже установленного устройства.
- Пользователь «на ходу» подключает к работающему компьютер новое устройство. В этом случае речь идет об определенной категории устройств, которые могут подключаться «на лету», таких как устройства с внешним интерфейсом eSata , USB и прч. Ведь Вы же не будете инсталлировать внутреннюю видеокарту, когда питание подано на слоты PCIe ? Я лично такого пока еще не вытворял 🙂
- Пользователь самостоятельно запускает программу установки комплекта пакета драйвера из-под учетной записи с правами локального администратора. Такой способ может использоваться как для установки драйверов для физических устройств, которые поддерживают стандарт Plug and Play, так и для установки не-PnP (legacy) драйверов, драйверов логических устройств, которые не могут быть автоматически обнаружены системой и которые не могут быть проинсталлированы иначе как в ручном режиме. Характерным примером могут быть антивирусы или виртуальные машины, которые инсталлируют свои драйвера (логических устройств) в систему.
- Пользователь щелкает правой кнопкой мыши на .inf -файле в директории с драйвером и выбирает пункт Установить из-под учетной записи с правами локального администратора.
Но что представляет из себя сам пакет драйвера? Ведь, как мы неоднократно видели, это целый набор файловом абсолютно различного, на первый взгляд, назначения. Без более углубленного обзора структуры инталляционного пакета установки драйвера нам будет сложно понять и сам алгоритм установки драйвера, поэтому приведем общие составляющие:
How to: Install and Update Hardware Drivers in Windows 10
Technical Level : Intermediate
Summary
Windows 10 continues the tradition of hardware compatibility by providing support for a vast collection of devices available within the Windows ecosystem. Hardware detection in particular is an important part of the out of the box experience. Driver software which makes this happen, allows your hardware to function by communicating with the operating system. In this article, we take a look at installing and updating drivers in Windows 10.
Details
I recently installed Windows 10 on an HP Elitebook to see how well the most recent Windows 10 build performs. The Elitebook is a fairly recent model notebook which includes an assortment of hardware technologies. Out of the box though I did not get a complete system, for instance the Intel HD Graphics 3000 was not detected and I was instead limited to the Microsoft Basic Display Adapter.
Apart from this, I had wi-fi ready, which mean, I could connect to the Internet right away.
Installing drivers through Windows Update
Windows Update is the premier starting point to resolve most common driver issues you might experience immediately after installing Windows 10.
Simply launch it from Start > Settings > Update and Recovery and click Check for Updates
Press Windows key + R
Type: ms-settings:windowsupdate
Click Check for updates (make sure you have an active Internet connection).
Immediately, Windows Update will detect your system configuration and download all the appropriate drivers for your system. As you can see in the above screenshot, my Intel HD 3000 Graphics was installed automatically. I did not even have to reboot the system. In addition to other hardware components were also detected and installed which includes my LAN adapter and card reader.
Important Drivers you should get after installing Windows 10.
When you perform a new install or upgrade, you should download the latest software drivers from the manufacturers website for your computer model. Important drivers include: Chipset, Video, Audio and Network (Ethernet/Wireless). For laptops, make sure you download the latest Touch Pad drivers. There are other drivers you will probably need, but you can often download these through Windows Update after have a working Internet connection setup.
How to find and download drivers from the manufacturers website:
Drivers can normally be found in the Support section from the manufacturers website where you will find a Software and Drivers sub-section. The method to find it will vary depending on the brand. You can go to your favorite search engine then enter the following query «model and make drivers download’ example: ‘hp 8460p drivers download’. This will often provide a direct link.
Normally, you might not find native Windows 10 drivers. If this is the case, use the latest Windows drivers available for your model. So if they only have Windows 7 drivers, try using those. Make sure you download the right drivers for your architecture (32 or 64 bit).
Proceed to download the appropriate drivers after selecting your version of Windows. The manufacturer might list two versions of the driver, always choose the latest.
Again, the procedures will vary, but as long as you can find the drivers and download section, normally available within Support, you should be able to get to the drivers. If you are reading this before upgrading, try having the essential drivers in advance.
Install drivers using Device Manager
If your driver was not detected or installed by Windows Update, you can try installing the driver manually if you have a compatible version. Windows 10 and previous versions of Windows such as Windows 7 share the same driver model, so it should work.
Press Windows key + X
Click Device Manager
Once device manager is open, select the device, right click it and click Update Driver Software
This will launch the update driver software wizard, which presents two options.
- Search automatically for updated driver software — its possible Windows might have the driver software if you have not checked it yet, if its taking too long, then the next option is usually best.
- Browse my computer for driver software — if there is a compatible driver and you already have the driver files, then all you need to do is point to it and Windows automatically install it for you.
Here I have selected to use an existing driver, browse to where the driver is located on your computer, whether that is a partition, network share, thumbdrvie or install disc. Make sure the option to Include subfolders is checked.
Click Next and wait while the wizard completes the installation.
Using Compatibility Mode to Resolve Driver problems
If both Windows Update and driver update prove unsuccessful, the next option is Troubleshoot Compatibility. Troubleshoot Compatibility provides a simple way to make older drivers work under modern versions of Windows by making the driver believe it is being installed on a supported version of Windows.

The first thing you need to do is point where the setup files are located. If you are installing from a thumb drive or CD/DVD. Launch File Explorer (Windows key + E) and open the location where the setup files are stored.
Right click the setup file for the program, this can be designated as setup.exe or something similar. Click Troubleshoot Compatibility

This will launch the Program Compatibility Troubleshooter wizard which will check for issues.

Select the option “Troubleshoot program”

Depending on the problems you are experiencing when attempting to install or use the software, check off the problems. In my case:
- ‘The program worked in earlier versions of Windows but won’t install or run now’
- The program requires additional permissions.

Select a version of Windows the program is known to work in. I notice the program works great in Windows Vista (with Service Pack 2), so I will select that option. Click Next

Proceed to run the through the programs setup routine by clicking Test the program….

Follow the on screen instructions to install the program as you normally would.

If all is successful, click the option at the end of the wizard ‘Yes, save these settings for this program’

Wait while your settings for the program are saved.

If you have a driver such as your video card automatically installing upon completion of installation and checking for Windows Update, try disabling automatic driver installation using the instructions in the following thread:
Go to the hardware developers website, download the appropriate driver for your model then install in compatibility mode using the instructions above.
How to install your printer:
Was this article helpful?
Sorry this didn’t help.
Great! Thanks for your feedback.
How satisfied are you with this article?
Thanks for your feedback, it helps us improve the site.
How satisfied are you with this article?
Thanks for your feedback.
Comments (163)
* Please try a lower page number.
* Please enter only numbers.
* Please try a lower page number.
* Please enter only numbers.
87 people found this comment helpful
Was this comment helpful?
Sorry this didn’t help.
Great! Thanks for your feedback.
How satisfied are you with this comment?
Thanks for your feedback, it helps us improve the site.
How satisfied are you with this comment?
Thanks for your feedback.
Thanks for the effort.
Lots of detail here.
Unfortunately, none of this worked.
Windows Update does not find any new drivers and wuapp.exe does not even seem to exist in Windows 10 Preview.
Trying to load the latest driver according to the Intel Driver Update Utility gives an error message that the hardware does not meet minimum specifications. Given that this is the Dell M6800 and there are no higher hardware specifications, that must mean some other problem.
Finally, there appears to have been an Intel Windows 10 Beta driver for the HD4600, but it’s not accessible from the Intel website and Windows Update does not load it.
169 people found this comment helpful
Was this comment helpful?
Sorry this didn’t help.
Great! Thanks for your feedback.
How satisfied are you with this comment?
Thanks for your feedback, it helps us improve the site.
How satisfied are you with this comment?
Thanks for your feedback.
JurekNowak, I have the same issue as you. I have a Dell Inspiron 6000 currently running Windows 7 Professional 32bit, and my display adapter is the ATI X300 with 128mb. Its a strong laptop even though it is close to 10 years old, I run a SSD, and upgraded a ton of things like the RAM and Wifi, Windows 7 even rates my system a 3.5.
When I tried to install Windows 10 technical preview, it ran great on this laptop, even smoother and quicker than Windows 7 in every way, with exception of the video. HD video would constantly skip and run very poorly because I was limited to the Microsoft generic display driver. Compatibility tweaks to the driver setup do not work!
No matter what actions I took, I could not install my ATI drivers that I was using in Windows 7. Since the system is 10 years old, Dell/AMD most likely is not going to provide any support for an updated driver. I haven’t ran the most recent version of Win 10 technical preview (last one I tried was 9926 I think), but I doubt there was a workaround created to allow older drivers to be accepted by this new OS.
I’m going to image my current hard drive and allow the Windows 10 update to install once it is ready this month. If a fix isn’t in the cards, I will be rolling back my system to Windows 7.
Some people might just say buy a new computer, but I really don’t need to. This system does everything I need it to do, and with upgrade options to go SSD, why drop $400 on even a basic laptop that doesn’t come close to the r/w speeds of my current system. I really hope Microsoft has come up with a workaround. I understand they make the most amount of money of the mainstream, but I am also a strong believer in Microsoft products and really enjoyed using the technical preview version of Windows 10 for a few weeks. Guess all I can do is keep my fingers crossed and hope for the best.
#windows10 #win10 #windowsx #microsoft #pleasefix


