Где в Windows находятся драйверы
установленных устройств
После установки на компьютере драйвера устройства его файлы копируются на системный диск. При этом, название и количество упомянутых файлов, а также их расположение на диске, зависят от конкретного драйвера. Обычно операционная система «разбрасывает» их по разным папкам, расположенным в каталогах «Windows» и «Program Files».
В некоторых случаях бывает необходимо узнать, где же хранятся эти файлы и как они называются. Например, когда файлы драйвера нужно удалить или же использовать их для установки устройства на другом компьютере.
Изложенная на этой странице информация доступна также в формате видео:
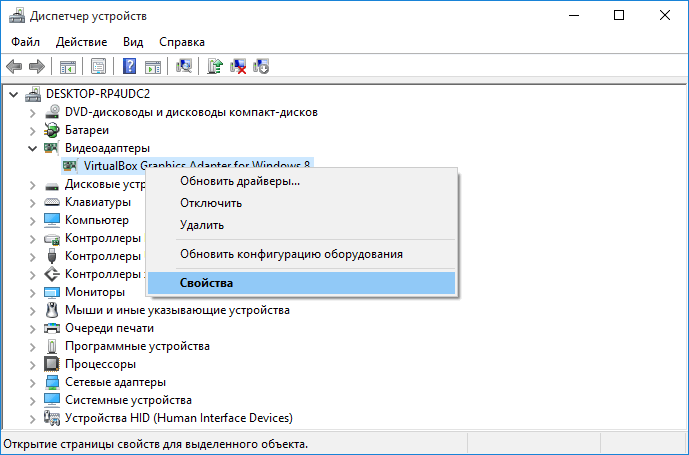
Получить список файлов драйвера конкретного устройства, установленного на компьютере, можно через диспетчер устройств.
• в диспетчере, в списке оборудования, найти интересующее устройство, щелкнуть по нему правой кнопкой мышки и в появившемся контекстном меню выбрать пункт «Свойства»;
• в открывшемся окне перейти на вкладку «Драйвер», где нажать кнопку «Сведения»;
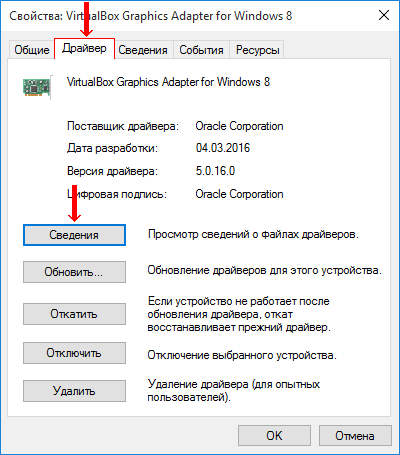
• откроется еще одно окно, в котором и будет отображена необходимая информация (список файлов драйвера).

Важно. Если Вы планируете использовать файлы драйвера для установки устройства на другом компьютере, кроме самих файлов, полученных изложенным выше способом, понадобится еще и файл сведений для установки. Найти его можно в папке C:\Windows\inf .
По умолчанию, указанная папка скрыта. Чтобы ее увидеть, на компьютере необходимо включить отображение скрытых файлов и папок. Как это сделать см. здесь.
Файл сведений для установки имеет расширение .inf. Его название можно определить следующим способом:
• открыть диспетчер устройств;
• в списке оборудования найти нужное устройство, щелкнуть по нему правой кнопкой мышки и в появившемся меню выбрать «Свойства».
• в открывшемся окне перейти на вкладку «Сведения». В расположенном там выпадающем списке выбрать пункт «Имя INF». После этого название файла отобразится в поле «Значение».

Однако, более надежным и простым способом переноса драйвера на другой компьютер является использование специальных программ. Неплохим вариантом является программа Driver Genius.
Программа автоматически скопирует в выбранное пользователем место установленные на компьютере драйверы (все или выборочно). Нужно скачать, установить и запустить Driver Genius (см. ссылку выше), в ее окне щелкнуть мышкой по пункту «Driver Backup» и дальше отвечать на вопросы программы до окончания процесса копирования.
Краткая информация для неопытных о том, что такое драйвер устройства, зачем он нужен и как проверить его наличие или отсутствие в операционной системе компьютера.
Одной из частых проблем, с которой сталкиваются пользователи в процессе настройки устройств компьютера, является невозможность установки драйверов для некоторых из них.
Причин, по которым это происходит, может быть очень много. В публикации рассмотрены наиболее распространенные случаи, а также способы их устранения.
В статье изложена информация о способах решения проблем, возникающих при отсутствии на компьютере драйвера определенного устройства (видеокарты, звуковой карты, модема, сетевого адаптера и др.).
Как Вам, наверное, уже известно, драйвер — это специальное программное обеспечение, необходимое для правильного обращения операционной системы компьютера с каким-то устройством (сетевой картой, звуковой картой, веб-камерой, видеокартой или др.).
Производители компьютерных устройств периодически выпускают для своих изделий новые драйверы, предлагая их для свободной загрузки на своих сайтах. Но если драйвер устройства на компьютере уже установлен и проблемы в его работе отсутствуют, менять его на более новый особого смысла нет.
Однако, это не касается видеокарты. Новый драйвер способен значительно повысить ее быстродействие в компьютерных играх и других приложениях (в некоторых случаях до 20 %).
Почти все драйверы, создаваемые для различных устройств, имеют так называемую цифровую подпись. Она является подтверждением того, что драйвер создан благонадежным разработчиком, гарантирующим отсутствие в нем вирусов, шпионских и других вредоносных дополнений.
По умолчанию, компьютер перед установкой драйвера проверяет наличие у него цифровой подписи и только тогда использует его. Это обеспечивает более высокий уровень безопасности.
Но иногда проверку подписи драйверов бывает целесообразно отключить.
Например, если поддержка какого-то устройства разработчиком прекращена и «официальный» драйвер для новых версий Windows для него отсутствует. А тот драйвер, что удалось найти, не имеет подписи и компьютер его устанавливать «отказывается». Риск наступления негативных последствий, конечно же, возрастает, но если другого варианта нет и Вы готовы рискнуть, то почему бы не попробовать? Ну, не выбрасывать же исправное устройство только из-за отсутствия «подписанного» драйвера!
Существует несколько способов отключения проверки.
В процессе настройки компьютера может возникнуть необходимость полного удаления определенного драйвера. Это может понадобиться в случае замены видеокарты или какого-то другого устройства компьютера на новое, установки нового драйвера вместо «проблемного» старого и в других подобных ситуациях.
Например, компания NVidia, являющаяся одним из основных разработчиков видеокарт, перед установкой новых драйверов своих устройств рекомендует полностью удалить с компьютера предыдущие.
В статье рассмотрены способы удаления как драйверов устройств, присутствующих в компьютере, так и устройств, которые когда-то подключались к компьютеру, но в данный момент уже не используются (неиспользуемые драйверы).

ПОКАЗАТЬ ЕЩЕ 
Updating Driver Files
Drivers are updated whenever one of the following occurs:
The Hardware Update Wizard is run from Device Manager.
NoteВ В Starting with Windows Vista, this wizard is now named the Update Driver Software Wizard.
Windows Update is run.
Installation software for a device is run.
Starting with Windows Vista, you can run the PnPUtil tool from an elevated command prompt to install or update the driver package for the device.
Use the following guidelines when you write installation software and INF files that update existing drivers.
Installation software can call UpdateDriverForPlugAndPlayDevices, supplying an INF file and a hardware ID, to update drivers for devices that match the hardware ID.
Starting with Windows Vista, installation software can also call one of the following to update drivers:
- DiInstallDriver, which pre-installs a driver and then installs the driver on devices present in the system that the driver supports.
- DiInstallDevice, which installs a specified driver from the driver store on a specified device that is present in the system.
When upgrading a driver, class installers and co-installers should not supply finish-install pages in response to DIF_NEWDEVICEWIZARD_FINISHINSTALL unless absolutely necessary. If possible, obtain finish-install information from the settings of the previous installation.
To the extent possible, class installers and co-installers should avoid basing behavior on whether they are providing an initial installation or are updating drivers for an already-installed device.
Starting with Windows XP, the registry values CoInstallers32 and EnumPropPages32 are deleted before the delivery of DIF_REGISTER_COINSTALLERS. INF files for earlier operating system versions must explicitly either delete these values or perform a nonappending modify operation on them.
Starting with Windows XP, the registry values UpperFilters and LowerFilters are deleted before the delivery of DIF_INSTALLDEVICE. INF files for earlier operating system versions must explicitly either delete these values or perform a nonappending modify operation on them.
Do not use INF DelFiles directives or INF RenFiles directives when updating drivers. Windows cannot guarantee that a particular file is not being used by another device. (Class installers and co-installers can delete or rename files, if they can reliably determine that no devices are using the files.)
Use the INF DelReg directive to remove old device-specific registry entries from a previous installation of the device, if the entries are no longer needed. (Do not remove global registry entries.)
Do not use the INF DelService directive in an INF DDInstall.Services section to remove previously installed device/driver services from the target computer. Windows cannot guarantee that a particular service is not being used by another device. (Class installers and co-installers can delete services, if they can reliably determine that no devices are using the services.)
When updating a class installer, class co-installer, or service DLL, you must give the new version a new file name.
Add and Remove Drivers to an offline Windows Image
You can use DISM to install or remove driver (.inf) files in an offline Windows or WinPE image. You can either add or remove the drivers directly by using the command prompt, or apply an unattended answer file to a mounted .wim, .ffu, .vhd, or .vhdx file.
When you use DISM to install a device driver to an offline image, the device driver is added to the driver store in the offline image. When the image is booted, Plug and Play (PnP) runs and associates the drivers in the store to the corresponding devices on the computer.
To add drivers to a WindowsВ 10 image offline, you must use a technician computer running WindowsВ 10, Windows ServerВ 2016, or Windows Preinstallation Environment (WinPE) for WindowsВ 10. Driver signature verification may fail when you add a driver to a WindowsВ 10 image offline from a technician computer running any other operating system.
To learn how to add a driver on a running Windows PC, see Add a driver online in audit mode or Install a plug and play device. To learn how to add a driver to a PC running WinPE, see Drvload command line options.
Driver types
- .inf-style drivers: Many drivers include an information file (with an .inf extension) to help install the driver. These can be installed using tools described in this topic.
- .exe-style drivers: Drivers without an .inf file often must be installed like typical Windows desktop applications. To learn how to add these, see Add a driver online in Audit Mode
- Boot-critical drivers: Graphics and storage drivers may sometimes need to be added to the Windows image (as shown in this topic), as well as the Windows PE image, and in the Windows recovery (WinRE) image.
Add drivers to an offline Windows image
To add drivers to an offline image, you have to mount an image prior to adding drivers.
If you’re adding drivers to a WinPE image, you can add them to the WinPE image in the output folder you specified when you ran copype, for example: C:\WinPE_amd64\media\sources\boot.wim . This ensures that drivers will be included in WinPE each time you build WinPE media from that folder.
- Mount a Windows image. For example:
- Add a driver to the image.
To install all of the drivers from a folder and all its subfolders, point to the folder and use the /Recurse option.
To see all DISM driver servicing command line options, see DISM driver servicing command-line options.
Using /Recurse can be handy, but it’s easy to bloat your image with it. Some driver packages include multiple .inf driver packages, which often share payload files from the same folder. During installation, each .inf driver package is expanded into a separate folder. Each individual folder has a copy of the payload files. We’ve seen cases where a popular driver in a 900MB folder added 10GB to images when added with the /Recurse option.
To install an unsigned driver, use /ForceUnsigned to override the requirement that drivers installed on X64-based computers must have a digital signature.
- Check to see if the driver was added. Drivers added to the Windows image are named Oem*.inf. This guarantees unique naming for newly added drivers. For example, the files MyDriver1.inf and MyDriver2.inf are renamed Oem0.inf and Oem1.inf.
- Commit the changes and unmount the image.
Remove drivers from an offline Windows image
- At an elevated command prompt, mount the offline Windows image:
- Remove a specific driver from the image. Multiple drivers can also be removed on one command line.
Removing a boot-critical driver package can make the offline Windows image unbootable. For more information, see DISM Driver Servicing Command-Line Options. пїЅ
- Commit the changes and unmount the image.
Add drivers to an offline Windows image by using an unattended answer file
- Gather the device driver .inf files that you intend to install on the Windows image.
All drivers in the directory and subdirectories that are referenced in the answer file are added to the image. You should manage the answer file and these directories carefully to address concerns about increasing the size of the image with unnecessary driver packages.
- Use WindowsВ System Image Manager (WindowsВ SIM) to create an answer file that contains the paths to the device drivers that you want to install.
- Add the Microsoft-Windows-PnpCustomizationsNonWinPE\DriverPaths\PathAndCredentials\Credentials component to your answer file in the offlineServicing configuration pass.
For each location that you intend to access, add a separate PathAndCredentials list item by right-clicking on DriverPaths in the Answer File pane and clicking Insert New PathAndCredentials.
See Configure components and settings in an answer file for information on how to modify an answer file.
- For each path in Microsoft-Windows-PnpCustomizationsNonWinPE , specify the path to the device driver and the credentials that are used to access the file, if the file is on a network share.
When you include multiple device driver paths by adding multiple PathAndCredentials list items, you must increment the value of Key for each path. For example, you can add two separate driver paths where the value of Key for the first path is equal to 1 and the value of Key for the second path is equal to 2.
- Save the answer file and exit WindowsВ SIM. The answer file must resemble the following sample.
- Mount the Windows image that you intend to install the drivers to by using DISM:
If you’re working with a VHD or FFU, specify /Index:1 .
- Apply the answer file to the mounted Windows image:
For more information about how to apply an answer file, see DISM Unattended Servicing Command-Line Options.
The .inf files referenced in the path in the answer file are added to the Windows image.
- Check to see if the driver was added. Drivers added to the Windows image are named Oem*.inf. This guarantees unique naming for newly added drivers. For example, the files MyDriver1.inf and MyDriver2.inf are renamed Oem0.inf and Oem1.inf.
For example, type:
- Unmount the .wim file and commit the changes. For example, type:
If you need drivers for WinPE to see the local hard disk drive or a network, you must use the windowsPE configuration pass of an answer file to add drivers to the WinPE driver store and to reflect boot-critical drivers required by WinPE. For more information, see Add Device Drivers to Windows During Windows Setup.


