- Windows Easy Transfer
- Переносим пользовательские данные с помощью с Windows Easy Transfer
- Скачать бесплатно Windows Easy Transfer 6.1
- Особенности программы
- Windows Easy Transfer for Windows XP, Windows 7, Windows 8 and Windows 10
- Windows Easy Transfer for Windows XP and Server 2003
- Windows Easy Transfer — Not Easy for Windows 8.1, Including Windows 10
- EaseUS Todo PCTrans — Windows Easy Transfer for Windows XP, Windows 7, 8, 10
- How to Transfer Files from PC to PC via the Connected Network
- Transfer Files/Programs via the Backup File
- Windows Easy Transfer for Windows 10 Free Download
- Using Windows Easy Transfer to Migrate Windows Files and Program Settings
- How to use Windows easy transferВ
- Does Windows easy transfer work from windows 7 to windows 10
- Can I transfer programs via Windows Easy Transfer
- Windows 10 Easy Transfer to Migrate Windows Accounts, Data, and Applications
- How to Migrate Data and Applications Along with Settings from One Windows-Based System to Windows 10
- 1. Transfer via the Network
- 2. Transfer via the Image File
Windows Easy Transfer
Windows Easy Transfer – бесплатная программа от Microsoft, с помощью которой можно без особых хлопот перенести пользовательские данные со старой системы в новую.
Утилита позволяет переносить не только файлы пользователя, но и учетные записи, избранное браузеров, электронную почту, а также установленные пользователем параметры приложений. С помощью Windows Easy Transfer вы сможете перенести пользовательские данные из Windows XP в Windows 7, из Windows Vista в Windows 7 и из Windows 7 в Windows 8, или наоборот. Как уже говорилась, программа распространяется разработчиком бесплатно, скачать ее можно с официального сайта Microsoft, а также по ссылке ниже.
Переносим пользовательские данные с помощью с Windows Easy Transfer
Скачайте бесплатно утилиту Windows Easy Transfer с нашего сайта или сайта Microsoft, затем установите ее в систему из которой собираетесь переносить пользовательские данные. После инсталляции запустите ее кликнув по значку на рабочем столе “Средство переноса данных для Windows 7”.

В стартовом окне программы появится список тех данных, которые можно перенести с помощью данного инструмента.
![]()
Для продолжения работы с программой кликните по кнопке “Далее”. Easy Transfer предлагает пользователю возможность копирования данных с помощью USB-кабеля, внешнего накопителя (например флэшки), или с помощью сети (сетевое подключение компьютер-компьютер). Выберите способ переноса данных, или устройство, которое будет выступать в качестве временного хранилища. В нашем примере это обычная USB-флэшка.

В следующем шаге программа Windows Easy Transfer попросит вас подтвердить, что все данные (файлы и параметры), которые подлежат переносу, находятся на этом компьютере. Чтобы сделать это кликните по пункту “Это мой исходный компьютер”.

Далее утилита начнет проверку возможностей переноса данных с исходного компьютера, и по завершении проверки, выдаст пользователю краткую информацию по тем файлам и параметрам, которые доступны для переноса.

В этом же окне с информацией, пользователь сможет отредактировать перечень файлов, посмотреть или изменить их. Для этого необходимо кликнут по кнопке “Настройка” и затем по “Дополнительно”. После чего на экране вашего монитора появится окно диспетчера файлов, где будут отображены все файлы и папки, которые программа отобрала для переноса.

В диспетчера файлов вы сможете отменить любые выбранные для переноса папки и файлы. Мы настоятельно рекомендуем вам очень внимательно просмотреть все эти папки, чтобы исключить возможность “забыть” какие-либо данные. Чтобы добавить какой-то файл или папку, нужно просто отметить галочками соответствующие чекбоксы. После редактирования списка данных для переноса, не забудьте кликнуть п кнопке “Сохранить”, чтобы внесенные вами изменения вступили в силу. После того как вы нажмете кнопку “Далее”, программа начнет сохранять все данные в специальный файл, но сначала она предложит вам защитить свои данные паролем. Если вы желаете защитить файл с данными, то укажите в соответствующем поле пароль для него.
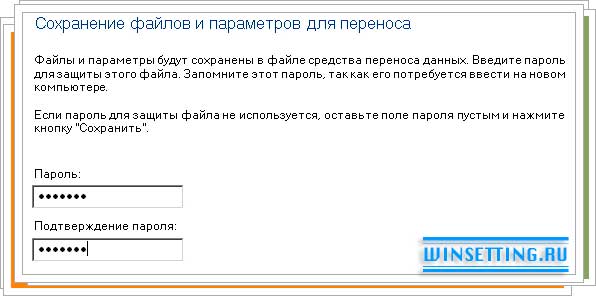
Если защита файла паролем вам не требуется, то оставьте поля для ввода пароля пустыми и кликните по кнопке “Сохранить”. После чего укажите устройство, куда будет записан файл с данными, а также его имя.

После того, как вы укажите съемный накопитель для сохранения данных, и зададите имя будущему файлу, кликните по кнопке “Сохранить”, а затем два раза подряд по “Далее”, чтобы запустить процесс копирования пользовательских данных в специальный файл. По завершению процесса копирования закройте окно программы Windows Easy Transfer и извлеките USB-флэшку из системного блока компьютера.
Итак, чтобы восстановить сохраненные данные в новой системе (компьютере), запустите на нем программу Windows Easy Transfer, затем кликните по “Далее”, выберите пункт “Да (Если вы сохранили файлы на внешний жесткий диск или USB-устройство флэш-памяти, подключите его сейчас)”. Вставьте вашу флэшку с файлом пользовательских данных и укажите ее в качестве источника. Кликните по “Далее”, затем по “Это мой новый компьютер” и снова по “Далее”. В итоге запустится процесс переноса данных, по завершению которого вы увидите все пользовательские данные старого компьютера на новом. Удачи!
Скачать бесплатно Windows Easy Transfer 6.1
![]()
Windows Easy Transfer – стандартная программа для переноса пользовательских данных и файлов между системами Windows XP, Windows Vista, 7 и 8 (обычно применяется для переноса из старой версии в новую). Она переносит данные и настройки учетных записей, видео, музыку, изображения, настройки приложений, некоторые записи реестра и другие пользовательские данные.
Чтобы запустить Windows Easy Transfer, найдите через поиск «Средство переноса данных Windows». Программа очень простая в использовании, так как выполнена в форме пошагового мастера – вам достаточно указать нужные данные для сохранения и следовать инструкциям на экране.
Перенести данные можно тремя способами – по кабелю, с помощью внешнего носителя или по сети. После выбора способа вам нужно указать, на каком компьютере вы сейчас работаете – на исходном (то есть с которого нужно перенести данные) или на новом (на который вы хотите перенести данные). Если вы работаете на исходном ПК, то на следующем этапе выберите нужные данные для переноса – учетные записи, медиа, файлы, папки и т. д.
Завершающий этап зависит от способа переноса. Если через внешний носитель, то программа создаст файл, который нужно будет загрузить на новый ПК и открыть. Если через кабель или по сети, то вам нужно открыть на новом компьютере «Средство переноса данных Windows» и следовать инструкциям.
Особенности программы
• Переносит учетные записи, файлы, папки, настройки, записи реестра и другие пользовательские данные с одного компьютера на другой.
• Возможность ручного выбора файлов для переноса.
• Три способа переноса – через кабель, по сети или с помощью внешнего носителя.
• Поддерживает Windows XP, Vista, 7 и 8.
Программа Windows Easy Transfer изначально предустановлена в системе, но если у вас ее нет, то можете скачать ее совершенно бесплатно.
Windows Easy Transfer for Windows XP, Windows 7, Windows 8 and Windows 10
Windows Easy Transfer for Windows XP and Server 2003
Microsoft doesn’t offer the support service for Windows XP since April 2014, and Windows Server 2003 will end in July 2015. Windows XP and Server 2003 holders have migrated or plan to transfer data, service, paid programs to something else or later system. Backing up to a local network or USB disk is a common choice, if you want to transfer to Windows 7, 10 or server 2008, 2012, Windows Easy Transfer would be an efficient solution. Windows Easy Transfer can support setting, data, but not support desk applications; we can try EaseUS Todo PCTrans — the data & programs migrations tool.
Support Windows 10/8.1/8/7/Vista/XP
Windows Easy Transfer — Not Easy for Windows 8.1, Including Windows 10
Just transferring files, documents, music, photos, settings among systems, Windows Easy Transfer work well on Windows XP, Vista, Windows 7, and Windows 8. However, it is not easy for Windows 8.1 users, indeed, we still don’t get any official reply about why not successfully transfer data from or to Windows 8.1. Still, now, there is not any feedback and comments about if Windows 10 supports Windows Easy Transfer.
Some people persist in using Windows Easy Transfer to transfer crucial files, setting. Considering Windows 8.1 and applications, highly recommend you EaseUS Todo PCTrans, it can quickly and safely transfer files and applications from Windows XP to Windows 7, 8, 8.1,10.
EaseUS Todo PCTrans — Windows Easy Transfer for Windows XP, Windows 7, 8, 10
EaseUS PC transfer software offers direct and indirect ways to migrate files, applications from Windows XP to Windows 7, 8, 10. «Via the connected network» to directly move photos, documents, movies, programs or «Via the compressed files» to create backup files.
How to Transfer Files from PC to PC via the Connected Network
Step 1.В Open EaseUS Todo PCTrans on both of your computers. Choose «PC to PC» to go to the next step.

Step 2.В Connect two PCs via the network by entering the password or verification code of the target PC. Besides, make sure you have chosen the right transfer direction and click «Connect» to continue.
The verification code is on the right top of the «PC to PC» main screen on the target computer.

Step 3. Then,В choose «Files» and click «Edit» to select files to transfer.

Step 4. Select the specific files as you want. What’s more, you can click the Edit icon to customize the storage path for transferred data.
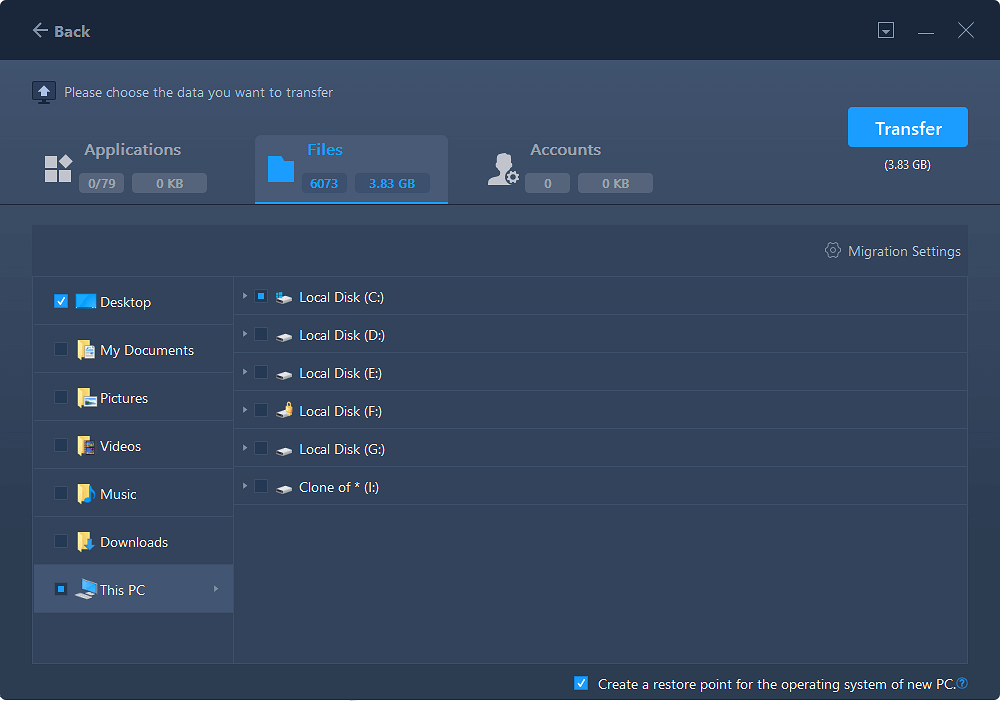
Step 5. Now, click «Finish» and «Transfer» to begin to transfer files from PC to PC. The size of the file determines the transfer time. Wait patiently.

Transfer Files/Programs via the Backup File
Step 1. Create a backup file.В
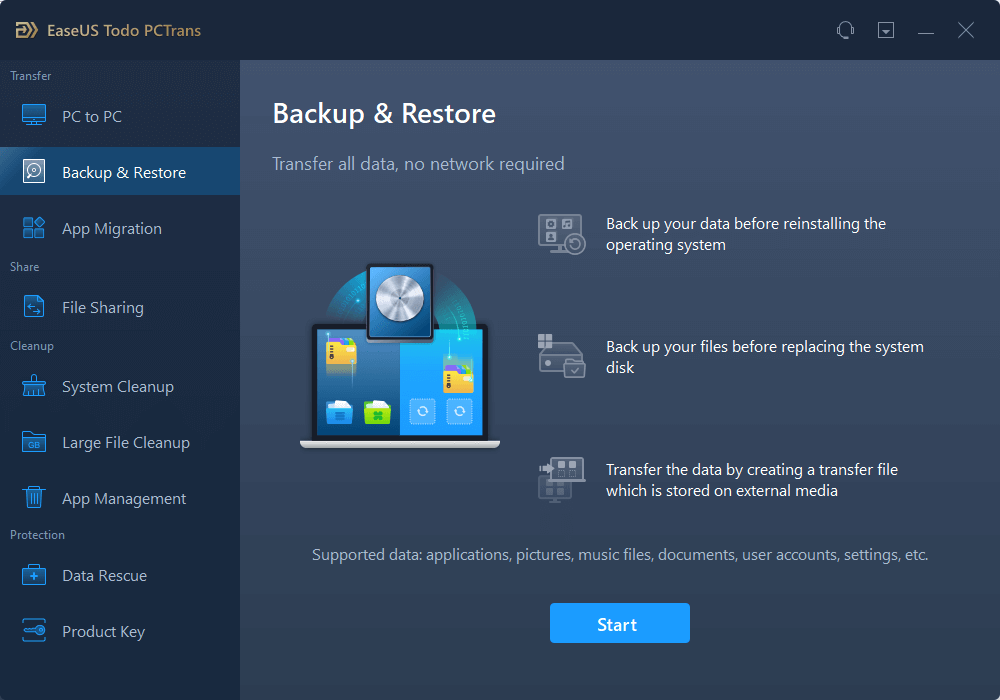
1. Connect your USB (flash) drive/external hard drive to your source computer. Launch Todo PCTrans, click «Backup & Restore > Start» on the main screen.
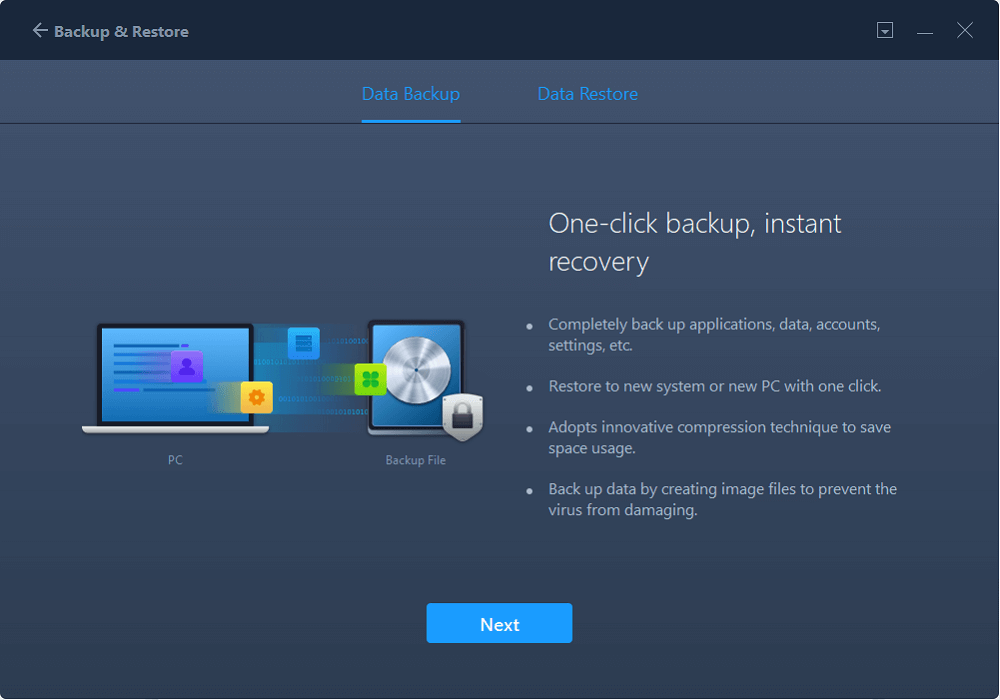
2. Select «Data Backup» to move on.
3. Click «Edit»В at Applications, User Accounts, and Files columns to choose the specific data, applications, etc. to create a backup file.В

Step 2. Recover via the created backup file.
1. Plugin your USB drive which stores the created backup file to the target PC and open EaseUS Todo PCTrans. Click «Backup & Restore > Start > Data Restore».
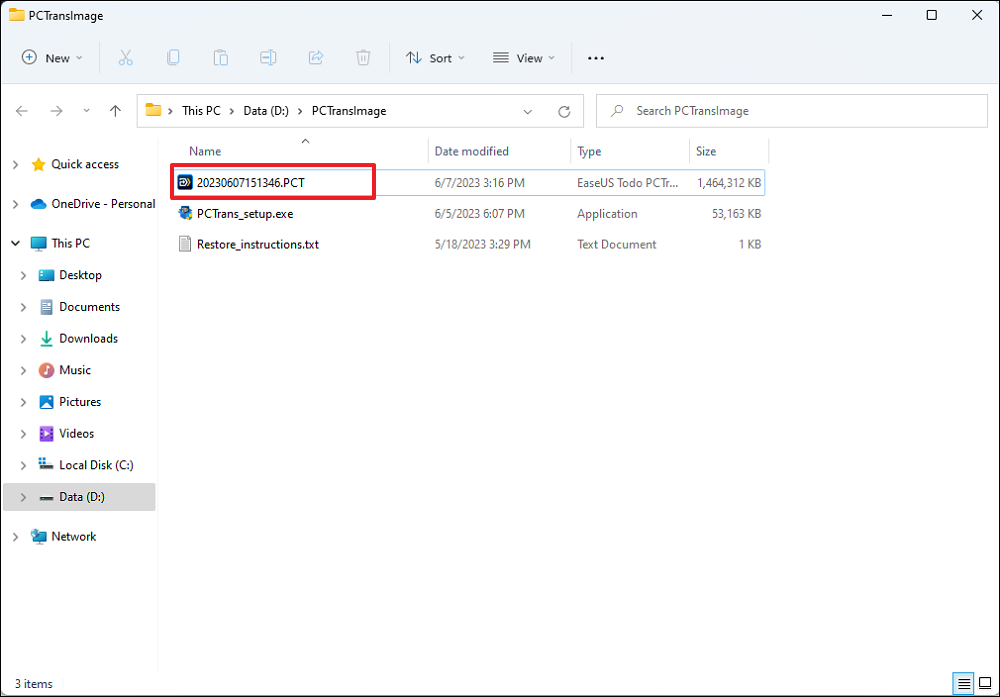
2. Click «Browse» to locate the Image file. Then, choose «Restore» and go to the next step.
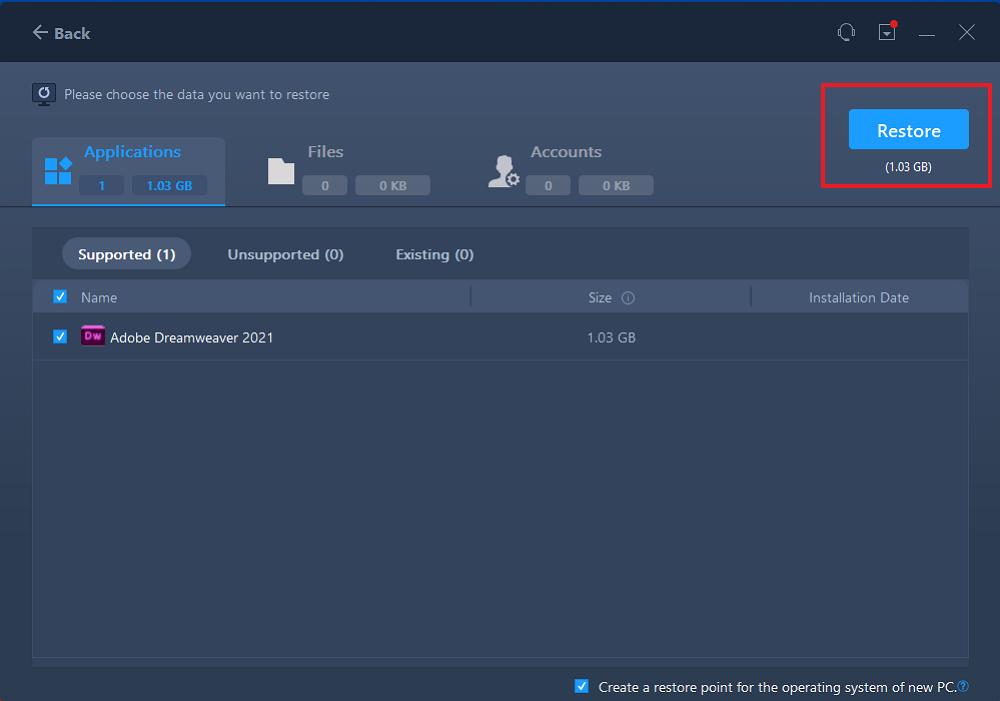
3. Now, you can select Applications/Files/Accounts you want to restore.
Or you can click the «Edit» button to choose the specific data to be transferred flexibly. Click «Finish» to confirm. Besides, you can also click the edit icon > «Submit» to change the target path to recover and save the files.
Windows Easy Transfer for Windows 10 Free Download
What will I lose when upgrading Windows 7 to Windows 10?В
I’ve been learning about those good new features of Windows 10. If I decide to upgrade, what will I lose? I’m willing to follow the Windows 10 trend, but at the same time, I have been used to playing with my current Windows 7 computer which holds all the data, my favorites, photos, music, applications, email and many things I feel reluctant to abandon. So what’s the best solution for me?
Using Windows Easy Transfer to Migrate Windows Files and Program Settings
Windows Easy Transfer is a powerful file transfer program developed by Microsoft, which allows you to transfer files and settings from the old computer version to the new one.В
![]()
How to use Windows easy transferВ
1. On the local computer:
- Input Windows Easy Transfer on the Start screen > Click Windows Easy Transfer
- Welcome to Windows Easy Transfer > Next > Select An external hard disk or USB flash drive > plug in your external devices
- Choose This is my old PC > Customize > Advanced > Save > Next > Save files to the external hard drive
2. Input the files and settings on the new computer:
- Run Windows Easy Transfer on the new pc.
- Welcome to Windows Easy Transfer > Next > Select An external hard disk or USB flash drive > Choose This is my new pc
- plug in your external devices > Select Yes > Open the Easy Transfer file location > enter the password > NextВ
- Customize > Advanced > Save > Click Transfer > Close Windows Easy Transfer > Restart your computer
Does Windows easy transfer work from windows 7 to windows 10
Windows Easy Transfer is not available in Windows 10. But it still works to transfer data among Windows 7, Windows 8, Windows 8.1, Windows XP, and Windows Vista.В
Can I transfer programs via Windows Easy Transfer
Unfortunately, the answer is No. Windows Easy Transfer transfers only move program settings, not the applications themselves.В
Windows 10 Easy Transfer to Migrate Windows Accounts, Data, and Applications
The direct upgrade of Windows 7/8 to Windows 10 will somehow miscarry many of the existed data, files, email and settings. But you can choose to save them by using Windows 10 easy transfer software. And we recommend EaseUS Todo PCTrans Free, which is the most useful and efficient tool to migrate items from one Windows-based system to Windows 10.
Support Windows 10/8.1/8/7/Vista/XP
How to Migrate Data and Applications Along with Settings from One Windows-Based System to Windows 10
No matter the items transfer happens on one computer or two machines, EaseUS Todo PCTrans is capable of handling the process easily. There are two options designed for different demands, which can be realized through a connected network or creating an image file.
1. Transfer via the Network
Run Todo PCTrans on both of the two PCs and choose «PC to PC». The programs will detect another PC or through clicking «+» icon and input IP address to connect another PC. After successful connecting two PCs, we could select the specific data, folders, applications to transfer.
Step 1. Launch EaseUS Todo PCTrans on your source and target computers, connect both PCs via the internet.
1. At the «PC to PC» section, click «PC to PC» to continue.В
2. Select your target computer via its device name, then enter its account password or verification code and select the transfer direction. Then click «Connect» to continue.
You can check the verification code on the right top of «PC to PC» mainscreen on the target computer.
Step 2. Select the categories Applications, Files, and Accounts to transfer via the internet.
If you want to transfer data selectively, click «Edit» under each category, and choose the specific items.
Step 3. Click «Transfer» to start transferring your apps/files/accounts from one computer to another computer via the Internet.
2. Transfer via the Image File
Launch Todo PCTrans, click «Image Transfer» and «Create Image File», choose the folders, programs to create the image. Then copy the image to the targeted computer, run Todo PCTrans on the new system, choose «Recover via Image File «.
Learn from the video tutorial of transferring files, software to Windows 10 by using EaseUS Todo PCTrans
Support Windows 10/8.1/8/7/Vista/XP


