- BCD System Store Settings for UEFI
- Windows Boot Manager Settings for UEFI
- Device Setting
- Path Setting
- Other Settings
- Windows Boot Loader Settings
- Device and OSDevice Settings
- Path Setting
- Windows Memory Tester Settings
- Device Setting
- Path Setting
- EasyUEFI — редактируем загрузочное меню UEFI
- Editing Boot Options in EFI
- Bootcfg
- Nvrboot
- EasyUEFI для Windows
- Windows edit efi boot
BCD System Store Settings for UEFI
For a typical deployment scenario, you do not need to modify the BCD store. This topic discusses the various BCD settings in the BCD store that you can modify. On UEFI systems, this includes settings for the following boot applications:
The following sections describe the available settings for each of these boot applications in detail and how to modify each application for UEFI systems.
For simplicity, the BCDEdit examples in this section modify the BCD system store. To modify another store, such as a copy of the BCD-template, include the store name in the command line.
Windows Boot Manager Settings for UEFI
Windows Boot Manager (
The BCD settings for the device and path elements in Windows Boot Manager indicate the firmware boot manager. The template that is named BCD-template for Windows includes the following settings for Windows Boot Manager.
Device Setting
The device element specifies the volume that contains Windows Boot Manager. For UEFI systems, the device element for Windows Boot Manager is set to the system partition volume letter. To determine the correct volume letter, use the Diskpart tool to view the disk partitions. The following example assumes that the system has a single hard drive that has multiple partitions, including a system partition that has been assigned a drive letter of S.
The following Diskpart commands select disk 0 and then list the details of the volumes on that disk, including their drive letters. It shows volume 2 as the system partition.
If the system partition does not have an assigned drive letter, assign one by using the Diskpart assign command. The following example assumes that the system partition is volume 2 and assigns it S as the drive letter.
After you have determined the system partition volume, set the device element for Windows Boot Manager to the corresponding drive letter. The following example sets device to drive S.
Path Setting
The path element specifies the location of the Windows Boot Manager application on that volume. For UEFI systems, path indicates the firmware boot manager, whose path is \EFI\Microsoft\Boot\Bootmgfw.efi.
You can confirm that BCD-template has the correct path by enumerating the values in the store, as follows:
To explicitly set path to \EFI\Microsoft\Boot\Bootmgfw.efi, use the following command.
Other Settings
You should set Windows Boot Manager to be the first item in the display order of the UEFI firmware, as shown in the following example.
You should also specify the topmost Windows boot loader application in the Windows Boot Manager display order. The following example shows how to put a specified Windows boot loader at the top of the display order.
In the preceding example, is the identifier for the specified Windows boot loader object. The next section discusses this identifier in greater detail.
NoteВ В A multiboot system that has multiple installed operating systems has multiple instances of the Windows boot loader. Each instance of the Windows boot loader has its own identifier. You can set the default Windows boot loader (
Windows Boot Loader Settings
A BCD store has at least one instance, and optionally multiple instances, of the Windows boot loader. A separate BCD object represents each instance. Each instance loads one of the installed versions of Windows that has a configuration that the object’s elements have specified. Each Windows boot loader object has its own identifier, and the object’s device and path settings indicate the correct partition and boot application.
BCD-template for Windows has a single Windows boot loader object that has the following settings.
The identifier for this Windows boot loader is <9f25ee7a-e7b7-11db-94b5-f7e662935912>. You can use this GUID on your system or let the BCDEdit tool generate a new GUID for you.
To simplify BCDEdit commands, you can specify one of the Windows boot loaders in the BCD system store as the default loader. You can then use the standard identifier (
Device and OSDevice Settings
The following elements specify key locations:
The device element specifies the partition that contains the boot application.
The osdevice element specifies the partition that contains the system root.
For the Windows boot loader for EFI, both elements are usually set to the drive letter of the Windows system partition. However, if BitLocker is enabled or a computer has multiple installed versions of Windows, osdevice and device might be set to different partitions.BCD-template sets both elements to drive C, which is the typical value. You can also explicitly set the osdevice and device values, as shown in the following example. The example also assumes that you have specified the Windows boot loader for EFI as the default boot-loader object.
Path Setting
The path element of a Windows boot loader specifies the location of the boot loader on that volume. For UEFI systems, path indicates the Windows boot loader for EFI, whose path is \Windows\System32\Winload.efi.
You can confirm that BCD-template has the correct path value by enumerating the values in the store. You can also explicitly set the path value, as shown in the following example.
Windows Memory Tester Settings
The Windows memory tester (
NoteВ В Note: Intel Itanium computers do not include a Windows memory tester and do not require
BCD-template for Windows has the following settings.
Device Setting
For UEFI systems, the device element for the Windows memory tester is set to the system partition drive letter. The following example assumes that the system partition is drive S, as used in earlier examples.
Path Setting
The path element specifies the location of Windows Test Manager on the volume that the device element has specified. For UEFI systems, path indicates the EFI version of the application (\EFI\Microsoft\Boot\Memtest.efi).
You can confirm that BCD-template has the correct path value by enumerating the values in the store. You can also use the BCDEdit tool to explicitly set the path value, as shown in the following example.
EasyUEFI — редактируем загрузочное меню UEFI

Пару недель назад мы рассказывали о неплохой утилите WinToUSB, сейчас пришла очередь поведать о другой полезной программе от этого разработчика. EasyUEFI — это инструмент для редактирования загрузочного меню, служащего для запуска операционных систем, на компьютерах использующих UEFI.
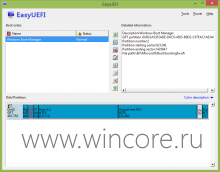
С помощью этой программы пользователь легко сможет добавить новые пункты в загрузочное меню (к примеру установленный на том же компьютере дистрибутив Linux), отключить, удалить, отредактировать уже существующие, воспользоваться функцией разового запуска с нужными параметрами.
Кроме прочего пользователю доступны функции создания резервных копий загрузчика, установки нужного таймаута до старта системы. В качестве полезного бонуса в комплекте предлагается утилита для создания загрузочного диска с WinPE, который может пригодиться при восстановлении системы.
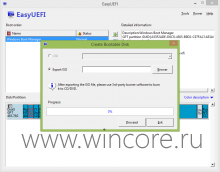
Распространяется EasyUEFI бесплатно, языки интерфейса: английский, китайский, корейский. Помните о том, что использовать подобного рода программное обеспечение нужно с умом и знанием дела.
Editing Boot Options in EFI
To edit boot options on computers with EFI NVRAM that are running Windows Server 2003 or earlier versions of NT-based Windows, use Bootcfg (bootcfg.exe), a tool that runs on Windows, or Nvrboot (nvrboot.efi), a tool that runs in the EFI environment. Both tools are included in the Windows XP 64-Bit Edition and the 64-bit version of Windows Server 2003.
You can also view and change some boot options in Control Panel under System. In the System Properties dialog box, on the Advanced tab, select Settings under Startup and Recovery. Because this functionality is limited, it is not discussed in this section. For information about the Startup and Recovery dialog box, see Help and Support Center.
Bootcfg
Bootcfg (bootcfg.exe) is a command-line tool that edits boot options on a local or remote computer Using the same Bootcfg commands and procedures, you can edit a Boot.ini file or the boot options in EFI NVRAM. Bootcfg is included in the %Systemroot%\System32 directory in Windows XP and Windows Server 2003. (The Bootcfg display is slightly different on systems that store boot options in EFI NVRAM, but the commands are the same.)
You can use Bootcfg to add, delete, and change the values of all valid boot options; however, you cannot set an indefinite time-out value. You can also use Bootcfg commands in a script or batch file to set boot options or to reset them after you replace or upgrade an operating system.
On systems that store boot options in EFI NVRAM, Bootcfg can also display the boot partition table, add boot entries for mirrored drives, and update the GUIDs for a system partition.
You must be a member of the Administrators group on the computer to use Bootcfg. For detailed instructions about using Bootcfg, see Help and Support Center.
Nvrboot
Nvrboot (nvrboot.efi) is an EFI-based boot entry editor included in Windows XP 64-Bit Edition and the 64-bit version of Windows Server 2003. Nvrboot runs in the EFI environment. You cannot run Nvrboot while an operating system is running.
Nvrboot edits only boot entries. You cannot use it to display or change the time-out value for the boot menu, although, you can use the push command (nvrboot p) to change the default boot entry.
Nvrboot also includes commands to export backup copies of boot entries and to import backup copies of boot entries into NVRAM. This procedure is discussed in the Backing up Boot Options in EFI section.
Nvrboot displays boot options in a user-friendly format. For example, it displays the operating system file path and the boot loader file path as a partition GUID followed by a Windows directory path.
The following procedure explains how to start Nvrboot from the EFI shell, a tool provided with many Itanium-based systems. Because the EFI shell tools vary among manufacturers, the description in this section might not accurately describe the EFI shell interface on a particular computer.
To run Nvrboot
Reboot the computer.
From the boot menu, choose EFI Shell.
At the shell prompt, type the drive letter or file system number of the system partition, such as C: or FSn, where n is the file system number of the system partition.
Type cd msutil to navigate to the Msutil directory where nvrboot.efi is located.
To start Nvrboot, type nvrboot.
To find instructions for Nvrboot, type h.
EasyUEFI для Windows
| Оценка: |
4.88 /5 голосов — 9 |
| Лицензия: | Бесплатная |
| Версия: | 3.2 free / 4.2 | Сообщить о новой версии |
| Обновлено: | 07.07.2020 |
| ОС: | Windows 10, 8.1, 8, 7 |
| Интерфейс: | Английский |
| Разработчик: | EasyUEFI Development Team |
| Категория: | Boot менеджеры |
| Загрузок (сегодня/всего): | 4 / 13 069 | Статистика |
| Размер: | 10,7 Мб |
| СКАЧАТЬ | |

EasyUEFI — удобная утилита для редактирования загрузочного меню операционных систем Windows на основе EFI/UEFI. Технология UEFI все чаще используется разработчиками и производителями ПК как замена известного всем интерфейса BIOS, позволяя более гибко и тонко управлять параметрами запуска операционки.
Этот инструмент дает возможность комфортно добавить новые записи в загрузочное меню, создать их резервные копии, отредактировать текущие или вообще удалить ненужные. Кроме того, есть такой режим, как запуск операционки с требуемыми параметрами, при этом запуск может быть как разовым, так и на постоянной основе.
Конечно, эта программа рассчитана на пользователей, которые уже имеют некоторый опыт работы с загрузочным меню Windows, т.к. даже самые незначительные необдуманные действия могут привести к проблемам в запуске ОС или сбоях в ее работе. Зато продвинутые пользователи имеют возможность создавать свои собственные сборки загрузочного диска для операционки Windows на основе WinPE, что может пригодиться для восстановления поврежденной системы.
Примечание. Обратите внимание, что программа EasyUEFI устанавливается и запускается только на тех компьютерах, которые аппаратно могут поддерживать технологию EFI/UEFI. В противном случае Вы будете оповещены о невозможности работы с приложением.
Windows edit efi boot
В чем преимущества UEFI перед BIOS?
- Более быстрая загрузка за счет отсутствия необходимости поиска загрузчика на всех дисках
- Поддержка носителей объемом >2Тб
- Более простая подготовка загрузочных носителей, отсутствие необходимости в записи разных загрузочных секторов
- Наличие собственного менеджера загрузки. Теперь необязательно заводить многоуровневую чехарду загрузчиков, чтобы организовать мультизагрузочную среду, в EFI NVRAM штатно хранятся все записи о имеющихся загрузчиках, и переключение между загружаемыми ОС осуществляется так же, как и между загрузочными носителями.
- Более защищенная среда загрузки
- Графический режим конфигурации UEFI, с поддержкой графики и мыши
Сообщение отредактировал saintonotole — 01.06.13, 17:59
Можно ли обновить мой BIOS на UEFI?
Не совсем. UEFI нельзя прошить вместо BIOS, поскольку он занимает гораздо больше памяти. Но существует такая штука, как DUET. Это загружаемая из BIOS посредством отдельного загрузочного раздела среда UEFI, которая может быть полезна, если вы собираетесь использовать диски объемом >2Тб на своем старом железе с BIOS. Подробнее можно ознакомиться здесь: http://www.rodsbooks.com/bios2uefi/
Сообщение отредактировал saintonotole — 01.06.13, 16:37
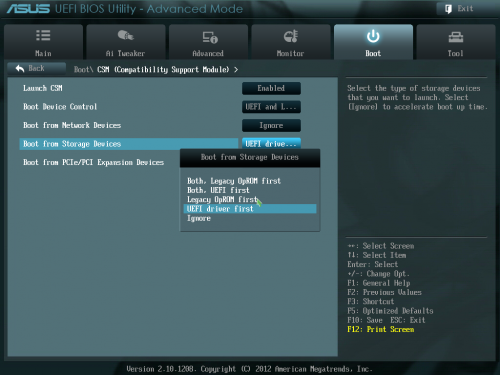
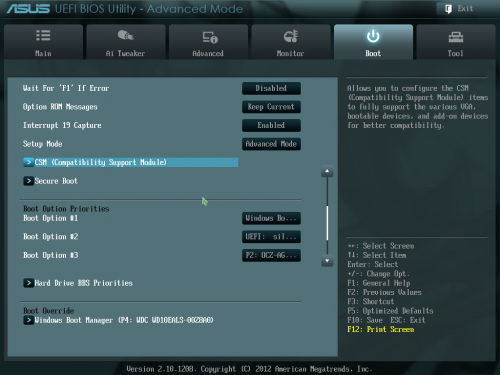
Здесь за гибкую настройку приоритета загрузки отвечает целый модуль CSM
|
|
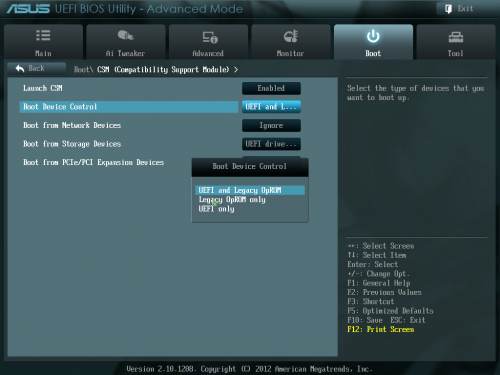
Выбор, что грузить, если на носителе есть и бутсектор, и efi-загрузчик
|
Сообщение отредактировал saintonotole — 16.06.13, 18:52 Что такое GPT? Сообщение отредактировал saintonotole — 01.06.13, 16:38 В чем преимущества GPT перед MBR?
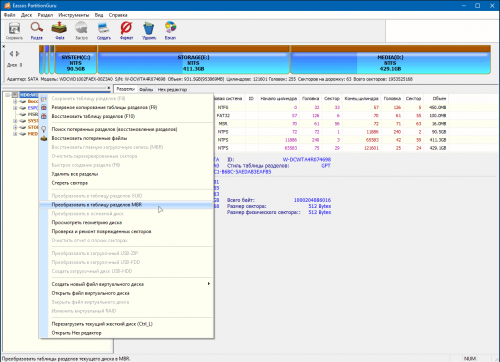
Сообщение отредактировал saintonotole — 08.06.13, 18:32 Где в GPT хранятся аналоги загрузочных секторов? Сообщение отредактировал saintonotole — 01.06.13, 16:38 Возможно ли сконвертировать диск из MBR в GPT и обратно без потери данных?
Сообщение отредактировал Shoore — 21.05.14, 22:22 Что такое UEFI Shell? Сообщение отредактировал AndrewP_1 — 17.12.18, 10:03 Как редактировать/удалить/добавить пункты загрузки в загрузочное меню UEFI? Найдя таким образом необходимый диск, нужно перейти в него Сообщение отредактировал Shoore — 31.10.14, 16:34 |