- Export and Import Dial-up and VPN Settings in Windows
- How to export and import VPN connections on Windows 10
- Export VPN connections on Windows 10
- Import VPN connections on Windows 10
- Change VPN connection credentials on Windows 10
- Записки IT специалиста
- OpenVPN объединяем ключи и конфигурацию клиента в один файл
- Дополнительные материалы:
- Создание и установка файлов конфигурации VPN-клиента для настройки подключений типа «точка — сеть» с использованием собственной аутентификации Azure на основе сертификата Create and install VPN client configuration files for native Azure certificate authentication P2S configurations
- Создание файлов конфигурации VPN-клиента Generate VPN client configuration files
- Создание файлов с помощью портала Azure Generate files using the Azure portal
- Создание файлов с помощью PowerShell Generate files using PowerShell
- Windows Windows
- Mac (OS X) Mac (OS X)
- Linux (графический пользовательский интерфейс strongSwan) Linux (strongSwan GUI)
- Установка strongSwan Install strongSwan
- Создание сертификатов Generate certificates
- Установка и настройка. Install and configure
- Linux (strongSwan CLI) Linux (strongSwan CLI)
- Установка strongSwan Install strongSwan
- Создайте сертификаты. Generate certificates
- Установка и настройка. Install and configure
- Дальнейшие действия Next steps
Export and Import Dial-up and VPN Settings in Windows
Most of us don’t really need to create dial-up connections on Windows operating system anymore, thanks to routers which is very commonly being used today. Once the router is configured, it will automatically connect to the Internet when it is turned on and the computer that is connected to the router can instantly use the Internet connection.
However, I still have a DSL modem that I have to manually connect through dial-up which is very useful to troubleshoot Internet connectivity problems to determine if it is the router or ISP’s fault. Other than that, VPN connections that uses PPTP and L2TP also needs to be configured from the same area where you create dial-up connections that is in the Network and Sharing Center.
If you have previously setup a lot of VPN connections by saving the username, password and the VPN address in Windows, you may want to look for an automated way to export the VPN settings and then import it to another computer so that you don’t need to manually recreate the connections again. Here is how you can backup and restore the connection settings in Windows.
1. Press Win+R to bring up with Run window, type %appdata% and hit Enter.
2. Go to Microsoft > Network > Connections and backup the Pbk folder.

To restore the dial-up connections and VPN settings, simply overwrite the Pbk folder that you’ve backed up to the existing Pbk folder. Do take note that this will only restore the connection settings without the username and password because the credentials are tied to the unique SID (Security Identifier) and owner on the computer.
Theoretically you can change the SID, computer name, and user account name to match the old one so that the username and password are restored together with the connection settings but I won’t recommend you to do that unless you’re on a clean Windows. Another problem is a tool developed by Sysinternals called NewSID to change SID does not work on Windows 7. Sysprep only changes to a random SID but does not allow you to specify a SID. Ghost Walker works on Windows 7 but it is only bundled in their Ghost shareware.
How to export and import VPN connections on Windows 10
You can export and import your VPN settings to another computer, and in this guide, you’ll learn how to perform this task.

On Windows 10, you can add and remove VPN (virtual private network) connections very easily. However, you won’t find an option to export existing connections you can use to import settings onto another device.
Although setting up a VPN connection is not a difficult task, the ability to export and import settings can always speed up the process to configure the same connections on multiple computers or when you want to move a VPN connection with specific settings to another device.
If you want to move VPN connections to another computer, there is a workaround to export and import the settings.
In this guide, you will learn the steps to export and import VPN connections on Windows 10.
Export VPN connections on Windows 10
To export VPN connections on Windows 10, connect a removable drive to the computer, and use these steps:
Open File Explorer on Windows 10.
Copy and paste the following path in the address bar and press Enter:
Right-click the Pbk folder and select the Copy option.
 Export VPN settings on Windows 10
Open the location that you want to use to export the VPN settings.
Right-click on the folder and select the Paste option.
Once you complete the steps, you can take the removable media to a different computer to import the settings.
In this guide, we use a removable drive to export and import VPN connections to another device, but you can use a network shared folder or any other sharing method.
Import VPN connections on Windows 10
To import the VPN connections to a Windows 10 device, connect the removable drive with the exported files, and use these steps:
Open the removable drive.
Right-click the Pbk folder and select the Copy option.
Copy and paste the following path in the File Explorer address bar and press Enter:
Right-click on the folder and select the Paste option.
 Import VPN settings on Windows 10
After completing the steps, the VPN connections should be available in the Settings app. However, there is no way to export and import the usernames and passwords. As a result, you will need to reenter this information manually.
Change VPN connection credentials on Windows 10
To add or change a VPN connection username and password information, use these steps:
Open Settings.
Click on Network & Internet.
Click on VPN.
Select the VPN connection.
Click the Advanced options button.
 VPN settings on Windows 10
Under the “Connections properties” section, click the Edit button.
 Edit VPN settings on Windows 10
Complete the username and password information.
 Change VPN username and password on Windows 10
Click the Save button.
Once you complete the steps, the VPN connection should be able to connect automatically without any additional steps.
We may earn commission for purchases using our links to help keep offering the free content. Privacy policy info.
All content on this site is provided with no warranties, express or implied. Use any information at your own risk. Always backup of your device and files before making any changes. Privacy policy info.
Записки IT специалиста
Технический блог специалистов ООО»Интерфейс»
- Главная
- OpenVPN объединяем ключи и конфигурацию клиента в один файл
OpenVPN объединяем ключи и конфигурацию клиента в один файл
 OpenVPN достаточно широко применяется системными администраторами как для объединения сетей офисов и филиалов, так и для доступа корпоративных клиентов. В последнем случае процесс настройки может доставить некоторые неудобства, особенно если таких клиентов много. Действительно, на удаленный компьютер нужно скачать ключи и сертификаты, разместить их в определенном месте, прописать пути к ним в конфигурацию. К счастью, можно значительно облегчить себе работу, достаточно объединить ключи и настройки клиента в один файл.
Классический способ настройки клиента, описанный во всех руководствах, наших в том числе, подразумевает что мы передаем на клиента и располагаем там целый ряд файлов: сертификат удостоверяющего центра — CA, закрытый ключ и сертификат клиента, файл конфигурации. Также еще может использоваться дополнительный ключ для TLS-аутентификации. Все это подразумевает ручную настройку и при большом числе клиентов может оказаться утомительным.
Поэтому облегчим жизнь и себе и пользователям, объединив все в единственный OVPN-файл. Прежде всего откроем файл конфигурации клиента и закомментируем в нем строки содержащие пути к ключам и сертификатам (пути даны сугубо условно):
Если вы используете TLS-аутентификацию, то дополнительно закомментируйте:
Теперь перейдем в самый конец файла и создадим там несколько секций в которые скопируем содержимое ключей и сертификатов:
В секцию ca мы копируем содержимое корневого сертификата ca.crt, в секцию key — содержимое ключа клиента, а в секцию cert — открытый ключ из его сертификата, обратите внимание, что копируется содержимое начиная от строки BEGIN и заканчивая строкой END включительно, как есть, без каких либо изменений. Открыть сертификаты и ключи можно обычным Блокнотом, либо любым иным текстовым редактором.
 Если вы используете TLS-аутентификацию, то добавьте секцию tls-auth и скопируйте в нее содержимое ключа ta.key:
И добавьте в файл опцию:
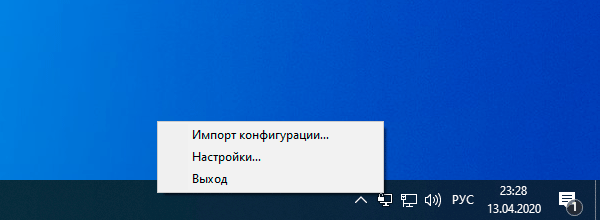
Теперь файл конфигурации можно сохранить и передать на клиентское устройство. А дальше все достаточно просто и практически не требует вмешательства администратора, многие пользователи вполне способны сделать все самостоятельно. Щелкаем правой кнопкой на значок графической оболочки OpenVPN в системном лотке, выбираем Импорт конфигурации и указываем на полученный файл.
 Если все сделано правильно, то вы получите сообщение об успешном импорте. Поздравляем, OpenVPN-клиент успешно настроен, можно переходить к следующему.
 Разница между традиционным способом существенная, мы радикально уменьшили число необходимых действий и теперь настройка клиента может быть выполнена руками самого пользователя, нужно только лишь подготовить подробную инструкцию. Хотя и подробностей там будет немного: установить OpenVPN c настройками по умолчанию и выполнить импорт конфигурации.
Дополнительные материалы:
Помогла статья? Поддержи автора и новые статьи будут выходить чаще:
Или подпишись на наш Телеграм-канал: 
Создание и установка файлов конфигурации VPN-клиента для настройки подключений типа «точка — сеть» с использованием собственной аутентификации Azure на основе сертификата Create and install VPN client configuration files for native Azure certificate authentication P2S configurations
Файлы конфигурации VPN-клиента содержатся в ZIP-файле. VPN client configuration files are contained in a zip file. Файлы конфигурации предоставляют параметры, необходимые для собственных клиентов Windows, VPN-подключений по протоколу IKEv2 или Linux, для подключения к виртуальной сети по подключениям типа «точка — сеть», которые используют собственную проверку подлинности на основе сертификата Azure. Configuration files provide the settings required for a native Windows, Mac IKEv2 VPN, or Linux clients to connect to a virtual network over Point-to-Site connections that use native Azure certificate authentication.
Файлы конфигурации клиента относятся к конфигурации VPN для виртуальной сети. Client configuration files are specific to the VPN configuration for the virtual network. Если вы создали файлы конфигурации VPN-клиента, а затем внесли изменения в конфигурацию VPN-подключения типа «точка — сеть» (например, изменили тип VPN-протокола или аутентификации), создайте новую конфигурацию VPN-клиента на устройствах пользователей. If there are any changes to the Point-to-Site VPN configuration after you generate the VPN client configuration files, such as the VPN protocol type or authentication type, be sure to generate new VPN client configuration files for your user devices.
Начиная с 1 июля 2018 года прекращается поддержка TLS 1.0 и TLS 1.1 в VPN-шлюзе Azure. Starting July 1, 2018, support is being removed for TLS 1.0 and 1.1 from Azure VPN Gateway. VPN-шлюз будет поддерживать только TLS 1.2. VPN Gateway will support only TLS 1.2. Затрагиваются только подключения «точка — сеть». Подключения «сеть — сеть» не затрагиваются. Only point-to-site connections are impacted; site-to-site connections will not be affected. Если вы используете TLS для VPN-подключений «точка — сеть» на клиентах Windows 10, не нужно предпринимать никаких действий. If you’re using TLS for point-to-site VPNs on Windows 10 clients, you don’t need to take any action. Если вы используете TLS для подключений «точка — сеть» клиентов Windows 7 и Windows 8, обратитесь к разделу Собственная аутентификация Azure с использованием сертификата для подключений типа «точка — сеть» за инструкциями по обновлению. If you are using TLS for point-to-site connections on Windows 7 and Windows 8 clients, see the VPN Gateway FAQ for update instructions.
Создание файлов конфигурации VPN-клиента Generate VPN client configuration files
Перед подключением убедитесь, что на устройствах всех пользователей установлены действительные сертификаты. Before you begin, make sure that all connecting users have a valid certificate installed on the user’s device. См. инструкции по установке сертификата клиента. For more information about installing a client certificate, see Install a client certificate.
Вы можете создать файлы конфигурации клиента с помощью PowerShell или с помощью портала Azure. You can generate client configuration files using PowerShell, or by using the Azure portal. И в первом, и во втором случае возвращается один и тот же ZIP-файл. Either method returns the same zip file. Распакуйте файл. Отобразятся следующие папки: Unzip the file to view the following folders:
- WindowsAmd64 и WindowsX86. Эти папки содержат пакеты установщика 32- и 64-разрядной версий Windows. WindowsAmd64 and WindowsX86, which contain the Windows 32-bit and 64-bit installer packages, respectively. Пакет установщика WindowsAmd64 предназначен для всех поддерживаемых 64-разрядных клиентов Windows, не только Amd. The WindowsAmd64 installer package is for all supported 64-bit Windows clients, not just Amd.
- Generic. Эта папка содержит общие сведения для создания собственной конфигурации VPN-клиента. Generic, which contains general information used to create your own VPN client configuration. Эта папка доступна, если для шлюза настроены протоколы IKEv2 и SSTP+IKEv2. The Generic folder is provided if IKEv2 or SSTP+IKEv2 was configured on the gateway. Если настроен только протокол SSTP, эта папка отсутствует. If only SSTP is configured, then the Generic folder is not present.
Создание файлов с помощью портала Azure Generate files using the Azure portal
На портале Azure перейдите в шлюз виртуальной сети, к которой необходимо подключиться. In the Azure portal, navigate to the virtual network gateway for the virtual network that you want to connect to.
На странице шлюз виртуальной сети выберите Конфигурация » точка — сеть«. On the virtual network gateway page, select Point-to-site configuration.

В верхней части страницы Конфигурация «точка — сеть» выберите скачать VPN-клиент. At the top of the Point-to-site configuration page, select Download VPN client. Пакет конфигурации клиента создается несколько минут. It takes a few minutes for the client configuration package to generate.
В браузере появится сообщение о том, что ZIP-файл конфигурации клиента доступен. Your browser indicates that a client configuration zip file is available. Он имеет то же имя, что и шлюз. It is named the same name as your gateway. Распакуйте файл. После этого отобразятся папки. Unzip the file to view the folders.
Создание файлов с помощью PowerShell Generate files using PowerShell
При создании файлов конфигурации VPN-клиента установите для параметра AuthenticationMethod значение EapTls. When generating VPN client configuration files, the value for ‘-AuthenticationMethod’ is ‘EapTls’. Создайте конфигурацию VPN-клиента с помощью следующей команды: Generate the VPN client configuration files using the following command:
Скопируйте URL-адрес в браузер, чтобы скачать ZIP-файл, а затем распакуйте файл для просмотра папок. Copy the URL to your browser to download the zip file, then unzip the file to view the folders.
Windows Windows
На каждом клиентском компьютере Windows можно использовать один и тот же пакет конфигурации VPN-клиента, если его версия соответствует архитектуре клиента. You can use the same VPN client configuration package on each Windows client computer, as long as the version matches the architecture for the client. Список поддерживаемых клиентских операционных систем см. в разделе с описанием подключений типа «точка — сеть» в статье VPN-шлюз: вопросы и ответы. For the list of client operating systems that are supported, see the Point-to-Site section of the VPN Gateway FAQ.
Вам потребуются права администратора для клиентского компьютера Windows, с которого устанавливается подключение. You must have Administrator rights on the Windows client computer from which you want to connect.
Чтобы настроить в Windows собственный VPN-клиент для аутентификации на основе сертификата, сделайте следующее: Use the following steps to configure the native Windows VPN client for certificate authentication:
- Выберите файлы конфигурации VPN-клиента, которые соответствуют архитектуре компьютера Windows. Select the VPN client configuration files that correspond to the architecture of the Windows computer. Для 64-разрядной архитектуры процессора выберите пакет установщика VpnClientSetupAmd64. For a 64-bit processor architecture, choose the ‘VpnClientSetupAmd64’ installer package. Для 32-разрядной архитектуры процессора выберите пакет установщика VpnClientSetupX86. For a 32-bit processor architecture, choose the ‘VpnClientSetupX86’ installer package.
- Дважды щелкните пакет, чтобы установить его. Double-click the package to install it. При появлении всплывающего окна SmartScreen щелкните Дополнительно, а затем выберите Выполнить в любом случае. If you see a SmartScreen popup, click More info, then Run anyway.
- На клиентском компьютере перейдите в раздел Параметры сети и щелкните VPN. On the client computer, navigate to Network Settings and click VPN. Для VPN-подключения отображается имя виртуальной сети, к которой оно устанавливается. The VPN connection shows the name of the virtual network that it connects to.
- Перед попыткой подключения убедитесь, что вы установили сертификат клиента на клиентском компьютере. Before you attempt to connect, verify that you have installed a client certificate on the client computer. Сертификат клиента требуется при использовании собственной аутентификации Azure на основе сертификата. A client certificate is required for authentication when using the native Azure certificate authentication type.
Mac (OS X) Mac (OS X)
Необходимо вручную настроить VPN-клиент IKEv2 на каждом компьютере Mac, который будет подключаться к Azure. You have to manually configure the native IKEv2 VPN client on every Mac that will connect to Azure. Azure не предоставляет файл mobileconfig для собственной аутентификации Azure на основе сертификата. Azure does not provide mobileconfig file for native Azure certificate authentication. В папке Generic содержатся все необходимые для конфигурации сведения. The Generic contains all of the information that you need for configuration. Если папки Generic нет в скачанных файлах, вполне вероятно, что IKEv2 не был выбран в качестве типа туннеля. If you don’t see the Generic folder in your download, it’s likely that IKEv2 was not selected as a tunnel type. Обратите внимание, что базовый SKU VPN-шлюза не поддерживает IKEv2. Note that the VPN gateway Basic SKU does not support IKEv2. Выбрав IKEv2, создайте ZIP-файл еще раз для получения папки Generic. Once IKEv2 is selected, generate the zip file again to retrieve the Generic folder.
Эта папка содержит следующие файлы: The Generic folder contains the following files:
- VpnSettings.xml, который содержит важные параметры, такие как адрес сервера и тип туннеля. VpnSettings.xml, which contains important settings like server address and tunnel type.
- VpnServerRoot. cer, содержащий корневой сертификат, необходимый для проверки VPN-шлюза Azure во время установки подключения P2S. VpnServerRoot.cer, which contains the root certificate required to validate the Azure VPN Gateway during P2S connection setup.
Чтобы настроить на устройстве Mac собственный VPN-клиент для аутентификации на основе сертификата, сделайте следующее: Use the following steps to configure the native VPN client on Mac for certificate authentication. Выполните следующие действия на каждом компьютере Mac, который будет подключаться к Azure: You have to complete these steps on every Mac that will connect to Azure:
Импортируйте корневой сертификат VpnServerRoot на компьютер Mac. Import the VpnServerRoot root certificate to your Mac. Для этого скопируйте файл на устройство Mac и дважды щелкните его. This can be done by copying the file over to your Mac and double-clicking on it. Выберите Добавить к импорту. Select Add to import.

При двойном щелчке сертификата диалоговое окно добавления может не отобразиться, но сертификат устанавливается в надлежащее хранилище. Double-clicking on the certificate may not display the Add dialog, but the certificate is installed in the correct store. Вы можете проверить наличие сертификата в цепочке ключей входа по категории сертификатов. You can check for the certificate in the login keychain under the certificates category.
Убедитесь, что вы установили сертификат клиента, выданный с использованием корневого сертификата, который вы передали в Azure при настройке параметров подключения типа «точка — сеть». Verify that you have installed a client certificate that was issued by the root certificate that you uploaded to Azure when you configured you P2S settings. Это не сертификат VPNServerRoot, который вы установили на предыдущем шаге. This is different from the VPNServerRoot that you installed in the previous step. Этот сертификат клиента требуется для аутентификации. The client certificate is used for authentication and is required. Дополнительную информацию о создании сертификатов см. в разделе Настройка подключения «точка — сеть» к виртуальной сети с использованием собственной аутентификации Azure на основе сертификата и портала Azure. For more information about generating certificates, see Generate Certificates. Инструкции по установке сертификата клиента см. в разделе Установка сертификата клиента для аутентификации Azure на основе сертификата при подключениях типа «точка — сеть». For information about how to install a client certificate, see Install a client certificate.
Откройте диалоговое окно сети в разделе » сетевые настройки » и выберите «+» , чтобы создать профиль подключения VPN-клиента для подключения P2S к виртуальной сети Azure. Open the Network dialog under Network Preferences and select ‘+’ to create a new VPN client connection profile for a P2S connection to the Azure virtual network.
Установите следующие значения: для параметра Interface (Интерфейс) — VPN, для VPN Type (Тип VPN) — IKEv2. The Interface value is ‘VPN’ and VPN Type value is ‘IKEv2’. Укажите имя профиля в поле имя службы , а затем щелкните создать , чтобы создать профиль подключения VPN-клиента. Specify a name for the profile in the Service Name field, then select Create to create the VPN client connection profile.

В папке Generic из файла VpnSettings.xml скопируйте значение тега VpnServer. In the Generic folder, from the VpnSettings.xml file, copy the VpnServer tag value. Вставьте это значение в поля профиля Server Address (Адрес сервера) и Remote ID (Удаленный ИД). Paste this value in the Server Address and Remote ID fields of the profile.

Выберите Параметры проверки подлинности и выберите сертификат. Select Authentication Settings and select Certificate. Для Catalina выберите нет, а затем — сертификат. For Catalina, select None, and then certificate.

Для Catalina выберите нет и сертификат. For Catalina, select None and then Certificate. Выберите правильный сертификат: Select the correct certificate:

Нажмите кнопку выбрать. Click Select… чтобы выбрать сертификат клиента, который будет использоваться для аутентификации. to choose the client certificate that you want to use for authentication. Это сертификат, установленный на шаге 2. This is the certificate that you installed in Step 2.

В окне Choose An Identity (Выбор удостоверения) отобразится список доступных сертификатов. Choose An Identity displays a list of certificates for you to choose from. Выберите правильный сертификат, а затем нажмите кнопку продолжить. Select the proper certificate, then select Continue.

В поле Local ID (Локальный идентификатор) укажите имя сертификата (из шага 6). In the Local ID field, specify the name of the certificate (from Step 6). В нашем примере поисковый запрос будет выглядеть так: ikev2Client.com . In this example, it is ikev2Client.com . Затем нажмите кнопку Применить , чтобы сохранить изменения. Then, select Apply to save the changes.

В диалоговом окне сеть нажмите кнопку Применить , чтобы сохранить все изменения. On the Network dialog, select Apply to save all changes. Затем выберите Connect (Подключиться), чтобы установить подключение «точка — сеть» к виртуальной сети Azure. Then, select Connect to start the P2S connection to the Azure virtual network.
Linux (графический пользовательский интерфейс strongSwan) Linux (strongSwan GUI)
Установка strongSwan Install strongSwan
Для приведенных ниже действий использовалась следующая конфигурация. The following configuration was used for the steps below:
- Компьютер: Ubuntu Server 18,04 Computer: Ubuntu Server 18.04
- Зависимости: strongSwan Dependencies: strongSwan
Чтобы установить необходимую конфигурацию strongSwan, используйте следующие команды: Use the following commands to install the required strongSwan configuration:
Чтобы установить интерфейс командной строки Azure, используйте следующую команду: Use the following command to install the Azure command-line interface:
Создание сертификатов Generate certificates
Если вы еще не создали сертификаты, выполните следующие действия. If you have not already generated certificates, use the following steps:
Создайте сертификат ЦС. Generate the CA certificate.
Выведите на экран сертификат ЦС в формате base64. Print the CA certificate in base64 format. Это формат, поддерживаемый Azure. This is the format that is supported by Azure. Вы отправляете этот сертификат в Azure как часть шагов настройки P2S. You upload this certificate to Azure as part of the P2S configuration steps.
Создайте сертификат пользователя. Generate the user certificate.
Создайте пакет p12, содержащий сертификат пользователя. Generate a p12 bundle containing the user certificate. Этот пакет понадобится на следующих шагах при работе с файлами конфигурации клиента. This bundle will be used in the next steps when working with the client configuration files.
Установка и настройка. Install and configure
Следующие инструкции были созданы в Ubuntu 18.0.4. The following instructions were created on Ubuntu 18.0.4. Ubuntu 16.0.10 не поддерживает графический пользовательский интерфейс strongSwan. Ubuntu 16.0.10 does not support strongSwan GUI. Использовать Ubuntu 16.0.10 можно только с помощью командной строки. If you want to use Ubuntu 16.0.10, you will have to use the command line. В зависимости от версии Linux и strongSwan указанные ниже примеры могут отличаться от экранов, которые вы видите. The examples below may not match screens that you see, depending on your version of Linux and strongSwan.
Откройте приложение Terminal, чтобы установить strongSwan и его Network Manager, выполнив команду из примера. Open the Terminal to install strongSwan and its Network Manager by running the command in the example.
Выберите Параметры, а затем выберите сеть. Select Settings, then select Network. Нажмите + кнопку, чтобы создать новое соединение. Select the + button to create a new connection.

В меню выберите IPSec/IKEv2 (strongSwan) и дважды щелкните. Select IPsec/IKEv2 (strongSwan) from the menu, and double-click.

На странице Добавление VPN добавьте имя VPN-подключения. On the Add VPN page, add a name for your VPN connection.

Откройте файл VpnSettings.xml из папки Generic в скачанных файлах конфигурации клиента. Open the VpnSettings.xml file from the Generic folder contained in the downloaded client configuration files. Найдите тег с именем VpnServer и скопируйте имя, начинающееся с «сертификат azuregateway» и заканчивая на «. cloudapp.NET». Find the tag called VpnServer and copy the name, beginning with ‘azuregateway’ and ending with ‘.cloudapp.net’.

Вставьте имя в поле адрес нового VPN-подключения в разделе шлюз . Paste the name in the Address field of your new VPN connection in the Gateway section. Затем щелкните значок папки в конце поля Certificate (Сертификат), перейдите в папку Generic и выберите файл VpnServerRoot. Next, select the folder icon at the end of the Certificate field, browse to the Generic folder, and select the VpnServerRoot file.
В разделе Client (Клиент) подключения для параметра Authentication (Аутентификация) выберите Certificate/private key (Сертификат/закрытый ключ). In the Client section of the connection, for Authentication, select Certificate/private key. Для параметров Certificate (Сертификат ) и Private key (Закрытый ключ) выберите созданные ранее сертификат и закрытый ключ. For Certificate and Private key, choose the certificate and the private key that were created earlier. В разделе Options (Параметры) выберите Request an inner IP address (Запросить внутренний IP-адрес). In Options, select Request an inner IP address. Затем выберите Добавить. Then, select Add.

Включите подключение. Turn the connection On.

Linux (strongSwan CLI) Linux (strongSwan CLI)
Установка strongSwan Install strongSwan
Для приведенных ниже действий использовалась следующая конфигурация. The following configuration was used for the steps below:
- Компьютер: Ubuntu Server 18,04 Computer: Ubuntu Server 18.04
- Зависимости: strongSwan Dependencies: strongSwan
Чтобы установить необходимую конфигурацию strongSwan, используйте следующие команды: Use the following commands to install the required strongSwan configuration:
Чтобы установить интерфейс командной строки Azure, используйте следующую команду: Use the following command to install the Azure command-line interface:
Создайте сертификаты. Generate certificates
Если вы еще не создали сертификаты, выполните следующие действия. If you have not already generated certificates, use the following steps:
Создайте сертификат ЦС. Generate the CA certificate.
Выведите на экран сертификат ЦС в формате base64. Print the CA certificate in base64 format. Это формат, поддерживаемый Azure. This is the format that is supported by Azure. Вы отправляете этот сертификат в Azure как часть шагов настройки P2S. You upload this certificate to Azure as part of the P2S configuration steps.
Создайте сертификат пользователя. Generate the user certificate.
Создайте пакет p12, содержащий сертификат пользователя. Generate a p12 bundle containing the user certificate. Этот пакет понадобится на следующих шагах при работе с файлами конфигурации клиента. This bundle will be used in the next steps when working with the client configuration files.
Установка и настройка. Install and configure
Загрузите пакет VPN-клиента с портала Azure. Download the VPNClient package from Azure portal.
Извлеките файл. Extract the file.
В общей папке скопируйте или переместите VpnServerRoot. cer в /ЕТК/ипсек.д/кацертс. From the Generic folder, copy or move the VpnServerRoot.cer to /etc/ipsec.d/cacerts.
Скопируйте или переместите CP Client. p12 в /ЕТК/ипсек.д/привате/. Copy or move cp client.p12 to /etc/ipsec.d/private/. Этот файл является сертификатом клиента для VPN-шлюза. This file is the client certificate for the VPN gateway.
Откройте файл VpnSettings.xml и скопируйте значение. Open the VpnSettings.xml file and copy the value. Это значение потребуется на следующем шаге. You will use this value in the next step.
Измените значения в приведенном ниже примере, а затем добавьте пример в конфигурацию /ЕТК/ипсек.конф . Adjust the values in the example below, then add the example to the /etc/ipsec.conf configuration.
Добавьте следующие значения в /ЕТК/ипсек.Секретс. Add the following values to /etc/ipsec.secrets.
Выполните следующие команды: Run the following commands:
Дальнейшие действия Next steps
Вернитесь к исходной статье, из которой вы работали, а затем завершите настройку P2S. Return to the original article that you were working from, then complete your P2S configuration.


