- Практическое руководство. Отключение кнопок в кнопочном столбе элемента управления DataGridView в Windows Forms How to: Disable Buttons in a Button Column in the Windows Forms DataGridView Control
- Пример Example
- Компиляция кода Compiling the Code
- How to disable the Windows Key in Windows 10 [FULL GUIDE]
- How can I disable the Windows Key while gaming?
- 1. Modify your registry
- 2. Use Disable Windows key reg
- 3. Use AutoHotkey
- 4. Use SharpKeys
- 5. Use Gaming mode on your keyboard
- 6. Use your keyboard software
- Enable or Disable Show Badges on Taskbar buttons in Windows 10
- Disable Show Badges on Taskbar buttons
- Enable and disable buttons dynamically on window
- 1 Answer 1
Практическое руководство. Отключение кнопок в кнопочном столбе элемента управления DataGridView в Windows Forms How to: Disable Buttons in a Button Column in the Windows Forms DataGridView Control
Элемент управления DataGridView включает класс DataGridViewButtonCell для отображения ячеек с пользовательским интерфейсом, похожим на кнопку. The DataGridView control includes the DataGridViewButtonCell class for displaying cells with a user interface (UI) like a button. Однако элемент управления DataGridViewButtonCell не дает возможности отключить показ кнопки в ячейке. However, DataGridViewButtonCell does not provide a way to disable the appearance of the button displayed by the cell.
В примере кода ниже показано, как настроить класс DataGridViewButtonCell для отображения кнопок, которые выглядят как отключенные. The following code example demonstrates how to customize the DataGridViewButtonCell class to display buttons that can appear disabled. В этом примере определен новый тип ячейки, DataGridViewDisableButtonCell , производный от DataGridViewButtonCell. The example defines a new cell type, DataGridViewDisableButtonCell , that derives from DataGridViewButtonCell. Этот тип предоставляет новое свойство Enabled , которому можно присвоить значение false для отрисовки отключенной кнопки в ячейке. This cell type provides a new Enabled property that can be set to false to draw a disabled button in the cell. В этом примере также определен новый тип столбца, DataGridViewDisableButtonColumn , в котором отображаются объекты DataGridViewDisableButtonCell . The example also defines a new column type, DataGridViewDisableButtonColumn , that displays DataGridViewDisableButtonCell objects. Для демонстрации этих новых типов ячеек и столбцов текущее значение каждого объекта DataGridViewCheckBoxCell в родительском элементе DataGridView определяет значение свойства Enabled элемента DataGridViewDisableButtonCell в одной и той же строке: true или false . To demonstrate this new cell and column type, the current value of each DataGridViewCheckBoxCell in the parent DataGridView determines whether the Enabled property of the DataGridViewDisableButtonCell in the same row is true or false .
При наследовании от класса DataGridViewCell или DataGridViewColumn и добавлении новых свойств к производному классу необходимо переопределить метод Clone , чтобы скопировать новые свойства во время операций копирования. When you derive from DataGridViewCell or DataGridViewColumn and add new properties to the derived class, be sure to override the Clone method to copy the new properties during cloning operations. Кроме того, необходимо вызвать метод Clone базового класса, чтобы свойства базового класса скопировались в новую ячейку или столбец. You should also call the base class’s Clone method so that the properties of the base class are copied to the new cell or column.
Пример Example
Компиляция кода Compiling the Code
Для этого примера требуются: This example requires:
How to disable the Windows Key in Windows 10 [FULL GUIDE]

- Have you wondered how to disable the Windows key? Modifying the registry is one solution.
- Instead of modifying the registry, you can download a .reg file and use it to disable the Windows key.
- Usually, gaming keyboards have dedicated software so you can check the key settings there.
- Using a dedicated third-party tool is another solution of how to disable the Windows key button.

- Download Restoro PC Repair Tool that comes with Patented Technologies (patent available here).
- Click Start Scan to find Windows issues that could be causing PC problems.
- Click Repair All to fix issues affecting your computer’s security and performance
- Restoro has been downloaded by 0 readers this month.
The Windows Key is rather useful and it’s a part of many shortcuts on Windows 10. Even though many users use it frequently, some users want to disable it.
Every advanced Windows user knows how useful Windows Key button is. Despite its usefulness, the key can sometimes be a problem, especially during intense gaming sessions.
By default, pressing the Windows Key will open the Start Menu and that can be a problem during gaming. By accidentally pressing the Windows button you’ll lose focus on your game and that can be a big problem.
In order to avoid these kinds of problems, many gamers disable their Windows Key during the gaming sessions.
In this guide, we’re going to show how to disable the Windows button. There are a couple of methods you can use from where you can choose the best for you.
How can I disable the Windows Key while gaming?
1. Modify your registry
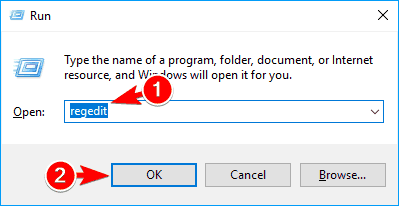
- Press Windows Key + R and enter regedit.
- Click on OK or press Enter.

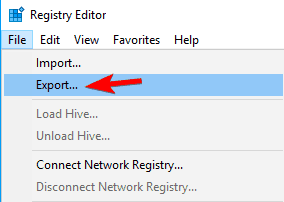
- Optional: Before you make any changes to your registry it’s always a good idea to create a backup. To do that, just click on File > Export.
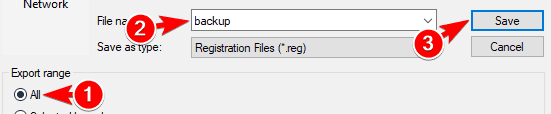
- Select All as Export range, choose a safe location, enter the desired file name and click on Save.
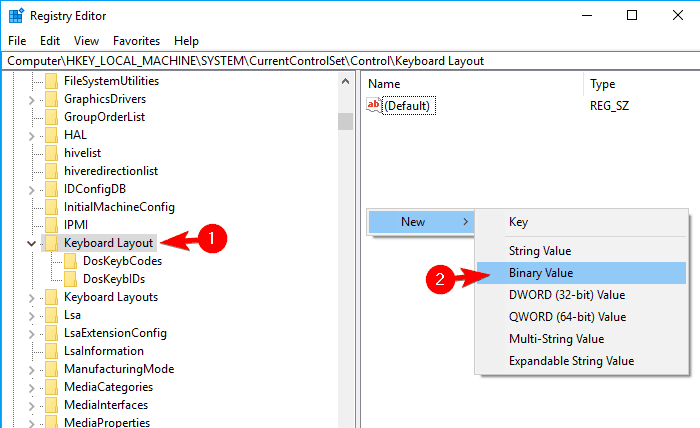
- In the left panel, navigate to: Computer\HKEY_LOCAL_MACHINE\SYSTEM\CurrentControlSet\Control\Keyboard Layout
- In the right pane, right-click the empty space and choose New >Binary Value from the menu.
- Enter Scancode Map as the name of the new value.
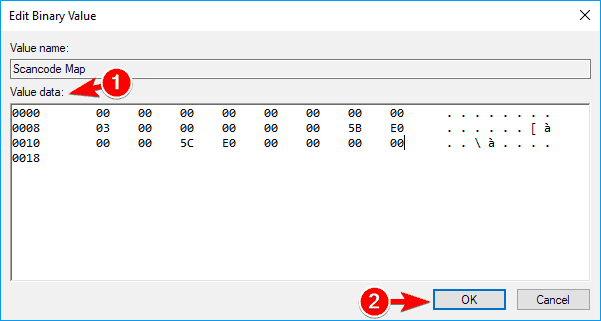
- Double click Scancode Map value and enter 00000000000000000300000000005BE000005CE000000000 in the Data field.
- Be extra cautious and double-check if the entered value is correct. Now click OK.
- After doing that, close Registry Editor and restart your PC.
Note: Keep in mind that your registry has sensitive information in it, so if you want to edit it, use extra caution. If you encounter any problems with your PC after modifying the registry, restore the backup created at steps 3-4.
After your PC restarts, the Windows Key should be completely disabled. To enable the Windows Key, you need to go back to Registry Editor and delete the Scancode Map that you created.
2. Use Disable Windows key reg

If you don’t want to modify your registry manually, there’s a .reg file available that you can use to modify it. Simply download Disable Windows key.reg and run it.
When the warning message appears, click on Yes. If you want to enable Windows Key again, download and run Enable Caps Lock and Windows keys.reg.
This method is a lot faster and simpler, so if you’re not comfortable with modifying the registry manually, be sure to try using the .reg file.
This method is great if you want to disable Windows Key and prevent other users from enabling it. Modifying the registry manually might not be the simplest method, but you can always use the .reg file to modify it automatically.
3. Use AutoHotkey

If you want to disable your Windows Key, you might want to try using AutoHotkey. This is an open-source and powerful automation scripting language.
The application allows you to assign certain commands to your keys, but it also allows you to disable keys. AutoHotkey isn’t the simplest application , so you might want to learn how it works before you can use it correctly.
Basically, you need to create a script that will block Windows Keys and add that script to AutoHotkey. Simply click AutoHotkey icon in your Taskbar and choose Edit this Script. Now you need to paste the following script at the bottom:
Save your script, right-click AutoHotkey and choose to Reload This Script from the menu. After doing that, both Windows Keys will be disabled.
Keep in mind that this solution won’t disable shortcuts that involve Windows Key, instead, it will just disable the keys themselves.
It’s worth mentioning that some online games might recognize AutoHotkey as a cheating application, so keep that in mind.
Before you use this solution it’s always a good idea to do some research and check if the game developers allow you to use AutoHotkey with their game.
⇒ Download Autohotkey
4. Use SharpKeys
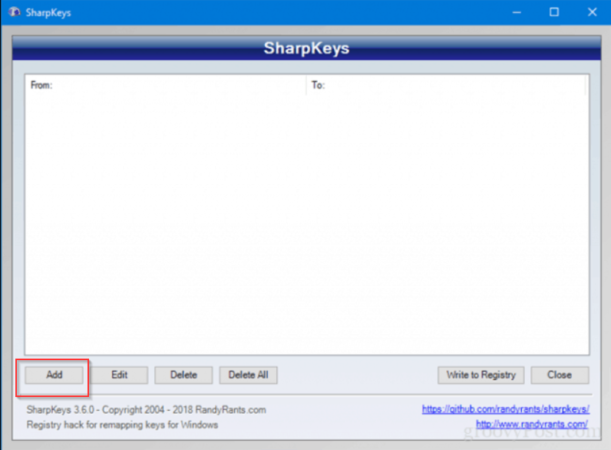
- Download and start SharpKeys.
- Once the application starts, click on Add.
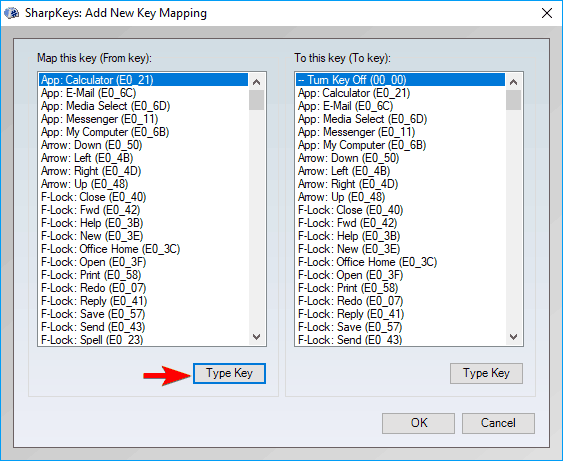
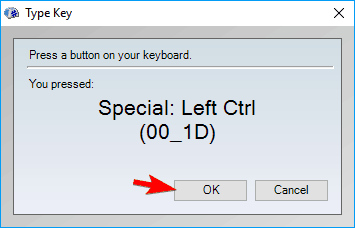
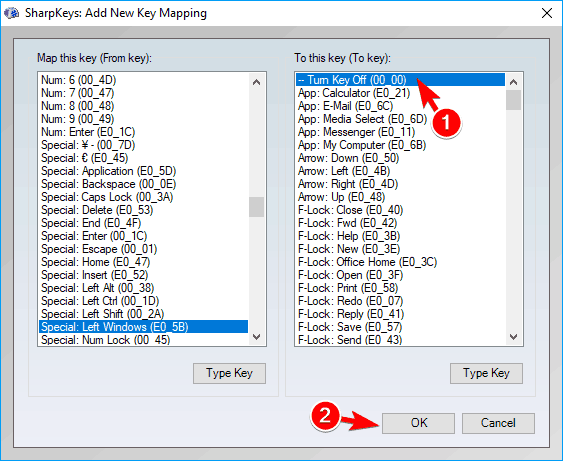
- Now you’ll see two columns. Click on Type Key in the left pane and press the Windows Key.
- Now click on OK to select the pressed key.
- Select Turn Key Off in the right pane and click on OK to save changes.
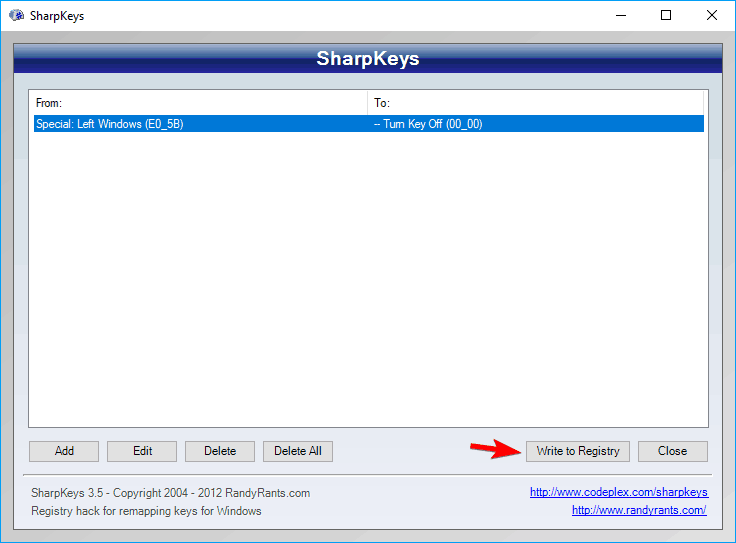
- Now click on Write to Registry button.
- Now you just have to restart your PC or log out and log back in to apply the changes.
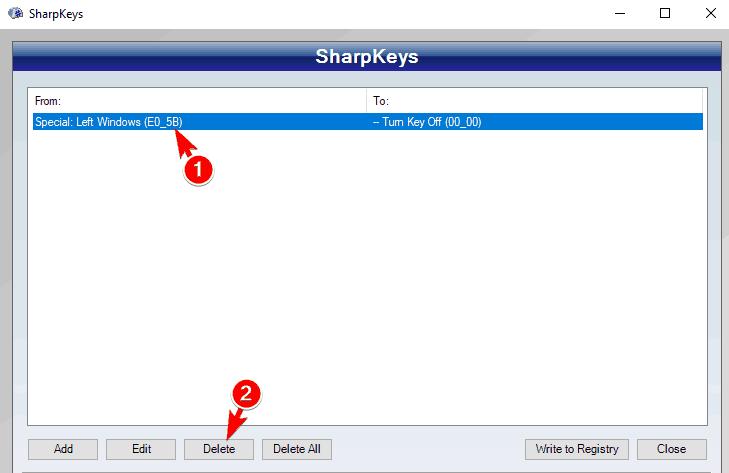
- To enable Windows Key again, start Sharpkeys, s elect the desired key from the menu, and click on Delete.
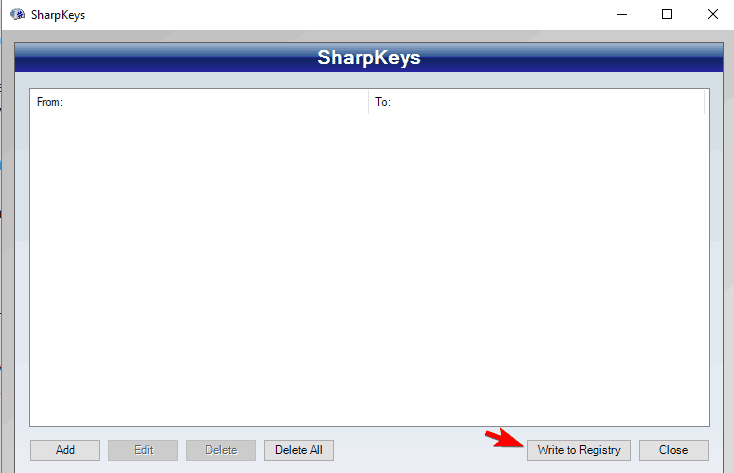
- After deleting the key, click on Write to Registry button.
- Now restart your PC or log off and back on to apply the changes.
Note: This is a free and portable tool that allows you to remap your keys, but it also has the ability to disable keys or to assign them to certain functions. Keep in mind that this is a powerful application, so you’re using it at your own risk.
5. Use Gaming mode on your keyboard

Many gaming keyboards have a Gaming mode feature that allows you to block Windows Key with ease. To activate Gaming mode you usually have to press a certain keyboard shortcut.
Some keyboards even have a controller icon on one of its keys so you can easily find the shortcut key for Gaming mode. If you can’t find the shortcut on your own, we advise you to check your keyboard manual for detailed instructions on how to activate Gaming mode.
Keep in mind that not all keyboards support this feature, so before you can use it you need to check if your keyboard supports it. Activating the Gaming mode is the simplest and fastest way to disable Windows Key, but unfortunately, not all keyboards support this feature.
6. Use your keyboard software
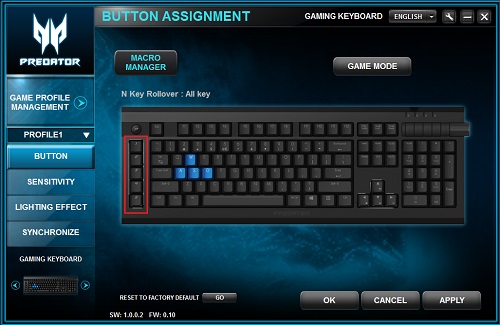
As we previously mentioned, many gaming keyboards support Gaming mode. These keyboards usually have dedicated software that you can use to configure various settings such as macros and lighting.
Enable or Disable Show Badges on Taskbar buttons in Windows 10
Windows 10 now lets you show notification overlays or badges on the taskbar buttons or icons of Windows Store apps. These badges are meant to show you the current status of a Windows Store or a Windows 10 Universal or Universal Windows Platform (UWP) app. You may have seen such badges on the Start Live Tiles.
For instance, the Mail app taskbar icon may display a number, which would indicate the number of unread emails. When there are no unread emails, there will be no badge displayed. But whenever any new email arrives, a badge would be displayed. While this is a very useful feature, some may want to disable it. So let us see how you can disable it.
Disable Show Badges on Taskbar buttons
Open Windows 10 Settings and click on Personalization.
Once here, click on Taskbar in the left panel, and scroll down a bit till your see Show badges on taskbar buttons.
The default is On. To disable showing of these badges, toggle the button to the Off position. But remember this will not work if you have enabled Small taskbar buttons.
Hope this helps!
Windows 10 taskbar in many ways is the same when compared to other versions of Windows, but there are a few new things Microsoft brought to the table to make it unique. This post will show you how to customize the Windows 10 taskbar to suit your preferences.
Date: August 5, 2016 Tags: Taskbar buttons
Enable and disable buttons dynamically on window
I’m trying to update a custom message box I made (Inherited from Window)
The solution im trying to find is to show the messagebox with the buttons disabled, until a condition changes, then enable them again to allow the program to continue.
Ive tried using the «show» method instead of show dialogue, but then the context does not get displayed.
Please see below for my current approach:
The first problem with my solution is that the first message shown will not self destroy, it always waits on the user input. I tried calling «Close» after the do while statement but that wouldn’t close down the first dialogue to show the next one with buttons enabled.
Can anyone give me any guidance please?

1 Answer 1
Your dialog will stop the code from working until you confirm it. I think for what you want to do, you need to start a thread, block the current input with the dialog and when the thread with «the work to do» has finished close the dialog or continue.
With the code you wrote, you can not exit the do while loop.
I have a program where I do something in the background and I display that the user should wait with a progressdialog. You could replace this progressdialog with any other dialog you want. You just need to create a form and make it modal so it blocks the input. This is done with the locked attribute. So here is an example how i do it:
This should solve your problem. If you need the progressdialog. Don’t forget that when you access your dialog you need to take care that it is threadsave. For example to increment the progress you do it like that:


