- Как включить и настроить теневое копирование файлов в Windows 10, 8.1, 8, 7
- Volume Shadow Copy Windows 10 vs All-round Backup Software
- What is Volume Shadow Copy?
- How to enable Volume Shadow Copy in Windows 10/8/7?
- Method 1: Enable Volume Shadow Copy using system restore points
- Method 2: Turn on Volume Shadow Copy using task scheduler
- How to restore deleted files or folders via Shadow Copy?
- Method 1: UseВ Windows Restore Previous Versions featureВ in Windows 7
- Method 2: Use Shadow ExplorerВ in Windows 8/10
- How to disable Volume Shadow Copy in Windows 10/8/7?
- All-round way to backup files and folders — meet all your needs
- Wrapping things up
Как включить и настроить теневое копирование файлов в Windows 10, 8.1, 8, 7
Товарищи, добрый день. По совету товарища, решил написать несколько статей о повышении безопасности для работы компьютера и файлов, хранящихся на нём. Это, относительно, простая и небольшая статья, будет просто частью одной очень большой общей статье о том, что нужно делать и понимать, чтобы не попасться на развод каких-либо мошенников и плохих людей. Не знаю, через сколько я её напишу, так как она должна быть реально огромная, но повышать компьютерную грамотность надо.
Так, что такое теневое копирование файлов? Это система Windows, которая в автоматическом режиме создает резервные копии файлов при создании точки восстановления системы (обычно при выключении и запуске компьютера). Данную функцию обязательно включать, если вы постоянно работаете с каким-либо важным документами и хотя при восстановлении предыдущих версий документов потеряется часть данных, зачастую это лучше, чем потерять файл полностью. Кстати, эта функция по сути, является единственным способом хоть как-то защититься от вирусов-шифраторов (о них тоже будет позже). Перейдем к включению данной функции.
Жмём сочетание клавиш Win+Pause/Break и в левом боковом меню открывшегося окна, жмём по ссылке «Защита системы«.
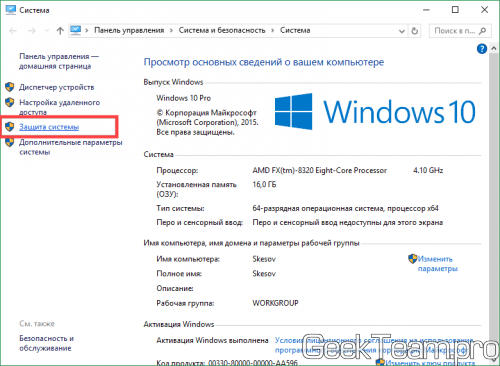
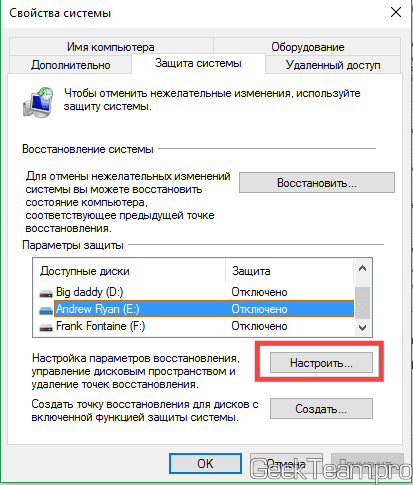
Откроется окно свойства системы на вкладке «Защита системы». В Windows 7 интерфейс попроще (можно выбрать только галочками жесткие диски, файлы с которых будут сохраняться), в современных операционных системах доступны некоторые настройки. Выбираем жесткий диск, файлы которого будут сохраняться и жмём кнопку «Настроить«.
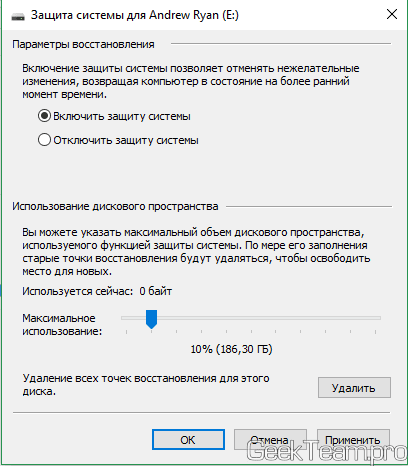
Переставляем вверху точку на «Включить защиту системы» и двигаем ползунок «Использование дискового пространства» на значение…. Которое граничит на значении вашей жадности и здравого смысла. Потому что, значение которое здесь будет указано всегда будет занято файлами точек восстановления. То есть, на жестком диск будет занят и вы не сможете записать на него большое количество фильмов, музыки, фото или что вы там ещё закачиваете. Но, если вы работаете с большим количеством важных документов, все-таки рекомендую выбрать 50-100Гб, если у вас очень много любимых фотографий, то желательно выбрать 2-3 объема папки с фото (к слову, если у вас несколько жестких дисков, можно двинуть ползунок на них тоже, так как все эти Гб будут использоваться с одной целью).
Идеальный вариант — это купить ещё один жесткий диск и использовать весь его объем для файлов теневого копирования. Да это дорого, особенно по нынешним ценам, но если у вас важные документы, они могут быть дороже 10к за новый жесткий диск, то почему нет. Тем более, напомню о вирусах — шифраторах:)
В общем, побороли жадность, выбрали объем и нажали ОК.
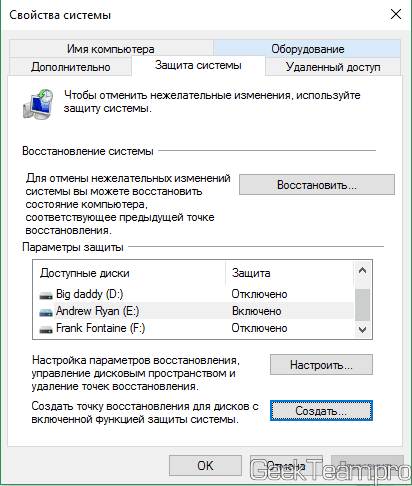
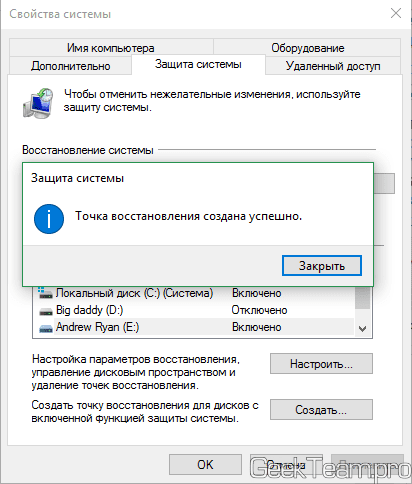
Нас вернет в окно «Свойства системы», жмём кнопку «Создать» для создания новой точки восстановления.
Указываем какое-нибудь имя и жмём ОК.
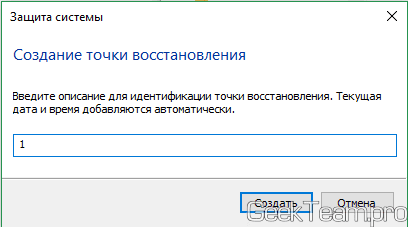
Контрольная точка создается довольно быстро и система выдаст окно о готовности, через несколько секунд.
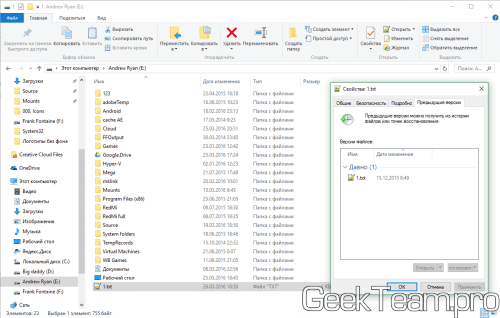
Для демонстрации работы теневого копирования, я перед созданием точки восстановления поместил некий файл-конфиг в корень диска Е, после создания добавил в него пару строк, сохранил и снова создал точку. Теперь открыв «Свойства файла» и перейдя на вкладку «Предыдущие версии» мы можем восстановить или открыть одну из них.
Вроде всё. Надеюсь эта статья оказалась вам полезной, обязательно нажмите одну из кнопок ниже, чтобы рассказать о ней друзьям. Также подпишитесь на обновления сайта, введя свой e-mail в поле справа или подписавшись на группу во Вконтакте и канал YouTube.
Спасибо за внимание 
Volume Shadow Copy Windows 10 vs All-round Backup Software
You will learn how to enable/restore/disable volume shadow copy in Windows 10/8/7 as well as all-round way to backup files and folders. Get details now!

By Ivy  / Last Updated March 16, 2021
Content of this article:
What is Volume Shadow Copy?
Volume Shadow Copy (also known asВ Volume Snapshot ServiceВ orВ VSSВ ) is a technology included in Microsoft Windows. It allows you to take backup copies or snapshots of computer files or volumes whether in use or not.В It requires VSS service, VSS requester, VSS writer, VSS provider during the process. And the process can be automatic or manual.В
Shadow Copies can be created on local and external volume by Windows component that uses VSS technology. In Windows 7, you can create a shadow copyВ via Backup and Restore, or System Restore Points. In Windows 8/10, you can use File History feature.
Shadow copies also give you a chance to restore deleted files or folders. In Windows 7, you can use the Previous Versions tab. ButВ itВ was removed for local volumes since Windows 8.В So, In Windows 8/8.1/10,В you canВ choose toВ use ShadowExplorer, which allows you to look through the old shadow copies and restore files.
Well then, you may wonder how to use Volume Shadow Copy in Windows 10/8/7. Please keep reading below to learn more. All operations will be included, such as enable Volume Shadow Copy, disable Volume Shadow Copy, and restore deleted files or folders.
How to enable Volume Shadow Copy in Windows 10/8/7?
Method 1: Enable Volume Shadow Copy using system restore points
Step 1. Type Create a restore point in the search box and select it. Then, in the System Properties, choose a drive and click Configure.
Step 2. In the new window, tick Turn on system protection and click Apply to enable.В
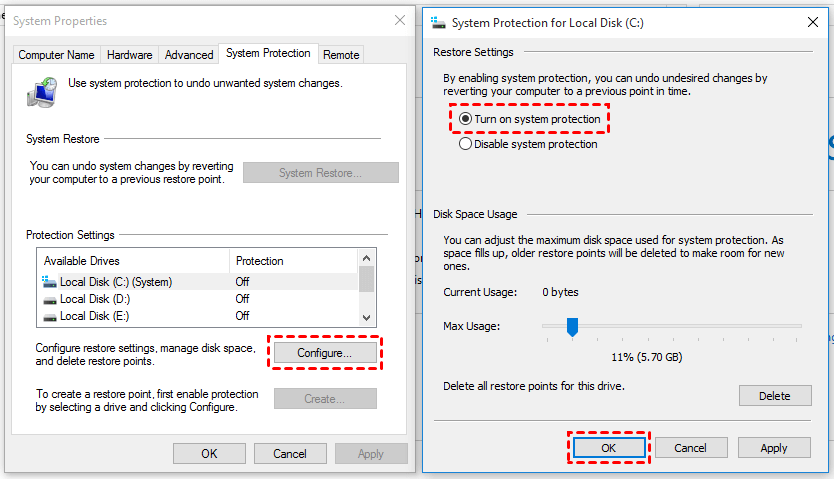
Step 3. Click Create to enable volume shadow copy in Windows 10.В
Method 2: Turn on Volume Shadow Copy using task scheduler
If you want to customize volume shadow copy in Windows 10 with a specific time, you could use Task Scheduler. The steps are below.
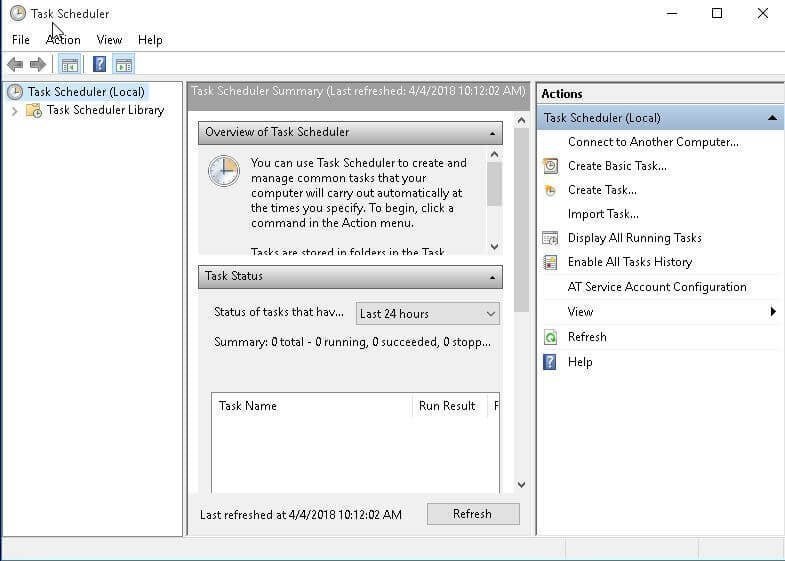
Step 1. Open Task Scheduler. You can click Start, type task scheduler and select it from the list.
Step 2. Click Create Task and then specify a name for the task (eg: ShadowCopy).
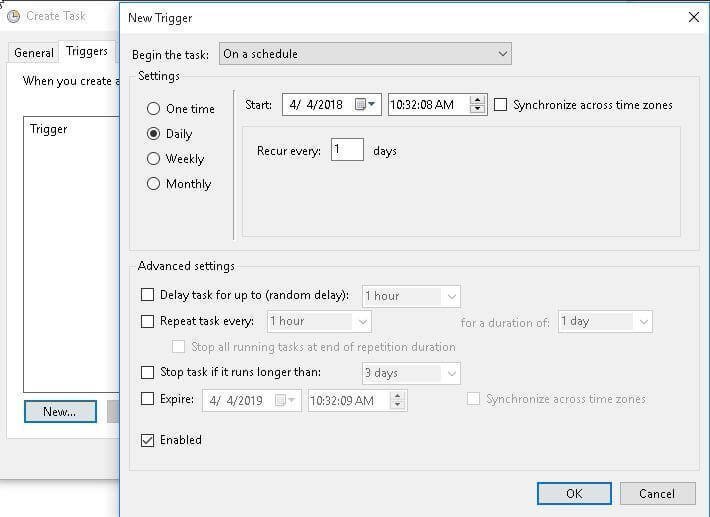
Step 3. Create a new trigger. You can click the Triggers tab and New. option at the lower location, then select oneВ setting among one time, daily, weekly, monthly.
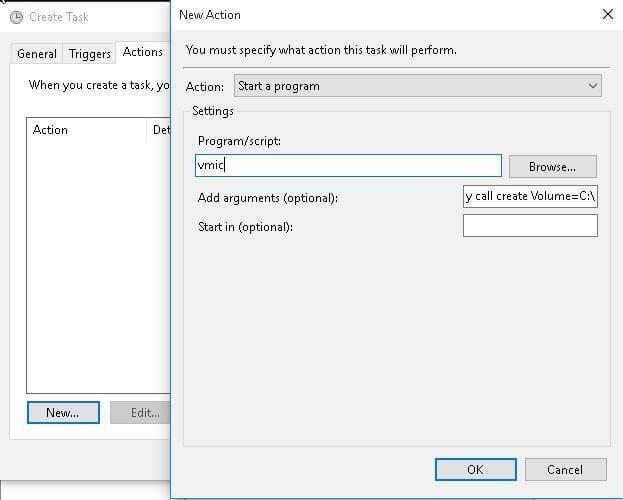
Step 4. Enable shadow copy. You can click the Actions tab and New. option, type wmic under the Program or script option, input the argumentВ shadowcopyВ call create Volume=C:\ at the blank box of right side.
When you run program items using VSS technology, you may receive volume shadow copy error in Windows 10. In this case, you should go toВ ServicesВ and check if the Volume Shadow Copy service is started at first time. Once it stops,В the volume shadow copy service is not working in Windows 10 and the program will fail to create a snapshot for your volume.
How to restore deleted files or folders via Shadow Copy?
Method 1: UseВ Windows Restore Previous Versions featureВ in Windows 7
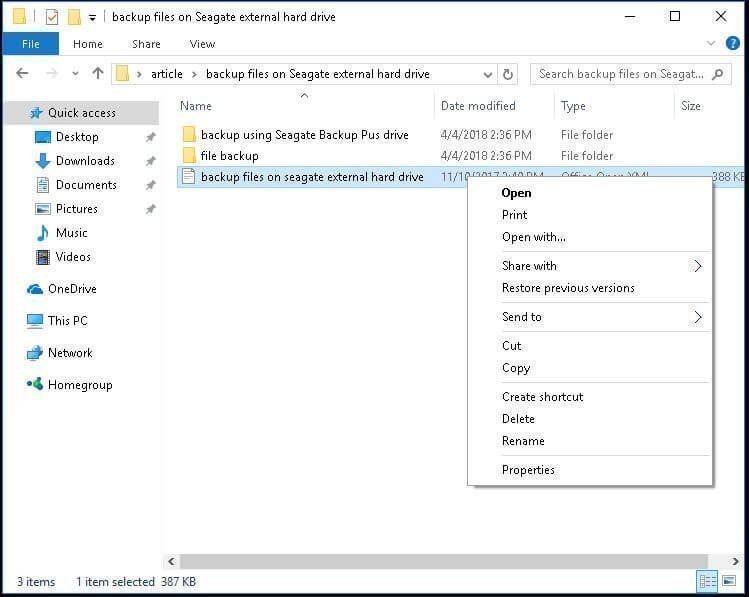
Step 1.В Navigate to the file or folder you want to restore in a previous state and right-click it, then select Restore Previous Versions from the drop-down menu. In addition, you still can select Properties and click the Previous Versions tab.
Step 2. Select the correct version of file or folder to restore.
In this window, you can see 3 options, including Open, Copy, Restore.
в—Џ The Open button will navigate to the location where the file or folder is stored.В
в—Џ The Copy button allows you to copy file or folder to another location on the computer, even on external hard drive.
в—Џ The Restore button gives you a chance to restore the file or folder to the same location and replace the existing version.
Tip on there are no previous versions available issue:В
One of the possible reasons why you receive this error is that the volume shadow service is disabled. You can manually enable it in task manager by the following steps.
Right-click taskbar> select Start Task Manager > click services at the bottom > find Volume Shadow Copy and double-click it > set the startup type as Automatic > click Apply to make it available.
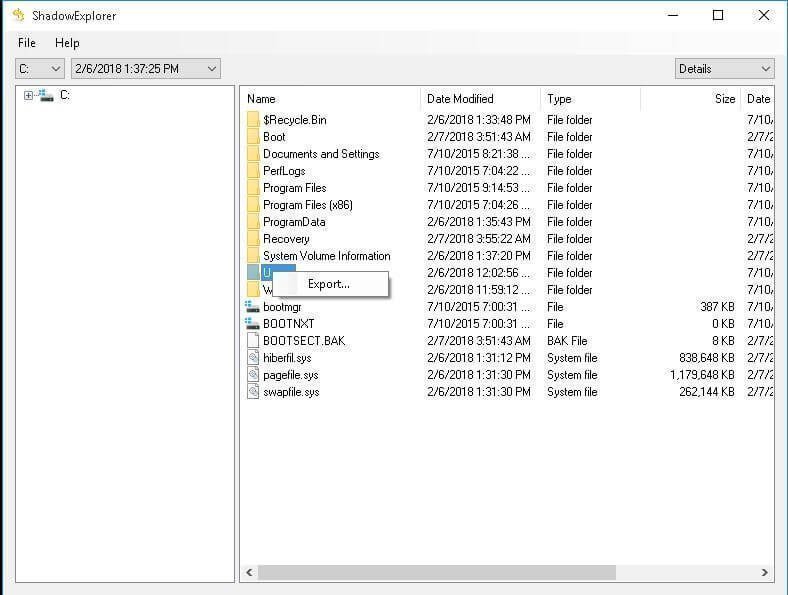
Method 2: Use Shadow ExplorerВ in Windows 8/10
Step 1. Download ShadowExplorer utility, install and launch it. Then, select the drive and date to restore file or folder.
Step 2.В Right-click the file or folder to restore and pitch on Export option.
Step 3. Specify the location to save the previous version of file or folder. Wait and check the previous file or folder.
How to disable Volume Shadow Copy in Windows 10/8/7?
Step 1. Go to System Properties window by searching Create a restore point on your computer. Then, select a drive and click Configure.
Step 2.В Tick Disable system protection and click ApplyВ >В OK to exit this window.
All-round way to backup files and folders — meet all your needs
The volume shadow copy can create a snapshot of your computer files or volume, which is very similar to backup, but can volume shadow copy really replace backup? The answer is NO, and it will not work in the following situation.
The partition or volumes crashes. In general, the shadow copies are stored in the original partition, so it’s damaged when the partition crashes.В
The volumeВ shadow copy in Windows has high disk usage. At this time, it will beВ deleted without any prompt.В
The volumeВ shadow copy only backup files stored in volume with NTFS file system.
You want to keep all the changes. The volume shadow copy cannot always keep all the changed files correctly.В
Well then, what is a backup image and what does it can do for you? A backup image will include the items you want and compress it to an image file, for example, files, folders, partition/volume, system, disk, so you can use the image file to rescue your computer or data on it. Also, If you use a trust and reliable backup software like AOMEI Backupper Standard, you can get more from it.В
You canВ track changes of the backed up files or folders regularly with its schedule settings, like daily/weekly/monthly backup andВ incremental or differential backup.В
You can backup files in volume formatted with all file system, including NTFS, FAT32, FAT16 etc.В
You can backup files to any storage as long as it can be detected, such as, external hard drive, flash drive, cloud drive, ie, OneDrive, NAS, etc.В
Then, let’s get started to create a file backup for your files and folders. If you want to backup specific partition, system or disk, please use «Partition Backup», «System Backup» or «Disk Backup» to replace it.В
Step 1. Connect the storage to store files or folders you want to backup, and be sure it can be detected. Then, download AOMEI Backupper Standard,В the best free disk cloning software, and install it. After that, launch it, you will see its deep-blue interface, clickВ BackupВ >В File BackupВ in order.

Step 2.В Click Add File or Add Folder to select files or folders to backup.В

Step 3.В Click where the arrow point and select a path to save the files and folders.

Step 4 (Recommended).В Click Schedule and select daily/weekly/monthlyВ or full/incremental/differential to continuously backup files and its changes. Please note the scheduled differential backup is available on AOMEI Backupper Professional or higher editions. Then, clickВ Start BackupВ to start the pending operation.

Notes:
• The default schedule settings are daily backup and incremental backup. The former option is to backup files regularly while the latter one is the guarantee to backup changes after full backup. Please note that incremental backup requires all backups to be intact.
• If the backup time is during off-peak hours, you could tick «Wake the computers to scheduled tasks». Then, it will automatically wake up your computer 2 minutes before the task start.
• If you backup files to flash drive, it’s suggested to use «USB Plug in» in AOMEI Backupper Professional. This software will backup files to flash drive automatically when it’s plugged in.В
Wrapping things up
Volume Shadow Copy in Windows 10/8/7 can help users backup files and folders, but it not always works. To make sure you can restore your files in the event of a disaster, you need to backup files or folders with the best free backup software — AOMEI Backupper Standard.В
You can choose to schedule backup files and its changes regularly with daily/weekly/monthly backup and full/incremental/differential backup. You can use any storage to store your files, because it’s compatible with all the devices detected by Windows.
In addition, you still can use it to perform partition backup,В system backup, disk backup, and corresponding restore operations. More so, you can restore Windows backup to dissimilar hardware, for example, different CPU. Can’t afford data loss? Please download this software and create a backup just in case.


