- Networking username & password in Windows 10
- Replies (17)
- How can I disable the «Enter network password» prompt?
- Replies (4)
- Enter network credentials on Windows 10 [Best solutions]
- How do I fix network credentials problems on Windows 10
- 1. Check that your IP addresses are properly assigned
- 2. Enter your Microsoft credentials
- 3. Enter computer name in the username field
- 4. Use username and password to log in to Windows 10
- 5. Add other PC’s network credentials to Credentials Manager
- 6. Change Advanced sharing settings
- 7. Change your security policies
- 8. Change your services
- 9. Set your connection to Private
- 10. Create a new user account
- 11. Change your user account options
Networking username & password in Windows 10
Replies (17)
* Please try a lower page number.
* Please enter only numbers.
* Please try a lower page number.
* Please enter only numbers.
![]()
Welcome and thank you for posting your query in Microsoft Community.
We regret the inconvenience caused to you.
Are you on domain network?
Have you made any changes to the firewall settings prior to this issue?
Let us run Network Troubleshooter and check, if this helps.
1. In the search box, type ‘Troubleshooter’, and then click ‘Troubleshooting’.
2. Under ‘Network and Internet’, click ‘Internet Connections’.
3. Follow the on screen instructions.
Do update us with the details, we are glad to assist you further.
12 people found this reply helpful
Was this reply helpful?
Sorry this didn’t help.
Great! Thanks for your feedback.
How satisfied are you with this reply?
Thanks for your feedback, it helps us improve the site.
How satisfied are you with this reply?
Thanks for your feedback.
I ran the troubleshooter. However, I am not having trouble with internet connections. I am having trouble with shared files. I ran the shared files troubleshooter and the result is: «You don’t have permissions to access the share.» Prior to Win 10, all we had to do was have the same username/password on all of the computers in order to share files. What is different now? And how can I fix it?
5 people found this reply helpful
Was this reply helpful?
Sorry this didn’t help.
Great! Thanks for your feedback.
How satisfied are you with this reply?
Thanks for your feedback, it helps us improve the site.
How satisfied are you with this reply?
Thanks for your feedback.
The network password problem has occurred on two systems I have worked on , each after one computer is upgraded to Windows 10.
It took me some while to find out how to stop the network password request.
Windows 10 has an additional network sharing setting not seen in Windows 7.
Find your way to Advanced Network Sharing Settings starting in the Control Panel. When the window opens scroll down to the bottom and locate All Networks, click on the down arrow to the right and then scroll down and select the radio button next to Turn off Password Protected Sharing, click on Save Changes and your done.
100 people found this reply helpful
Was this reply helpful?
Sorry this didn’t help.
Great! Thanks for your feedback.
How satisfied are you with this reply?
Thanks for your feedback, it helps us improve the site.
How satisfied are you with this reply?
Thanks for your feedback.
5 people found this reply helpful
Was this reply helpful?
Sorry this didn’t help.
Great! Thanks for your feedback.
How satisfied are you with this reply?
Thanks for your feedback, it helps us improve the site.
How satisfied are you with this reply?
Thanks for your feedback.
The network password problem has occurred on two systems I have worked on , each after one computer is upgraded to Windows 10.
It took me some while to find out how to stop the network password request.
Windows 10 has an additional network sharing setting not seen in Windows 7.
Find your way to Advanced Network Sharing Settings starting in the Control Panel. When the window opens scroll down to the bottom and locate All Networks, click on the down arrow to the right and then scroll down and select the radio button next to Turn off Password Protected Sharing, click on Save Changes and your done.
what if we have to keep username and password?? and where do we enter that username and password
How can I disable the «Enter network password» prompt?
Replies (4)
Thank you for choosing Windows 8.
You would like to disable the «Network Password» when trying to share files within network. I will be happy to help you with this issue.
Method 1: If you are trying to set up file and printer sharing on a network that has PCs running different Windows operating systems, I would suggest you to follow the steps from the link and check if it helps.
Method 2: If you want to open shared files and folders that are on a PC running Windows XP from a PC running Windows 8 or Windows RT , it’s best to put the items in the Shared Documents folder. Then, right-click the item you want to share, click Sharing and Security , and select the Share this folder on the network check box. If you want to edit the shared items from other PCs on your network, select the Allow network users to change my files check box.
Public folders: Frequently asked questions
Hope this helps. Try the above steps and get back to us for further assistance and with requested details, if the issue is not resolved.
Was this reply helpful?
Sorry this didn’t help.
Great! Thanks for your feedback.
How satisfied are you with this reply?
Thanks for your feedback, it helps us improve the site.
How satisfied are you with this reply?
Thanks for your feedback.
Thanks for your assistance.
I have already setup the network according to the outline presented in Method 1. Printing works fine from the DESKTOP, LAPTOP and OFFICE. I can also read, write and modify files on any of the three computers from any of the others. The problem is that when accessing the files residing on the DESKTOP from the LAPTOP, I am prompted to enter a username and password. After entering my username and a blank password, I am able to access files on the DESKTOP, but
I do not want to have to enter my username and password for access.
I want access to be seamless as it is from LAPTOP to OFFICE, OFFICE to DESKTOP, etc.
Method 2 is irrelevant because the issue lies with accessing a Windows 7 Home Edition PC (DESKTOP) from a Windows 8 PC (LAPTOP). Accessing files on the PC running Windows XP (OFFICE) from the PC running Windows 8 (LAPTOP) is working fine.
I’m keeping my fingers crossed that someone out there can help.
Was this reply helpful?
Sorry this didn’t help.
Great! Thanks for your feedback.
How satisfied are you with this reply?
Thanks for your feedback, it helps us improve the site.
How satisfied are you with this reply?
Thanks for your feedback.
Hey you just need to make the logins on each system match. If you duplicate the username and password on each system it will try to use that first.
Since your windows 8 likely tied to a LiveID it is likely using that first. You can try to just use a local account or add the same administrator account to each system using the Local Users And Groups dialog.
Was this reply helpful?
Sorry this didn’t help.
Great! Thanks for your feedback.
How satisfied are you with this reply?
Thanks for your feedback, it helps us improve the site.
How satisfied are you with this reply?
Thanks for your feedback.
Thank you for choosing Windows 8.
You would like to disable the «Network Password» when trying to share files within network. I will be happy to help you with this issue.
Method 1: If you are trying to set up file and printer sharing on a network that has PCs running different Windows operating systems, I would suggest you to follow the steps from the link and check if it helps.
Method 2: If you want to open shared files and folders that are on a PC running Windows XP from a PC running Windows 8 or Windows RT , it’s best to put the items in the Shared Documents folder. Then, right-click the item you want to share, click Sharing and Security , and select the Share this folder on the network check box. If you want to edit the shared items from other PCs on your network, select the Allow network users to change my files check box.
Public folders: Frequently asked questions
Hope this helps. Try the above steps and get back to us for further assistance and with requested details, if the issue is not resolved.
press the windows icon your keyboard, once you see the tiles just type «live account» you will see a few results. click on the exact word matching your search, and then choose «manage your account». now you will see a different page. Find for the word that says disconnect (on the white page below your username) and click on it. It will prompt you to create a local account, Just create one and issue solved for me. dont worry you wont loose any data. everything remained how it was for me. hope this helps. if it did drop me a mail at *** Email address is removed for privacy *** 🙂
Enter network credentials on Windows 10 [Best solutions]

- Working with your team over a local network is a very fast method of collaborative work.
- Issues might arise when Windows asks for your network credentials but won’t recognize them.
- We have a great System Errors Hub with information available to help you out in tricky situations.
- The Teamwork section offers ideas about using collaboration software in your best interest.

If you have a local network, you’re probably sharing files between computers. In order to protect your PC from unauthorized access Windows 10 uses network credentials.
This is a decent protection, but several users reported certain issues when asked to enter network credentials on Windows 10.
Enter network credentials message can appear while trying to access shared drives or directories and prevent you from accessing your files.
Similar issues that users reported are the following:
- Enter network credentials the username or password is incorrect
- Enter network credentials Windows 8, 7
- Windows 10 network credentials incorrect
- To fix this issue, you might have to change your security policies.
- Enter network credentials/ Access is denied
- To fix this problem, try disabling certain services and check if that helps.
- Network credentials asking for password
- If you keep getting asked for your network credentials, the issue might be your user account; simply create a new user account and check if that solves your problem.
How do I fix network credentials problems on Windows 10
1. Check that your IP addresses are properly assigned

In a local network, you probably assign all computers static IP addresses in order to access them easier.
According to users, your IP address might be set to automatic, and that can sometimes cause issues with network credentials, therefore be sure to check if IP addresses of your network devices are set to static.
To set your IP addresses to static you can always use your router’s built-in software.
If you’re facing trouble with the static IP address, this guide should help out.
2. Enter your Microsoft credentials

Windows 10 relies heavily on your Microsoft account, and since you can use your Microsoft account to sign in to Windows 10, you can also use it to access other network devices in your local network.
Users reported that you can fix problems with network credentials simply by entering your Microsoft account username and password instead of your local account’s username and password.
It is important to mention that many network issues are caused by malware, various scripts, and bots. You can secure yourself by installing Cyberghost, a leader in the VPN market. It protects your PC from attacks while browsing, masks and manages your IP address, and blocks all unwanted access.
3. Enter computer name in the username field

According to users, you can fix problems with network credentials by entering the name of the computer that you’re trying to access followed by the username.
For example, if the computer you’re trying to access is named Computer1 and you have a user named Mike, you need to enter both computer name and the user name in the user input field.
In our example the user name field would be Computer1Mike. Bear in mind not to enter any slashes before the computer name.
4. Use username and password to log in to Windows 10

Users reported that you can’t connect to other network computers if you don’t use a username and password to log in.
This limitation mostly affects users that log in to Windows 10 by using a PIN, therefore if you need to access and share files with others, you might want to temporarily stop using PIN code for login.
If your PIN is not working properly, you can get to the bottom of the problem with the help of this article.
5. Add other PC’s network credentials to Credentials Manager
- Press Windows Key + S and enter credentials. Choose Credential Manager from the menu.

- Make sure that Windows Credentials is selected. Click Add a Windows credential.
- E nter the name of the computer you want to access, the user name, and the password related to that user name.
- Once you’re done click OK.
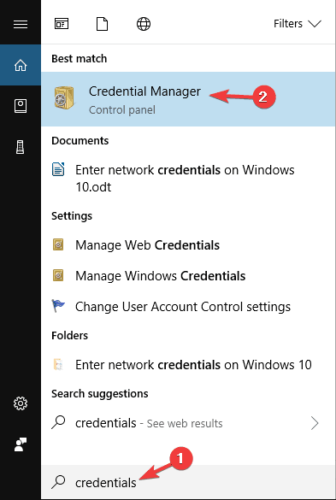
After adding the other computer’s information to the Credentials Manager you should be able to access it without any problems.
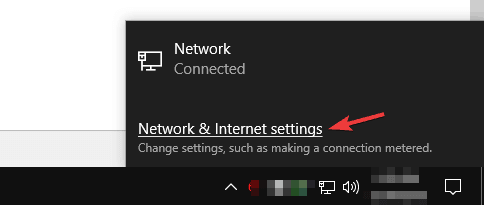
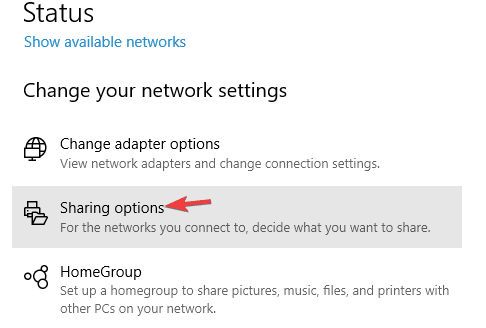
6. Change Advanced sharing settings
- Click the network icon in the Taskbar and choose Network & Internet settings.
- Click on Sharing options.
- Find your network profile and go to the HomeGroup connections section. Make sure that Allow Windows to manage homegroup connections (recommended) is selected.
- Click Save changes.
If your taskbar isn’t working, take a look here.
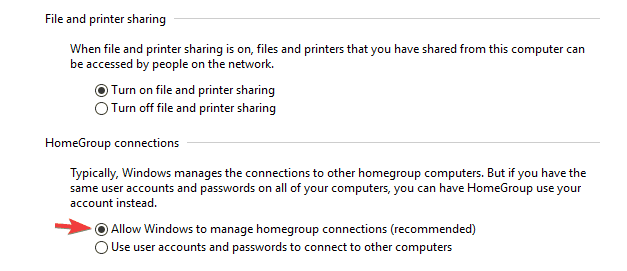
Several users reported that you can fix this problem simply by changing the following Advanced sharing settings:
- Open Advanced sharing settings window.
- Now expand All Networks section.
- In the Password protected sharing section, select Turn off password protected sharing. Click Save changes button.
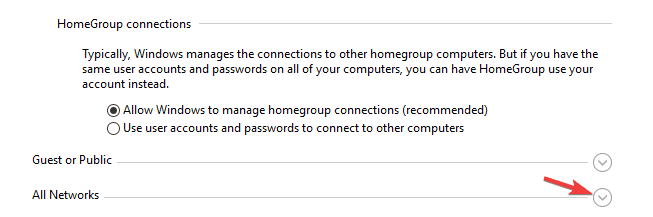
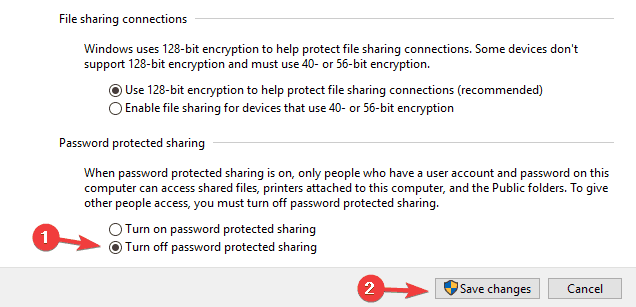
After making these changes, the problem should be completely resolved.
7. Change your security policies
- Press Windows Key + R and enter secpol.msc . Now press Enter or click OK .
- When the Local Security Policy window opens, in the left pane navigate to Local Policies > Security Options . In the right pane, double-click Accounts: Limit local account use of blank passwords to console logon only .
- Now select Disabled from the menu and click on Apply and OK .
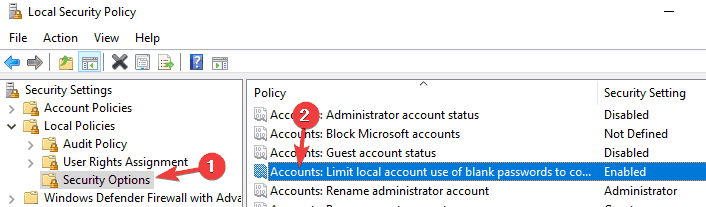
After making these changes, the problem with this message should be completely resolved and everything will start working again.
8. Change your services
- Press Windows Key + R and enter services.msc. Now press Enter or click OK.
- When Services window opens, locate Credential Manager on the list and double-click it.
- The properties window will now appear. Set Startup type to Disabled and click the Stop button to stop the service. Now click Apply and OK.
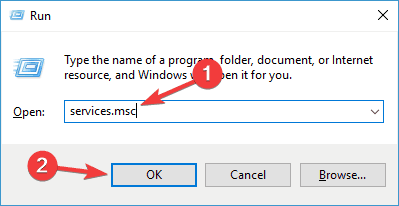
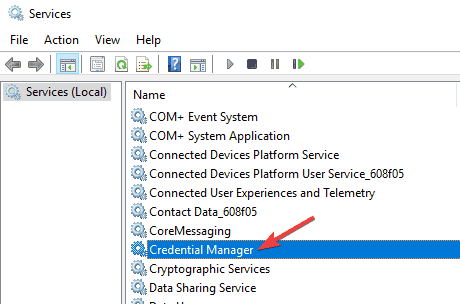
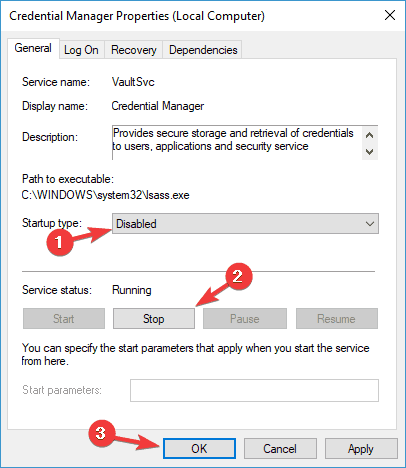
Once you stop the service, check if the problem is resolved.
9. Set your connection to Private
- In the Taskbar, click the network icon and choose Network & Internet settings.
- Now select Change connection properties.
- Now set Network profile to Private.
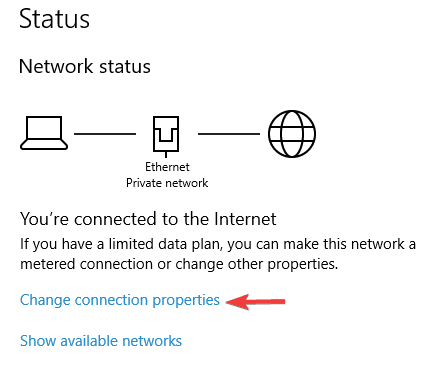
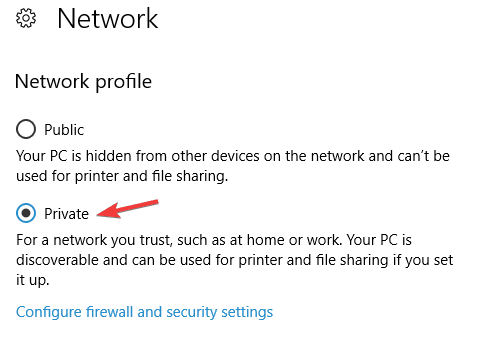
After doing that, the issue should be completely resolved. Keep in mind that you should use this step only on a secure networks. If you’re on a public network, changing these settings might reduce your security, so keep that in mind.
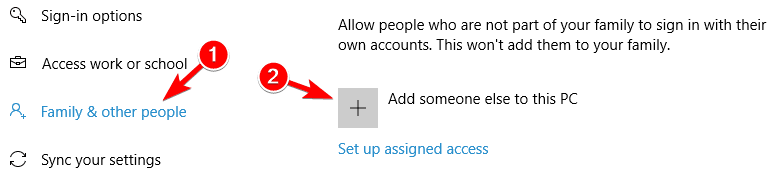
10. Create a new user account
- Open the Settings app. You can do that quickly by using Windows Key + I shortcut.
- When Settings app opens, navigate to Accounts section.
- Select Family & other people from the left pane. Now click Add someone else to this PC.
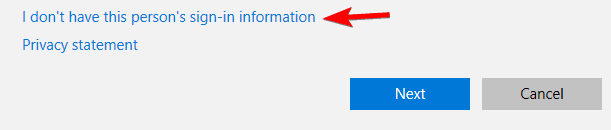
- Select I don’t have this person’s sign-in information.
- Choose Add a user without a Microsoft account.
- Enter the desired user name and click the Next button to proceed.


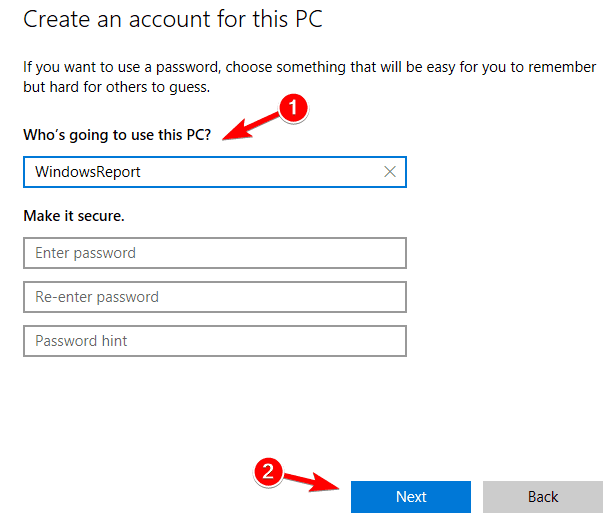
After doing that, you’ll have a new user account on your PC. Switch to a new user account and check if the problem still persists. If the issue doesn’t appear on a new account, you might want to consider using your new account instead of your main one.
If you’re having trouble accessing the Settings app, you may want to take a closer look here. If your user account has expired, follow these steps to get things rolling again.
11. Change your user account options
- Press Windows Key + R and enter netplwiz. Now press Enter or click OK.
- Uncheck Users must enter a user name and password to use this computer. Now click OK and Apply to save changes.
- Restart your PC to apply the changes.
- Once you log back in, repeat the same steps, but this time enable the Users must enter a user name and password option and save changes.


After doing that, the problem should be completely resolved and the password protection setting will work as it should.
Problems with network credentials can sometimes be hard to fix, but we hope that you managed to fix them after using one of our solutions.
If you have any more questions, don’t hesitate to leave them in the comments section below.


