- System Error Codes
- More ways to find an error code
- Third party error codes
- System Error Codes
- Bug Check 0xC000021A: WINLOGON_FATAL_ERROR
- WINLOGON_FATAL_ERROR Parameters
- Cause
- Resolution
- Resolving an error in a user-mode device driver, system service, or third-party application
- Resolving a mismatched system file problem
- Remarks
- Using Safe Mode
- При запуске Windows 7 появляется ошибка Checking file system on C: что это и что делать
- Что делать при появлении этой ошибки? Для начала нужно проверить диск C на наличие ошибок
- Во-первых, нужно проверить ошибки файловой системы
- Во-вторых, следует проверить диск C на битые сектора
- Теперь можно безопасно остановить проверку файловой системы
- Во-первых, для этого можно использовать редактор реестра
- Во-вторых, для этого можно использовать «Планировщик заданий»
- Вывод
- Command Prompt: Check Disk Errors and Repair Hard Drive in Windows 10, 8, 7
- The Review of Check Disk tool
- How to run the Check Disk tool for disk repair? [3 Ways]
- Way 1. Run Check Disk from Command Prompt
- Way 2. Run Check Disk from Partition Properties
- Way 3. Launch chkdsk.exe tool with free partition software
- Conclusion
System Error Codes
This section is intended for developers who are debugging system errors. If you reached this page while searching for other errors, here are some links that might help:
- Windows Update errors — For help resolving issues with Windows Update.
- Windows activation errors — For help verifying your copy of Windows.
- Troubleshooting blue screen errors — For help discovering what caused a stop error.
- Microsoft Support — For support with a Microsoft product.
More ways to find an error code
We’ve listed the system error codes in this section, organized by number. If you need more help tracking down a specific error, here are some more recommendations:
- Use the Microsoft Error Lookup Tool.
- Install the Debugging Tools for Windows, load a memory dump file, and then run the !err command.
- Search the Microsoft Protocols site for the raw text or error code. For more information, see [MS-ERREF]: Windows Error Codes.
Third party error codes
Other error codes may be generated by third party services or apps (for example, Error Code: -118 may be displayed by the Steam game service) and in those situations you would contact the third party’s support line.
System Error Codes
System Error Codes are very broad: each one can occur in one of many hundreds of locations in the system. Consequently, the descriptions of these codes cannot be very specific. Use of these codes requires some amount of investigation and analysis. You need to note both the programmatic and the runtime context in which these errors occur.
Because these codes are defined in WinError.h for anyone to use, sometimes the codes are returned by non-system software. And sometimes the code is returned by a function deep in the stack and far removed from code that is handling the error.
The following topics provide lists of system error codes. These values are defined in the WinError.h header file.
Bug Check 0xC000021A: WINLOGON_FATAL_ERROR
The WINLOGON_FATAL_ERROR bug check has a value of 0xC000021A. This means that that the Winlogon process terminated unexpectedly.
This topic is for programmers. If you are a customer who has received a blue screen error code while using your computer, see Troubleshoot blue screen errors.
WINLOGON_FATAL_ERROR Parameters
A string that identifies the problem
Cause
This error occurs when a user-mode subsystem, such as WinLogon or the Client Server Run-Time Subsystem (CSRSS), has been fatally compromised and security can no longer be guaranteed. In response, the operating system switches to kernel mode. Microsoft Windows cannot run without WinLogon or CSRSS. Therefore, this is one of the few cases where the failure of a user-mode service can shut down the system.
Mismatched system files can also cause this error. This mismatch can occur if you have restored your hard disk from a backup. Some backup programs might skip restoring system files that they determine are in use.
Resolution
Running the kernel debugger may not be useful in this situation because the actual error occurred in a user-mode process.
Resolving an error in a user-mode device driver, system service, or third-party application
Because bug check 0xC000021A occurs in a user-mode process, the most common culprits are third-party applications. If the error occurred after the installation of a new or updated device driver, system service, or third-party application, the new software should be removed or disabled to isolate the cause. Contact the manufacturer of the software about a possible update.
Resolving a mismatched system file problem
If you have recently restored your hard disk from a backup, check if there is an updated version of the backup/restore program available from the manufacturer.
Look at the most recently installed applications. To do this navigate to «Uninstall or change a program» in control panel and sort the installed applications by install date.
Check the System Log in Event Viewer for additional error messages that might help pinpoint the device or driver that is causing the error. For more information, see Open Event Viewer. Look for critical errors in the system log that occurred in the same time window as the blue screen.
Check the System Log in Event Viewer for additional error messages that might help pinpoint the device or driver that is causing the error. Look for critical errors in the system log that occurred in the same time window as the blue screen.
Remarks
Use the System File Checker tool to repair missing or corrupted system files. The System File Checker is a utility in Windows that allows users to scan for corruptions in Windows system files and restore corrupted files. Use the following command to run the System File Checker tool (SFC.exe).
Run a virus detection program. Viruses can infect all types of hard disks that are formatted for Windows, and the resulting disk corruption can generate system bug check codes. Make sure the virus detection program checks the Master Boot Record for infections.
Verify that the system has the latest updates installed. To detect which version is installed on your system, select Start, select Run, type winver, and then press ENTER. The About Windows dialog box displays the Windows version number (and the version number of the service pack, if one is installed).
Using Safe Mode
Consider using Safe Mode to isolate elements for troubleshooting and, if necessary, to use Windows. Using Safe Mode loads only the minimum required drivers and system services during the Windows startup.
To enter Safe Mode, use Update and Security in Settings. Select RecoveryВ > Advanced startup to boot to maintenance mode. At the resulting menu, choose TroubleshootВ > Advanced OptionsВ > Startup SettingsВ > Restart. After Windows restarts and displays the Startup Settings screen, select option 4, 5, or 6 to boot to Safe Mode.
Safe Mode may also be available by pressing a function key on boot, for example F8. Refer to information from the computer’s manufacturer for specific startup options.
При запуске Windows 7 появляется ошибка Checking file system on C: что это и что делать
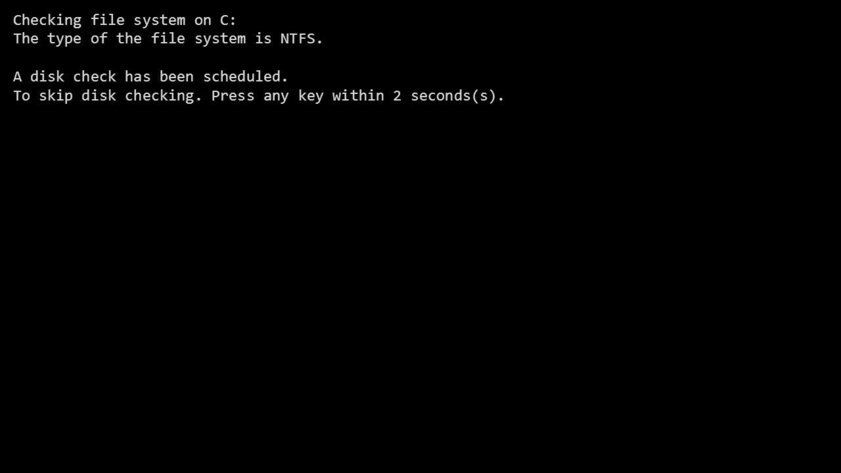
Полагаю, многие сталкивались с ошибкой Checking file system on C (перевод: «Проверка файловой системы на [диске] C») при запуске Windows 7 (или с Checking file system on D). Она обычно случается после сбоя в работе операционной системы. Когда она намертво виснет, многие просто вытягивают из розетки кабель питания или зажимают кнопку включения для принудительного выключения. После повторной загрузки может появиться соответствующий экран с «заветной» надписью (на фото ниже): «Checking file system on C. » — что это и что делать?
«Checking file system on C. » — эта надпись означает, что Microsoft не советует принудительно выключать питание компьютера — это может нанести вред всему ему в целом, а также жестким дискам в частности. Более того, данный процесс может испортить важные файлы, которые используются для нормальной загрузки операционной системы.
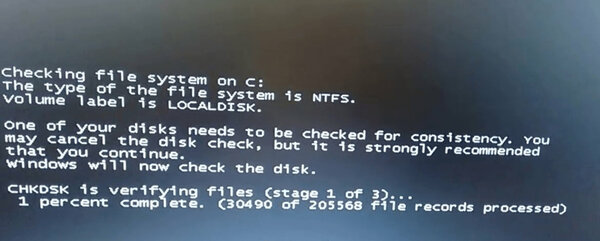
Это нормально, если сообщение Checking file system on C при запуске Windows 7 появляется один раз — как раз после описанных выше инцидентов. Тем не менее, некоторые пользователи отмечают, что эта проверка появляется снова и снова — каждый раз при перезагрузке операционной системы. Это отнимает массу времени и просто тратит нервы, но у данной проблемы есть достаточно простое решение.
Что делать при появлении этой ошибки? Для начала нужно проверить диск C на наличие ошибок
Если сообщение Checking file system on C появляется каждый раз при запуске Windows 7, для начала нужно разобраться, если ли ошибки на диске.
Во-первых, нужно проверить ошибки файловой системы
Шаг 1. Откройте «Проводник» и найдите диск C. Запустите контекстное меню нажатием правой кнопки по значку диска и выберите пункт «Свойства».
Шаг 2. Перейдите на вкладку «Инструменты» и нажмите на кнопку «Проверить».
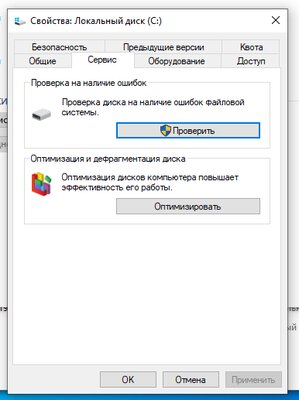
Шаг 3. Переведите в активное положение переключатель «Исправлять ошибки файловой системы автоматически» и нажмите на кнопку «Пуск».
Во-вторых, следует проверить диск C на битые сектора
Если на диске C нет ошибок файловой системы, следует проверить поврежденные сектора. В этом, к примеру, я буду использовать приложение AOMEI Partition Assistant Professional — это удобный инструмент для управления жесткими дисками. Но у него есть аналоги: WinDFT, Seagate Seatools, Victoria.
Шаг 1. Установите и запустите приложение AOMEI Partition Assistant. Откройте контекстное меню диска C, перейдите в пункт «Расширенный» и выберите возможность «Проверить раздел».
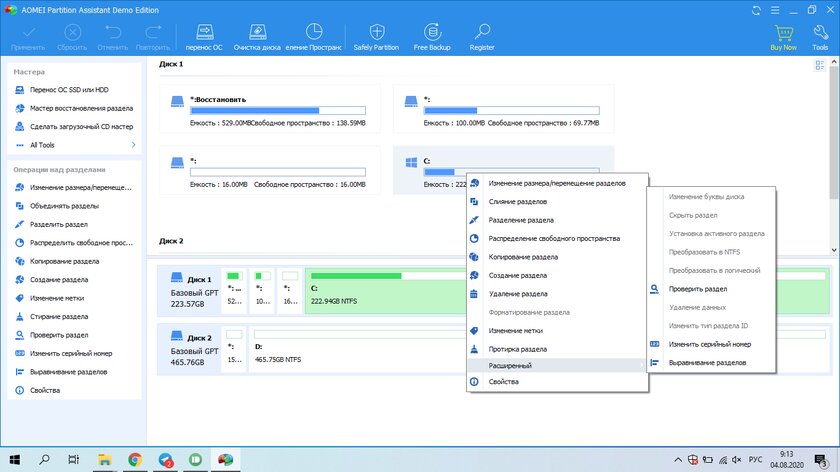
Шаг 2. Выберите способ проверки ошибок для выполнения «Проверить на наличие плохих секторов на разделе» и нажмите на кнопку OK.
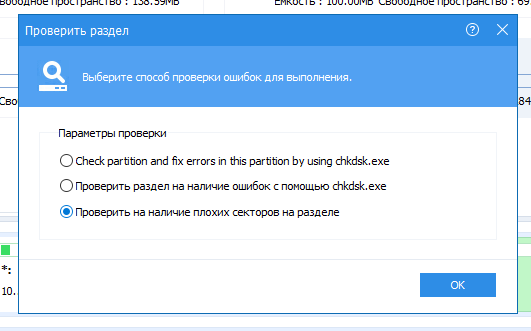
Шаг 3. Нажмите на кнопку «Старт», чтобы начать проверку.
Примечания:
- Если утилита найдет поврежденные сектора, нужно создать резервную копию диска C. Если в поврежденных секторах есть важные данные, отправьте накопитель в профессиональный центр восстановления данных. Браться за этот процесс самостоятельно не стоит — велик риск навсегда лишиться важной информации.
- Учитывайте, что не все поврежденные сектора могут быть восстановлены, поэтому лучше всего приучите себя создавать резервные копии хранилища по расписанию.
Теперь можно безопасно остановить проверку файловой системы
После проверки диска С на ошибки, вы должны задаться вопросом, как остановить этот процесс при каждом запуске операционной системы Windows 7. Вот два эффективных решения, которые для этого можно использовать.
Во-первых, для этого можно использовать редактор реестра
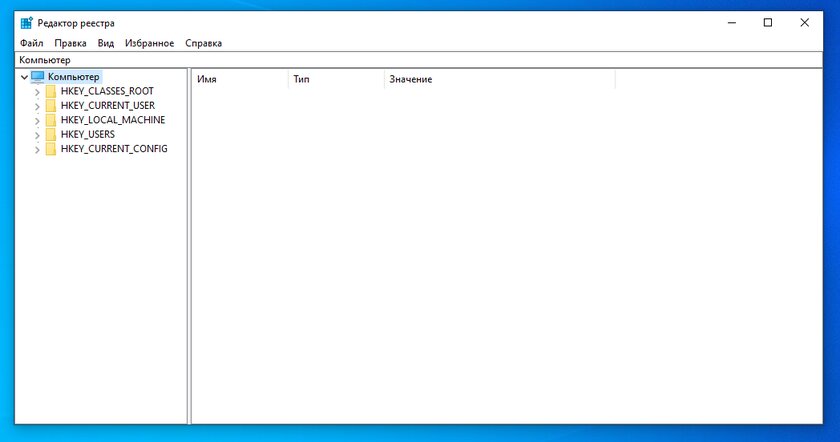
Шаг 1. Воспользуйтесь сочетание клавиш Windows + R, чтобы открыть диалоговое окно «Выполнить». Введите название приложения regedit и нажмите на клавишу Enter или кнопку OK, чтобы открыть редактор реестра.
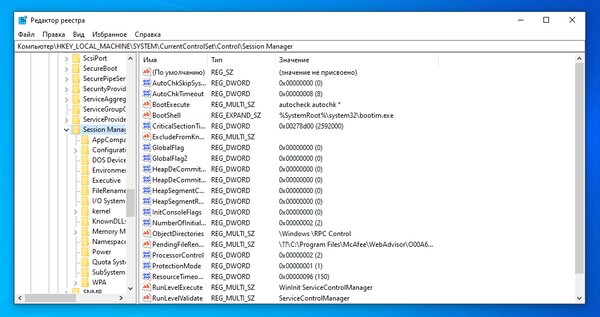
Шаг 2. Используйте левую панель данного приложения, чтобы перейти в следующий каталог:
Шаг 3. Откройте файл BootExecute из правой части данного приложения.
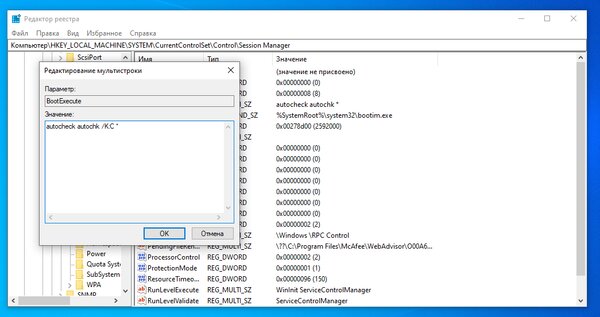
Шаг 4. Добавьте значение /K:C в поле ключа перед значком *. Нажмите на кнопку OK, чтобы применить изменение.
Примечания:
- * — этот значок говорит о том, что каждый диск проверяется на согласованность.
- Ключ /K отключает проверку диска при запуске Windows — в данном случае он имеет отношение к диску C.
Шаг 5. Закройте редактор реестра.
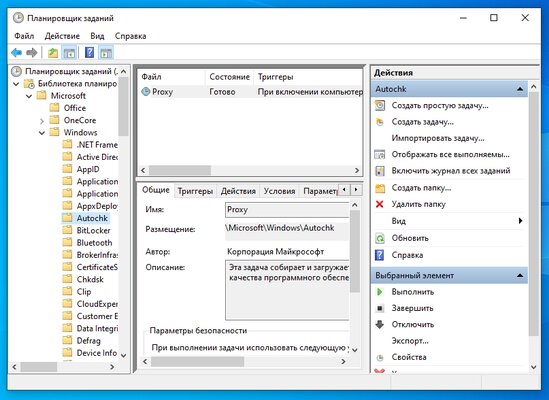
Во-вторых, для этого можно использовать «Планировщик заданий»
Шаг 1. Нажмите на кнопку «Пуск» и перейдите в «Панель управления», разверните меню «Система и безопасность» и откройте раздел «Администрирование».
Шаг 2. Откройте «Планировщик заданий». Выберите пункт Autochk и нажмите на кнопку «Отключить» в правой панели.
Вывод
В общем, справиться с ошибкой Checking file system on C при запуске Windows 7 достаточно просто. Для начала нужно проверить диск С на ошибки и битые сектора, а после этого можно избавляться от соответствующей проверки с помощью редактора реестра или «Планировщика заданий».
Command Prompt: Check Disk Errors and Repair Hard Drive in Windows 10, 8, 7
Wanna use Command Prompt to check disk errors and fix them? This article lists 3 methods to launch CHKDSK.exe tool and check hard drive bad sectors and repair them effectively.

By Cherry  / Last Updated March 31, 2021
The Review of Check Disk tool
Check Disk, short as “CHKDSK”, is a Windows utility that can check the file system integrity of your hard disk and can fix various file system errors on FAT16, FAT32, and NTFS drives. It is available for Windows XP, Windows Vista, Windows 7, Windows 8/8.1 and Windows 10. The Check Disk utility helps you to check file system errors, bad sectors, lost clusters, and so on.
Sometimes, you need to run chkdsk.exe to solve your problems. For example, if you face the problems ranging from blue screens to inability to open files or folders, you can run the Check Disk tool to check for and fix errors on disks.
How to run the Check Disk tool for disk repair? [3 Ways]
Well, how to run and use Check Disk utility on Windows PC? You can access it from elevated Command Prompt windows, from Windows File Explorer or via a third-party partition manager. Below are details on these three ways. Take a closer look at them and choose a proper way based on your needs.
Way 1. Run Check Disk from Command Prompt
The most common way to access Check Disk is from elevated Command Prompt. There are the corresponding check disk commands to help check and fix errors on the selected partition. To use command prompt check disk, you need to open command prompt as administrator. Take an example of Windows 10:
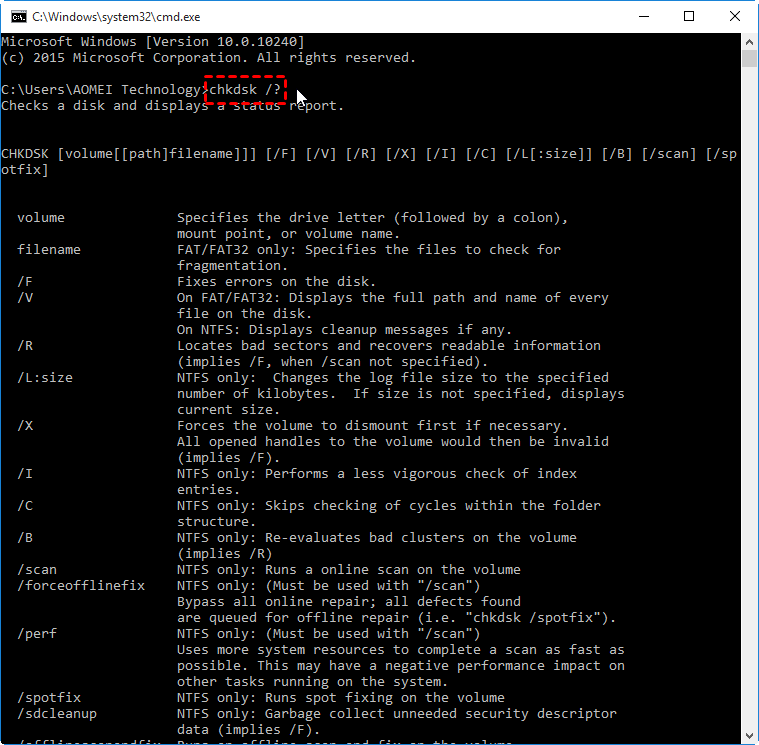
Press Windows + R simultaneously, type cmd, press Enter. Then, you will get into a command prompt and you can start to check disk with command line. If you do not know how to use it, you can type chkdsk /? and hit Enter, which will give you its parameters or switches.
If you cannot boot your computer, you can run check disk from command prompt either by booting the operating system into the recovery mode or by using the original installation disc to run command prompt.
For example, if you want to test the integrity of the G: drive, you can type the command in the prompt: «chkdsk g:», To find and repair any errors that are found in G: drive, type «chkdsk g: /f» instead.
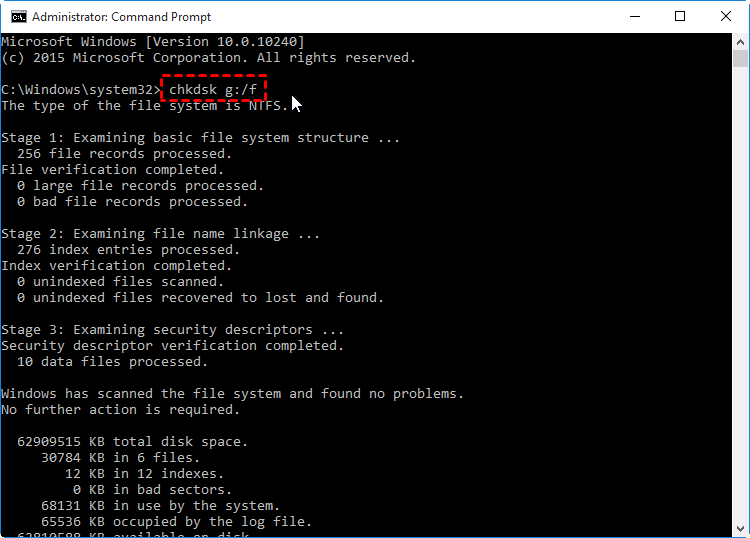
в…в…в… Check Disk can’t repair volumes that are in use. If the volume is in use, it will display a prompt that asks if you want to schedule the volume to be checked the next time you restart the system. Click Yes.
Way 2. Run Check Disk from Partition Properties
Apart from using Command Prompt to launch Check Disk tool, you can also access it from the partition properties. Double click “My Computer/This PC” -> Right-click Drive ->Properties > Tools tab -> Check or Check Now.
Here you will get two options for “Automatically fix file system errors” and “Scan for and attempt recovery of bad sectors”. choose one according to your need, click Start.

в…в…в… If the drive to be checked is in use, you may have to schedule the chkdsk at reboot.
Way 3. Launch chkdsk.exe tool with free partition software
Using Command Prompt Check Disk to scan the drive for errors and fix them is important to Windows users. However, you should know that if you misuse the commands, you risk losing data permanently. So, you’d better make a backup of your data before using command line, or you can find a safe alternative to Check Disk commands.
It is recommended to use the AOMEI Partition Assistant Standard. This great free disk partition manager can help you check for and fix errors on disk partitions. It supports Windows 10, 8.1, 8, 7, Vista, and XP, both 32 bit and 64 bit. You can use it with a concise interface that even a non-technician can operate easily. Here we will show how to check for and fix errors on disk partitions with free AOMEI Partition Assistant.
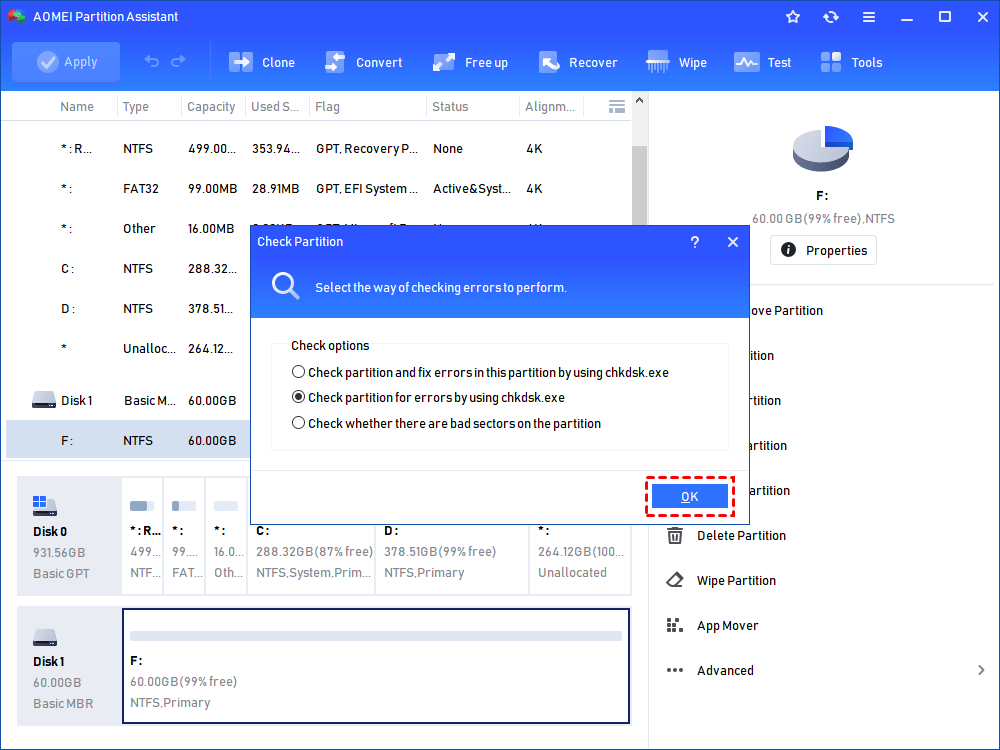
Step 1. Free download the software, install and launch it. It will display you the basic situation of your hard drives. Select the partition that you want to check for, right click it, select Advanced -> Check Partition.

Step 2. It will pop up a small window that you can select the way of checking errors to perform. Choose one according to your needs and click OK. It will proceed immediately.
Notes:
в‘ There are 3 ways you can select to perform: check partition and fix errors in this partition by using chkdsk.exe; check the partition for errors by using chkdsk.exe; check whether there are bad sectors on the partition. Select the one as your command.
②If the partition you selected is being used by another process, you cannot continue the operation. A window will pop up to tell that you can continue the operation again if this partition is dismounted. But it will make all the running programs invalid. When asked “would you like to force a dismount on this partition”. click Yes, it will execute the task, click No, it will cancel the operation.
Conclusion
In this post, we not only tell how to run Check Disk from Command Prompt, but also share another two ways to access chkdsk.exe tool. Apart from checking partition for bad sectors or errors, AOMEI Partition Assistant has many other features that can help you manage your hard drives on Windows 10/8/7 better. For example, you can check the entire hard disk for errors via “Surface Test”, merge two partitions, move partitions, clone partitions, etc.
To unlock and enjoy more advanced features such as allocate free space from one partition to another, convert system disk between MBR and GPT without deleting partitions, recover lost partitions, and more, you can upgrade to AOMEI Partition Assistant Professional.


