- Use the System File Checker tool to repair missing or corrupted system files
- Run the System File Checker tool (SFC.exe)
- More Information
- SFC и DISM: Проверка и Восстановление системных файлов в Windows
- Проверка и Восстановление системных файлов через CMD
- 1. Использование инструмента System File Checker (SFC)
- 2. Использование инструмента Deployment Image and Service Management (DISM)
- Проверка и Восстановление системных файлов через PowerShell
- 1. Использование инструмента System File Checker (SFC)
- 2. Использование инструмента Deployment Image and Service Management (DISM)
- Анализ лога CBS, какие файлы не удалось восстановить
Use the System File Checker tool to repair missing or corrupted system files
If some Windows functions aren’t working or Windows crashes, use the System File Checker to scan Windows and restore your files.
Though the steps below might look complicated at first glance, just follow them in order, step-by-step, and we’ll try to get you back on track.
Run the System File Checker tool (SFC.exe)
To do this, follow these steps:
Open an elevated command prompt. To do this, do the following as your appropriate:
If you are running Windows 10, Windows 8.1 or Windows 8, first run the inbox Deployment Image Servicing and Management (DISM) tool prior to running the System File Checker. (If you are running Windows 7 or Windows Vista, skip to Step 3.)
Type the following command, and then press Enter. It may take several minutes for the command operation to be completed.
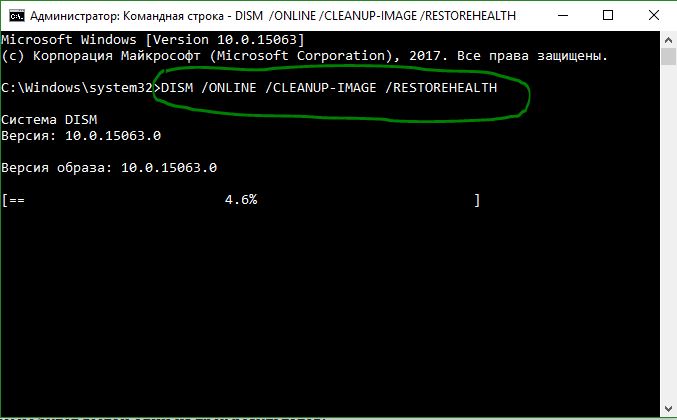
DISM.exe /Online /Cleanup-image /Restorehealth
Important: When you run this command, DISM uses Windows Update to provide the files that are required to fix corruptions. However, if your Windows Update client is already broken, use a running Windows installation as the repair source, or use a Windows side-by-side folder from a network share or from a removable media, such as the Windows DVD, as the source of the files. To do this, run the following command instead:
DISM.exe /Online /Cleanup-Image /RestoreHealth /Source: C:\RepairSource\Windows /LimitAccess
Note: Replace the C:\RepairSource\Windows placeholder with the location of your repair source. For more information about using the DISM tool to repair Windows, reference Repair a Windows Image.
At the command prompt, type the following command, and then press ENTER:
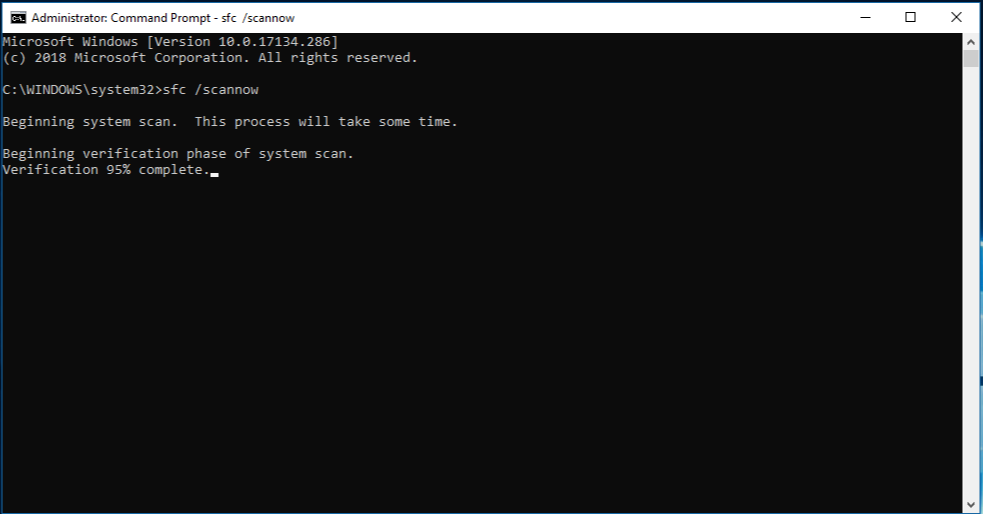
The sfc /scannow command will scan all protected system files, and replace corrupted files with a cached copy that is located in a compressed folder at %WinDir%\System32\dllcache.
The %WinDir% placeholder represents the Windows operating system folder. For example, C:\Windows.
Note Do not close this Command Prompt window until the verification is 100% complete. The scan results will be shown after this process is finished.
After the process is finished, you may receive one of the following messages:
Windows Resource Protection did not find any integrity violations.
This means that you do not have any missing or corrupted system files.
Windows Resource Protection could not perform the requested operation.
To resolve this problem, perform the System File Checker scan in safe mode, and make sure that the PendingDeletes and PendingRenames folders exist under %WinDir%\WinSxS\Temp.
Windows Resource Protection found corrupt files and successfully repaired them. Details are included in the CBS.Log %WinDir%\Logs\CBS\CBS.log.
To view the detail information about the system file scan and restoration, go to How to view details of the System File Checker process.
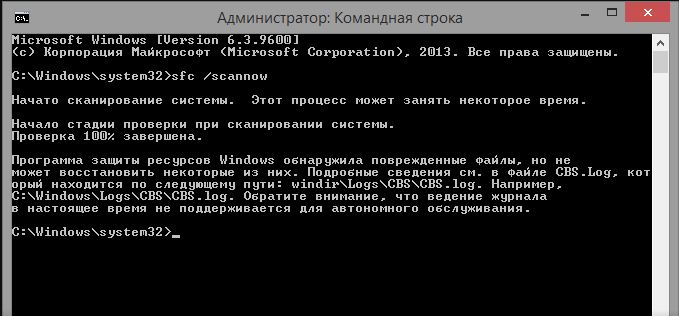
Windows Resource Protection found corrupt files but was unable to fix some of them. Details are included in the CBS.Log %WinDir%\Logs\CBS\CBS.log.
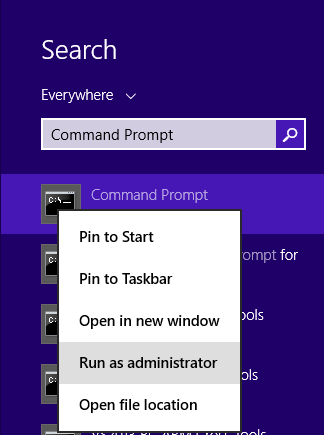
Swipe in from the right edge of the screen, and then tap Search. Or, if you are using a mouse, point to the lower-right corner of the screen, and then click Search. Type Command Prompt in the Search box, right-click Command Prompt, and then click Run as administrator. If you are prompted for an administrator password or for a confirmation, type the password, or click Allow.
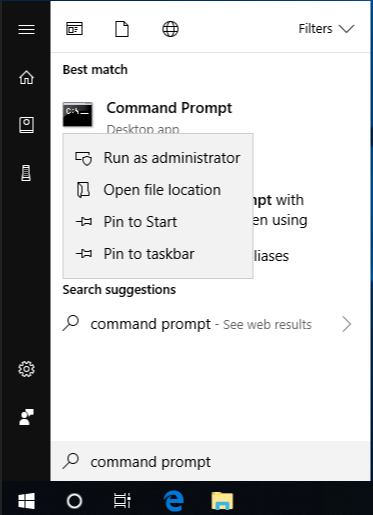
To do this, click Start, type Command Prompt or cmd in the Search box, right-click Command Prompt, and then click Run as administrator. If you are prompted for an administrator password or for a confirmation, type the password, or click Allow.
More Information
To view the details that included in the CBS.Log file, you can copy the information to the Sfcdetails.txt file by using the Findstr command, and then view the details in the Sfcdetails.txt. To do this, follow these steps:
Open an elevated command prompt as described in the previous step 1.
At the command prompt, type the following command, and then press ENTER:
Note The Sfcdetails.txt file contains details from every time that the System File Checker tool has been run on the computer. The file includes information about files that were not repaired by the System File Checker tool. Verify the date and time entries to determine the problem files that were found the last time that you ran the System File Checker tool.
Open the Sfcdetails.txt file from your desktop.
The Sfcdetails.txt file uses the following format:
Date/Time SFC detail The following sample log file contains an entry for a file that could not be repaired: 2007-01-12 12:10:42, Info CSI 00000008 [SR] Cannot repair member file [l:34<17>]»Accessibility.dll» of Accessibility, Version = 6.0.6000.16386, pA = PROCESSOR_ARCHITECTURE_MSIL (8), Culture neutral, VersionScope neutral, PublicKeyToken =
How to manually replace a corrupted system file with a known good copy of the file
After you determine which system file was corrupted and could not be repaired through the detail information in the Sfcdetails.txt file, find where the corrupted file located, and then manually replace the corrupted file with a known good copy of the file. To do this, follow these steps:
Note You may be able to get a known good copy of the system file from another computer that is running the same version of Windows with your computer. You may perform a System File Checker process on that computer to make sure the system file that you intend to copy is a good copy.
Take administrative ownership of the corrupted system file. To do this, at an elevated command prompt, copy and then paste (or type) the following command, and then press ENTER:
takeown /f Path_And_File_Name Note The Path_And_File_Name placeholder represents the path and the file name of the corrupted file. For example, type takeown /f C:\windows\system32\jscript.dll. 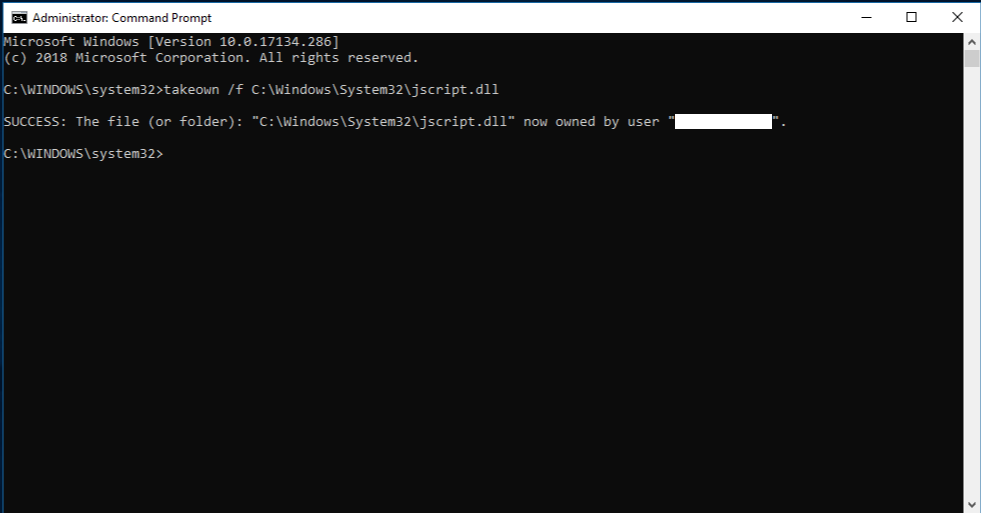
Grant administrators full access to the corrupted system file. To do this, copy and paste (or type) the following command, and then press ENTER:
icacls Path_And_File_Name /GRANT ADMINISTRATORS:F Note The Path_And_File_Name placeholder represents the path and the file name of the corrupted file. For example, type icacls C:\windows\system32\jscript.dll /grant administrators:F.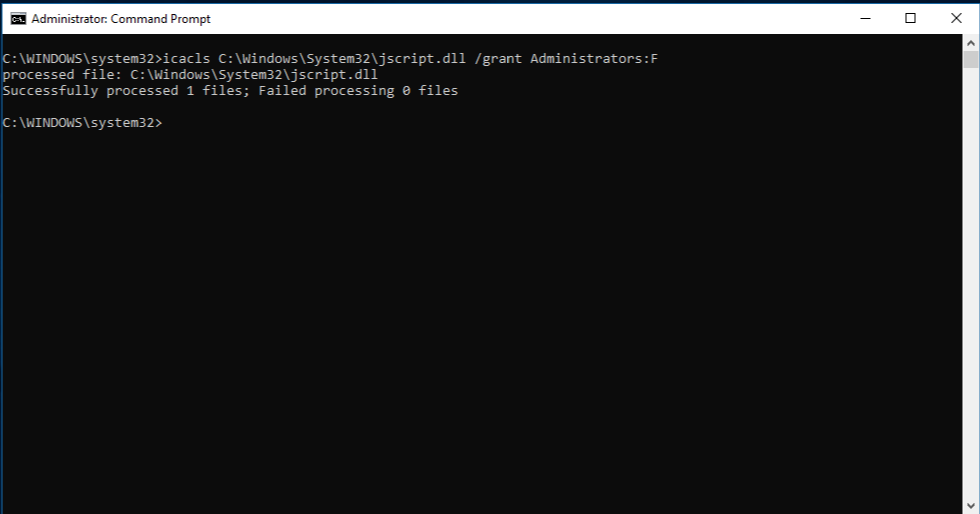
Replace the corrupted system file with a known good copy of the file. To do this, copy and paste (or type) the following command, and then press ENTER:
Copy Source_File Destination Note The Source_File placeholder represents the path and file name of the known good copy of the file on your computer, and the Destination placeholder represents the path and file name of the corrupted file. For example, type copy E:\temp\jscript.dll C:\windows\system32\jscript.dll.
If the steps above don’t work, you may need to reinstall Windows. For more info, see Windows 10 recovery options.
SFC и DISM: Проверка и Восстановление системных файлов в Windows
Всякий раз, когда что-то идет не так с компьютером или ноутбуком, есть ряд инструментов для устранения неполадок, которые вы можете выполнить, чтобы попытаться устранить проблему. В Windows 10/8/7 есть несколько встроенных команд, которые можно использовать для проверки и восстановления поврежденных системных файлов, которые со временем вызывают проблемы при изменении.
Одним из способов устранения неполадок, связанных с Windows, является проверка системы и восстановление системных файлов. Это может помочь во всех типах проблем, таких как медленная система, синий экран смерти, внезапные сбои питания и сбои системы.
Рассмотрим, как запустить средство проверки системных файлов в Windows с помощью командной строки CMD и PowerShell, таких команд как sfc /scannow и инструмента DISM.
Проверка и Восстановление системных файлов через CMD
Средство проверки системных файлов сканирует ваш компьютер на предмет любого повреждения или изменений в системных файлах, которые в противном случае могли бы помешать нормальной работе вашего ПК. Инструменты заменяет файл правильной версией, чтобы обеспечить бесперебойную работу. С помощью командной строки можно попытаться сканировать и восстановить системные файлы поздних операционных систем, как Windows 10/8/7 /Vista. Разберем две команды sfc /scannow и DISM с помощью CMD.
1. Использование инструмента System File Checker (SFC)
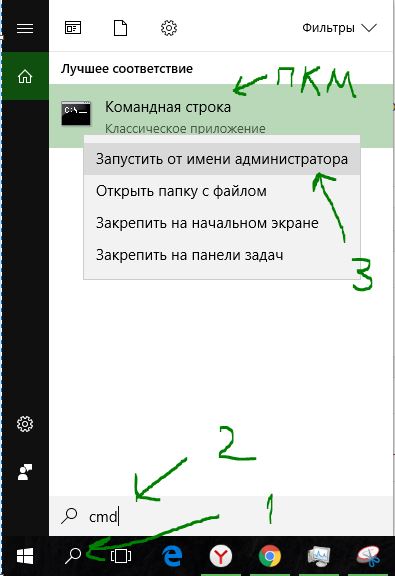
Запустите командную строку (CMD) от имени администратора. Нажмите «поиск» и напишите просто «cmd» или «командная строка», далее по ней правой кнопкой мыши и запуск от имени админа.
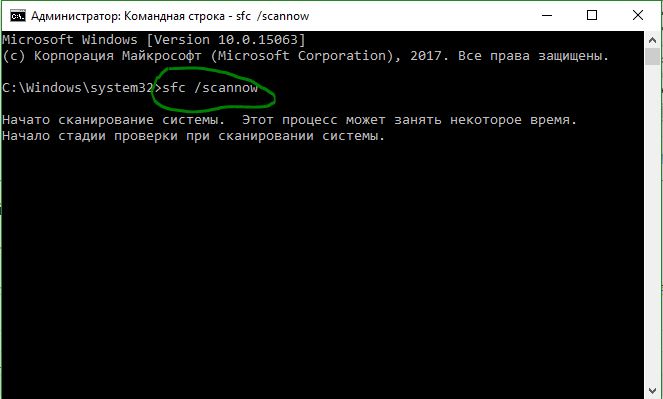
Задайте команду sfc /scannow и дождитесь окончания процесса.
Примечание: После сканирования вашей системы будет выдан один из трех результатов:
- Ошибок системных файлов не будет.
- Будут ошибки системных файлов и Windows восстановит их автоматически.
- Windows обнаружила ошибки, но не может восстановить некоторые из них.
Если у вас показывает вариант 3, что ошибка обнаружена и система не может восстановить, то загрузитесь в безопасном режиме и проделайте заново процедуру. Советую отключить шифрование EFS и Bitlocker , если на момент проверки они имеются. Ничего не получилось? Двигаемся ниже.
2. Использование инструмента Deployment Image and Service Management (DISM)
Если вышеуказанное не работает в безопасном режиме, есть один последний способ проверить повреждение в системных файлах и исправить их. Используем инструмент Deployment Image and Service Management (DISM). Команда работает с системами Windows 8/8.1/10. Откройте обратно командную строку от имени администратора и используйте следующую команду:
- DISM /ONLINE /CLEANUP-IMAGE /RESTOREHEALTH
Процесс может занять длительное время с зависанием процентной шкалы. Закончив работу, перезагрузите компьютер и запустите обратно sfc /scannow, чтобы убедиться, что ошибок нет или ошибка пропала.
Проверка и Восстановление системных файлов через PowerShell
Мы будем использовать Windows PowerShell, чтобы показать, как использовать службу обслуживания и управления DISM для сканирования и исправления поврежденных системных файлов в Windows 10. Этот способ будет более эффективный для обновления windows 10, чем командная строка.
1. Использование инструмента System File Checker (SFC)
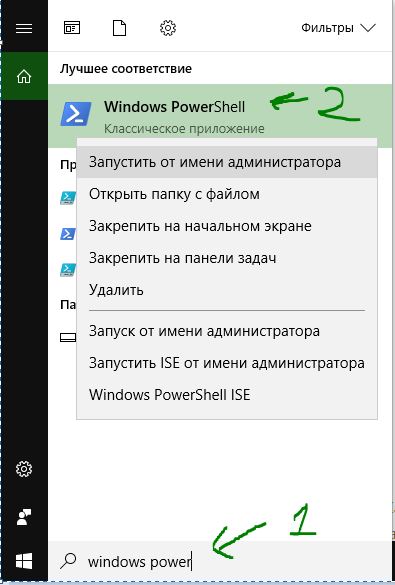
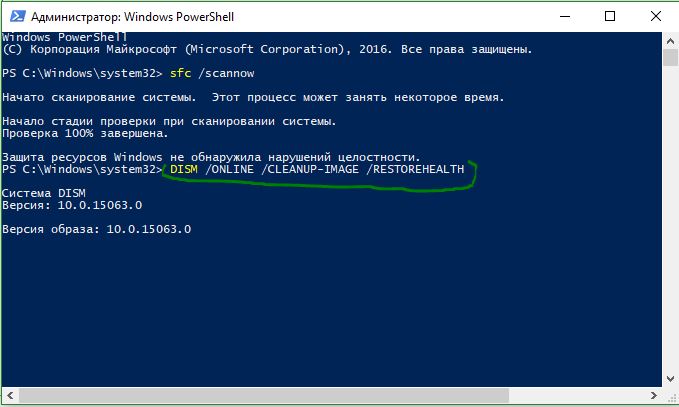
Запустите PowerShell от имени администратора. Нажмите «поиск» и наберите windows powershell, после нажмите правой кнопкой мыши и выберите от имени админа.
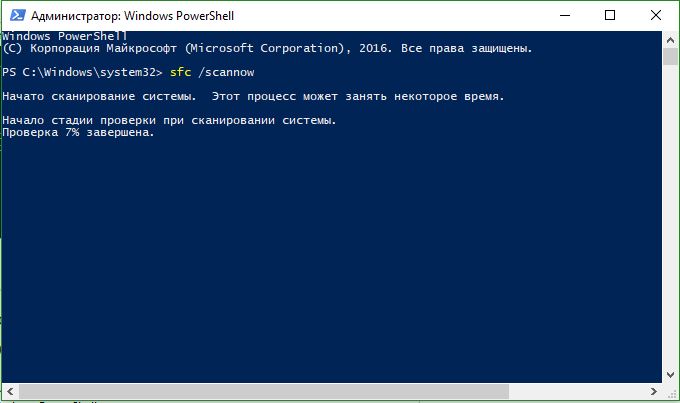
Задайте в окне PowerShell команду sfc /scannow. Если сканирование обнаружит какие-либо проблемы, Windows попытается их исправить. Если Windows не сможет их исправить, он предупредит вас, что необходимы дальнейшие исследования и действия. Двигайтесь ниже, если обнаружены ошибки.
2. Использование инструмента Deployment Image and Service Management (DISM)
Сканирование DISM обнаруживает поврежденные системные файлы и Windows попытается исправить их, и даст вам отчет о ходе работы в конце. Если Windows не сможет найти файлы, необходимые для восстановления поврежденных системных файлов, вам также будет предоставлена информация о том, что делать дальше, со ссылкой на веб-сайт Microsoft и варианты устранения неполадок. Задайте ниже команду в окно PowerShell.
- DISM /ONLINE /CLEANUP-IMAGE /RESTOREHEALTH
Если DISM все исправил или не выявил ошибки, то перезагрузите ноутбук, компьютер и запустите для проверки обратно sfc /scannow.
Анализ лога CBS, какие файлы не удалось восстановить
Если после сканирования системных файлов, программа защиты ресурсов Windows обнаружила поврежденные файлы, но не может восстановить некоторые из них, лог файл CBS может помочь нам определить, какие именно файлы повреждены. Для этого:
- Перейдите по пути C:\Windows\Logs\CBS
- Откройте файл CBS.log в блокноте или текстовом редакторе.
- В блокноте нажмите Ctrl+F, чтобы вызвать поиск
- В поиске напишите Cannot repair member file, чтобы найти файлы, которые не удается восстановить.
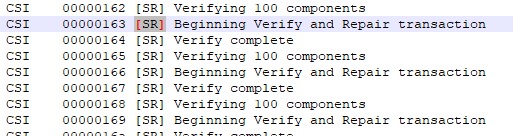
- Если поиск не дал результатов, то найдите записи [SR] и вы обнаружите, что все они одинаковы 100 components.
- Ищите листая вручную любые изменения, отличные от 100 components, где вы и найдете поврежденный файл или указание.
- Ориентируетесь по времени, когда вы примерно запускали сканирование SFC, так как лог может быть и за вчерашний день.