- Просмотр «Журнала ошибок» в Windows 10
- «Журнал ошибок» в Виндовс 10
- Включение логирования
- Запуск «Просмотра событий»
- Анализ журнала ошибок
- Windows Vista, Windows 7, Windows Server 2008 R2, Windows 8.1, and Windows 10 setup log file locations
- Introduction
- Down-level phase
- Windows Preinstallation Environment phase
- Online configuration phase
- Windows Welcome phase
- Rollback phase
Просмотр «Журнала ошибок» в Windows 10
Во время работы операционной системы, как и любого другого программного обеспечения, периодически возникают ошибки. Очень важно уметь анализировать и исправлять подобные проблемы, дабы в будущем они не появлялись снова. В ОС Windows 10 для этого был внедрен специальный «Журнал ошибок». Именно о нем мы и поговорим в рамках данной статьи.
«Журнал ошибок» в Виндовс 10
Упомянутый ранее журнал является лишь небольшой частью системной утилиты «Просмотр событий», которая по умолчанию присутствует в каждой версии Windows 10. Далее мы разберем три важных аспекта, которые касаются «Журнала ошибок» — включение логирования, запуск средства «Просмотр событий» и анализ системных сообщений.
Включение логирования
Для того чтобы система могла записывать все события в журнал, необходимо включить его. Для этого выполните следующие действия:
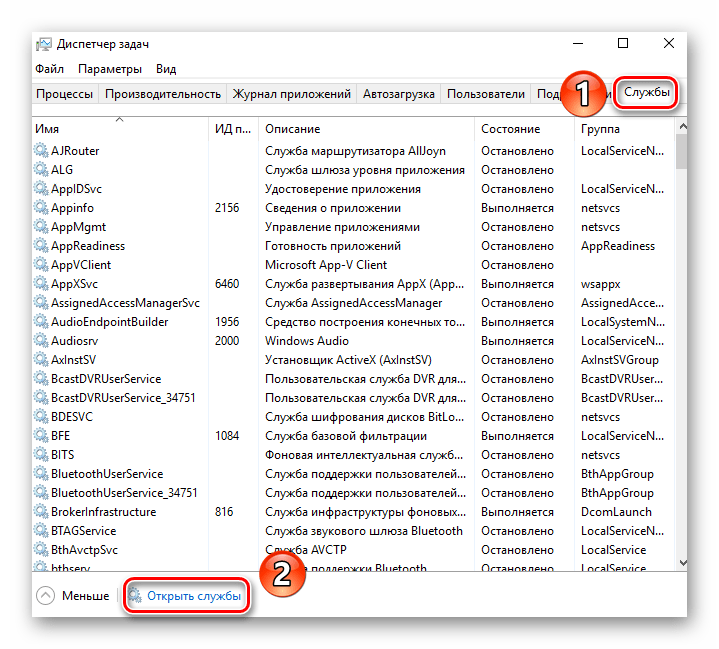
- Нажмите в любом пустом месте «Панели задач» правой кнопкой мышки. Из контекстного меню выберите пункт «Диспетчер задач».

В открывшемся окне перейдите во вкладку «Службы», а затем на самой странице в самом низу нажмите кнопку «Открыть службы».
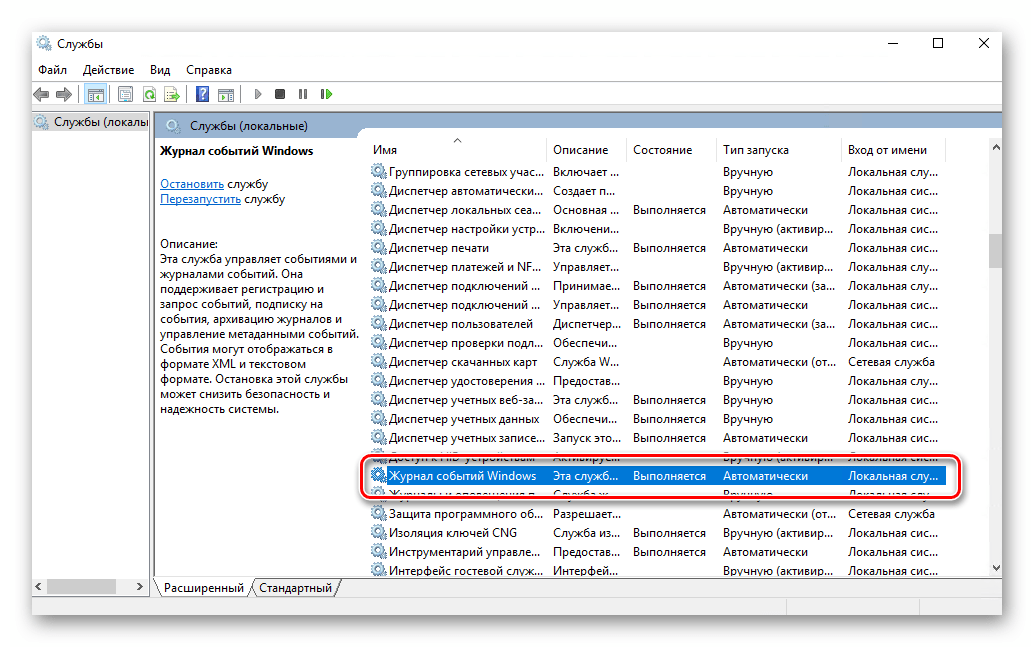
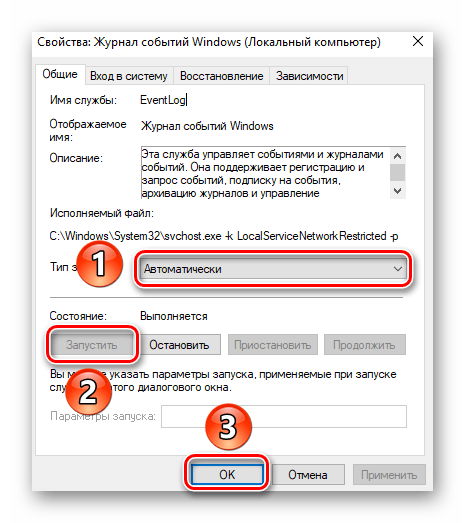
Далее в перечне служб нужно найти «Журнал событий Windows». Убедитесь, что она запущена и работает в автоматическом режиме. Об этом должны свидетельствовать надписи в графах «Состояние» и «Тип запуска».
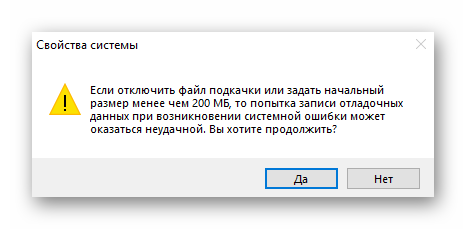
После этого остается проверить, активирован ли на компьютере файл подкачки. Дело в том, что при его выключении система попросту не сможет вести учет всех событий. Поэтому очень важно установить значение виртуальной памяти хотя бы 200 Мб. Об этом напоминает сама Windows 10 в сообщении, которое возникает при полной деактивации файла подкачки.
О том, как задействовать виртуальную память и изменить ее размер, мы уже писали ранее в отдельной статье. Ознакомьтесь с ней при необходимости.
С включением логирования разобрались. Теперь двигаемся дальше.
Запуск «Просмотра событий»
Как мы уже упоминали ранее, «Журнал ошибок» входит в состав стандартной оснастки «Просмотр событий». Запустить ее очень просто. Делается это следующим образом:
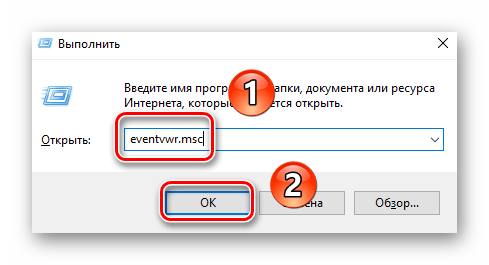
- Нажмите на клавиатуре одновременно клавишу «Windows» и «R».
- В строку открывшегося окна введите eventvwr.msc и нажмите «Enter» либо же кнопку «OK» ниже.
В результате на экране появится главное окно упомянутой утилиты. Обратите внимание, что существуют и другие методы, которые позволяют запустить «Просмотр событий». О них мы в деталях рассказывали ранее в отдельной статье.
Анализ журнала ошибок
После того как «Просмотр событий» будет запущен, вы увидите на экране следующее окно.
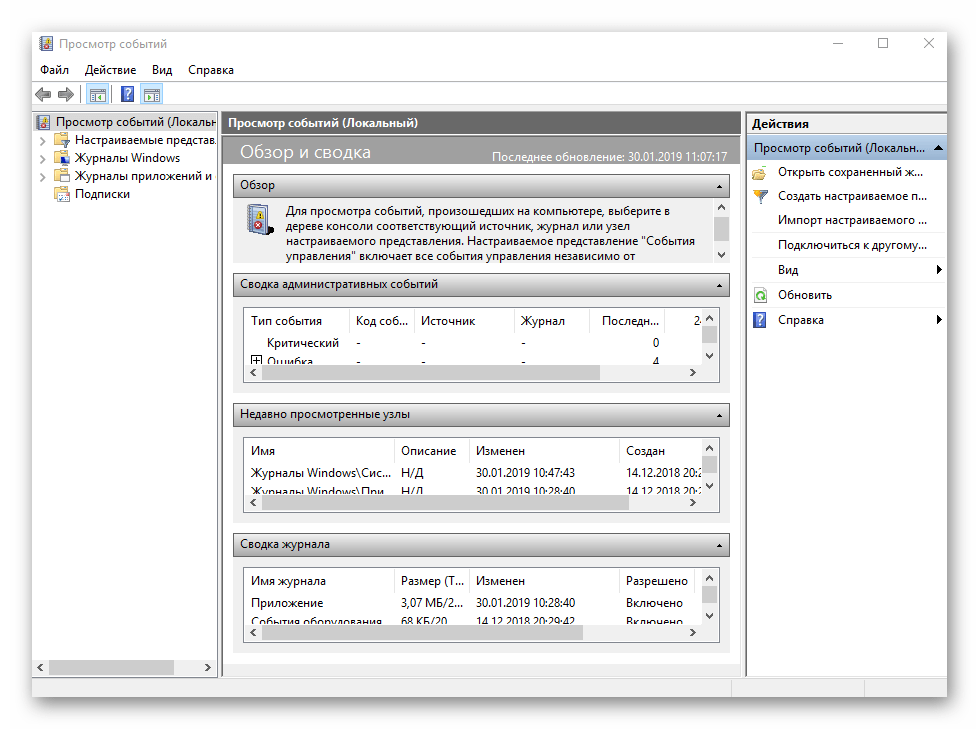
В левой его части находится древовидная система с разделами. Нас интересует вкладка «Журналы Windows». Нажмите на ее названии один раз ЛКМ. В результате вы увидите список вложенных подразделов и общую статистику в центральной части окна.
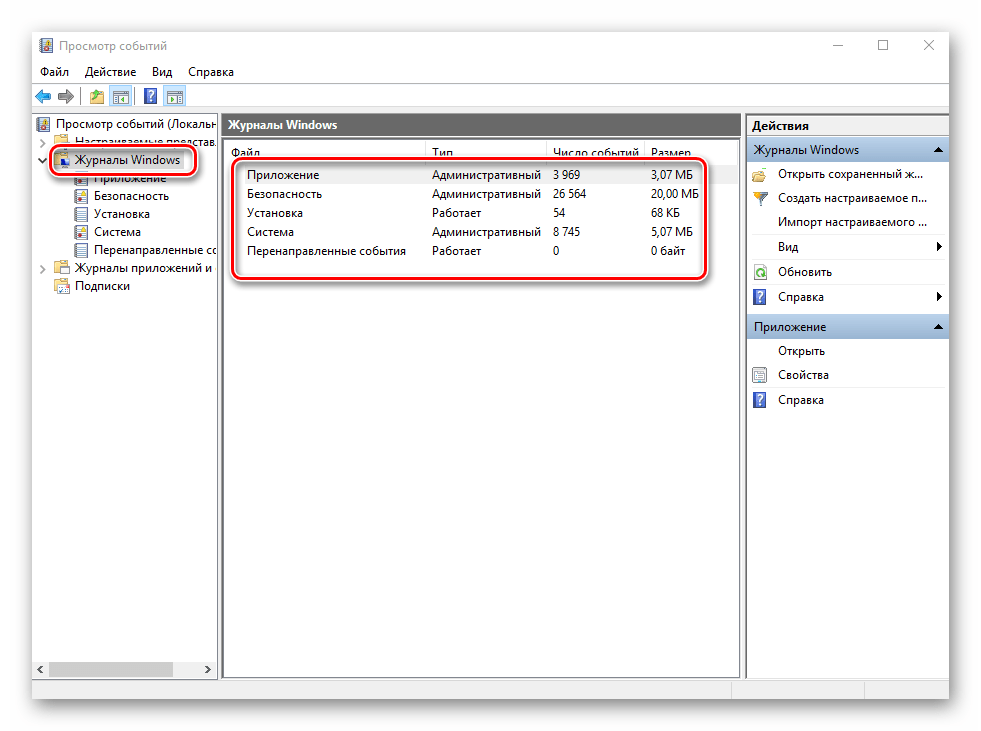
Для дальнейшего анализа необходимо зайти в подраздел «Система». В нем находится большой список событий, которые ранее происходили на компьютере. Всего можно выделить четыре типа событий: критическое, ошибка, предупреждение и сведения. Мы вкратце расскажем вам о каждом из них. Обратите внимание, что описать все возможные ошибки мы не можем просто физически. Их много и все они зависят от различных факторов. Поэтому если у вас не получится что-то решить самостоятельно, можете описать проблему в комментариях.
Критическое событие
Данное событие помечено в журнале красным кругом с крестиком внутри и соответствующей припиской. Кликнув по названию такой ошибки из списка, немного ниже вы сможете увидеть общие сведения происшествия.
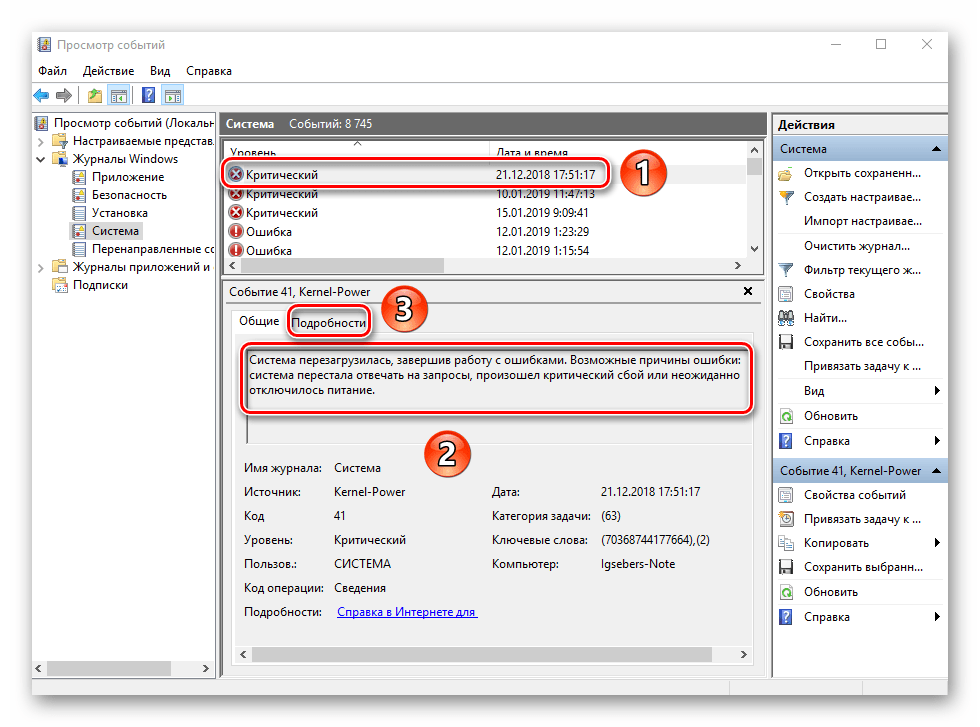
Зачастую представленной информации достаточно для того, чтобы найти решение проблемы. В данном примере система сообщает о том, что компьютер был резко выключен. Для того чтобы ошибка не появлялась вновь, достаточно просто корректно выключать ПК.
Для более продвинутого пользователя есть специальная вкладка «Подробности», где все событие представлены с кодами ошибок и последовательно расписаны.
Ошибка
Этот тип событий второй по важности. Каждая ошибка помечена в журнале красным кругом с восклицательным знаком. Как и в случае с критическим событием, достаточно нажать ЛКМ по названию ошибки для просмотра подробностей.
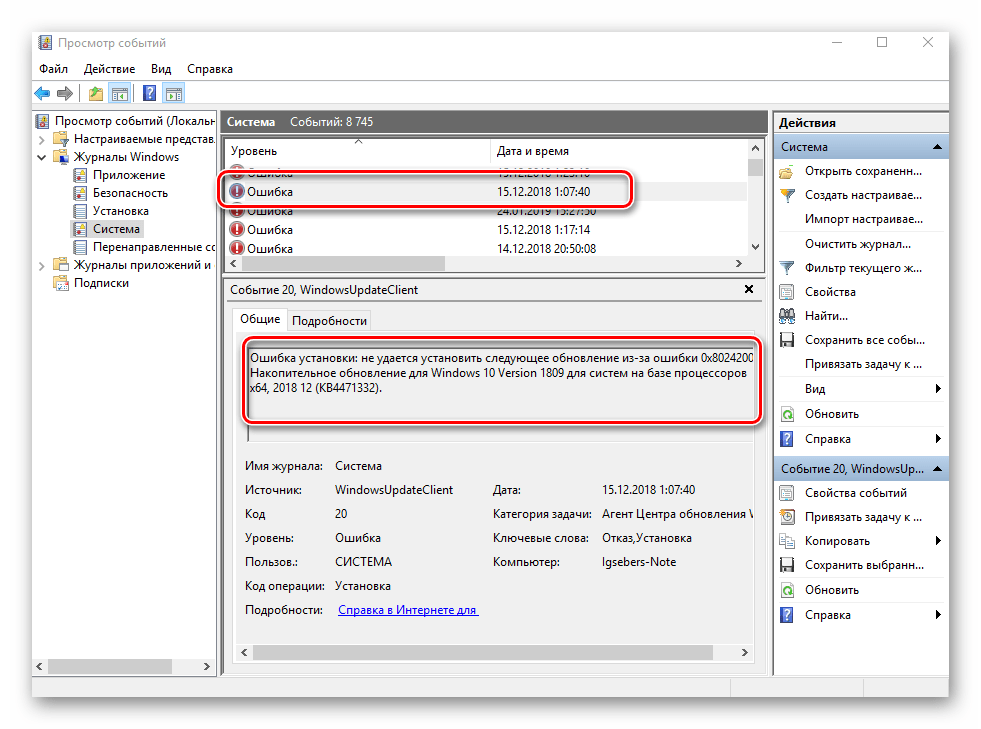
Если из сообщения в поле «Общие» вы ничего не поняли, можно попробовать найти информацию об ошибке в сети. Для этого используйте название источника и код события. Они указаны в соответствующих графах напротив названия самой ошибки. Для решения проблемы в нашем случае необходимо попросту повторно инсталлировать обновление с нужным номером.
Предупреждение
Сообщения данного типа возникают в тех ситуациях, когда проблема не носит серьезный характер. В большинстве случаев их можно игнорировать, но если событие повторяется раз за разом, стоит уделить ему внимание.
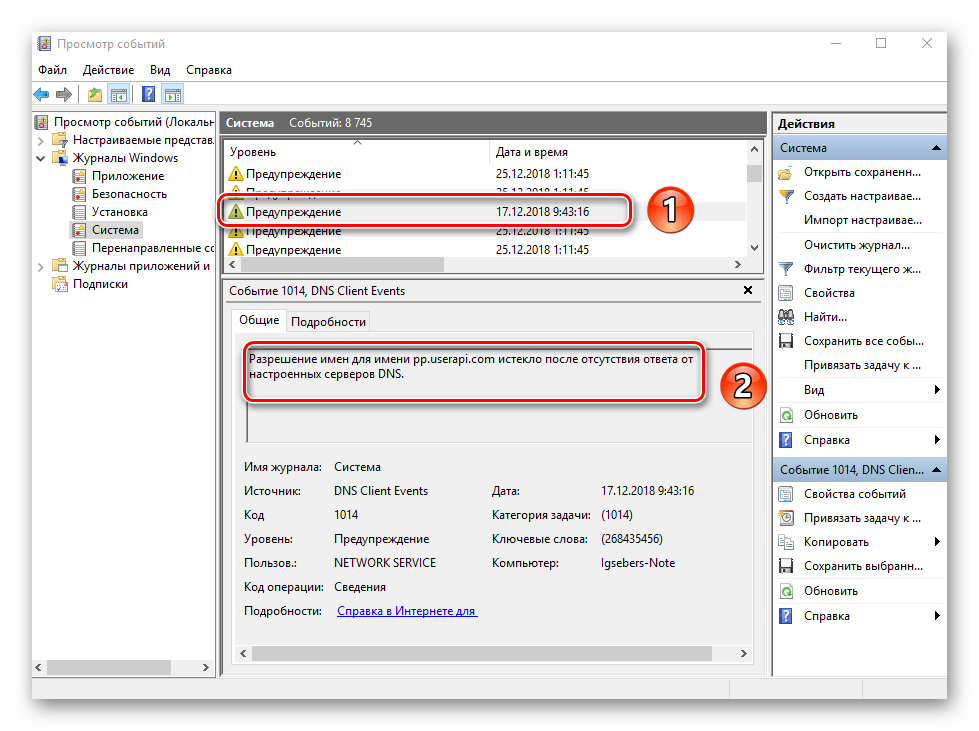
Чаще всего причиной появления предупреждения служит DNS-сервер, вернее, неудачная попытка какой-либо программы подключиться к нему. В таких ситуациях софт или утилита попросту обращается к запасному адресу.
Сведения
Этот тип событий самый безобидный и создан лишь для того, чтобы вы могли быть в курсе всего происходящего. Как понятно из его названия, в сообщение содержатся сводные данные о всех инсталлированных обновлениях и программах, созданных точках восстановления и т.д.
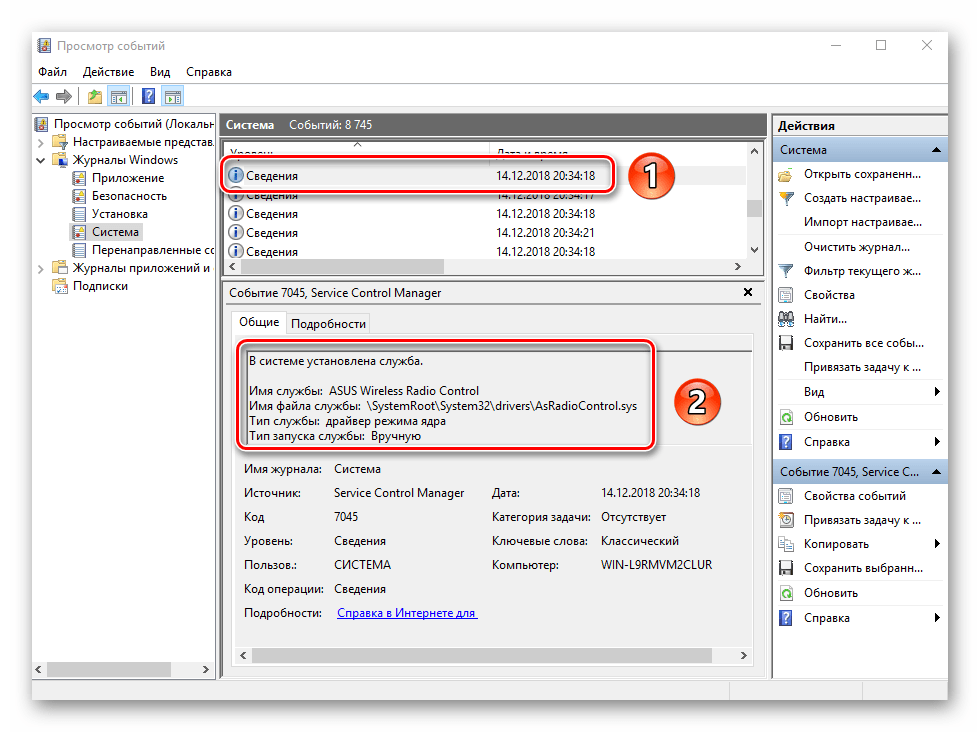
Подобная информация будет очень кстати для тех пользователей, которые не хотят устанавливать сторонний софт для просмотра последних действий Windows 10.
Как видите, процесс активации, запуска и анализа журнала ошибок очень прост и не требует от вас глубоких познаний ПК. Помните, что таким образом можно узнать информацию не только о системе, но и о других ее компонентах. Для этого достаточно в утилите «Просмотр событий» выбрать другой раздел.
Windows Vista, Windows 7, Windows Server 2008 R2, Windows 8.1, and Windows 10 setup log file locations
This article describes where to locate these log files and which log files are most useful for troubleshooting each setup phase of Windows 7, of Windows Server 2008 R2, and of Windows Vista.
Original product version: В Windows 10 — all editions, Windows Server 2019, Windows Server 2016
Original KB number: В 927521
Introduction
Windows setup log files are in different locations on the hard disk. These locations depend on the setup phase.
Support for Windows Vista without any service packs installed ended on April 13, 2010. To continue receiving security updates for Windows, make sure you’re running Windows Vista with Service Pack 2 (SP2). For more information, see Windows XP support has ended.
Down-level phase
The downlevel phase is the Windows setup phase that is running within the previous operating system. The following table lists important log files in this setup phase.
| Log file | Description |
|---|---|
| C:\WINDOWS\setupapi.log | Contains information about device changes, driver changes, and major system changes, such as service pack installations and hotfix installations. This log file is used only by Microsoft Windows XP and earlier versions. |
| C:$WINDOWS. BT\Sources\Panther\setupact.log | Contains information about setup actions during the installation. |
| C:$WINDOWS. BT\Sources\Panther\setuperr.log | Contains information about setup errors during the installation. |
| C:$WINDOWS. BT\Sources\Panther\miglog.xml | Contains information about the user directory structure. This information includes security identifiers (SIDs). |
| C:$WINDOWS. BT\Sources\Panther\PreGatherPnPList.log | Contains information about the initial capture of devices that are on the system during the downlevel phase. |
Windows Preinstallation Environment phase
The Windows Preinstallation Environment (Windows PE or WinPE) phase is the Windows setup phase that occurs after the restart at the end of the downlevel phase, or when you start the computer by using the Windows installation media. The following table lists important log files in this setup phase.
| Log file | Description |
|---|---|
| X:$WINDOWS. BT\Sources\Panther\setupact.log | Contains information about setup actions during the installation. |
| X:$WINDOWS. BT\Sources\Panther\setuperr.log | Contains information about setup errors during the installation. |
| X:$WINDOWS. BT\Sources\Panther\miglog.xml | Contains information about the user directory structure. This information includes security identifiers (SIDs). |
| X:$WINDOWS. BT\Sources\Panther\PreGatherPnPList.log | Contains information about the initial capture of devices that are on the system during the downlevel phase. |
| or | |
| C:$WINDOWS. BT\Sources\Panther\setupact.log | Contains information about setup actions during the installation. |
| C:$WINDOWS. BT\Sources\Panther\setuperr.log | Contains information about setup errors during the installation. |
| C:$WINDOWS. BT\Sources\Panther\miglog.xml | Contains information about the user directory structure. This information includes security identifiers (SIDs). |
| C:$WINDOWS. BT\Sources\Panther\PreGatherPnPList.log | Contains information about the initial capture of devices that are on the system during the downlevel phase. |
You may also see a log file in the X:\WINDOWS directory. The Setupact.log file in this directory contains information about the progress of the initial options that are selected on the Windows installation screen. The Windows installation screen appears when you start the computer by using the Windows installation media. After you select Install now from the Windows installation screen, the Setup.exe file starts, and this log file is no longer used.
Online configuration phase
The online configuration phase (the first boot phase) starts when you receive the following message:
Please wait a moment while Windows prepares to start for the first time.
During this phase, basic hardware support is installed. If it’s an upgrade installation, data and programs are also migrated. The following table lists important log files in this setup phase.
| Log file | Description |
|---|---|
| C:\WINDOWS\PANTHER\setupact.log | Contains information about setup actions during the installation. |
| C:\WINDOWS\PANTHER\setuperr.log | Contains information about setup errors during the installation. |
| C:\WINDOWS\PANTHER\miglog.xml | Contains information about the user directory structure. This information includes security identifiers (SIDs). |
| C:\WINDOWS\INF\setupapi.dev.log | Contains information about Plug and Play devices and driver installation. |
| C:\WINDOWS\INF\setupapi.app.log | Contains information about application installation. |
| C:\WINDOWS\Panther\PostGatherPnPList.log | Contains information about the capture of devices that are on the system after the online configuration phase. |
| C:\WINDOWS\Panther\PreGatherPnPList.log | Contains information about the initial capture of devices that are on the system during the downlevel phase. |
Windows Welcome phase
The Windows Welcome phase includes the following options and events:
- It provides the options to create user accounts.
- It provides the option to specify a name for the computer.
- The Windows System Assessment Tool (Winsat.exe) finishes performance testing to determine the Windows Experience Index rating.
The Windows Welcome phase is the final setup phase before a user signs in. The following table lists important log files in this setup phase.
| Log file | Description |
|---|---|
| C:\WINDOWS\PANTHER\setupact.log | Contains information about setup actions during the installation. |
| C:\WINDOWS\PANTHER\setuperr.log | Contains information about setup errors during the installation. |
| C:\WINDOWS\PANTHER\miglog.xml | Contains information about the user directory structure. This information includes security identifiers (SIDs). |
| C:\WINDOWS\INF\setupapi.dev.log | Contains information about Plug and Play devices and driver installation. |
| C:\WINDOWS\INF\setupapi.app.log | Contains information about application installation. |
| C:\WINDOWS\Panther\PostGatherPnPList.log | Contains information about the capture of devices that are on the system after the online configuration phase. |
| C:\WINDOWS\Panther\PreGatherPnPList.log | Contains information about the initial capture of devices that are on the system during the downlevel phase. |
| C:\WINDOWS\Performance\Winsat\winsat.log | Contains information about the Windows System Assessment Tool performance testing results. |
Rollback phase
If a Windows upgrade installation fails, and you’ve successfully rolled back the installation to the previous operating system desktop, there are several log files that you can use for troubleshooting. The following table lists important log files in this phase.


