- How to troubleshoot app package signature errors
- What you need to know
- Technologies
- Prerequisites
- Instructions
- Step 1: Examine event logs for diagnostic information
- Step 2: Determine the certificate chain used to sign the app package
- Step 3: Determine the certificates trusted by the local machine
- Remarks
- Security Considerations
- System Error Codes
- More ways to find an error code
- Third party error codes
- System Error Codes
- Исправление ошибки 0xc0000428 при запуске или установке Windows
- Причины ошибки
- Исправление ошибки 0xc0000428 при запуске Windows 10
- Однократное отключение проверки подлинности цифровой подписи
- Удаление проблемного файла
- Отключение проверки идентификатора драйверов на постоянной основе
- Восстановление при загрузке
- Ошибка 0xc0000428 при установке Windows 10
How to troubleshoot app package signature errors
An app deployment failure can be caused by a failure to validate the digital signature of the app package. Learn how to recognize these failures, and what to do about them.
When you deploy a packaged Windows app, Windows always attempts to validate the digital signature on the app package. Failures during signature validation block deployment of the package. But why the package didn’t validate might not be obvious. In particular, if you sign your packages with private certificates for local testing, you often must manage the trust for those certificates as well. An incorrect certificate trust configuration can lead to signature validation failures.
What you need to know
Technologies
Prerequisites
- Windows Event Log to diagnose installation failures.
- Certutil tasks for managing certificates for certificate store manipulation during troubleshooting
Instructions
Step 1: Examine event logs for diagnostic information
Depending on how you attempted to deploy your app, you might not have received a meaningful error code for the deployment failure. In this case, you can usually get the error code directly from the event logs.
To get the error code from the event logs
Run eventvwr.msc.
Go to Event Viewer (Local) > Applications and Services Logs > Microsoft > Windows.
The first log to check is AppxPackagingOM > Microsoft-Windows-AppxPackaging/Operational.
Deployment-related errors are recorded in AppXDeployment-Server > Microsoft-Windows-AppXDeploymentServer/Operational.
For deployment errors, search for the most recent error event 404. This error event provides you with the error code and a description of why the deployment failed. If an error event 465 preceded the 404 event, there was a problem opening the package.
If the 465 error didn’t occur, see general Troubleshooting packaging, deployment, and query of Windows apps. Otherwise, refer to this table for common error codes that can show up in the error string for error event 465:
| Error code | Error | Description | Suggestion |
|---|---|---|---|
| 0x80073CF0 | ERROR_INSTALL_OPEN_PACKAGE_FAILED | The app package could not be opened. | This error typically indicates a problem with the package. You need to build and sign the package again. For more info, see Using App Packager. |
| 0x80080205 | APPX_E_INVALID_BLOCKMAP | The app package has been tampered with or has an invalid block map. | The package is corrupted. You need to build and sign the package again. For more info, see Using App Packager. |
| 0x800B0004 | TRUST_E_SUBJECT_NOT_TRUSTED | The app package has been tampered with. | The package contents no longer match its digital signature. You need to sign the package again. For more info, see How to sign an app package using SignTool. |
| 0x800B0100 | TRUST_E_NOSIGNATURE | The app package is unsigned. | Only signed Windows app packages can be deployed. For info about signing an app package, see How to sign an app package using SignTool. |
| 0x800B0109 | CERT_E_UNTRUSTED_ROOT | The certificate chain that was used to sign the app package ends in a root certificate that isn’t trusted. | Continue to Step 2 to troubleshoot the certificate trust. |
| 0x800B010A | CERT_E_CHAINING | No certificate chain could be built to a trusted root authority from the cert that was used to sign the app package. | Continue to Step 2 to troubleshoot the certificate trust. |
Step 2: Determine the certificate chain used to sign the app package
To figure out the certificates that the local computer must trust, you can examine the certificate chain for the digital signature on the app package.
To determine the certificate chain
- In File Explorer, right-click on the app package and select Properties.
- In the Properties dialog, select the Digital Signatures tab, which also displays whether the signature can be validated.
- In the Signature list, select the signature and then click the Details button.
- In the Digital Signature Details dialog, click the View Certificate button.
- In the Certificate dialog, select the Certification Path tab.
The top certificate in the chain is the root certificate and the bottom certificate is the signing certificate. If only a single certificate is in the chain, the signing certificate is also its own root certificate. You can determine the serial number for each certificate that you then use with Certutil:
To determine the serial number for each certificate
- In the Certification path pane, select the certificate and then click View Certificate.
- In the Certificate dialog, select the Details tab, which displays the serial number and other useful properties of the certificate.
Step 3: Determine the certificates trusted by the local machine
To be able to deploy an app package, it must not only be trusted in the user’s context but also the local computer context. As a result, the digital signature can appear valid when viewed in the Digital Signatures tab from the previous step but still fail validation during deployment of the app package.
To determine if the certificate chain used to sign the app package is specifically trusted by the local computer
Run this command:
Run this command:
If you don’t specify the certificate serial number, Certutil lists all certificates that are trusted by the local computer for that store.
The package may fail to install due to certificate chaining errors, even if the signing certificate is not self-signed and the root certificate is in the root store of the local computer. In this case, there might be an issue with trust for the intermediate certificate authorities. For more info about this issue, see Working with Certificates.
Remarks
If you determined that the package couldn’t be deployed because the signing certificate isn’t trusted, don’t install the package unless you know where it originated and you trust it.
If you want to manually trust the app for install (for example, to install your own test-signed app package), you can manually add the certificate to the local computer certificate trust from the app package.
To manually add the certificate to the local computer certificate trust
- In File Explorer, right-click on the app package, and in the pop-up context menu select Properties.
- In the Properties dialog, select the Digital Signatures tab.
- In the Signature list, select the signature and then click the Details button.
- In the Digital Signature Details dialog, click the View Certificate button.
- In the Certificate dialog, click the Install Certificate… button.
- In the Certificate Import Wizard, select Local Machine and then click Next. You will need to grant administrator privileges to continue.
- Select Place all certificates in the following store and browse to the Trusted People store.
- Click Next, then click Finish to complete the wizard.
After this manual addition, you can see that the certificate is now trusted in the Certificate dialog.
You can remove the certificate after you no longer need it.
To remove the certificate
Run Cmd.exe as administrator.
In the administrator command prompt, run this command:
Look for the serial number of the certificate that you installed. This number is the certID.
Run this command:
We recommend that you avoid manually adding root certificates to the local machine Trusted Root Certification Authorities Certificate Store. Having several applications that are signed with certificates that chain to the same root certificate, such as line of business applications, can be more efficient than installing individual certificates to the Trusted People store. The Trusted People store contains certificates that are considered trusted by default and so aren’t verified by higher authorities or certificate trust lists or chains. For considerations around adding certificates to the Trusted Root Certification Authorities certificate store, see Code-Signing Best Practices.
Security Considerations
By adding a certificate to local machine certificate stores, you affect the certificate trust of all users on the computer. We recommend that you install any code signing certificates that you want for testing app packages to the Trusted People certificate store. Promptly remove those certificates when they are no longer necessary, to prevent them from being used to compromise system trust. If you create your own test certificates for signing app packages, we also recommend that you restrict the privileges that are associated with the test certificate. For info about creating test certificates for signing app packages, see How to create an app package signing certificate.
System Error Codes
This section is intended for developers who are debugging system errors. If you reached this page while searching for other errors, here are some links that might help:
- Windows Update errors — For help resolving issues with Windows Update.
- Windows activation errors — For help verifying your copy of Windows.
- Troubleshooting blue screen errors — For help discovering what caused a stop error.
- Microsoft Support — For support with a Microsoft product.
More ways to find an error code
We’ve listed the system error codes in this section, organized by number. If you need more help tracking down a specific error, here are some more recommendations:
- Use the Microsoft Error Lookup Tool.
- Install the Debugging Tools for Windows, load a memory dump file, and then run the !err command.
- Search the Microsoft Protocols site for the raw text or error code. For more information, see [MS-ERREF]: Windows Error Codes.
Third party error codes
Other error codes may be generated by third party services or apps (for example, Error Code: -118 may be displayed by the Steam game service) and in those situations you would contact the third party’s support line.
System Error Codes
System Error Codes are very broad: each one can occur in one of many hundreds of locations in the system. Consequently, the descriptions of these codes cannot be very specific. Use of these codes requires some amount of investigation and analysis. You need to note both the programmatic and the runtime context in which these errors occur.
Because these codes are defined in WinError.h for anyone to use, sometimes the codes are returned by non-system software. And sometimes the code is returned by a function deep in the stack and far removed from code that is handling the error.
The following topics provide lists of system error codes. These values are defined in the WinError.h header file.
Исправление ошибки 0xc0000428 при запуске или установке Windows
Пользователи ОС Windows знакомы с различными видами ошибок, в том числе критических, вследствие которых возникают знаменитые чёрные и синие «экраны смерти». Неполадки могут появляться при старте системы, во время работы, обновления или на разных этапах установки и могут быть вызваны программным либо аппаратным сбоем, при этом в большинстве случаев проблема легко решаема без привлечения к процессу специалистов. Сообщение, сопровождающееся кодом ошибки, отчасти помогает определить природу сбоя и устранить неисправность, хотя не всегда текст, описывающий ошибку достаточно информативен.
Например, нередко при запуске или установке Windows 7, 8, 10 возникает ошибка с кодом 0xc0000428, препятствующая дальнейшим действиям. Иногда сообщение даже указывает на проблемный файл и его расположение, а в сведениях о произошедшей ошибке можно увидеть пояснение к ней – «Системе не удаётся проверить цифровую подпись этого файла» или другую информацию. Когда сбойный файл не указывается, решение задачи усложняется. Почему появляется проблема и как от неё избавиться мы и рассмотрим.
Причины ошибки
Возникает BSOD ошибка 0xc0000428 спонтанно, часто на завершающем этапе установки Windows и при загрузке компонентов системы. В этом чаще всего виновен файл oem-drv64.sys, препятствующий процедуре ввиду отсутствия цифровой подписи, которую проверяет ОС. Иногда корректной установке может помешать неправильно заданный в BIOS режим, тогда его нужно будет поменять. Настройки могут слетать, что затем приводит ПК в состояние ошибки, код 0xc0000428. Кроме того, сбой может возникать, когда на компьютере стоит две операционные системы.
Ошибка 0xc0000428 может быть спровоцирована такими факторами:
- Попытка инсталляции нелегальной версии Windows.
- На одном из драйверов отсутствует цифровая подпись.
- Установка неподписанных драйверов на виртуальные машины, эмулирующие операционную систему.
- Отсутствие или повреждение драйвера, несоответствие версии ОС.
- Использование готовых .reg-файлов, позволяющих вносить изменения в реестр зависимо от внутреннего кода (твики реестра).
- Повреждение загрузчика.
От причины, по которой возникла ошибка 0xc0000428, напрямую зависит способ устранения проблемы. Поскольку знакомство с данным сбоем, как и с любым подобным, ничего хорошего не сулит, и проигнорировать его не получится, вопрос нужно решать путём выяснения и устранения источника этого явления.
Исправление ошибки 0xc0000428 при запуске Windows 10
Если проблема состоит в том, что в загрузке имеется элемент, не имеющий цифровой подписи, что проверяется системой, информация об этом появится в сообщении. Проверку идентификатора драйверов при загрузке Windows 7, 8, 10 можно отключить однократно или на всё последующее время работы системы, что часто помогает решить проблему. Иногда пользователь также видит и сведения о местонахождении некорректного системного файла, так что сбой можно устранить и путём его удаления. Таким образом, есть несколько вариантов устранения неисправности.
Однократное отключение проверки подлинности цифровой подписи
Рассмотрим сначала, как исправить ошибку 0xc0000428 при запуске Windows 7:
- Перезагружаем систему любым способом и жмём F8 до появления окна с выбором режима загрузки. Если это ноутбук, может потребоваться одновременное нажатие клавиш Fn+F
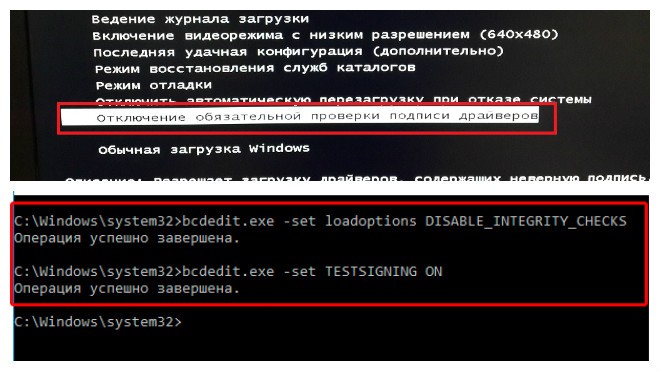
- Выбираем строчку «Отключение обязательной проверки подписи драйверов» или «Disable Driver Signature Enforcement» и нажимаем «Enter».
Выбор варианта загрузки Windows
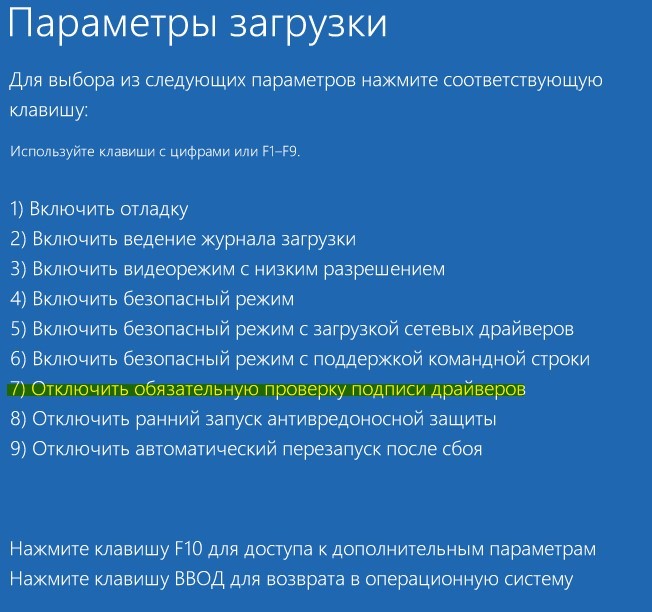
Шаги по устранению проблемы на Windows 10 и 8:
- Для доступа к параметрам загрузки жмём F8 или, если у вас ноутбук, Fn+F
- Выбираем пункт 7 – «Отключить обязательную проверку подписи драйверов», для чего нажимает клавишу F7 или Fn+F Также можно нажимать 7 в верхнем ряду цифр.
Удаление проблемного файла
Далее следует удалить с жёсткого диска драйвер, создавший неприятность:
- Перезагружаем ПК и идём в параметры загрузки (F8).
- Жмём «Безопасный режим».
- Следуем по указанному в информации, сопровождающей ошибку, адресу (обычно это windows\system32\drivers\) и удаляем драйвер oem-drvsys.
Потребуется перезагрузка, после чего система запросит восстановление средствами Windows, и активация ОС. Если в сведениях об ошибке был указан другой файл, нужно найти и установить подходящий драйвер. При удалении драйвера oem-drv64.sys бывают нередкими проблемы с активацией системы, реже с пуском, поэтому может потребоваться отключить проверку цифровой подписи в принципе.
*После старта также нужно будет обратиться к редактору реестра (вызываем консоль «Выполнить», удерживая клавиши Win+R, вводим команду regedit) и удалить
HKEY_LOCAL_MACHINE\SYSTEM\CurrentControlSet\services\oem-drv64.
Отключение проверки идентификатора драйверов на постоянной основе
С этой целью часто применяют сторонний софт, но можно также осуществить процедуру вручную:
- Запускаем командную строку на правах администратора.
- В ней прописываемexe /set nointegritychecks on.
- Перезагружаем компьютер, затем идём в BIOS/UEFU.
- Здесь отключаем опцию Secure Boot, если она включена (переводим в положение Disabled).
Отключение обязательной проверки подписи драйверов
Восстановление при загрузке
Все вышеописанные действия эффективны, когда речь не идёт о повреждении загрузчика системы. Если проблема не была решена, восстановление загрузчика Windows можно выполнить, применив загрузочную флешку с соответствующей версией ОС или диск, для чего нажать внизу справа «Восстановление системы», выбрать из меню «Выбор действия», «Поиск и устранение неисправностей», затем переходим в «Дополнительные параметры» и жмём «Восстановление при загрузке».
Как альтернативный вариант можно прибегнуть к возврату к созданной ранее точке восстановления Windows. Если таковые имеются, их можно найти в параметрах, загрузившись с флешки с ОС и нажав «Восстановление системы», после чего перейдя по меню. Того же эффекта можно добиться, используя командную строку с правами администратора, в консоли потребуется ввести команду rstrui.
Ошибка 0xc0000428 при установке Windows 10
Причины, почему система не устанавливается и на одном из этапов процесса появляется BSOD, могут быть разными. От провоцирующего фактора, в результате которого возникла ошибка 0xc0000428 при установке ОС Windows 10, напрямую зависит, какой из способов будет эффективен. Если сбой сопровождается сообщением с указанием сбойного элемента, который не проходит проверку цифровой подписи, инструкция по устранению проблемы та же, что и в предыдущем случае, когда система не запускается. Когда же источник неприятности неизвестен, придётся его искать.
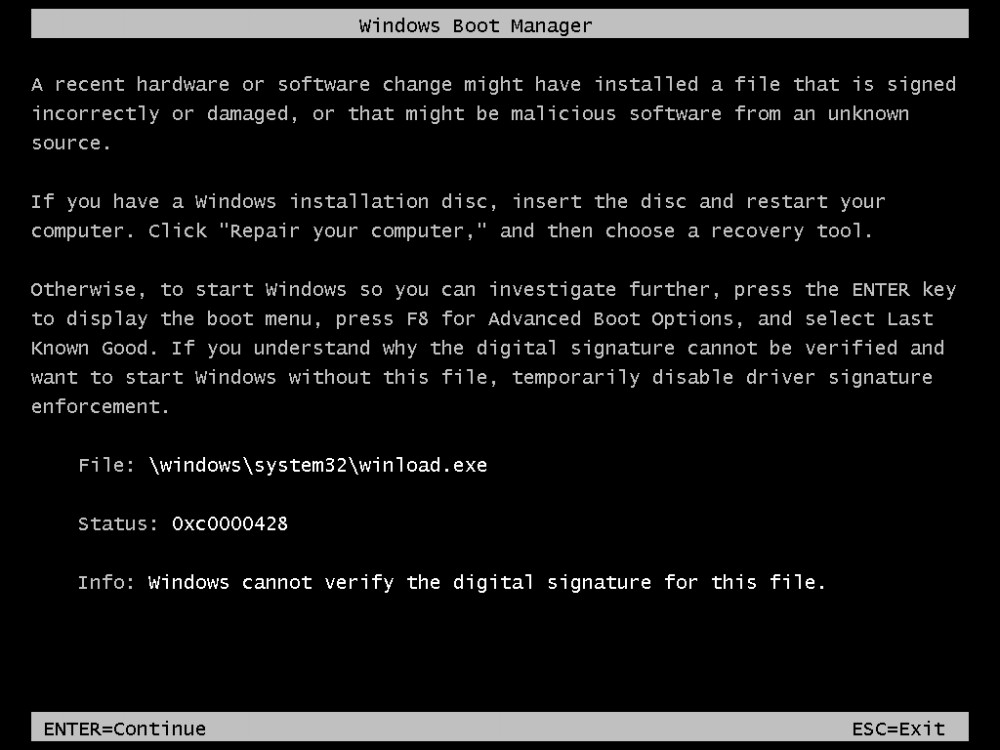
Вывод ошибки 0xc0000428 во время загрузки Виндовс
Варианты, как исправить сбой с кодом 0xc0000428 при установке Windows 10:
- Иногда мешает процессу неправильно заданный режим в BIOS, для чего необходимо поменять его на UEFI (идём в BIOS – «Boot» – «Boot Menu», здесь выставляем «UEFI»).
- Ошибка нередко бывает спровоцирована криво записанным образом на накопитель. Тогда необходимо перезаписать флешку. Например, если проблема возникла при использовании мультизагрузочного накопителя с загрузчиком Grub4DOS, стоит записать иным способом.
- Иногда также помогает отключение Secure Boot в BIOS.
- Исправление ошибки 0xc0000428, появившейся при перезагрузке системы на начальном этапе процесса установки, может заключаться в удалении раздела с загрузчиком предыдущей ОС (если стояла ранее), или, если Windows 10 устанавливается на отформатированный диск, тогда нужно использовать другой образ системы.
- В некоторых случаях исправить ошибку можно путём возврата к предыдущей версии операционной системы и повторной инсталляции.
Все вышеизложенные способы устранения сбоя с кодом 0xc0000428 при установке Windows эффективны в тех или иных ситуациях, при этом иногда, например, при невозможности установить причину явления или необходимости повторной записи образа, решение вопроса может занять немало времени. Как правило, после устранения проблема больше не возникает.


