- Dynamic-Link Library Search Order
- Factors That Affect Searching
- Search Order for UWP apps
- Standard Search Order for UWP apps
- Alternate Search Order for UWP apps
- Search Order for Desktop Applications
- Standard Search Order for Desktop Applications
- Alternate Search Order for Desktop Applications
- Search Order Using LOAD_LIBRARY_SEARCH Flags
- IT-блог о веб-технологиях, серверах, протоколах, базах данных, СУБД, SQL, компьютерных сетях, языках программирования и создание сайтов.
- Как настроить и добавить путь к программе в системную переменную Path в Windows 10, Windows 8 и Windows 7
- Что такое переменная Path и зачем она нужна в Windows. Зачем нужно добавлять путь?
- Как добавить путь к программе в системную переменную Path в Windows 10 и Windows 8
- Как настроить переменную Path в Windows 7
- Выводы
Dynamic-Link Library Search Order
A system can contain multiple versions of the same dynamic-link library (DLL). Applications can control the location from which a DLL is loaded by specifying a full path or using another mechanism such as a manifest. If these methods are not used, the system searches for the DLL at load time as described in this topic.
Factors That Affect Searching
The following factors affect whether the system searches for a DLL:
- If a DLL with the same module name is already loaded in memory, the system checks only for redirection and a manifest before resolving to the loaded DLL, no matter which directory it is in. The system does not search for the DLL.
- If the DLL is on the list of known DLLs for the version of Windows on which the application is running, the system uses its copy of the known DLL (and the known DLL’s dependent DLLs, if any) instead of searching for the DLL. For a list of known DLLs on the current system, see the following registry key: HKEY_LOCAL_MACHINE\SYSTEM\CurrentControlSet\Control\Session Manager\KnownDLLs.
- If a DLL has dependencies, the system searches for the dependent DLLs as if they were loaded with just their module names. This is true even if the first DLL was loaded by specifying a full path.
Search Order for UWP apps
When a UWP app for Windows 10 (or a Store app for Windows 8.x) loads a packaged module by calling the LoadPackagedLibrary function, the DLL must be in the package dependency graph of the process. For more information, see LoadPackagedLibrary. When a UWP app loads a module by other means and does not specify a full path, the system searches for the DLL and its dependencies at load time as described in this section.
Before the system searches for a DLL, it checks the following:
- If a DLL with the same module name is already loaded in memory, the system uses the loaded DLL, no matter which directory it is in. The system does not search for the DLL.
- If the DLL is on the list of known DLLs for the version of Windows on which the application is running, the system uses its copy of the known DLL (and the known DLL’s dependent DLLs, if any). The system does not search for the DLL. For a list of known DLLs on the current system, see the following registry key: HKEY_LOCAL_MACHINE\SYSTEM\CurrentControlSet\Control\Session Manager\KnownDLLs.
If the system must search for a module or its dependencies, it always uses the search order for UWP apps even if a dependency is not UWP app code.
Standard Search Order for UWP apps
If the module is not already loaded or on the list of known DLLs, the system searches these locations in this order:
- The package dependency graph of the process. This is the application’s package plus any dependencies specified as
in the section of the application’s package manifest. Dependencies are searched in the order they appear in the manifest.
If a DLL has dependencies, the system searches for the dependent DLLs as if they were loaded with just their module names. This is true even if the first DLL was loaded by specifying a full path.
Alternate Search Order for UWP apps
If a module changes the standard search order by calling the LoadLibraryEx function with LOAD_WITH_ALTERED_SEARCH_PATH, the system searches the directory the specified module was loaded from instead of the directory of the calling process. The system searches these locations in this order:
- The package dependency graph of the process. This is the application’s package plus any dependencies specified as
in the section of the application’s package manifest. Dependencies are searched in the order they appear in the manifest.
Search Order for Desktop Applications
Desktop applications can control the location from which a DLL is loaded by specifying a full path, using DLL redirection, or by using a manifest. If none of these methods are used, the system searches for the DLL at load time as described in this section.
Before the system searches for a DLL, it checks the following:
- If a DLL with the same module name is already loaded in memory, the system uses the loaded DLL, no matter which directory it is in. The system does not search for the DLL.
- If the DLL is on the list of known DLLs for the version of Windows on which the application is running, the system uses its copy of the known DLL (and the known DLL’s dependent DLLs, if any). The system does not search for the DLL. For a list of known DLLs on the current system, see the following registry key: HKEY_LOCAL_MACHINE\SYSTEM\CurrentControlSet\Control\Session Manager\KnownDLLs.
If a DLL has dependencies, the system searches for the dependent DLLs as if they were loaded with just their module names. This is true even if the first DLL was loaded by specifying a full path.
If an attacker gains control of one of the directories that is searched, it can place a malicious copy of the DLL in that directory. For ways to help prevent such attacks, see Dynamic-Link Library Security.
Standard Search Order for Desktop Applications
The standard DLL search order used by the system depends on whether safe DLL search mode is enabled or disabled. Safe DLL search mode places the user’s current directory later in the search order.
Safe DLL search mode is enabled by default. To disable this feature, create the HKEY_LOCAL_MACHINE\System\CurrentControlSet\Control\Session Manager\SafeDllSearchMode registry value and set it to 0. Calling the SetDllDirectory function effectively disables SafeDllSearchMode while the specified directory is in the search path and changes the search order as described in this topic.
If SafeDllSearchMode is enabled, the search order is as follows:
- The directory from which the application loaded.
- The system directory. Use the GetSystemDirectory function to get the path of this directory.
- The 16-bit system directory. There is no function that obtains the path of this directory, but it is searched.
- The Windows directory. Use the GetWindowsDirectory function to get the path of this directory.
- The current directory.
- The directories that are listed in the PATH environment variable. Note that this does not include the per-application path specified by the App Paths registry key. The App Paths key is not used when computing the DLL search path.
If SafeDllSearchMode is disabled, the search order is as follows:
- The directory from which the application loaded.
- The current directory.
- The system directory. Use the GetSystemDirectory function to get the path of this directory.
- The 16-bit system directory. There is no function that obtains the path of this directory, but it is searched.
- The Windows directory. Use the GetWindowsDirectory function to get the path of this directory.
- The directories that are listed in the PATH environment variable. Note that this does not include the per-application path specified by the App Paths registry key. The App Paths key is not used when computing the DLL search path.
Alternate Search Order for Desktop Applications
The standard search order used by the system can be changed by calling the LoadLibraryEx function with LOAD_WITH_ALTERED_SEARCH_PATH. The standard search order can also be changed by calling the SetDllDirectory function.
The standard search order of the process will also be affected by calling the SetDllDirectory function in the parent process before start of the current process.
If you specify an alternate search strategy, its behavior continues until all associated executable modules have been located. After the system starts processing DLL initialization routines, the system reverts to the standard search strategy.
The LoadLibraryEx function supports an alternate search order if the call specifies LOAD_WITH_ALTERED_SEARCH_PATH and the lpFileName parameter specifies an absolute path.
Note that the standard search strategy and the alternate search strategy specified by LoadLibraryEx with LOAD_WITH_ALTERED_SEARCH_PATH differ in just one way: The standard search begins in the calling application’s directory, and the alternate search begins in the directory of the executable module that LoadLibraryEx is loading.
If SafeDllSearchMode is enabled, the alternate search order is as follows:
- The directory specified by lpFileName.
- The system directory. Use the GetSystemDirectory function to get the path of this directory.
- The 16-bit system directory. There is no function that obtains the path of this directory, but it is searched.
- The Windows directory. Use the GetWindowsDirectory function to get the path of this directory.
- The current directory.
- The directories that are listed in the PATH environment variable. Note that this does not include the per-application path specified by the App Paths registry key. The App Paths key is not used when computing the DLL search path.
If SafeDllSearchMode is disabled, the alternate search order is as follows:
- The directory specified by lpFileName.
- The current directory.
- The system directory. Use the GetSystemDirectory function to get the path of this directory.
- The 16-bit system directory. There is no function that obtains the path of this directory, but it is searched.
- The Windows directory. Use the GetWindowsDirectory function to get the path of this directory.
- The directories that are listed in the PATH environment variable. Note that this does not include the per-application path specified by the App Paths registry key. The App Paths key is not used when computing the DLL search path.
The SetDllDirectory function supports an alternate search order if the lpPathName parameter specifies a path. The alternate search order is as follows:
- The directory from which the application loaded.
- The directory specified by the lpPathName parameter of SetDllDirectory.
- The system directory. Use the GetSystemDirectory function to get the path of this directory. The name of this directory is System32.
- The 16-bit system directory. There is no function that obtains the path of this directory, but it is searched. The name of this directory is System.
- The Windows directory. Use the GetWindowsDirectory function to get the path of this directory.
- The directories that are listed in the PATH environment variable. Note that this does not include the per-application path specified by the App Paths registry key. The App Paths key is not used when computing the DLL search path.
If the lpPathName parameter is an empty string, the call removes the current directory from the search order.
SetDllDirectory effectively disables safe DLL search mode while the specified directory is in the search path. To restore safe DLL search mode based on the SafeDllSearchMode registry value and restore the current directory to the search order, call SetDllDirectory with lpPathName as NULL.
Search Order Using LOAD_LIBRARY_SEARCH Flags
An application can specify a search order by using one or more LOAD_LIBRARY_SEARCH flags with the LoadLibraryEx function. An application can also use LOAD_LIBRARY_SEARCH flags with the SetDefaultDllDirectories function to establish a DLL search order for a process. The application can specify additional directories for the process DLL search order by using the AddDllDirectory or SetDllDirectory functions.
The directories that are searched depend on the flags specified with SetDefaultDllDirectories or LoadLibraryEx. If more than one flag is used, the corresponding directories are searched in the following order:
- The directory that contains the DLL (LOAD_LIBRARY_SEARCH_DLL_LOAD_DIR). This directory is searched only for dependencies of the DLL to be loaded.
- The application directory (LOAD_LIBRARY_SEARCH_APPLICATION_DIR).
- Paths explicitly added with the AddDllDirectory function (LOAD_LIBRARY_SEARCH_USER_DIRS) or the SetDllDirectory function. If more than one path has been added, the order in which the paths are searched is unspecified.
- The System directory (LOAD_LIBRARY_SEARCH_SYSTEM32).
If the application does not call LoadLibraryEx with any LOAD_LIBRARY_SEARCH flags or establish a DLL search order for the process, the system searches for DLLs using either the standard search order or the alternate search order.
IT-блог о веб-технологиях, серверах, протоколах, базах данных, СУБД, SQL, компьютерных сетях, языках программирования и создание сайтов.
Как настроить и добавить путь к программе в системную переменную Path в Windows 10, Windows 8 и Windows 7
Привет, посетитель сайта ZametkiNaPolyah.ru! Продолжим разбираться с командами и системными утилитами в операционной системе Windows 10, на этот раз будет разговор о переменной PATH в Windows. Всё дело в том, что системная переменная PATH дает нам возможность расширить список команд командной строки Windows, как это сделать, вы узнаете из этой публикации. Здесь мы с вами поговорим о назначении системной переменной PATH, а также разберемся с вопросом: как добавить путь к исполняемому файлу в системную переменную PATH в операционных системах Windows 10, Windows 8 и Windows 7. Этой публикацией можно пользоваться как простой инструкцией по добавлению значений в переменную PATH для Windows.
Если вам интересна тема компьютерных сетей, то в блоге уже практически закончена первая часть курса по основам компьютерных сетей, можете ознакомиться с ее содержимым. И вот здесь можно получить немного информации о самом курсе.
Что такое переменная Path и зачем она нужна в Windows. Зачем нужно добавлять путь?
PATH – это системная переменная окружения Unix-подобных (например, Linux Mint) операционных систем, а также операционных систем семейства Windows. В переменной PATH нет ничего сложно и хитрого, это обыкновенный список папок и каталогов, в которых лежат исполняемые файлы (программы). Программы, путь к исполняемым файлом которых задан в системной переменной PATH, могут быть исполнены (запущены) непосредственно из командной строки Windows и из любого места вашей файловой системы (в Linux тоже есть командная строка, но ее лучше называть эмулятор терминала).
Давайте лучше посмотрим на примере зачем нужна переменная PATH в операционных системах семейства Windows (как, впрочем, и в других семействах). Смотреть будем на примере сторонней утилиты командной строки Windows tracetcp.exe. Она у меня установлена по следующему пути: c:\Program Files\tracetcp\. Запустим командую строку Windows и попробуем выполнить команду tracetcp.
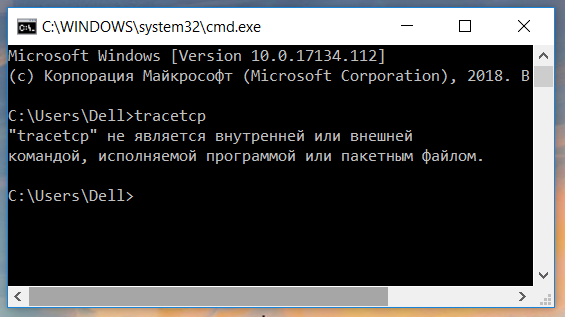
Пробуем запустить стороннюю утилиту командной строки Windows
Обратите внимание на то, что командная строка не смогла выполнить команду tracetcp, хотя приложение и установлено на мой компьютер, проблема заключается в том, что командная строка не смогла найти исполняемый файл tracetcp.exe. Но где командная строка его искала? Она искала этот файл в текущем каталоге, то есть в данном случае в каталоге: c:\Users\Dell, там этого файла не оказалось, затем командная строка обратилась к переменной PATH, там она не обнаружила пути к исполняемому файлу tracetcp.exe, но обнаружила путь к папке System32, проверила, что в этой папке также нет файла tracetcp.exe и выдала нам предупреждение: «»tracetcp» не является внутренней или внешней командой, исполняемой программой или пакетным файлом.».
Поскольку мы находились в папке, отличной от той, где находится файл tracetcp.exe, а пути в переменной PATH к этому файлу не оказалось, командная строка просто не смогла его найти, чтобы исполнить, давайте всё-таки его запустим, для этого нужно будет перейти в папку c:\Program Files\tracetcp при помощи команды cd (в операционных системах Linux тоже есть команда cd и работает она аналогично), а затем запустить утилиту.
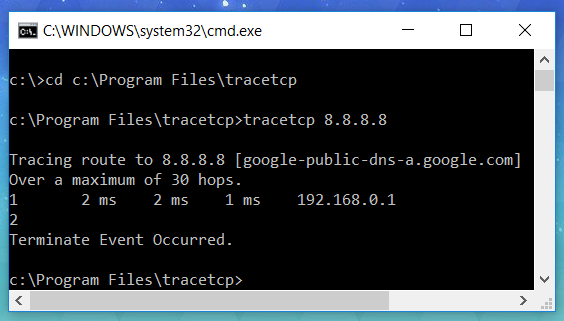
Запуск исполняемого файла в командной строке Windows
Теперь командная строка Windows смогла запустить нашу утилиту, поскольку смогла найти исполняемый файл tracetcp.exe, но каждый раз переходить в папку, где лежит исполняемый файл или каждый раз указывать абсолютный путь к исполняемому файлу — это очень неудобно, будет гораздо лучше, если мы укажем путь к исполняемому файлу в переменной PATH, тогда командная строка будет самостоятельно его находить в любое время и в любом месте.
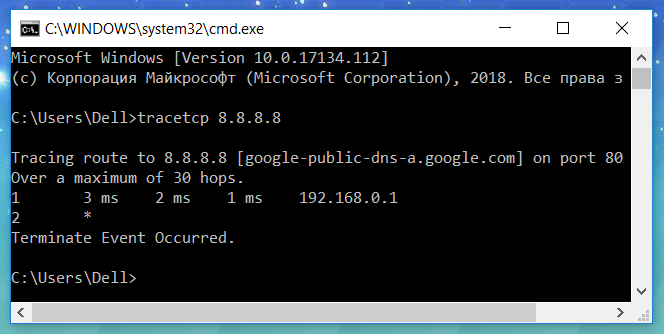
Исполняемый файл был запущен, поскольку путь до него был добавлен в системную переменную Path
На рисунке выше показано, что командная строка смогла запустить приложение из домашней папки пользователя, но это лишь благодаря тому, что я добавил путь исполняемому файлу в переменную PATH, теперь команда tracetcp будет работать из любой другой папки. Утилита tracetcp довольно простое приложение, представляющее собой один исполняемый файл — tracetcp.exe, можно было бы не прописывать путь в переменную PATH, а просто скопировать этот файл в папку System32, но устанавливать сторонние и непроверенные приложения, не требующие наличия файлов в System32, не самая хорошая и безопасная затея. В Windows лучше потратить немного времени на то, чтобы добавить путь к файлу в переменную PATH, о том как это сделать мы и поговорим ниже, рассмотрев этот процесс для операционных систем Windows 10, Windows 8 и Windows 7.
Как добавить путь к программе в системную переменную Path в Windows 10 и Windows 8
Добавление пути к программе в системную переменную PATH в операционных системах Windows 10 и Windows 8 делается по одному алгоритму, показывать я буду на примере Windows 10, так как восьмерки под рукой нет. Ранее мы уже видели, что небольшая утилита tracetcp запускалась из командной строки Windows только в том случае, если мы переходили в ту папку, в которую она установлена. Но это легко исправить, просто добавив полный путь к исполняемому файлу tracetcp.exe в системную переменную PATH. Давайте это и сделаем. Описывать процесс добавления значения в переменную PATH буду буквально по шагам и с демонстрацией скриншотов окон в Windows 10. Хотя сперва я напишу сам алгоритм, если его не хватит, то обратитесь к скриншотам ниже:
- Открываем поиск и пишем: «Система» или «Панель управления».
- Появится окно, в левом верхнем углу которого есть небольшое меню и пункт «Дополнительные параметры системы».
- Появится окно поменьше, в нижнем правом углу есть кнопка «Переменные среды. ».
- Откроется окно управления переменными средами в Windows 10.
- Нас интересует переменная PATH, которая находится в разделе «Системные переменные», нажимаем на нее два раза.
- Появится окно для редактирования значений переменной PATH, чтобы добавить новое значение воспользуйтесь кнопкой «Создать».
- Подтвердите добавление нового значения в переменную PATH нажатием кнопки «Ок» и закройте все остальные окна.
- Если во время редактирования переменной PATH у вас была запущена командная строка Windows, то закройте ее и откройте заново, чтобы cmd.exe прочитала новое значение переменной PATH.
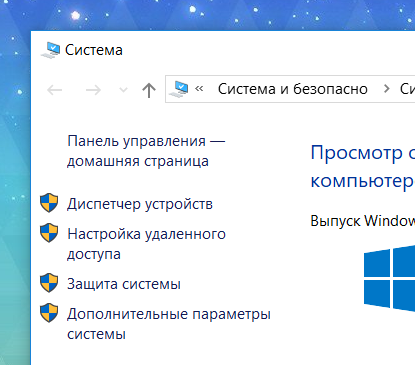
Открываем поиск Windows и в форму пишем: «Система» или «Панель управления». В результате вы должны увидеть примерно такой результат, как показано на рисунке ниже.

Используем поиск Windows, ищем по ключевому слову Система
После того, как вы нажмете на кнопку «Система», у вас появится окно, в левой части которого есть небольшое меню, самым нижним пунктом этого меню будет «Дополнительные параметры системы».
Чтобы добавить значение в переменную PATH переходим во вкладку Дополнительные параметры системы
После перехода у вас появится окно поменьше, в этом окне нас интересует вкладка «Дополнительно». В правом нижнем углу есть кнопка «Переменные среды. », на нее и нажимаем.
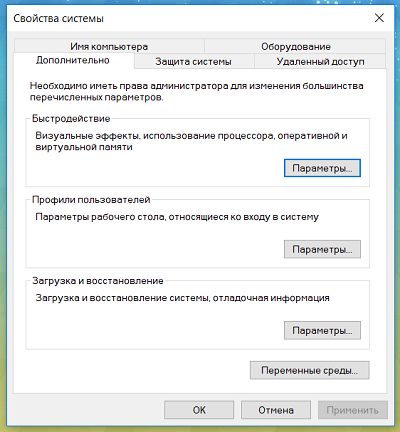
Нажимаем на кнопку Переменные среды
Появится еще одно окно, которое позволяет управлять системными переменными Windows 10. Обратите внимание: в это окно разделено на две части, в верхней части происходит управление переменными среды для текущего пользователя, в нижней части расположены системные переменные.
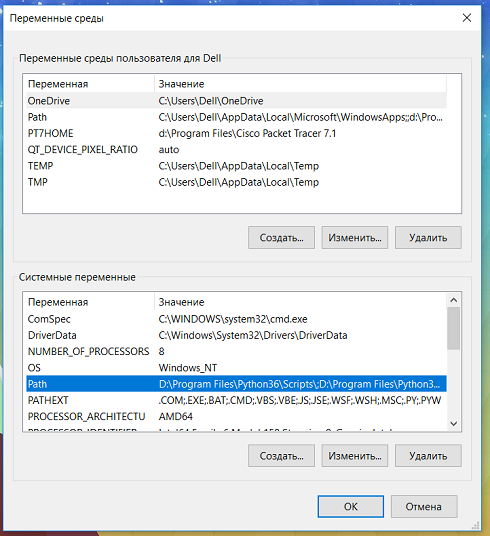
В разделе Системные перемененные ищем переменную PATH
В данном случае нас будет интересовать переменная Path, которая находится в разделе «Системные переменные», кликаем на нее два раза, у нас появляется окно, которое позволяет удалять, добавлять и редактировать значения системной переменной Path в Windows 10 и Windows 8. Нам осталось выполнить два действия: нажать на кнопку создать, в появившуюся активную форму вписать путь к файлу tracetcp.exe и подтвердить свои действия нажатием клавиши «Ок».
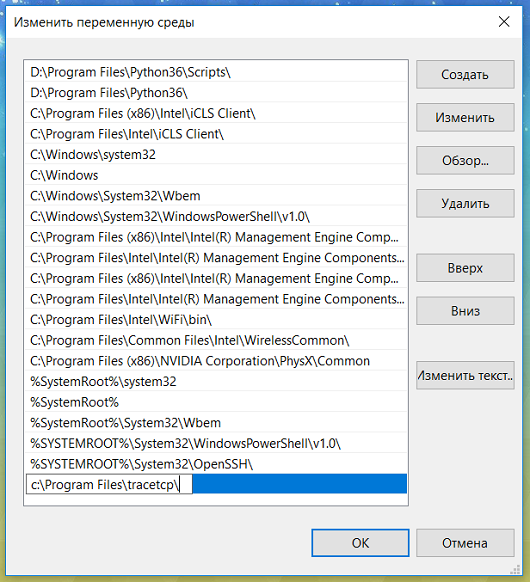
Дбовляем путь к исполняемому файлу в системную переменную PATH в Windows 10
Закройте все остальные окна. Если у вас была открыта командная строка, вы можете убедиться в том, что она не увидела новое значение переменной PATH, попробуйте выполнить tracetcp из корня диска C, ничего не сработает. Когда вы добавляете новый путь в переменную PATH, программе cmd.exe нужно перечитать значения этой переменной, самый простой способ заключается в том, чтобы закрыть и заново открыть командую строку. Теперь команда tracetcp работает из любой папки, аналогично можно поступать и с другими программами командной строки, которые вы устанавливаете в Windows.
Как настроить переменную Path в Windows 7
К сожалению, у меня не осталось скриншотов, на которых можно было бы продемонстрировать добавление пути в системную переменную PATH на Windows 7, поэтому здесь будет только пошаговый алгоритм добавления значения в переменную PATH:
- На вашем рабочем столе есть икнока с названием «Компьютер» или «Мой компьютер», нажмите на нее правой кнопкой мыши.
- Появится контекстное меню, в самом низу которого есть пункт «Свойства», выберете его.
- Перед вам развернется окно, в котором есть пункт меню «Дополнительные параметры системы», его и выбираем.
- В этом окне будет кнопка «Переменные среды», жмем на нее.
- У нас появляется окно управления системными переменными в Windows 7, внизу которого есть список переменных, среди которого нужно найти переменную PATH.
- Если такой переменной нет, то ее нужно создать, воспользовавшись кнопкой создать: у вас появится окно, в котором нужно будет вписать имя новой переменной, в нашем случае это Path.
- Если переменная PATH есть, то ее нужно выделить левой кнопкой мыши и нажать на кнопку изменить: появится небольшое окошко с двумя формами для ввода: верхняя форма содержит имя переменной — это Path. В нижней форме указаны абсолютные пути до исполняемых файлов различных программ, выглядет это примерно так: d:\Program Files\application1\;d:\Program Files\application2\;d:\Program Files\aplication3\; и так далее, чтобы добавить еще одно значение переместитесь в конец строки, убедитесь, что последним символом является «;» (именно этот символ является разделителем), впишите путь к исполняемому файлу (в моем случае он выглядел бы так: с:\Program Files\tracetcp\) и в конце добавьте точку с запятой.
- Подтвердите свои действия нажатием кнопки «Ок» и закройте другие окна.
Как видите, настроить переменную PATH в Windows 7 не так уж и сложно.
Выводы
Вы этой статье мы разобрались с назначение системной переменной PATH и отметили, что в каждой операционной системе оно одинаковое и заключается в том, что переменная PATH является списком каталогов, в котором хранятся исполняемые файлы, если путь к исполняемому файлу есть в переменной PATH, то он может быть исполнен из командной строки операционной системы. Также мы разобрались с тем, как прописать путь к исполняемому файлу в операционных системах Windows 10, 8, 7.


