- View and open SharePoint files with File Explorer
- How to Sync SharePoint files and folders
- What to do if Internet Explorer is your browser
- What’s the difference between Sync and Open With Explorer?
- Windows libraries
- Features for Users
- Features for Administrators
- More about Libraries
- Library Contents
- Default Libraries and Known Folders
- Hiding Default Libraries
- Default Save Locations for Libraries
- Indexing Requirements and “Basic” Libraries
- Folder Redirection
- Supported storage locations
- Library Attributes
View and open SharePoint files with File Explorer
Open with Explorer (in the classic SharePoint experience) and View in File Explorer (in the modern experience) are only available in Internet Explorer 11. These two options aren’t available in other browsers such as Chrome and Microsoft Edge, and this situation won’t change, because the underlying technology doesn’t work in newer browsers.
We recommend using
Sync instead of Open with Explorer
 Sync instead of Open with Explorer
Whether you’re using Chrome, Microsoft Edge, Internet Explorer, or another browser, Sync is a faster and more reliable method for putting SharePoint files into folders you can see in File Explorer.
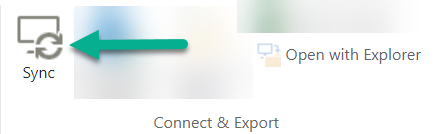
Sync is available on the ribbon, just to the left of Open with Explorer:
How to Sync SharePoint files and folders
Watch a 90-second video about the basics of using Sync on your SharePoint files and folders.
What to do if Internet Explorer is your browser
The «ActiveX» technology underlying Open with Explorer is relatively old and has become less reliable over time. So even in Internet Explorer 11, sometimes the Open with Explorer option is grayed out. If Internet Explorer is your browser, you can use Sync to get more reliable results. See Sync SharePoint and Teams files with your computer for instructions.
However, if you prefer to continue using Open with Explorer, read the following sections of this article. The first section can help you troubleshoot if Open with Explorer is unavailable.
Note: Microsoft 365 apps and services will not support Internet Explorer 11 starting August 17, 2021. Learn more. Please note that Internet Explorer 11 will remain a supported browser. Internet Explorer 11 is a component of the Windows operating system and follows the Lifecycle Policy for the product on which it is installed.
Select a heading below to open it and see the detailed information.
Here are four possible reasons, along with instructions for correcting each problem.
You’re not using a browser that supports ActiveX controls. Open with Explorer works only in Internet Explorer 10 or 11. On Windows 10, Edge is the default browser, but Internet Explorer 11 is also installed. Open with Explorer does not work with Edge, Chrome, or Firefox. You can use Internet Explorer to do your file transfers, and then go back to using your preferred browser (if not IE).
Internet Explorer has ActiveX controls or Add-ons are blocked. In Internet Explorer 11, press ALT+T on the keyboard. In the Tools menu if there’s a check next to ActiveX Filtering, then press X to turn it off. You can also click Tools, click Safety, and then click ActiveX Filtering.
You’re using 64-bit version of Internet Explorer. ActiveX controls are a 32-bit only technology. They don’t run in the 64-bit version of Internet Explorer. In Internet Explorer 11, there is only one browser and it automatically switches to 32-bit for ActiveX controls. However, if you’re using the 64-bit Internet Explorer 10, you must switch to the 32-bit version. To check your version, press ALT+H, and then press A for About Internet Explorer.
The SharePoint add-ons aren’t installed. In Internet Explorer, click Tools, and then click Manage Add-ons. Make sure you have these add-ons installed and enabled:
SharePoint Export Database Launcher
SharePoint OpenDocuments Class
SharePoint Stssync Handler
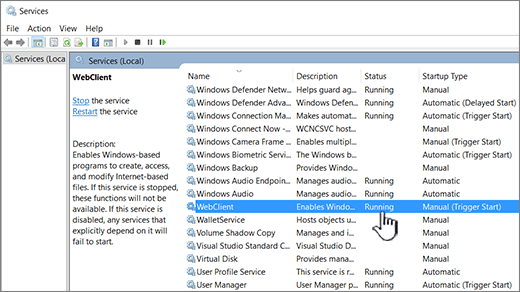
The Windows WebClient isn’t running Windows WebClient provides the support for Windows and the ActiveX control to communicate with SharePoint libraries. By default, it’s on and running in Windows. If it isn’t running, you may have problems using Open with Explorer. The WebClient is part of Internet Explorer. To make sure the WebClient is running, follow these steps.
Press the Windows key + R, type service.msc, and then press Enter.
In the Services dialog box, find WebClient. If you can’t find it, click Name to sort the list alphabetically.
Check under Status to make sure it says Running. If not, right-click WebClient, and select Start.
Note: Your version history is not copied when you use Sync or Open with Explorer. Only the latest or published versions of documents are copied or moved. For more info, see Why doesn’t sync or Open with Explorer copy or move my versioning info?
File Explorer is the Windows file management system you use on the desktop. You can open SharePoint libraries in File Explorer, and move or copy files and folders from your desktop folders to SharePoint. You can also open multiple SharePoint libraries in File Explorer, and copy or move folders between them.
Note: If you have Check out required enabled, you may need to temporarily disable it to download multiple files. For more info, see Set up a library to require check-out of files.
In SharePoint, open the document library with the file or folders you want to move or copy.
Do one of the following:
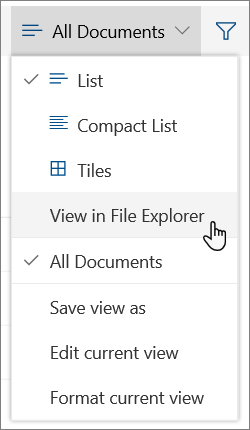
In SharePoint, click the View menu and then click View in File Explorer.
In SharePoint Server 2016, SharePoint Server 2013, or SharePoint Server 2010, click the Library tab, and then click Open with Explorer.

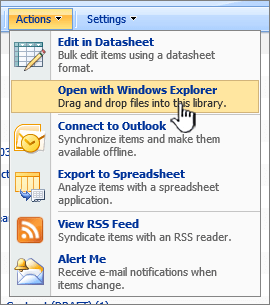
In SharePoint Server 2007, click Actions  , and then click Open in Windows Explorer.
Note: View in File Explorer, Open with Explorer, and Open in Windows Explorer only work with Internet Explorer 10 or 11.
In addition to opening in File Explorer, SharePoint may also open the library in another tab in Classic SharePoint mode. You can ignore or close this library window.
You may get a pop-up asking if you’d rather sync the library. This is up to you. When you open a library in File Explorer, the folder on your desktop is temporary. If you use sync, you’ll get a persistent folder that stays in sync with the document library. For more info, see Sync SharePoint files with the OneDrive sync app.
If you get an Internet Explorer Security dialog, click Allow. You can also click the Do not show me the warning for this program again checkbox.
Open the destination document folder, and repeat step 2.
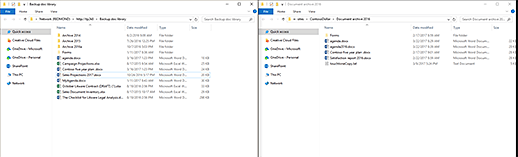
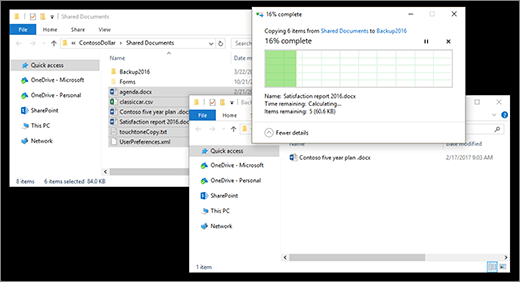
Now that you have both document libraries open in File Explorer—the source and the destination—you can copy or move files and folders between them.
Arrange the two windows so you can copy or move between them. You can display both on the screen with these steps:
Click the source window, and press the Windows key  + Left arrow. The window should dock to the left side of the screen.
Repeat this with the destination window but press Windows key + Right arrow to dock it to the right side of the screen. Both windows should now be visible.
You can also just resize the windows and overlap them.
Do one of the following:
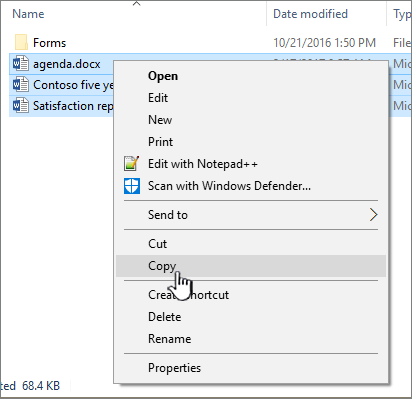
To copy, select the folders and files in the source , right-click, and select Copy, or press Ctrl+C to copy.
To move, select the folders and files in the source, right-click and select Cut, or press Ctrl+X to cut.

If you’re moving files, you can also select and drag the files from one File Explorer window to another, rather than using cut and paste.
Note: If your library uses versioning, you only get the published or the most current documents. You can’t move or copy previous versions. For more info, see Why doesn’t sync or Open with Explorer copy or move my versioning info?
In the destination folder, right-click and select Paste, or press Ctrl+V.
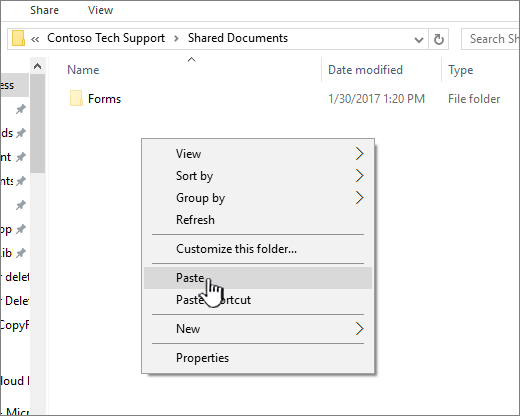
Note: If you don’t see Paste, return to the source folder, highlight the files and folders you want, right-click and select Cut or Copy.
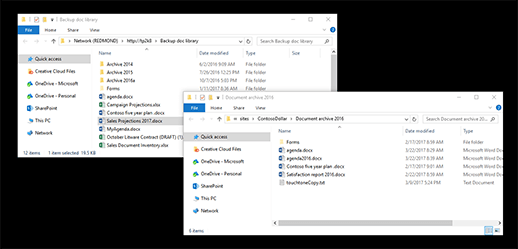
When you’ve copied or moved all the files you want, close both File Explorer windows. Any file or folder changes you’ve made are automatically uploaded to SharePoint.
Return to the destination library in SharePoint. If the new files, folders, or changes haven’t appeared yet, refresh the page.
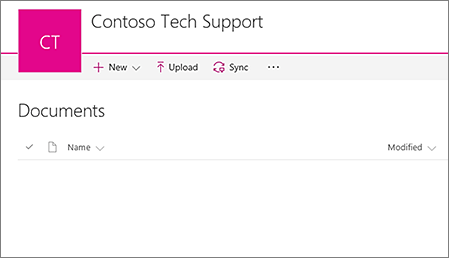
Before copying files
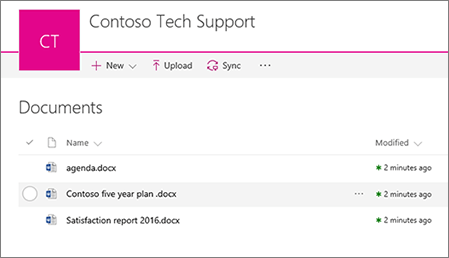
After copying files
In addition to using Open With Explorer, you can also sync the library with your desktop. When you sync, you get a persistent copy of the SharePoint library on your desktop. You can save files directly to the synced folder, and they are automatically uploaded in the SharePoint library it’s synced to.
You can sync either or both your source and destination libraries and work between them as well. For more info, see Sync SharePoint files with the OneDrive sync app.
If you must have versioning information included when you move a file from one SharePoint library to another, use the Move to command. For more details, read on.
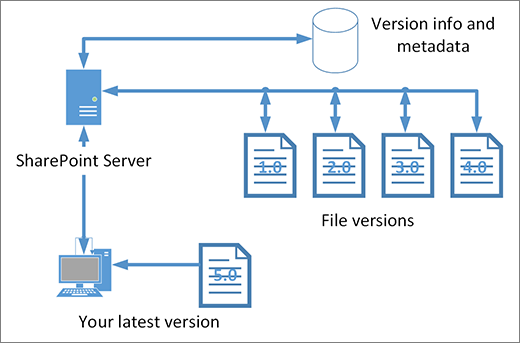
Versioning is part of a SharePoint library. The versions and tracking is stored in the SharePoint data itself, and not in the files. Rather than overwrite older files when you check in a new version, SharePoint stores the older files as well as the newer ones, and differentiates between them with version numbers. The files are still separate, and are tracked in the library, but the versions are only in the SharePoint library.
Sync and Open with Explorer work with files which contain only the metadata that’s needed for that single file, such as modified date or author. When you copy using Open with Explorer, it can only copy or move files and their immediate info. The additional information and other files in SharePoint aren’t included.
If you’re using SharePoint, the Move to command does move the versioning history, as it is working inside the library. Move to retains versioning because only one copy of the file and structure exists. When SharePoint moves a file between folders or libraries with Move To, it includes versions and tracking information.
The SharePoint Copy to command, however, only copies the latest file. This prevents splitting the history between two locations. You can make updates to either file, but the changes are only reflected on that file.
If you’re copying files to keep a backup, and want to preserve the versioning, consider using a SharePoint server based backup rather than manually copying. That way if something happens to your current files, the backup of SharePoint can be retrieved. See Best practices for backing up and restoring in SharePoint Server.
What’s the difference between Sync and Open With Explorer?
Both Sync and Open with Explorer connect a SharePoint library with a folder on your desktop, but there is a difference:
Open with Explorer uses a temporary folder that opens in File Explorer. That folder only lasts until you close it and the content is saved to SharePoint. So Open with Explorer gives you one-time access to the SharePoint library by way of your desktop folders.
Sync uses the OneDrive sync app to create a more permanent folder that you can use on a daily basis. All content that you add to, edit, or remove from either the online SharePoint library or the desktop folder automatically syncs with the other location. For example, once you sync a library, you can save directly from Word or Excel to the desktop folder, and everything is automatically uploaded to the SharePoint library. If you save something to the desktop folder while you’re working offline, Sync will update the SharePoint library as soon as you’re back online.
Windows libraries
Applies to: Windows 10, Windows 8.1, Windows 7, Windows Server 2016, Windows Server 2012 R2, Windows Server 2012, Windows Server 2008 R2
Libraries are virtual containers for users’ content. A library can contain files and folders stored on the local computer or in a remote storage location. In Windows Explorer, users interact with libraries in ways similar to how they would interact with other folders. Libraries are built upon the legacy known folders (such as My Documents, My Pictures, and My Music) that users are familiar with, and these known folders are automatically included in the default libraries and set as the default save location.
Features for Users
Windows libraries are backed by full content search and rich metadata. Libraries offer the following advantages to users:
- Aggregate content from multiple storage locations into a single, unified presentation.
- Enable users to stack and group library contents based on metadata.
- Enable fast, full-text searches across multiple storage locations, from Windows Explorer or from the Start menu.
- Support customized filter search suggestions, based on the types of files contained in the library.
- Enable users to create new libraries and specify which folders they want to include.
Features for Administrators
Administrators can configure and control Windows libraries in the following ways:
- Create custom libraries by creating and deploying Library Description (*.library-ms) files.
- Hide or delete the default libraries. (The Library node itself cannot be hidden or deleted from the Windows Explorer navigation pane.)
- Specify a set of libraries available to Default User, and then deploy those libraries to users that derive from Default User.
- Specify locations to include in a library.
- Remove a default location from a library.
- Remove advanced libraries features, when the environment does not support the local caching of files, by using the Turn off Windows Libraries features that rely on indexed file data Group Policy. This makes all libraries basic (see Indexing Requirements and Basic Libraries), removes libraries from the scope of the Start menu search, and removes other features to avoid confusing users and consuming resources.
More about Libraries
The following is important information about libraries you may need to understand to successfully manage your enterprise.
Library Contents
Including a folder in a library does not physically move or change the storage location of the files or folders; the library is a view into those folders. However, users interacting with files in a library are copying, moving, and deleting the files themselves, not copies of these files.
Default Libraries and Known Folders
The default libraries include:
Libraries are built upon the legacy known folders (such as My Documents, My Pictures, and My Music) that users are familiar with. These known folders are automatically included in the default libraries and set as the default save location. That is, when users drag, copy, or save a file to the Documents library, the file is moved, copied, or saved to the My Documents folder. Administrators and users can change the default save-to location.
Hiding Default Libraries
Users or administrators can hide or delete the default libraries, though the libraries node in the Navigation pane cannot be hidden or deleted. Hiding a default library is preferable to deleting it, as applications like Windows Media Player rely on the default libraries and will re-create them if they do not exist on the computer. See How to Hide Default Libraries for instructions.
Default Save Locations for Libraries
Each library has a default save location. Files are saved or copied to this location if the user chooses to save or copy a file to a library, rather than a specific location within the library. Known folders are the default save locations; however, users can select a different save location. If the user removes the default save location from a library, the next location is automatically selected as the new default save location. If the library is empty of locations or if all included locations cannot be saved to, then the save operation fails.
Indexing Requirements and “Basic” Libraries
Certain library features depend on the contents of the libraries being indexed. Library locations must be available for local indexing or be indexed in a manner conforming to the Windows Indexing Protocol. If indexing is not enabled for one or more locations within a library, the entire library reverts to basic functionality:
- No support for metadata browsing via Arrange By views.
- Grep-only searches.
- Grep-only search suggestions. The only properties available for input suggestions are Date Modified and Size.
- No support for searching from the Start menu. Start menu searches do not return files from basic libraries.
- No previews of file snippets for search results returned in Content mode.
To avoid this limited functionality, all locations within the library must be indexable, either locally or remotely. When users add local folders to libraries, Windows adds the location to the indexing scope and indexes the contents. Remote locations that are not indexed remotely can be added to the local index using Offline File synchronization. This gives the user the benefits of local storage even though the location is remote. Making a folder “Always available offline” creates a local copy of the folder’s files, adds those files to the index, and keeps the local and remote copies in sync. Users can manually sync locations which are not indexed remotely and are not using folder redirection to gain the benefits of being indexed locally.
For instructions on enabling indexing, see How to Enable Indexing of Library Locations.
If your environment does not support caching files locally, you should enable the Turn off Windows Libraries features that rely on indexed file data Group Policy. This makes all libraries basic. For further information, see Group Policy for Windows Search, Browse, and Organize.
Folder Redirection
While library files themselves cannot be redirected, you can redirect known folders included in libraries by using Folder Redirection. For example, you can redirect the “My Documents” folder, which is included in the default Documents library. When redirecting known folders, you should make sure that the destination is either indexed or always available offline in order to maintain full library functionality. In both cases, the files for the destination folder are indexed and supported in libraries. These settings are configured on the server side.
Supported storage locations
The following table show which locations are supported in Windows libraries.
| Supported Locations | Unsupported Locations |
|---|---|
| Fixed local volumes (NTFS/FAT) | Removable drives |
| Shares that are indexed (departmental servers*, WindowsВ home PCs) | Removable media (such as DVDs) Network shares that are accessible through DFS Namespaces or are part of a failover cluster |
| Shares that are available offline (redirected folders that use Offline Files) | Network shares that aren’t available offline or remotely indexed Network Attached Storage (NAS) devices |
| Other data sources: SharePoint, Exchange, etc. |
* For shares that are indexed on a departmental server, Windows Search works well in workgroups or on a domain server that has similar characteristics to a workgroup server. For example, Windows Search works well on a single share departmental server with the following characteristics:
- Expected maximum load is four concurrent query requests.
- Expected indexing corpus is a maximum of one million documents.
- Users directly access the server. That is, the server is not made available through DFS Namespaces.
- Users are not redirected to another server in case of failure. That is, server clusters are not used.
Library Attributes
The following library attributes can be modified within Windows Explorer, the Library Management dialog, or the Library Description file (*.library-ms):
- Name
- Library locations
- Order of library locations
- Default save location
The library icon can be modified by the administrator or user by directly editing the Library Description schema file.
See the Library Description Schema topic on MSDN for information on creating Library Description files.


