- Print list of files from Windows Explorer
- Replies (4)
- Find Specific Files in Windows Explorer with These Search Tips
- Locating Images using Parameters
- Set default in File Explorer to List View in Windows 10
- Replies (53)
- Попробовал Files — файловый менеджер для Windows. Подходит тем, кому надоел стандартный «Проводник»
- Попробовал Files — файловый менеджер для Windows. Подходит тем, кому надоел стандартный «Проводник»
- Что понравилось в файловом менеджере Files
- How to export Explorer file lists to Excel
Print list of files from Windows Explorer
Replies (4)
1
The Quick Way:
Open that folder, press Ctrl + A to select all files
On the Home Ribbon, click Copy Path
Then paste that into a Word Document or Excel Spreadsheet . . .
2.
To list all files in that folder and all sub-folders
Navigate to that folder
In the Address bar of File Explorer, type cmd and hit Enter
That will open Command Prompt in that folder
Paste this command into Command Prompt and hit Enter
dir /a /s /b > filelist.txt
When that command completes, close Command Prompt
There will be a new file in that folder (filelist.txt) and that will contain a complete listing of all files . . .
Power to the Developer!
MSI GV72 — 17.3″, i7-8750H (Hex Core), 32GB DDR4, 4GB GeForce GTX 1050 Ti, 256GB NVMe M2, 2TB HDD
48 people found this reply helpful
Was this reply helpful?
Sorry this didn’t help.
Great! Thanks for your feedback.
How satisfied are you with this reply?
Thanks for your feedback, it helps us improve the site.
How satisfied are you with this reply?
Thanks for your feedback.
![]()
I am an Independent Advisor and will assist you.
Press Fn + PrtScrn or PrtScrn button to take a screen shot of these files
Save the screenshot to your OneDrive Account or Folder you created for Screenshots in Documents.
Right click on the Saved file > Select Print
8 people found this reply helpful
Was this reply helpful?
Sorry this didn’t help.
Great! Thanks for your feedback.
How satisfied are you with this reply?
Thanks for your feedback, it helps us improve the site.
How satisfied are you with this reply?
Thanks for your feedback.
HI Teresa. I’m Greg, an installation specialist, 9 year Windows MVP and Independent Advisor, here to help you.
We used to be able to Ctrl + A and then right click on the group to print a list of files. In Windows 10 it requires a bit more in order to include the full list which a Prt Screen or copy and paste would not include any files needing scrolling.
I hope this helps. Feel free to ask back any questions and let us know how it goes. I will keep working with you until it’s resolved.
______________________________________________
Standard Disclaimer: There are links to non-Microsoft websites. The pages appear to be providing accurate, safe information. Watch out for ads on the sites that may advertise products frequently classified as a PUP (Potentially Unwanted Products). Thoroughly research any product advertised on the sites before you decide to download and install it.
Windows MVP 2010-20
Over 100,000 helped in forums in 10 years
I do not quit for those who are polite and cooperative.
I will walk you through any steps and will not let you fail.
Find Specific Files in Windows Explorer with These Search Tips
Even if you can’t remember its name
Ever lost a file on your PC and just can’t track it down? With the search tips in this article, you’ll be able to find specific files in Windows file explorer, even if you can’t remember the exact name or location.
The more information you know about the file you are looking for the better. You’ll be able to use search parameters like file size, created date, file type, and more by using the tips listed below.
For reference, before we begin, all of the tips listed in this article will be making use of the search function found at the top right of Windows file Explorer.

Hopefully by the time you’ve read all of the tips in this article, you’ll have found a solution to track down your files.
Also, check out my other post on searching Windows using third-party tools or via the command line. Also, in order for all the searches below to work faster, you should have search indexing enabled in Windows.
Locating Images using Parameters
First let’s take a look at the options you have available for tracking down specific images. Below we have a number of tips exclusive for images on your PC.
If you know the dimensions of the image, you can type in width: x, height: x. Simply replace ‘x’ with the exact dimensions.

If you don’t know the exact dimensions, but you know it’s within a certain limit, you can instead use the following search parameters:
- Width: >x for files over a specific width
- Width: x for files over a specific height
- Height: ’ to look for files made before or after specific dates, respectively. An example has been provided below.

If you know the rough file size, you can use the ‘size:’ command to filter out results. You can use the following quick commands for certain sizes:
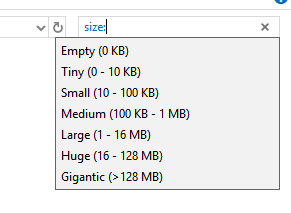
Using these commands is great for smaller files, but for files that are larger than 128MB, you should use a search range. For example, if you know that a file is between 200MB and 300MB, you can use the command: ‘size: 500MB – 800MB’. This will only show the files that are between that range.

Thanks for taking a look at our advanced Windows Explorer file search tips. Remember that you can combine any combination of these search filters in a single search.
If, for example, you are looking for a .png file that is over 1000 pixels wide and you know it was created before the 20th of February 2018, you can use this command: ‘type: .png, width: >1000, date:
Ollie stumbled upon writing online whilst participating in a mobile network forum back in 2011. Since then, he has developed an incredible passion for writing about all sorts of tech from smartphones, PC hardware, software, and everything in between. Read Ollie’s Full Bio
Set default in File Explorer to List View in Windows 10
Replies (53)
* Please try a lower page number.
* Please enter only numbers.
* Please try a lower page number.
* Please enter only numbers.
12 people found this reply helpful
Was this reply helpful?
Sorry this didn’t help.
Great! Thanks for your feedback.
How satisfied are you with this reply?
Thanks for your feedback, it helps us improve the site.
How satisfied are you with this reply?
Thanks for your feedback.
131 people found this reply helpful
Was this reply helpful?
Sorry this didn’t help.
Great! Thanks for your feedback.
How satisfied are you with this reply?
Thanks for your feedback, it helps us improve the site.
How satisfied are you with this reply?
Thanks for your feedback.
I have tried some thing and it seems to work.
Go to the folder that you want, click on View, click on Preview pane then on List.
Then shut down File Explorer and restart.
Get back in and pick the folder in File Explorer and it should be in list view.
This works on each folder by it self. Other folders can be different.
27 people found this reply helpful
Was this reply helpful?
Sorry this didn’t help.
Great! Thanks for your feedback.
How satisfied are you with this reply?
Thanks for your feedback, it helps us improve the site.
How satisfied are you with this reply?
Thanks for your feedback.
I appreciate the answer. I’ve done that about 10,000 times. Yes it may work the next time, but then for reasons I don’t understand, I’ll open up another folder or come back to that folder later and it will be back to the details view. It is very irritating. I have been using Microsoft OS since the DOS days. I’ve seen this problem for decades. I work at a computer all day and have been wasting my time on this for a long time. 🙁
Thanks anyway. It was kind of you to try to help.
67 people found this reply helpful
Was this reply helpful?
Sorry this didn’t help.
Great! Thanks for your feedback.
How satisfied are you with this reply?
Thanks for your feedback, it helps us improve the site.
Попробовал Files — файловый менеджер для Windows. Подходит тем, кому надоел стандартный «Проводник»
Попробовал Files — файловый менеджер для Windows. Подходит тем, кому надоел стандартный «Проводник»
Мне кажется, что «Проводник» сильно отстал от жизни и в плане дизайна, и с точки зрения функциональности. Я пытался выбрать другой файловый менеджер для Windows, но так и не нашёл подходящий вариант. Либо слишком много функций, как в Total Commander, либо отвратительный внешний вид.
А потом я нашёл Files и понял, что это отличная замена стандартному «Проводнику». Для работы с ним не нужно перестраиваться, есть кастомизация и несколько интересных фишек.
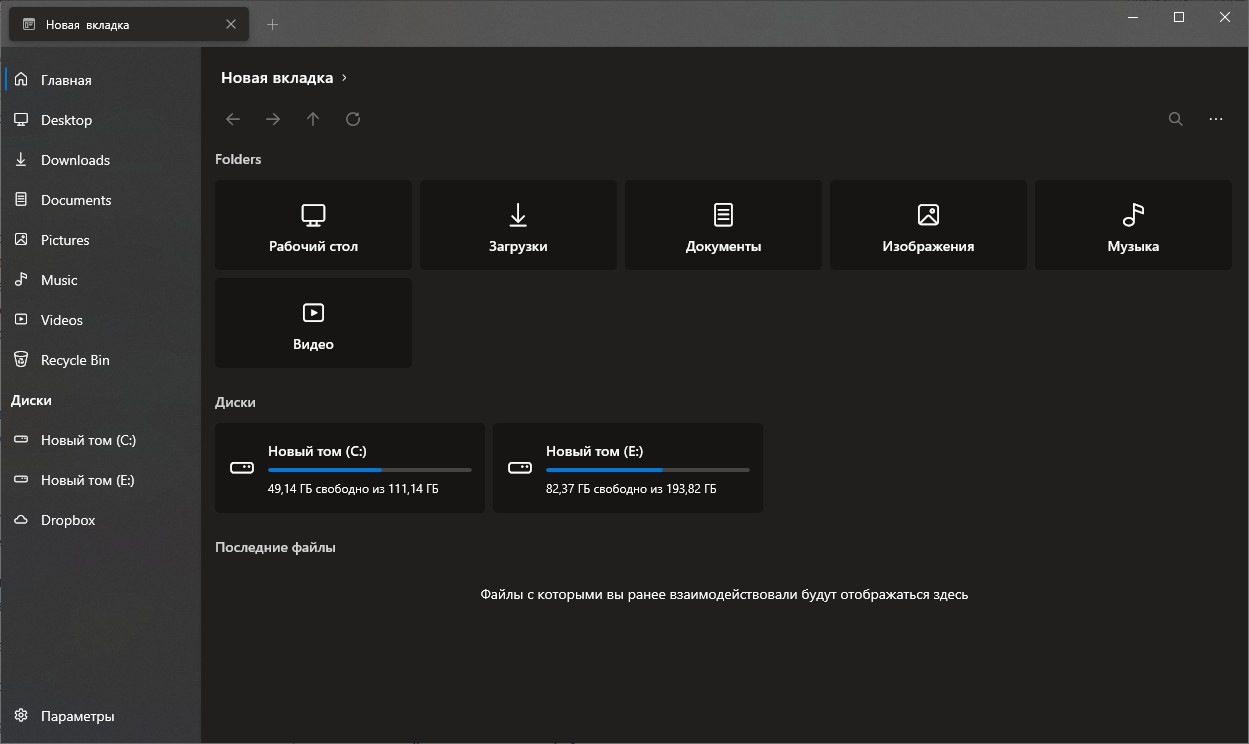
По умолчанию Files открывается на стартовой странице, но можно выбрать любую папку
Files — файловый менеджер с открытым исходным кодом, который использует последние возможности Windows, включая Fluent Design. По функциональности он не сравнится с Total Commander и другими файловыми менеджерами. Но Files неплохо закрывает потребности обычных пользователей.
Что понравилось в файловом менеджере Files
- Есть вкладки, которые обещают добавить в «Проводник» уже больше 3 лет. QTTabBar и Clover всегда казались мне плохой альтернативой.
- Внешний вид — наконец-то Fluent Design.
- Изменение светлой/тёмной темы. Отдельная настройка, только для файлового менеджера, а не для всей Windows.
- Настройки запуска — можно сразу начинать с новой вкладки, открывать определённую папку или продолжить с места, на котором закрыл менеджер.
- Двойная панель — можно открывать все новые вкладки в ней по умолчанию или выбирать этот режим вручную.
- Опция «Открыть в терминале» — можно выбрать CMD или PowerShell.
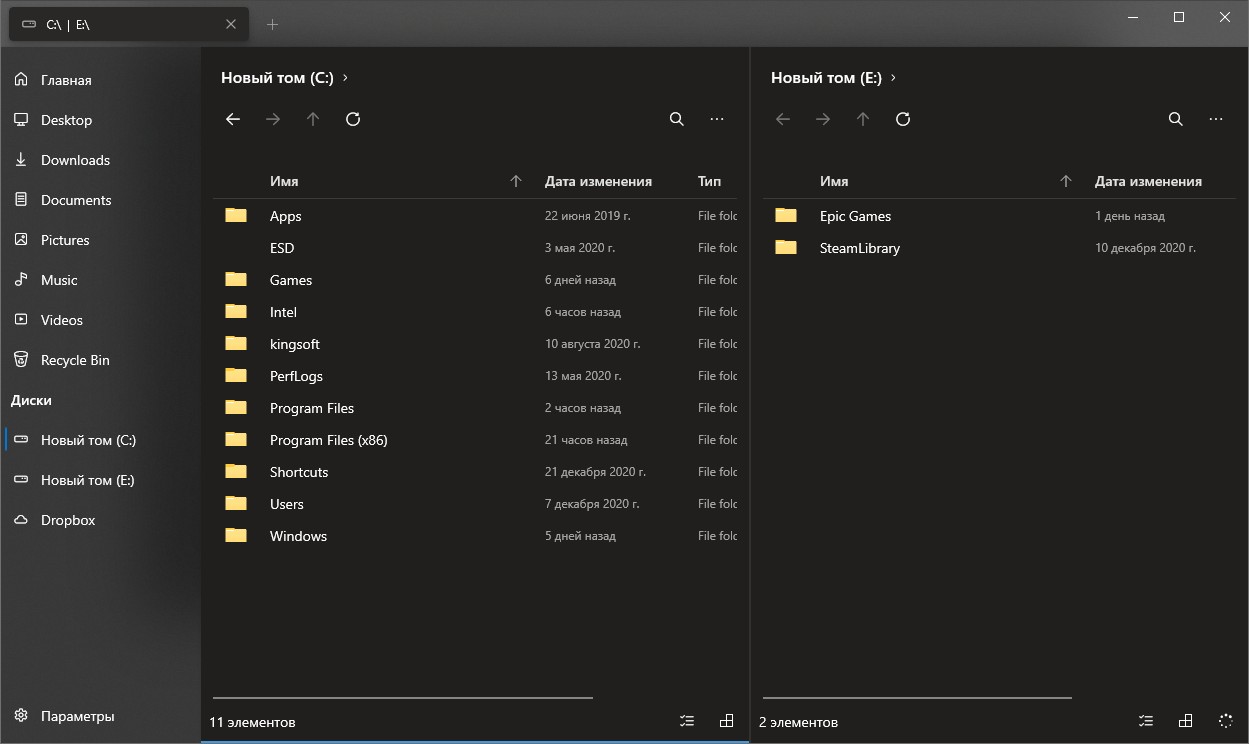
Классический вид файлового менеджера для удобной работы с файлами
Какие-то функции мигрировали из стандартного «Проводника» и просто стали чуть более удобными — например, управление сортировкой и отображением. Больше нет страшной верхней панели со всеми этими настройками. Все параметры кастомизации находятся на отдельной странице.

Настроек не очень много, но все полезные
В итоге я убрал стандартный «Проводник» с таскбара и прикрепил Files. Можно также перенастроить сочетание Win + E, чтобы оно запускало новый файловый менеджер для Windows. В документации Files предлагают два способа:
- скрипт, добавленный через программу AutoHotKey;
- редактирование реестра.
Первый способ безопаснее и проще. Если выберете редактирование реестра, не забудьте сначала сделать его резервную копию.
How to export Explorer file lists to Excel
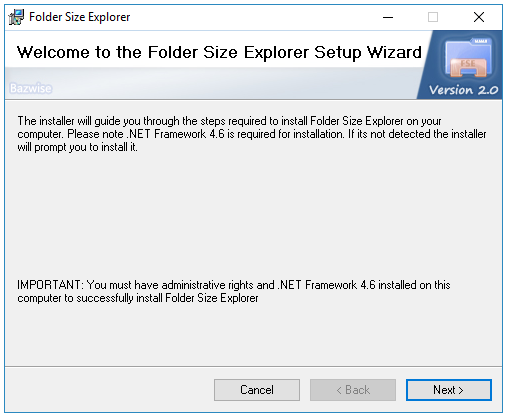
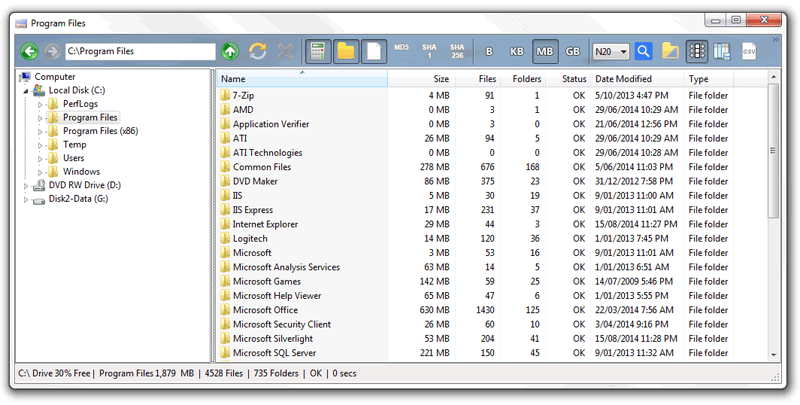
Microsoft’s Windows Explorer does not have the ability to export or save a list of files and folders to a text or csv file. Folder size Explorer however is a simple and free Windows Explorer clone that can export file and folder lists to csv (comma separated values) files which can then be opened in Excel for further editing. Folder Size Explorer is freeware and can be downloaded and installed for free here. To export or save a list of Explorer files and folders simply follow the steps shown below:
1. Download Folder Size Explorer. Open it and run «setup.exe». You should see the screenshot below. Click next a few times accepting the defaults to complete the installation. A shortcut will be created on your desktop.
2. Run Folder Size Explorer and select the folder whose contents you wish to save to excel as shown in the screenshot below. You should sort the columns as you would like them to appear in Excel before you export the list.
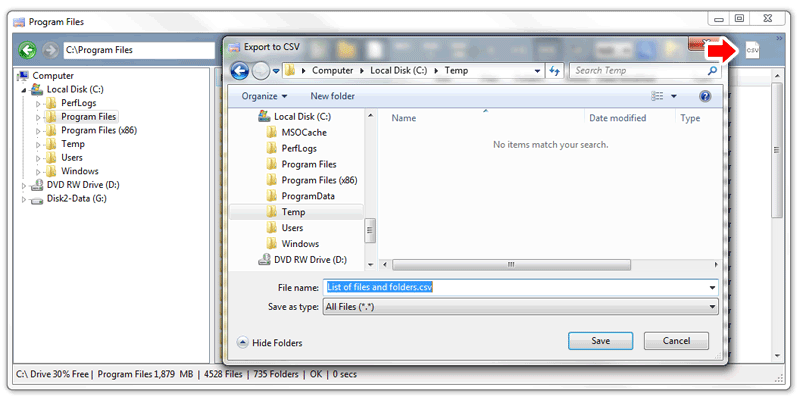
3. Click the  csv icon on the toolbar, select the destination directory, type in the filename and then click the save button to create the .csv file.
4. Start Excel, click file then open from the menu and locate the file you just created above. Once the file has been opened you should see the list of files and folders including the full file paths as shown in the screenshot below.
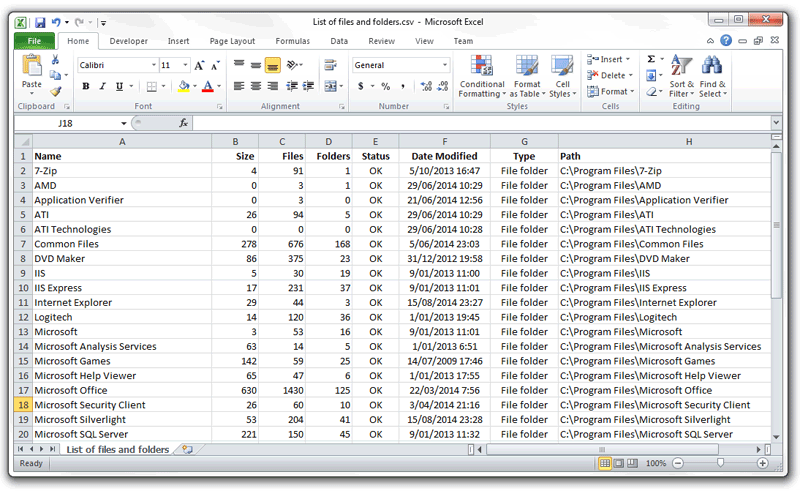
That’s pretty much it. There’s really not much to it. Please note that a csv file can be opened in any version of Microsoft Excel. Also a .csv file is nothing more than a normal text file (.txt) so it can be opened by any app that can read text files such as Notepad, Word, WordPad etc. Folder Size Explorer is compatible with Windows XP, Vista, 7 and 8.


