- 3 Ways to Open File Explorer Options in Windows 10
- 3 ways to open File Explorer Options in Windows 10:
- File explorer keeps forgetting sort- & «view» options
- Replies (30)
- Set default in File Explorer to List View in Windows 10
- Replies (53)
- View -> Options disabled in File Explorer in Windows 10
- Replies (2)
- Change Windows 10 File Explorer Default View
- Change Windows 10 File Explorer Default View
- Control Panel Method
- Folder Option Method
- Quick Access Method
3 Ways to Open File Explorer Options in Windows 10
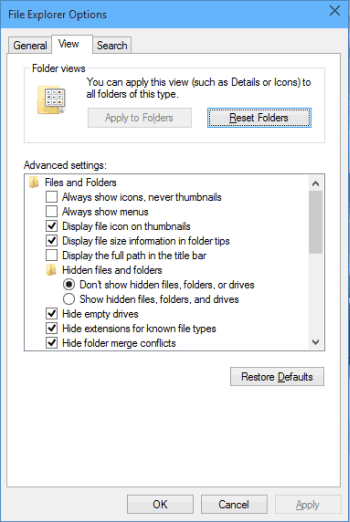
In File Explorer Options (i.e. Folder Options), you can show the hidden files and folders, display check boxes to select items and make other settings on your Windows 10 PC. Thus, this article specially introduces three methods to open File Explorer Options in Windows 10 Pro Technical Preview.
Video guide on how to open File Explorer Options in Windows 10:
3 ways to open File Explorer Options in Windows 10:
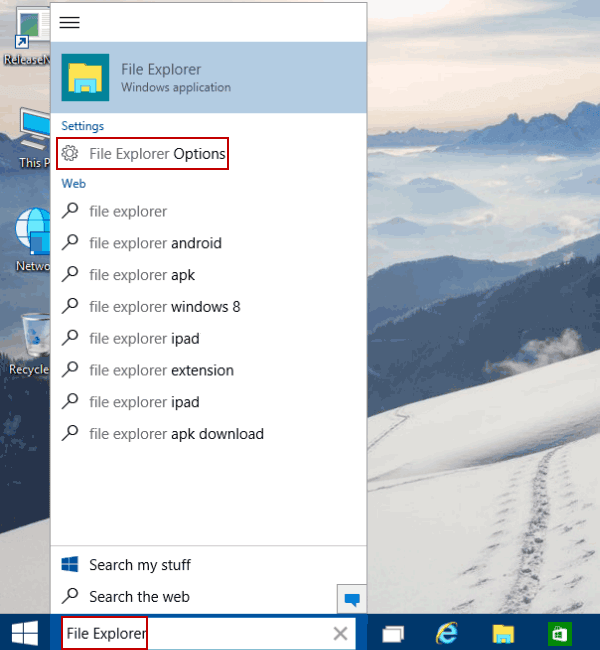
Way 1: Open it via search.
Type file explorer in the search box on taskbar, and choose File Explorer Options in the result.
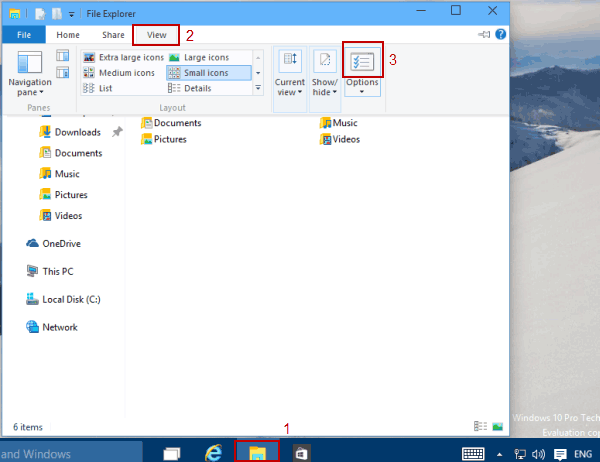
Way 2: Open Folder Options in File Explorer.
Click File Explorer on the desktop taskbar, open View and tap the icon located above Options.
Way 3: Open File Explorer Options in Control Panel.
Step 2: Click the bar on the right of View by, and then choose Small icons to view all items by small icons.
Step 3: Find and tap File Explorer Options.
File explorer keeps forgetting sort- & «view» options
I’ve had this problem ever since upgrading from W8.1 pro to W10 pro
Problem occurs on my SSD and HDD
Not a single folder in my system save sorting & view settings i apply to them. I can successfully sort folder X by method X, but once i exit the folder and re-enter the sorting order previously applied will be gone and back to default.
Any ideas what could be wrong? never before had such issue
Replies (30)
* Please try a lower page number.
* Please enter only numbers.
* Please try a lower page number.
* Please enter only numbers.
![]()
We appreciate you for being part of Windows 10.
Before proceeding, we need more information to help you better.
- While sorting which files you face this issue exactly?
- Is this issue specific for a specific folder on the computer?
- Have you setup the same folder layout settings for all the folders?
- Did you make any change to the system files prior to this issue?
Follow the bellows methods and check if it helps.
Method 1:
SFC Scan:
System File Checker is a utility in Microsoft Windows that allows users to scan for and restore corruptions in Windows system files. Follow the steps:
- Type “cmd” without quotes on the Start screen.
- On the left pane, right click on the “ Command Prompt ” and select “ Run as Administrator ”.
- Type ‘ sfc /scannow’ without quotes and hit Enter .
- Check if it fixes any missing or corrupt system files.
If you are not able to repair some files after performing SFC scan, I suggest you to refer to the point 3 “ Windows Resource Protection found corrupt files but was unable to fix some of them. Details are included in the CBS.Log %WinDir% \Logs\CBS\CBS.log”. Under the section “ Run the System File Checker tool (SFC.exe)” to repair the corrupted files after performing SFC scan.
Use the System File Checker tool to repair missing or corrupted system files
If the issue persist, follow the below method.
Method 2:
1) Open the File explorer (Windows+ E), select This PC from left navigation pane.
2) Click on View tab at the top of the File explorer.
3) Click on Options drop down menu at the top right corner, click on Change Folder and search options.
4) Select the view tab from the window, click on Reset folders and Restore defaults then click on Apply and Ok button.
Method 3:
I would suggest you to check if this issue remains in a different user account on the computer. If you have another user account, make the required changes to a folder and check the results.
Create a local user account in Windows 10
I hope the above information helps. Kindly let us know if you need any further assistance with Windows. We are glad to assist you.
Set default in File Explorer to List View in Windows 10
Replies (53)
* Please try a lower page number.
* Please enter only numbers.
* Please try a lower page number.
* Please enter only numbers.
12 people found this reply helpful
Was this reply helpful?
Sorry this didn’t help.
Great! Thanks for your feedback.
How satisfied are you with this reply?
Thanks for your feedback, it helps us improve the site.
How satisfied are you with this reply?
Thanks for your feedback.
131 people found this reply helpful
Was this reply helpful?
Sorry this didn’t help.
Great! Thanks for your feedback.
How satisfied are you with this reply?
Thanks for your feedback, it helps us improve the site.
How satisfied are you with this reply?
Thanks for your feedback.
I have tried some thing and it seems to work.
Go to the folder that you want, click on View, click on Preview pane then on List.
Then shut down File Explorer and restart.
Get back in and pick the folder in File Explorer and it should be in list view.
This works on each folder by it self. Other folders can be different.
27 people found this reply helpful
Was this reply helpful?
Sorry this didn’t help.
Great! Thanks for your feedback.
How satisfied are you with this reply?
Thanks for your feedback, it helps us improve the site.
How satisfied are you with this reply?
Thanks for your feedback.
I appreciate the answer. I’ve done that about 10,000 times. Yes it may work the next time, but then for reasons I don’t understand, I’ll open up another folder or come back to that folder later and it will be back to the details view. It is very irritating. I have been using Microsoft OS since the DOS days. I’ve seen this problem for decades. I work at a computer all day and have been wasting my time on this for a long time. 🙁
Thanks anyway. It was kind of you to try to help.
67 people found this reply helpful
Was this reply helpful?
Sorry this didn’t help.
Great! Thanks for your feedback.
How satisfied are you with this reply?
Thanks for your feedback, it helps us improve the site.
View -> Options disabled in File Explorer in Windows 10
Replies (2)
![]()
Thank you for posting on Microsoft Community. I understand the inconvenience you are facing. I will certainly help you with this.
Try with the methods below and check.
Method 1: I suggest you to run System File Checker, which will check your system for missing, corrupt or damaged files and attempt to fix them.
Please refer the article on “How to run System File Checker” and check if that helps.
https://support.microsoft.com/kb/929833/en-gb
Method 2:
If no corrupted system files were found in the previous state, then I suggest you to try the following steps:
Open command prompt by pressing Windows key + X and selecting “Command prompt admin”.
In command prompt, type the following commands and press Enter after each command:
DISM.exe /Online /Cleanup-image /Scanhealth
DISM.exe /Online /Cleanup-image /Restorehealth
Close the command prompt and restart the PC and check if it works.
Hope this helps. If you face any issues with Windows, do get back to us. We will be happy to assist you.
1 person found this reply helpful
Was this reply helpful?
Sorry this didn’t help.
Great! Thanks for your feedback.
How satisfied are you with this reply?
Thanks for your feedback, it helps us improve the site.
Change Windows 10 File Explorer Default View
File Explorer is a “Graphical User Interface” which is mostly known as GUI among IT Professionals. GUI is an interface that everything looks smooth. If you use the core Windows Operating System, you will not be able to see the File Explorer by default. You have to bring it by Command Prompt or CMD. Here, we are going to show you, how to change Windows 10 File Explorer default view?
Change Windows 10 File Explorer Default View
Whenever you open up the File Explorer on Windows 10 so you will see the default view. Windows 10 File Explorer default View is like this that when you open, it will show you the “Frequent Folder” with “Recent Folder”. The picture, movies, documents, and other materials that you have opened them will be shown to you. In Windows 8 this feature was not developed on the other hand it has improved in Windows 10. Recent File will help to have quick access to the files which you have recently used them. There may be some users that don’t like while opening the file explorer they see the recent files.
They prefer to have quick access to the Drives and Folders, not to the recent files. For this task, we are here to help you how to change the default view of file explorer in Windows 10.
» data-medium-file=»https://www.wikigain.com/wp-content/uploads/2016/01/Change-File-Explorer-View-241×300.png» data-large-file=»https://www.wikigain.com/wp-content/uploads/2016/01/Change-File-Explorer-View.png» loading=»lazy» src=»http://www.wikigain.com/wp-content/uploads/2016/01/Change-File-Explorer-View.png» alt=»Change File Explorer View» width=»380″ height=»473″ srcset=»https://g6k7x4j6.stackpathcdn.com/wp-content/uploads/2016/01/Change-File-Explorer-View.png 380w, https://g6k7x4j6.stackpathcdn.com/wp-content/uploads/2016/01/Change-File-Explorer-View-241×300.png 241w» sizes=»(max-width: 380px) 100vw, 380px»/>
Change File Explorer View
You can change the File Explorer view in three miscellaneous ways.
Control Panel Method
Go to Control Panel> File Explorer Options. A new window will pop up, and you can change the view from “Quick Access” to “This PC”. Now when you open up Windows 10 File Explorer, you will not see the recent files and folders.
» data-medium-file=»https://www.wikigain.com/wp-content/uploads/2016/01/Change-File-Explorer-from-Quick-Access-to-This-PC-300×145.jpg» data-large-file=»https://www.wikigain.com/wp-content/uploads/2016/01/Change-File-Explorer-from-Quick-Access-to-This-PC.jpg» loading=»lazy» src=»http://www.wikigain.com/wp-content/uploads/2016/01/Change-File-Explorer-from-Quick-Access-to-This-PC.jpg» alt=»Change File Explorer from Quick Access to This PC» width=»502″ height=»242″ srcset=»https://g6k7x4j6.stackpathcdn.com/wp-content/uploads/2016/01/Change-File-Explorer-from-Quick-Access-to-This-PC.jpg 502w, https://g6k7x4j6.stackpathcdn.com/wp-content/uploads/2016/01/Change-File-Explorer-from-Quick-Access-to-This-PC-300×145.jpg 300w» sizes=»(max-width: 502px) 100vw, 502px»/>
Change File Explorer from Quick Access to This PC
Folder Option Method
First you have to open the File Explorer then go to view tab. From the right-hand side, click on Folder Option. Again, you will see the same windows that you will be able to change the default view from here as well.
» data-medium-file=»https://www.wikigain.com/wp-content/uploads/2016/01/Windows-10-Folder-Options-300×106.png» data-large-file=»https://www.wikigain.com/wp-content/uploads/2016/01/Windows-10-Folder-Options.png» loading=»lazy» src=»http://www.wikigain.com/wp-content/uploads/2016/01/Windows-10-Folder-Options.png» alt=»Windows 10 Folder Options» width=»477″ height=»169″ srcset=»https://g6k7x4j6.stackpathcdn.com/wp-content/uploads/2016/01/Windows-10-Folder-Options.png 477w, https://g6k7x4j6.stackpathcdn.com/wp-content/uploads/2016/01/Windows-10-Folder-Options-300×106.png 300w» sizes=»(max-width: 477px) 100vw, 477px»/>
Windows 10 Folder Options
Quick Access Method
The easiest way and quick way is this method. Just open up the Windows 10 File Explorer then scroll up till you get Quick Access. Right-click on the Quick Access then choose Options.

Quick Access Method
From every way you go, you will see the same first screenshot which I have used in this article. Just change it to This PC.
We recommend you to visit these articles as well.
If you have got any question regarding this article feel free to ask us and thanks for being with us.


