- Сведения о версиях Internet Explorer
- Выпуск версий Internet Explorer для Windows
- Диалоговое окно Internet Explorer в Internet Explorer 9 и 11 для продуктов с помощью Windows 10 версии 1803
- Изменения в диалоговом окланте Об internet Explorer в Internet Explorer 11 в Windows 10 версии 1809 и более поздней версии
- Определение версии Internet Explorer для Windows
- OldNewExplorer 1.1.9
- Аналоги программы
- Download and Use OldNewExplorer for Windows 10
- How to Download and Install OldNewExplorer for Windows 10
- Download and Install OldNewExplorer for Windows 10
- Use OldNewExplorer for Windows 10
- 1. Disable the File Explorer Ribbon
- 2. Enabling the Details Pane
- 3. Making the Status Bar visible
- 4. Hiding folders Group in “This PC” and enabling Libraries in Navigation Pane
- 5. Enabling the Classical Drive Grouping
- 6. Changing the Appearance Style
- 7. Turning off the Quick Access in Navigation Pane
- Conclusion
Сведения о версиях Internet Explorer
В этой статье содержатся сведения о версии Internet Explorer. В этой статье также обсуждается, как определить, какая версия Internet Explorer установлена на вашем компьютере.
Оригинальная версия продукта: Internet Explorer 9 и более поздние версии
Исходный номер КБ: 969393
Выпуск версий Internet Explorer для Windows
Номера версий Internet Explorer для Windows Server 2008, Windows 7 и Windows 8 используют следующий формат:
основная версия. второстепенная версия. номер сборки. номер subbuild
В этой таблице показаны возможные номера версий Internet Explorer.
| Версия | Продукт |
|---|---|
| 9.0.8112.16421 | Internet Explorer 9 RTM |
| 11.0.9600.***** | Internet Explorer 11 для Windows 7 и Windows 8.1 |
| 11.0.9600.***** | Internet Explorer 11 для Windows Server 2008 R2, Windows Server 2012 и Windows Server 2012 R2 |
| 11.*****.10240.0 | Internet Explorer 11 в Windows 10 (начальная версия, выпущенная в июле 2015 г.) |
| 11.*****.14393.0 | Internet Explorer 11 в Windows 10 версии 1607 и Windows Server 2016 |
| 11.*****.17134.0 | Internet Explorer 11 в Windows 10 версии 1803 |
| 11.*****.17763.0 | Internet Explorer 11 в Windows 10 версии 1809 и Windows Server 2019 |
| 11.*****.18362.0 | Internet Explorer 11 в Windows 10 версии 1903 и Windows 10 версии 1909 |
Internet Explorer 11 будет иметь номер версии, который начинается с 11.0.9600.***** на:
- Windows 7
- Windows 8.1
- Windows Server 2008 R2
- Windows Server 2012
- Windows Server 2012 R2
Номер версии для последнего ***** будет изменяться в зависимости от обновлений, установленных для Internet Explorer.
Чтобы увидеть номер версии и последнее установленное обновление, перейдите в меню справки и выберите о Internet Explorer.
Internet Explorer 11 в Windows 10 отличается небольшими версиями. Internet Explorer 11 изменяет свою версию с каждым обновлением во второй части с помощью OS-Build информации. Например, если у вас есть Windows 10 версии 1607 с KB4580346 от 13 октября 2020 г., в операционной системе показан номер сборки ОС 14393.3986 (по winver.exe). Internet Explorer 11 будет показываться как версия 11.3986.14393.0.
Незначительный номер версии, номер сборки и номер подстройки могут отображаться без нулевых. Например, версия 7.00.5730.1100 может отображаться как 7.0.5730.11.
Все версии Internet Explorer 9.0 и более поздние версии, настроенные с помощью набора администрирования Microsoft Internet Explorer (IEAK), включают одну из следующих строк после номера версии. Чтобы просмотреть эти сведения, нажмите кнопку О в меню справки:
- IC = поставщик контента в Интернете
- IS = поставщик интернет-услуг
- CO = корпоративный администратор
Internet Explorer версии 9.0 и Internet Explorer версии 11.0 для продуктов с windows 10 версии 1803 включают строку Update Versions, в которую перечислены все установленные обновления или горячие фиксы текущей версии Internet Explorer.
Номера версий Internet Explorer в списке основаны на версиях Windows. Номера списков могут быть изменены последним обновлением. Количество сборки Internet Explorer в версии выпуска Windows Vista такое же, как и в других версиях.
Диалоговое окно Internet Explorer в Internet Explorer 9 и 11 для продуктов с помощью Windows 10 версии 1803
Диалоговое окно About Internet Explorer можно открыть, нажав справку о Internet > Explorer. Или нажмите Alt+X и нажмите A.
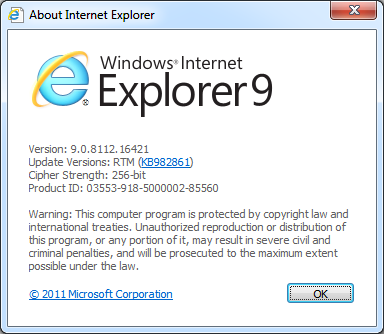
Поле Версии обновления обновляется каждый раз, когда обновляется Internet Explorer 9 или Internet Explorer 11. Номер версии имеет следующие компоненты:
- Поле версии App Major останется 9 или 11.
- Поле версии App Minor останется 0.
- Поле обновления будет приумношать по 1 для каждого выпускаемой версии Internet Explorer.

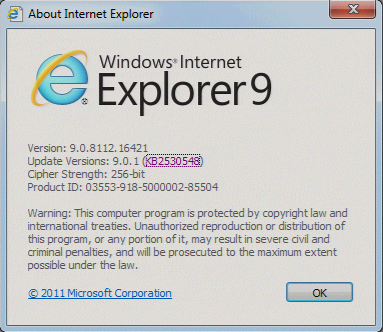
Каждое обновление имеет связанную с ним статью База знаний (например, KB4586768 — накопительное обновление безопасности для Internet Explorer: 10 ноября 2020 г.). В этой статье содержатся подробные сведения о том, что включено в обновление, и обновимых разных данных. Чтобы легко получить дополнительные сведения, проверьте диалоговое окно About Internet Explorer. Он предоставляет ссылку на статью Базы знаний Майкрософт, связанную с последним установленным обновлением internet Explorer.
Например, если установлено первое обновление для Internet Explorer 9, диалоговое окно About Internet Explorer будет иметь ссылку на версии Update: 9.0.1 (KB2530548).
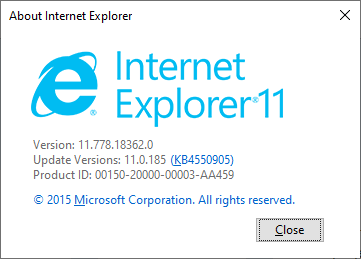
Изменения в диалоговом окланте Об internet Explorer в Internet Explorer 11 в Windows 10 версии 1809 и более поздней версии
Диалоговое окно About Internet Explorer можно открыть, нажав справку о Internet > Explorer. Или нажмите Alt + X и нажмите A.
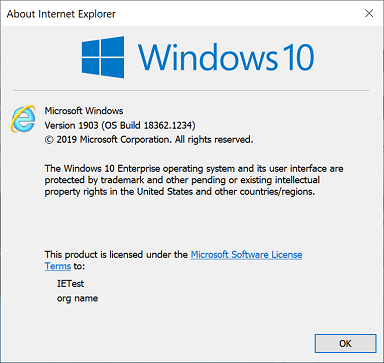
В Windows 10 версии 1809 и более поздней версии диалоговое окно About Было обновлено, чтобы использовать более современный диалоговое окно, которое отражает последние обновления установленной операционной системы, чтобы обеспечить лучшую точность. Обновленный диалоговое окно будет отражать те же сведения о версии, что и в winver.exe. Версия обновления больше не используется.
Определение версии Internet Explorer для Windows
Чтобы определить версию Internet Explorer, используйте любой из следующих методов:
Во всех версиях Internet Explorer выберите «Об обозревателе Интернета» в меню справки. Сведения о продукте и версии отображаются в диалоговом окне, которое отображается.
Используйте реестр. Версию Internet Explorer можно определить, просмотрев следующий ключ реестра:
HKEY_LOCAL_MACHINE\Software\Microsoft\Internet Explorer
В этом ключе обратитесь к значению svcVersion. Значение строки версии содержит номер версии Internet Explorer, установленный на компьютере. (Например, значение строки версии для Internet Explorer 11 в Windows 10 версии 2004 — 11.630.19041.0). В реестре для незначительного номера версии сохраняется только один ноль, если его номер составляет 00. Если небольшой номер версии не 00, сохраняется полное значение версии.
- Незначительный номер версии, номер сборки и номер подстройки могут отображаться без нулевых. Например, версия 7.00.5730.1100 может отображаться как 7.0.5730.11.
- Номера версий Internet Explorer в списке основаны на версиях Windows. Номера списков могут быть изменены с помощью последнего hotfix.
- Определите версию Internet Explorer с помощью скрипта.
Все версии Internet Explorer отправляют сведения о версиях в загонщике сведений о агенте пользователя Hypertext Transfer Protocol (HTTP). Эти сведения можно прочитать из сценария на веб-странице.
Разработчики веб-страниц могут использовать эти сведения для использования новых функций в более поздних версиях Internet Explorer, таких как HTTP Strict Transport Security в Internet Explorer 11.0. Они также могут понизить рейтинг более ранних версий Internet Explorer, которые не поддерживают эти функции.
OldNewExplorer 1.1.9

OldNewExplorer представляет собой простое, но очень полезное программное обеспечение, которое необходимо для операционной системы Windows от восьмого поколения обновления и выше. Благодаря возможностям этой утилиты пользователи смогут вернуть классический вид ОС, который был свойственен в седьмой версии обновления – самой удобной и популярной.
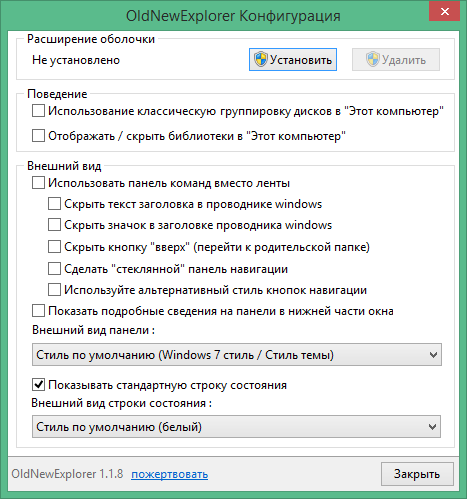
Особенно актуальная данная программа будет для Windows 10, ведь последняя версия обновления не нравится очень многим людям, так как интерфейс такой системы крайне сложен и не понятен. Поэтому, чтобы не менять свою ОС, проще установить данное приложение.
Пароль ко всем архивам: 1progs
Во время использования этой программы, все хранящиеся файлы остаются на своих привычных местах, поэтому изменяется лишь визуальная составляющая операционной системы. Среди главных отличий – это появление библиотек, кнопка пуск, строка с задачами и так далее.
- Работа в пассивном режиме;
- Не нагружает центральный процессор;
- Отсутствую лаги и задержки;
- Актуально для всех ОС старше 7 поколения;
Скачать OldNewExplorer вы можете прямо у нас, кликнув по ссылке, которая находится на данной странице.
Битая ссылка или обновилась версия программы? Напишите об этом в комментариях, обязательно обновим!
Если не подходит пароль к архиву или после извлечения не все файлы в архиве — смотрите раздел Помощь
Аналоги программы
Похожие программы смотрите в наших подборках программ
Download and Use OldNewExplorer for Windows 10
OldNewExplorer is a single, lightweight utility that allows you to retrieve the old classic appearance of File Explorer quite easily. Loaded with several tweaking options, this software can perform various changes along with certain built-in settings. Using this software, you can give Windows 10 the complete taste of old Windows Explorer.
Microsoft has made some significant changes in Windows 10’s File Explorer in comparison to its previous versions. The inclusion of new ribbon file is probably the greatest change. The OldNewExplorer for Windows 10 lets you modify the ribbon pane, status bar, libraries, details pane, moreover it also lets you change the Quick Access in the navigation pane. Most importantly, you can do all these consuming less time as well as little effort. It will neither involve any transformation nor any of the skin packs. Before you make the change, don’t forget to create a system restore point as this is equally important as to bring back the change in a few clicks. Let us begin the procedure and explore every detail of the software.
How to Download and Install OldNewExplorer for Windows 10
In order to reform the File Explorer of Windows 10 with a touch of Windows Explorer, the first task is to download the OldNewExplorer software tool on your computer. Later on, install it to a drive disk and as it is a third-party software, it may alter the windows system. Therefore, before proceeding to download, ensure to create a backup file. It will help you to recover again if something goes incorrect, unfortunately. The software is checked properly by the experts and it is trustworthy.
Download and Install OldNewExplorer for Windows 10
Step-1: Open any browser on your computer and download OldNewExplorer. You can grab this lightweight and simple software using this below link –
Step-2: Once you download the file, extract its content to any of the disk drives. For doing this, you can use any File extractor or unzipping tool you like.
Step-3: Now it’s time to install the tool on the PC and to do so, put a double-click on the program file OldNewExplorerCfg.exe.
Step-4: On the following OldNewExplorer configuration page, you will see an option Install. You can see the option under Shell extension section. Click on the Install button and let the settings be applied to File Explorer when you select them.
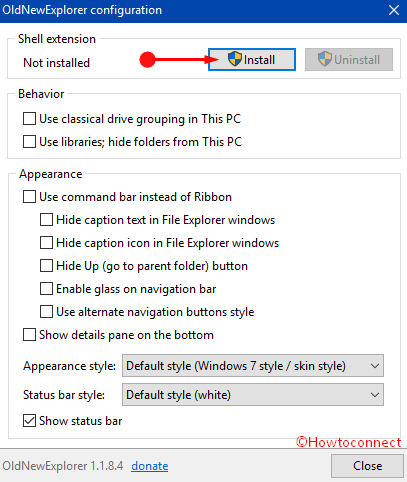
Step-5: The program asks permission to generate changes to your PC. Select the option Yes twice in UAC dialog box as it prompts up two times.
The software gets installed on your computer if you complete the above tasks properly. To ensure the proper installation, you can check the OldNewExplorer configuration page. You can notice Installed in underneath the Shell extension section if the software is installed successfully on your PC.
Now you have the OldNewExplorer for Windows 10 application on your machine. You can proceed to make the File Explorer appearance exactly like Windows Explorer using this software tweak pretty effortlessly. So, let’s start!
Use OldNewExplorer for Windows 10
Literally, it is not possible to make the File Explorer exactly same like Windows Explorer. But using this software will take you near to perfection. Several things are to be changed in order to give the File Explorer an older look. We will discuss the changes one after the other and let’s see each of them in a series of steps.
1. Disable the File Explorer Ribbon
Starting with Windows 8, Microsoft incorporated this Ribbon option into File Explorer. It has successfully changed the outward aspect of the navigation bar. If you don’t like this ribbon, you can disable it using the following steps:
Step-1: On the OldNewExplorer utility, navigate to the Appearance section from the configuration page.
Step-2: Select the option Use command bar instead of Ribbon.
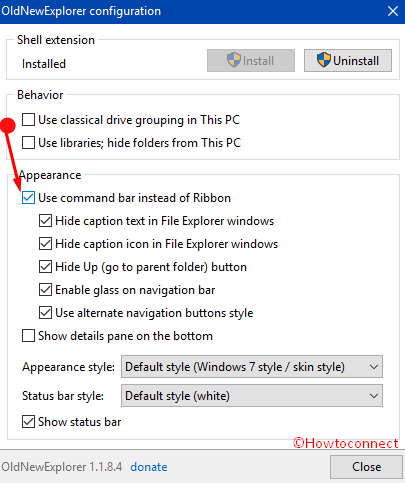
Note – Just below this option, you can notice few other checkboxes also. These options are independent and you can select them individually also without choosing command bar option. All these options will be automatically selected when you select the Use command bar instead of Ribbon option
You can also make some changes according to your choice by selecting single options mentioned below. They are as follows:
Hide caption text in File Explorer windows – Choose this option when you prefer to not show the caption text in the title bar of File Explorer.
Hide caption icon in File Explorer windows – If you would like to have an empty bar, checkmark this option and hide the icon.
Hide Up (go to parent folder) button – Though the UP button is useful, still you can keep it out of sight.
Enable glass on navigation pane – Choosing this option transforms the navigation bar into the same style and color as of the title bar instead of displaying its default white.
Use alternate navigation buttons style – To modify the style of the navigation pane such as right and left arrow buttons, go ahead with this option.
Noteworthy is all these boxes will be automatically checked once you select “Use command bar instead of Ribbon”. Therefore, you can check this option first then uncheck the following options according to your demand.

2. Enabling the Details Pane
On Windows 7, the Details pane in Windows Explorer used to show up at the extreme bottom when an item is selected. But, in the File Explorer, the pane was shifted to the right side. Eventually, it took the precious horizontal space as well as widens the window in order to show file details.
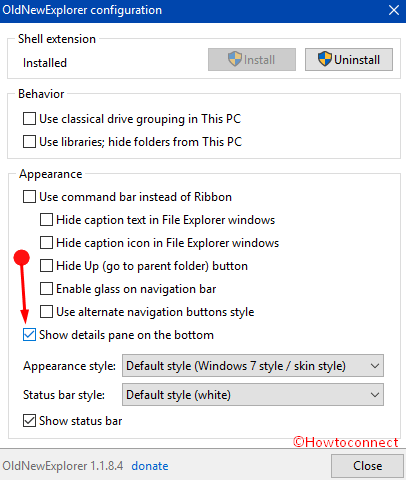
If you want to bring the old look back, pursue these steps.
Step-1: Launch OldNewExplorer on your PC and locate the option Show details pane on the bottom. You can find it just inside the Appearance section. Check this option to make the change.
If you have already changed the ribbon with the command bar, you need to follow another way to see the Details pane and thus follow the guidelines below.
Step-1: Open File Explorer on your computer and select Organize that appears at the top left side of the window.
Step-2: Select the option Layout from the drop-down list. This opens a submenu on the right with a list of options, click on the option Details pane.
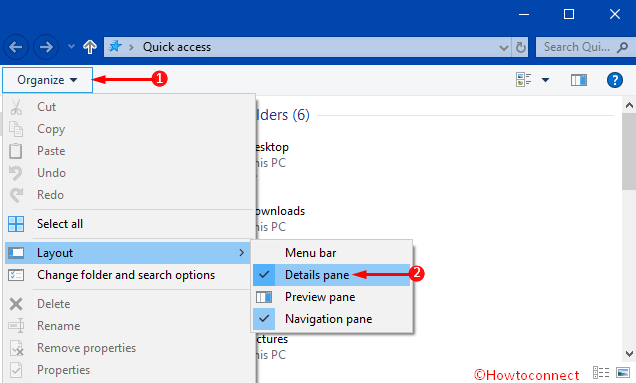
Step-3: This immediately displays the Details pane on the right portion of the File Explorer.
3. Making the Status Bar visible
In Windows 7, the status bar for any selected file used to appear at the bottom. With the introduction of File Explorer, it was disappeared. You can easily enable this status bar too again.
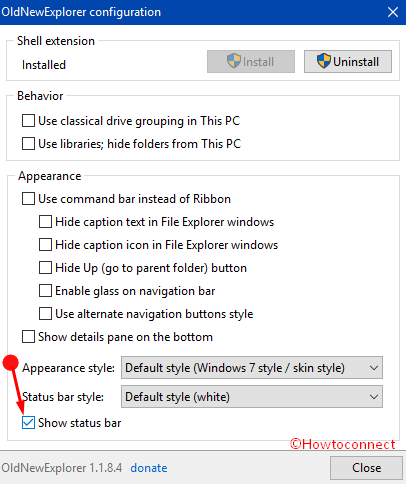
Step-1: On OldNewExplorer find the option Show status bar. Selecting this option will make the status bar visible again. Usually, the status bar is white in color but you can change it to grey.
Step-3: In the configuration page, you will see an option Status bar style. Select this option and from the drop-down list, choose the Grey instead of Default style (White).
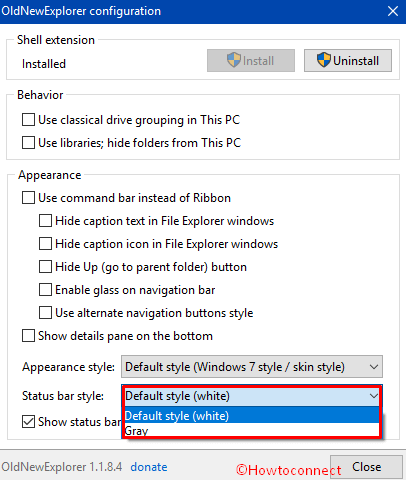
You notice that the status has become grey and is equal to the details pane. Additionally, there will be a vertical bar to separate the sections in the status bar.
4. Hiding folders Group in “This PC” and enabling Libraries in Navigation Pane
Microsoft has removed the Libraries option in the Navigation pane but has included Folders group to This PC which also displays Devices and drives group. Most of the users didn’t like these changes. Thankfully, you can hide the Folders group in This PC and add Libraries in the Navigation pane using the OldNewExplorer too.
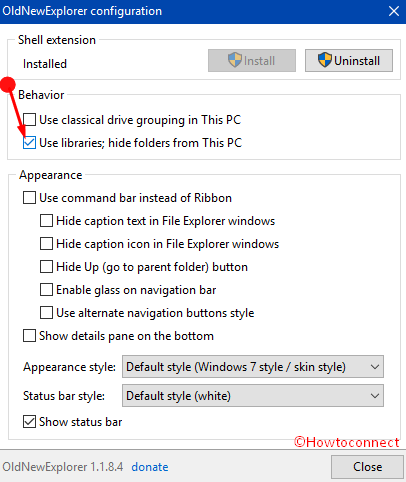
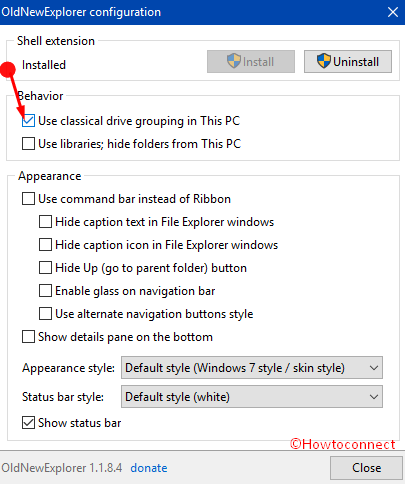
Step-1: Launch the software on the computer and look for the option Use libraries; hide folders from This PC. You will find it in the Behavior section just above the Appearance section. Selecting this option instantly makes the Libraries noticeable in the Navigation pane. Moreover, this disappears the Folders group making the Devices and drives group visible in This PC window.
5. Enabling the Classical Drive Grouping
Drivers listed in the Devices and drives section underneath This PC window is visible with no special grouping in Windows 10. But in previous versions, it was listed in separate groups. This group was termed as Computer in “Windows Explorer” and there was special grouping for Devices with Removable Storage, Hard Disk Drives as well as Network Location. To bring these appearances back, the sequence of steps are given below.
Step-1: In the OldNewExplorer, navigate to the option “Use classical drive grouping in This PC“. Select this and you can see the old look of Windows 7 here in This PC window.
6. Changing the Appearance Style
You can now change the Appearance style of Option Bar in the details pane as well as above the file list. To do so,
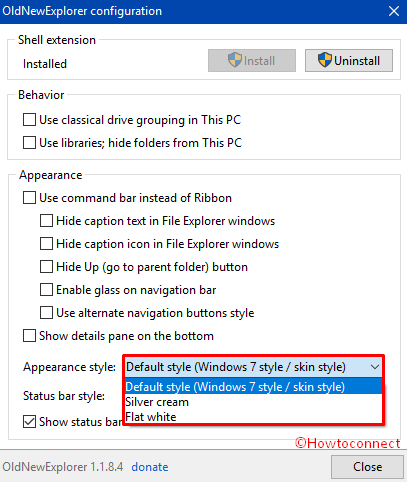
Step-1: You need to open the OldNewExplorer for Windows 10 and go to the option Appearance style above the Status bar style. Click on it to see a drop-down list and you can see three options. The first option namely Default style (Windows 7 style/skin style) gives it a look like Windows 7. But you also select Silver cream or Flat white according to your choice
7. Turning off the Quick Access in Navigation Pane
In Windows 10’s File Explorer you won’t find “Favorites” because instead of it Quick Access is accessible. Moreover, Quick access section in the navigation pane shows frequently used folders instead of common location such as Downloads, Pictures, Documents, and Downloads. However, if you want to see them like the old one, follow the given steps.
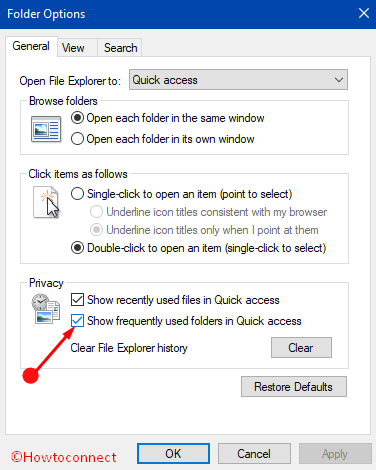
Step-1: Go to the Folder Options from your computer. You will see some tabs here.
Step-2: Switch on the General tab. Locate and uncheck the option namely “Show frequently used folders in Quick Access“. In order to save the change, click on Apply before leaving the dialog.
These are the uses of OldNewExplorer for Windows 10 software. Using this utility, you can effortlessly roll back to the old appearance and style of Windows Explorer staying into Windows 10.
If you ever prefer to return back to Windows 10 File Explorer look and style, ensure to deselect all the options in the utility. Furthermore, in the Appearance style section, choose Default option. Finally, click Uninstall button otherwise this won’t revert the changes.
Conclusion
Microsoft’s new edition is Windows 10 and they have made lots of significant changes to make the options look better and provide maximum ease of access to the users. As a result, users experience drastic changes in File Explorer in comparison to its older versions. These modifications are not welcomed by some users who upgrade their operating system to Windows 10. Hence, the Oldnewexplorer for Windows 10 will be completely helpful to those who want to accept the advanced features of Windows 10 as well as the taste of Windows Explorer. We have mentioned a sequence of steps that assist you to download, install and use of Oldnewexplorer for Windows 10. Hope it will be effective for you as well.


