- View and open SharePoint files with File Explorer
- How to Sync SharePoint files and folders
- What to do if Internet Explorer is your browser
- What’s the difference between Sync and Open With Explorer?
- My Drive does not appear in Windows Explorer view
- Summary
- Resolution
- Method 1: Run the automated troubleshooter for your version of Windows:
View and open SharePoint files with File Explorer
Open with Explorer (in the classic SharePoint experience) and View in File Explorer (in the modern experience) are only available in Internet Explorer 11. These two options aren’t available in other browsers such as Chrome and Microsoft Edge, and this situation won’t change, because the underlying technology doesn’t work in newer browsers.
We recommend using
Sync instead of Open with Explorer
 Sync instead of Open with Explorer
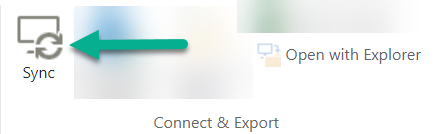
Whether you’re using Chrome, Microsoft Edge, Internet Explorer, or another browser, Sync is a faster and more reliable method for putting SharePoint files into folders you can see in File Explorer.
Sync is available on the ribbon, just to the left of Open with Explorer:
How to Sync SharePoint files and folders
Watch a 90-second video about the basics of using Sync on your SharePoint files and folders.
What to do if Internet Explorer is your browser
The «ActiveX» technology underlying Open with Explorer is relatively old and has become less reliable over time. So even in Internet Explorer 11, sometimes the Open with Explorer option is grayed out. If Internet Explorer is your browser, you can use Sync to get more reliable results. See Sync SharePoint and Teams files with your computer for instructions.
However, if you prefer to continue using Open with Explorer, read the following sections of this article. The first section can help you troubleshoot if Open with Explorer is unavailable.
Note: Microsoft 365 apps and services will not support Internet Explorer 11 starting August 17, 2021. Learn more. Please note that Internet Explorer 11 will remain a supported browser. Internet Explorer 11 is a component of the Windows operating system and follows the Lifecycle Policy for the product on which it is installed.
Select a heading below to open it and see the detailed information.
Here are four possible reasons, along with instructions for correcting each problem.
You’re not using a browser that supports ActiveX controls. Open with Explorer works only in Internet Explorer 10 or 11. On Windows 10, Edge is the default browser, but Internet Explorer 11 is also installed. Open with Explorer does not work with Edge, Chrome, or Firefox. You can use Internet Explorer to do your file transfers, and then go back to using your preferred browser (if not IE).
Internet Explorer has ActiveX controls or Add-ons are blocked. In Internet Explorer 11, press ALT+T on the keyboard. In the Tools menu if there’s a check next to ActiveX Filtering, then press X to turn it off. You can also click Tools, click Safety, and then click ActiveX Filtering.
You’re using 64-bit version of Internet Explorer. ActiveX controls are a 32-bit only technology. They don’t run in the 64-bit version of Internet Explorer. In Internet Explorer 11, there is only one browser and it automatically switches to 32-bit for ActiveX controls. However, if you’re using the 64-bit Internet Explorer 10, you must switch to the 32-bit version. To check your version, press ALT+H, and then press A for About Internet Explorer.
The SharePoint add-ons aren’t installed. In Internet Explorer, click Tools, and then click Manage Add-ons. Make sure you have these add-ons installed and enabled:
SharePoint Export Database Launcher
SharePoint OpenDocuments Class
SharePoint Stssync Handler
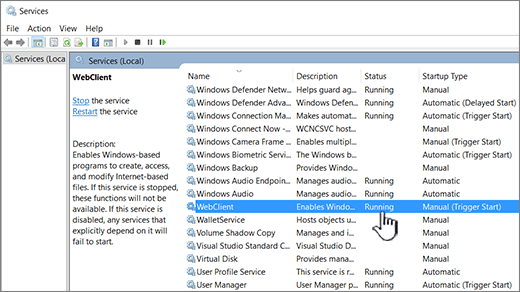
The Windows WebClient isn’t running Windows WebClient provides the support for Windows and the ActiveX control to communicate with SharePoint libraries. By default, it’s on and running in Windows. If it isn’t running, you may have problems using Open with Explorer. The WebClient is part of Internet Explorer. To make sure the WebClient is running, follow these steps.
Press the Windows key + R, type service.msc, and then press Enter.
In the Services dialog box, find WebClient. If you can’t find it, click Name to sort the list alphabetically.
Check under Status to make sure it says Running. If not, right-click WebClient, and select Start.
Note: Your version history is not copied when you use Sync or Open with Explorer. Only the latest or published versions of documents are copied or moved. For more info, see Why doesn’t sync or Open with Explorer copy or move my versioning info?
File Explorer is the Windows file management system you use on the desktop. You can open SharePoint libraries in File Explorer, and move or copy files and folders from your desktop folders to SharePoint. You can also open multiple SharePoint libraries in File Explorer, and copy or move folders between them.
Note: If you have Check out required enabled, you may need to temporarily disable it to download multiple files. For more info, see Set up a library to require check-out of files.
In SharePoint, open the document library with the file or folders you want to move or copy.
Do one of the following:
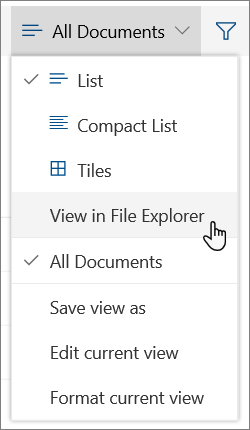
In SharePoint, click the View menu and then click View in File Explorer.
In SharePoint Server 2016, SharePoint Server 2013, or SharePoint Server 2010, click the Library tab, and then click Open with Explorer.

In SharePoint Server 2007, click Actions  , and then click Open in Windows Explorer.
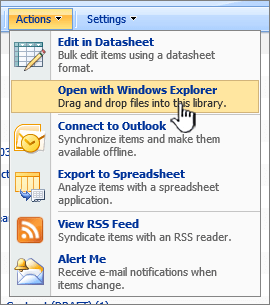
Note: View in File Explorer, Open with Explorer, and Open in Windows Explorer only work with Internet Explorer 10 or 11.
In addition to opening in File Explorer, SharePoint may also open the library in another tab in Classic SharePoint mode. You can ignore or close this library window.
You may get a pop-up asking if you’d rather sync the library. This is up to you. When you open a library in File Explorer, the folder on your desktop is temporary. If you use sync, you’ll get a persistent folder that stays in sync with the document library. For more info, see Sync SharePoint files with the OneDrive sync app.
If you get an Internet Explorer Security dialog, click Allow. You can also click the Do not show me the warning for this program again checkbox.
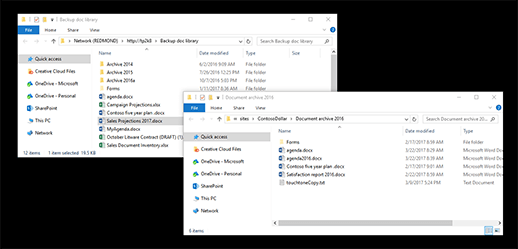
Open the destination document folder, and repeat step 2.
Now that you have both document libraries open in File Explorer—the source and the destination—you can copy or move files and folders between them.
Arrange the two windows so you can copy or move between them. You can display both on the screen with these steps:
Click the source window, and press the Windows key  + Left arrow. The window should dock to the left side of the screen.
Repeat this with the destination window but press Windows key + Right arrow to dock it to the right side of the screen. Both windows should now be visible.
You can also just resize the windows and overlap them.
Do one of the following:
To copy, select the folders and files in the source , right-click, and select Copy, or press Ctrl+C to copy.
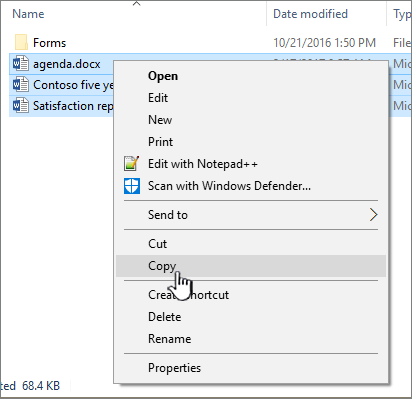
To move, select the folders and files in the source, right-click and select Cut, or press Ctrl+X to cut.

If you’re moving files, you can also select and drag the files from one File Explorer window to another, rather than using cut and paste.
Note: If your library uses versioning, you only get the published or the most current documents. You can’t move or copy previous versions. For more info, see Why doesn’t sync or Open with Explorer copy or move my versioning info?
In the destination folder, right-click and select Paste, or press Ctrl+V.
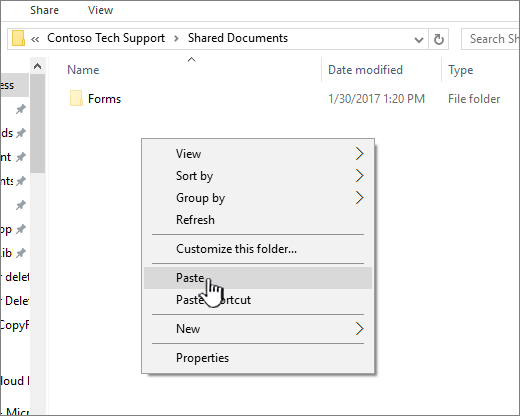
Note: If you don’t see Paste, return to the source folder, highlight the files and folders you want, right-click and select Cut or Copy.
When you’ve copied or moved all the files you want, close both File Explorer windows. Any file or folder changes you’ve made are automatically uploaded to SharePoint.
Return to the destination library in SharePoint. If the new files, folders, or changes haven’t appeared yet, refresh the page.
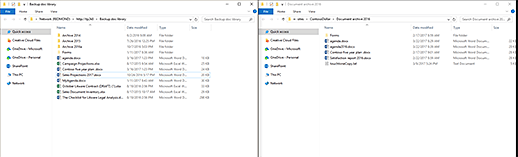
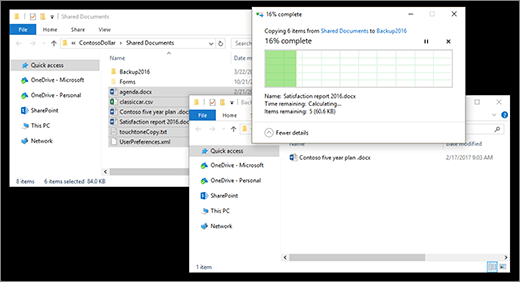
Before copying files
After copying files
In addition to using Open With Explorer, you can also sync the library with your desktop. When you sync, you get a persistent copy of the SharePoint library on your desktop. You can save files directly to the synced folder, and they are automatically uploaded in the SharePoint library it’s synced to.
You can sync either or both your source and destination libraries and work between them as well. For more info, see Sync SharePoint files with the OneDrive sync app.
If you must have versioning information included when you move a file from one SharePoint library to another, use the Move to command. For more details, read on.
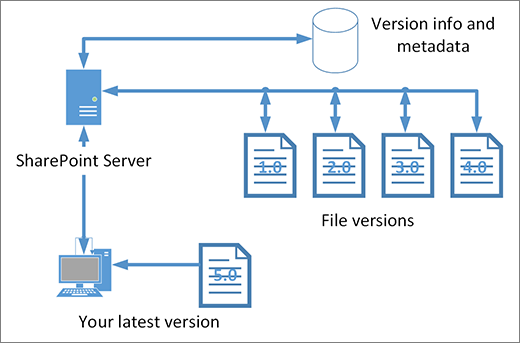
Versioning is part of a SharePoint library. The versions and tracking is stored in the SharePoint data itself, and not in the files. Rather than overwrite older files when you check in a new version, SharePoint stores the older files as well as the newer ones, and differentiates between them with version numbers. The files are still separate, and are tracked in the library, but the versions are only in the SharePoint library.
Sync and Open with Explorer work with files which contain only the metadata that’s needed for that single file, such as modified date or author. When you copy using Open with Explorer, it can only copy or move files and their immediate info. The additional information and other files in SharePoint aren’t included.
If you’re using SharePoint, the Move to command does move the versioning history, as it is working inside the library. Move to retains versioning because only one copy of the file and structure exists. When SharePoint moves a file between folders or libraries with Move To, it includes versions and tracking information.
The SharePoint Copy to command, however, only copies the latest file. This prevents splitting the history between two locations. You can make updates to either file, but the changes are only reflected on that file.
If you’re copying files to keep a backup, and want to preserve the versioning, consider using a SharePoint server based backup rather than manually copying. That way if something happens to your current files, the backup of SharePoint can be retrieved. See Best practices for backing up and restoring in SharePoint Server.
What’s the difference between Sync and Open With Explorer?
Both Sync and Open with Explorer connect a SharePoint library with a folder on your desktop, but there is a difference:
Open with Explorer uses a temporary folder that opens in File Explorer. That folder only lasts until you close it and the content is saved to SharePoint. So Open with Explorer gives you one-time access to the SharePoint library by way of your desktop folders.
Sync uses the OneDrive sync app to create a more permanent folder that you can use on a daily basis. All content that you add to, edit, or remove from either the online SharePoint library or the desktop folder automatically syncs with the other location. For example, once you sync a library, you can save directly from Word or Excel to the desktop folder, and everything is automatically uploaded to the SharePoint library. If you save something to the desktop folder while you’re working offline, Sync will update the SharePoint library as soon as you’re back online.
My Drive does not appear in Windows Explorer view
Summary
When looking for attached hard drives, USB flash drives or CD and DVD drives using Windows Explorer, you may notice that some drives are not seen in Windows Explorer or the drive may disappear after a short time or when Windows resumes from Sleep or Hibernation. This can be caused by any of the following:
Your drive does not have a drive letter assigned to it in Disk Management
The drive may be disabled or offline
Your USB driver may be corrupted
Corrupted registry keys may be causing issues with connecting toyour CD or DVD drive
Resolution
USB flash drives
CD and DVD drives
Method 1: Run the automated troubleshooter for your version of Windows
Method 2: Make sure that the drive has a drive letter assigned in Disk Management
Method 3: Make sure that the disk drive is Enabled
Method 4: Make sure that the drive is Online
Method 5: Your USB drive may be corrupted
Method 6: Corrupted registry keys may be causing issues with connecting to your CD or DVD drive
To resolve the issue follow the steps in the methods listed below starting with method 1, if the steps in that method do not resolve the issue, continue to the next method:
Method 1: Run the automated troubleshooter for your version of Windows:
For Windows 7 users:
If your using Windows 7, run the built in Hardware and Device troubleshooter to resolve the issue. To do this, click the link below and follow the steps on that article:
If your using Windows Vista, click the link below to download and run the Hardware and Devices troubleshooter for Windows Vista:
Method 2: Make sure that the drive has a drive letter assigned in Disk Management:
If your hard drive, thumbnail drive, memory stick, or flash memory is recognized in Disk Management but not displayed in Windows Explorer, the drive may not have been assigned a drive letter by Windows.
Open Computer Management by clicking the Start button, clicking Control Panel, and click System and Security viewed by Category View.
Click Administrative Tools, and then double-clicking Computer Management.
If you’re prompted for an administrator password or confirmation, type the password or provide confirmation.
Look for a drive that does not have an assigned drive letter and is not labeled as System Reserved.
Note: The System Reserved drive is reserved by Windows.
Right-click the unlabeled drive and click Change drive letter and paths…
Click Add and then click OK to select the first available drive letter.
If the Change drive letter and paths… option is not available, make sure that the drive is Online.
If the drive is Offline, right-click the disk number and click Online.
For more information on Adding, changing or removing drive letters for Windows 7, click the link below to see the article on the Microsoft website:
Change, add, or remove a drive letter For more information on Adding, changing or removing drive letters for Windows Vista, click the link below to see the article on the Microsoft website:
Method 3: Make sure that the disk drive is Enabled
If the drive has been Disabled the disk will not be visible in Windows Explorer. To see if the disk is Disabled, follow the steps below to Enable it:
For Windows Vista and Windows 7 users:
Click Start and type Device Manager in the Search box
Click Device Manager in the Control Panel list
Locate the Disk drives item in the list and click the small arrow to the right to expand the list of drives
If a disk drive is disabled you will see an icon with an arrow pointing down over the icon of the disk drive
If you see an icon with an arrow pointing down over the icon of the disk drive, double-click the icon and click the Enable Device button
Click Next on the Enabling a device dialog box, click Next, and then click Finish
Click Close and then close the Device Manager window
Note: If you don’t see your disk drive in the listed drives, the drive may not have been detected by Windows.
Note: If you receive an error message when Enabling the disk drive, you may have a defective disk drive.
For Windows XP Users:
Click Start then right click My Computer and click Properties
Click the Hardware tab and then click Device Manager
Locate the Disk drives item in the list and click the small arrow to the right to expand the list of drives
If a disk drive is disabled you will see a red X over the icon of the disk drive
If you see an icon with a red X over the icon of the disk drive, double-click the icon and click the Enable Device button
Click Next on the Enabling a device dialog box, and then click Finish
Click Close and then close the Device Manager window
Note: If you don’t see your disk drive in the listed drives, the drive may not have been detected by Windows.
Note: If you receive an error message when Enabling the disk drive, you may have a defective disk drive.
Method 4: Make sure that the drive is Online
If the drive is currently Offline, the disk will not be visible in Windows Explorer. To check the current status of your disks, follow the steps below:
Open Computer Management by clicking the Start button, clicking Control Panel, and click System and Security.
Click Administrative Tools, and then double-clicking Computer Management. If you’re prompted for an administrator password or confirmation, type the password or provide confirmation.
Look for a drive that does not have an assigned drive letter and that is not labeled as System Reserved.
Note The System Reserved drive is reserved by Windows.
Right-click the drive and click Change drive letter and paths…Click Add and then click OK to select the first available drive letter.
If the Change drive letter and paths… option is not available, make sure that the drive is Online.
If the drive is Offline, right-click the disk number and click Online.
Method 5: Your USB drive may be corrupted
Your USB disk may be corrupted, to check for a corrupted disk, plug the disk into another computer to see if the disk is seen in Windows Explorer on that computer. Make sure that you have the driver installed.
If the device is still not seen in Windows Explorer on the alternate computer, the disk may be corrupted. Some hardware manufacturers do offer hardware testing software that may help to access and detect test for issues on their hardware. Visit the hardware manufacturers website and search for any helpful testing software.
Method 6: Corrupted registry keys may be causing issues with connecting to your CD or DVD drive
Corrupted registry keys may be causing your CD or DVD drive not to be seen by Windows. An automated Fix it is available to resolve this issue. To run this Fix it, follow the steps listed in the following KB article:
982116 Your CD drive or DVD drive is missing or is not recognized by Windows or other programs
Answers Forum Support: To see the discussion on this issue in the Answers forum, click the following link:
When an external drive was encrypted with BitLocker (on a Windows 7-based PC) the drive may not be visible when plugging it to another computer (Windows XP-based PC). There may be an expectation of getting a popup asking for the BitLocker encryption key but this does not happen.
This can be resolved by decrypting and disabling BitLocker while connected to the first Windows 7-based PC, the drive will then be visible as expected on the second PC.
Roxio GoBack:
This problem may occur if you have used the Roxio GoBack program on the hard disk. The problem occurs because Roxio GoBack modifies the master boot record (MBR) and changes the partition type on the hard disk. This can cause the drive to be inaccessible in Windows XP, even when the hard disk appears in Device Manager and in Disk Management console.
To resolve this problem, contact Symantec for the latest updates to GoBack.
Or you can work around this problem by using the following steps:
WARNING: If you are not sure that you can safely follow these steps, contact your hardware documentation or contact the manufacturer of the hard disk or the computer before you continue.
Configure the hard disk as the primary master, and then restart the computer.
Disable Roxio GoBack. To do so, follow these steps:
Press SPACEBAR to view the GoBack boot menu.
Press D to disable GoBack, press Y to confirm, and then press ENTER two times.
Shut down the computer and then return the hard disk to its original configuration.


