- Explorer.exe — что это за процесс, как исправить и перезапустить
- Как перезапустить Проводник Explorer.exe в Windows 10/8.1/7
- Исправить различные ошибки с Проводником Exporer.exe в Windows 10/8.1/7
- Explorer.exe с желтым восклицательным знаком и пустым окном
- How to customize Explorer in Windows 10
- How to customize Explorer in Windows 10
- Customize “View” in Explorer
- Customize “Folder Options” in Explorer
- General Folder Options
- Customize View Options
- Как отобразить строку меню в Internet Explorer
- Отображение строки меню в Internet Explorer
- Влияние полноэкранного режима на видимость строки меню
- Настройка видимости других скрытых панелей инструментов
- Change or reset Internet Explorer settings
- Change Internet Explorer settings
- Reset Internet Explorer settings
- If Internet Explorer won’t open, or pages won’t load.
- 8 ways to open the Folder Options window, in Windows (all versions)
- 1. Open Folder Options using search (all Windows versions)
- 2. Open Folder Options from the Control Panel (all Windows versions)
- 3. Use the View tab in File Explorer to open Folder Options (Windows 10 and Windows 8.1)
- 4. Use the Organize menu in Windows Explorer, to open Folder Options (Windows 7 only)
- 5. Use the Run window to open Folder Options (all Windows versions)
- 6. Use the File menu in File Explorer to open Folder Options (Windows 10 and Windows 8.1)
- 7. Use the Command Prompt or PowerShell to open Folder Options (all Windows versions)
- 8. Use the Folder Options shortcut that we created for you (all Windows versions)
- Which method do you prefer for opening the Folder Options?
Explorer.exe — что это за процесс, как исправить и перезапустить
Процесс explorer.exe, он же «Проводник», является основной частью операционной системы Windows 10/8.1/7 и служит для улучшения графической оболочки проводника для переключения различных папок и файлов. К примеру, с помощью этого процесса мы можем открывать папки, копировать и удалять файлы. Представьте, если бы это приходилось делать все через командную строку? По сути так и появился процесс explorer.exe.
Проводник (explorer.exe) также отвечает за оболочку панели задач и меню пуск, которые могут со временем дать сбой и не работать. К примеру, когда вы нажимаете на кнопку «Пуск» или «Все параметры», то ничего не происходить и кнопки эти не кликабельны. В этой ситуации поможет перезапуск Explorer.exe в Windows. Если вы внесли какие-либо изменения в интерфейс проводника или реестр, то они появятся только после перезагрузки, но можно просто перезапустить сам процесс explorer.exe, не перезагружая компьютер.
Может быть так, когда ваш ПК работает все время, уходя только в спящей режим без выключения и перезагрузки, то процесс explorer.exe может грузить сильно память, и перезагрузка компьютера поможет исправить эту проблему. Explorer.exe не является вирусом, но вредоносное ПО может замаскироваться под это имя процесса и грузить вашу систему. Сам файл находится по пути C:\Windows\explorer.exe, если он в другом месте, то это вирус.
Также этот процесс может давать сбой, виснуть, не давать отклика и показывать различные сообщения об ошибках, как «Ошибка при системном вызове», «Ошибка приложения», «Системная ошибка переполнения буфера» и другие ошибки, связанные с повреждением системных файлов, которые относятся к explorer.exe. Давайте разберем, все возможные решения, чтобы исправить ошибки связанные с explorer.exe в Windows 10/7/8.1.
Как перезапустить Проводник Explorer.exe в Windows 10/8.1/7
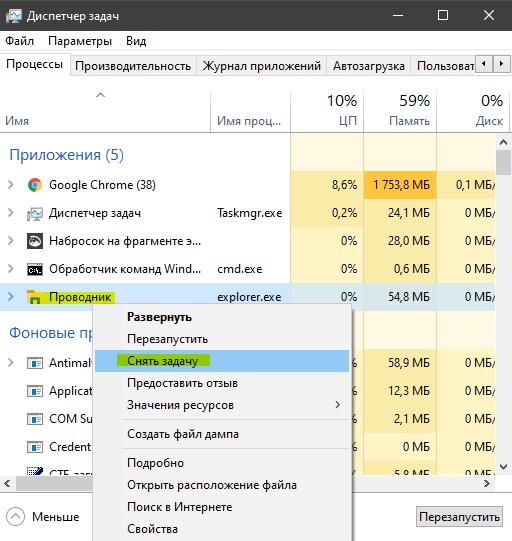
Этот способ поможет в большинстве случаях исправить ошибки с отображением интерфейса, некликабельностью кнопок и других ошибок связанных с проводником. Нажмите сочетание кнопок на клавиатуре Ctrl+Shift+Esc, чтобы открыть диспетчер задач. Во вкладке «Процессы» найдите имя «Проводник«, нажмите по нему правой кнопкой мыши и выберите «Снять задачу«.
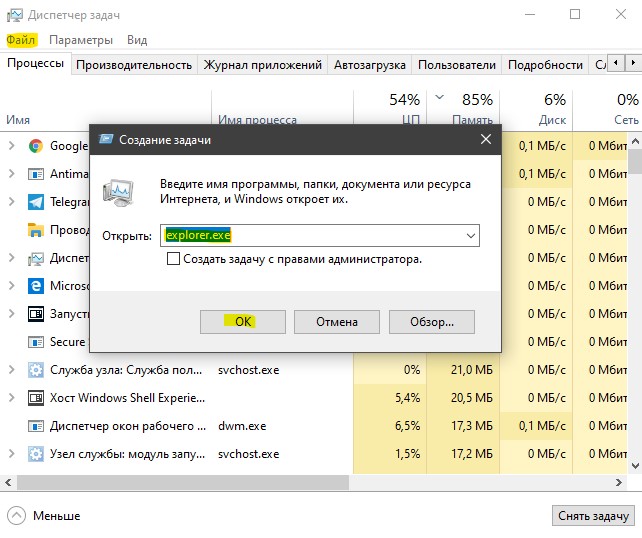
У вас пропадет интерфейс рабочего стола, не пугайтесь. В диспетчере задач нажмите на вкладку «Файл» > «Запустить новую задачу» > введите в окно explorer.exe и нажмите OK.
Исправить различные ошибки с Проводником Exporer.exe в Windows 10/8.1/7
1. Если у вас установлены облачные клиенты, как OneDrive, Яндекс Диск и другие, то отключите их на время и проверьте устранена ли проблема.
2. Воспользуйтесь антивирусным сканером, как Zemana или DoctorWeb .
4. Откройте «Автозагрузку» программ в диспетчере задач и отключите все лишнее (торент, сторонние программы и т.п.).
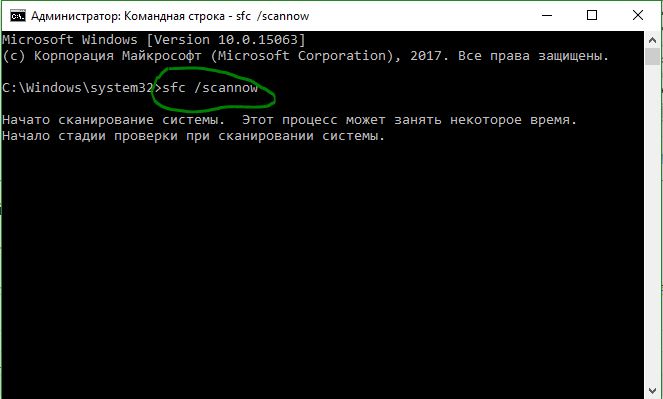
5. Откройте командную строку от имени администратора и введите команды по очереди, дожидаясь окончание процесса после каждой.
- chkdsk /f /r /x
- sfc /scannow
- DISM /ONLINE /CLEANUP-IMAGE /RESTOREHEALTH
Explorer.exe с желтым восклицательным знаком и пустым окном
После проверки вирусов в системе, может появится пустое окно с восклицательным знаком и сообщением об ошибке explorer.EXE.

В этом случае, нажмите Win+R и введите regedit, чтобы открыть редактор реестра. В реестре перейдите по пути:
- HKEY_CURRENT_USER\Software\Microsoft\Windows NT\CurrentVersion\Windows
- Перезагрузите ПК.
How to customize Explorer in Windows 10
Windows File Explorer, popularly known as just Explorer is the heart of Windows UI. Every interaction you make with files, and folders are through Explorer. As the OS has evolved, so did the File Explorer, and in this guide, we will share how you can customize Explorer in Windows 10.
How to customize Explorer in Windows 10

The default Explorer view offers access to all user folders, and drives. On the top, you have few fixed tabs like File, View, and more show up based on what you select and your current location. For example, when you choose an image, you get a Picture Tools menu, while you get Application tools when you select an executable. The fact is the list is dynamic, and keep changing all the time based on the situation.
Since we are dealing to customize Explorer in Windows 10, most of them are available in the Options section of View tab, and some are related to the context menu.
Customize “View” in Explorer
How you want to look at your files, depend entirely on the kind of work you engage into regularly. In the view tab of the ribbon menu, you can switch from extra large (suitable for images) to Large icons to Details which adds date, type, size to the files, folders, and tags if you use it.
Next, you can choose to Sort & Group files and folders by size, date, name, etc. If you feel something is missing, you can select “Add Columns” in detailed view.
Apart from file views, you can add two side panes to extend them. It is useful for individual files if you do not wish to use details mode.
- Preview Pane: Useful for Images and media files.
- Details Pane: Useful when you deal with a lot of files where you need to check details like size, creation date, and so on.
Then you have a Navigation Pane, which adds tree like explorer structure on the left. It helps you to navigate between the folders quickly.
Lastly, you have a few more options. Enable
- checkboxes for easy selection of multiple items
- viewing of file extensions
- View hidden files and folders. More here on how to hide/unhide folders in Windows
Customize “Folder Options” in Explorer
In the view menu, you have the Options. When you click on it, it opens a pop-up window which offers a plethora of choices you can make. They are majorly for folders and search. Here you have three significant configurations–General, View, and Search. We are going to look at the first two.
TIP: Make sure to check out Windows Explorer Tips and Tricks.
General Folder Options
Change Default Folder
Choose quick access when you want to go to your frequently used folders, and files without wasting much time. If you also want quick access to drives, enable navigation pane, and you have the best of both.
Do you use a Touch Screen?
You can choose to open the folders with a single click, but it could be annoying when using a mouse. If you have a touch screen, a single tap can open the folder. Double click with touch is slightly irritating.
Others
- Display or clear recently used files, and frequently used folders.
- Open every folder in their view.
Customize View Options
Here you get micro control on what you get to see for the files and folders. Right from icons, to menus, to full path, the option to hide empty drives and so on. Here are few which you should look at-
Automatically type in the search box:
When we open any folder, we usually search an item. If you have an extensive collection of files and folders, enable this option. So when you need to find something, it will type it in the search box and filter the results.
When you click on the search box or type with this option enabled, you get a couple of filter option. It helps you to narrow down search result to find the exact file or folder you were trying to find. You can limit on file size, type, date modified and so on.
Restore Previous Folders on Login:
It helps you to resume work even faster as it will open the folders you work often. All you need to is shut down those the computer without closing them.
Using these options in View, you can create a minimal or an illustrated view of the folders. Useful or not depends on your work.
Lastly, you don’t have to apply the same view to all folders. When you open the view configuration being in a folder, you only customize the look for that folder. So the best way to go ahead is to customize with the folders you work with, and leave others. Though you can choose to apply the current view to all folders with “Apply to folders” button.
If something doesn’t fit, you can always reset the Folder view.
That is pretty much you should know about how you can customize Explorer in Windows 10. Though I would repeat that everything depends on your work, most of the consumers don’t really change anything unless its a need, but those who need to handle a lot of files and folders, these are really helpful.
Как отобразить строку меню в Internet Explorer
Примечание . Данная процедура предназначена для браузера IE в операционной системе Windows. Мобильные устройства не имеют возможности просмотра строки меню.
Браузер Microsoft Internet Explorer по умолчанию скрывает верхнюю строку меню. Строка меню содержит основные меню браузера: «Файл», «Редактировать», «Просмотр», «Избранное», «Инструменты» и «Справка». Скрытие строки меню не делает ее функции недоступными; скорее он просто расширяет область, которую браузер может использовать для отображения содержимого веб-страницы. Вы можете легко получить доступ к строке меню и всем ее функциям в любой момент.
Кроме того, вы можете выбрать постоянное отображение, если вы предпочитаете работать с ним видимым.
Примечание . В Windows 10 браузером по умолчанию является Microsoft Edge, а не Internet Explorer. Строка меню полностью отсутствует в браузере Edge, поэтому не может быть отображена.
Отображение строки меню в Internet Explorer
Вы можете временно отобразить строку меню или настроить ее отображение, если явно не скрываете ее.
Чтобы временно просмотреть строку меню : убедитесь, что Explorer является активным приложением (щелкнув где-нибудь в его окне), а затем нажмите клавишу Alt . На этом этапе выбор любого элемента в строке меню отображается до тех пор, пока вы не нажмете в другом месте на странице; затем он снова становится скрытым.
Чтобы строка меню оставалась видимой : щелкните правой кнопкой мыши строку заголовка над строкой URL-адреса в браузере и установите флажок рядом со строкой меню . Строка меню будет отображаться, если вы снова не установите флажок, чтобы скрыть его.
Или нажмите Alt (чтобы отобразить строку меню) и выберите меню View . Выберите Панели инструментов, а затем Строка меню .
Влияние полноэкранного режима на видимость строки меню
Обратите внимание, что если Internet Explorer находится в полноэкранном режиме, строка меню не отображается независимо от ваших настроек. Для входа в полноэкранный режим нажмите сочетание клавиш F11 ; чтобы выключить его, снова нажмите F11 . Как только полноэкранный режим отключен, строка меню снова будет отображаться, если вы настроили ее так, чтобы она оставалась видимой.
Настройка видимости других скрытых панелей инструментов
Internet Explorer предоставляет широкий спектр панелей инструментов, кроме строки меню, включая панель «Избранное» и строку состояния. Включите видимость для любой включенной панели инструментов, используя те же методы, которые обсуждались здесь для панели меню.
Change or reset Internet Explorer settings
The new browser recommended by Microsoft is here
Get speed, security, and privacy with the new Microsoft Edge .
Change Internet Explorer settings
There are many changes you can make to customize your browsing experience in Internet Explorer. To view all settings and options, open Internet Explorer on the desktop, select Tools > Internet options.
Reset Internet Explorer settings
You can reset Internet Explorer settings to what they were when Internet Explorer was first installed on your PC. This is useful for troubleshooting problems that may be caused by settings that were changed after installation. Be aware that this process isn’t reversible, and all previous Internet Explorer settings are lost after reset.
Close all open windows and programs.
Open Internet Explorer, select Tools > Internet options.
Select the Advanced tab.
In the Reset Internet Explorer Settings dialog box, select Reset.
In the box, Are you sure you want to reset all Internet Explorer settings?, select Reset.
When Internet Explorer finishes applying default settings, select Close, and then select OK. Restart your PC to apply changes.
If Internet Explorer won’t open, or pages won’t load.
If Internet Explorer won’t open, or if pages aren’t loading, there may be an add-on that is interfering with the process. To tell whether this issue is with an add-on or not, you can try the following:
Find your processor speed.
Select Start > Settings > System > About.
Under Device specifications, see System type.
Based on your processor speed, choose the appropriate line of code below and copy and paste or type the code into the Search box on the toolbar.
For 32-bit:
«C:\Program Files (x86)\Internet Explorer\iexplore.exe» -extoff
For 64-bit:
«C:\Program Files\Internet Explorer\iexplore.exe» -extoff
Internet Explorer will open and you can find out which add-ons were causing issues. To manage add-ons in Internet Explorer, see Manage add-ons in Internet Explorer 11.
8 ways to open the Folder Options window, in Windows (all versions)
Most Windows users rely on File Explorer (in Windows 10 or 8.1) or Windows Explorer (in Windows 7), to access and organize their files and folders. If you want to personalize how Explorer works, you must first open the Folder Options window, where you can set things like how folder and files are opened. Here are all the ways we know for opening the Folder Options window, in all versions of Windows:
NOTE: This guide covers Windows 10, Windows 7, and Windows 8.1. Some methods work in all three versions of Windows, others just in one or two. For each method, we mention the Windows version in which it works. If you do not know the version of Windows that you have, read this tutorial: What version of Windows do I have installed?
1. Open Folder Options using search (all Windows versions)
One method that works in all versions of Windows involves using search. In Windows 10, use the search field from the taskbar and enter the keywords “folder options.” Then, click or tap “File Explorer Options.” If you like using Cortana, you can say to her: “Open folder options.”
In Windows 7, open the Start Menu and, in its search box, type “folder options” and click on the search result with the same name.
In Windows 8.1, go to the Start screen and search for “folder options.” Then, click or tap the Folder options result.
2. Open Folder Options from the Control Panel (all Windows versions)
Another method that works well is to open the Control Panel, and go to “Appearance and Personalization.” Then, if you are using Windows 10, click or tap “File Explorer Options.”
If you are using Windows 7 or Windows 8.1, click “Folder Options.”
3. Use the View tab in File Explorer to open Folder Options (Windows 10 and Windows 8.1)
If you are using Windows 10 or Windows 8.1, open File Explorer and then go to the View tab in the ribbon. In the View tab, click or tap the Options button found on the right.
4. Use the Organize menu in Windows Explorer, to open Folder Options (Windows 7 only)
In Windows 7, open Windows Explorer and then click Organize in the toolbar on the top. In the menu that opens, choose “Folder and search options.”
The Folder Options window is opened, and you can set how Windows Explorer works.
5. Use the Run window to open Folder Options (all Windows versions)
Press Windows+R to open the Run window. In the Open field, type one of the following commands and press OK:
- control.exe folders
- rundll32.exe shell32.dll,Options_RunDLL 0
Both commands open the same Folder Options window.
6. Use the File menu in File Explorer to open Folder Options (Windows 10 and Windows 8.1)
If you are using Windows 10 or Windows 8.1, open File Explorer and then click or tap File, in the top-left corner. In the menu that opens, click or tap “Change folder and search options.”
7. Use the Command Prompt or PowerShell to open Folder Options (all Windows versions)
For those of you who like using the Command Prompt (CMD), start it and then type “control.exe folders” or “rundll32.exe shell32.dll,Options_RunDLL 0” (without the quotation marks) and press Enter.
Others may prefer PowerShell. Open it and type one of the same two commands: “control.exe folders” or “rundll32.exe shell32.dll,Options_RunDLL 0” (without the quotation marks). Do not forget to press Enter, so that your command is executed.
8. Use the Folder Options shortcut that we created for you (all Windows versions)
We have created the most extensive collection of shortcuts for Windows. Download it, extract it and you look for the Folder Options shortcut in the Appearance and Personalization sub-folder for your Windows version.
Which method do you prefer for opening the Folder Options?
Now you know several methods for accessing the Folder Options window, which allows you to personalize how File Explorer works in Windows 10 and Windows 8.1, as well as how Windows Explorer works in Windows 7. Try them out and let us know which one is your favorite. Also, if you know other ways of accessing the Folder Options window, do not hesitate to share them in a comment below. We promise to update this guide based on your feedback.


