- Setting Up Windows Explorer Folders, Views, Options and Settings Tutorial
- 3 Ways to Open File Explorer Options in Windows 10
- 3 ways to open File Explorer Options in Windows 10:
- How to show File Extensions in Windows 10
- What are File Extensions & how are they useful
- Show File Extensions in Windows 10
- 1] Through Folder or File Explorer Options
- 2] Via Windows File Explorer
- 3] Using the Registry Editor
- How to set a default Folder View for all folders in Windows 10
- What are Folder Templates
- Set a default Folder View for all folders
- Set default in File Explorer to List View in Windows 10
- Replies (53)
Setting Up Windows Explorer Folders, Views, Options and Settings Tutorial
Customize your folders for the full potential of your PC experience.
ONLY HAVE THIS ONE FOLDER OPEN YOU ARE TRYING TO SET.
Select the bottom arrow and select View Tab
Now you will have this view with only a couple columns of info.
this is what you do to add and save the columns for similar type files in folders. (Shown in Photos)
Select sort by, and then select choose columns. Now here you want to select the columns as you want them displayed from left to right in the window. You may have to open and close choose columns several times to set it how you want it because they are listed in alphabetical order in the selections box.
Now after you have selected all that you want now select this, size all columns to fit.
Now you need to set it to stay this way. To do this select FILE TAB>>Change folder and search options. Go to View Tab
Now this is the important part. If the Apply to folders button is enabled to use, GREAT. (Mine shows disabled because I already made the change) Just select Apply on bottom, then Apply to Folders on top and OK.
If the Apply to folders is disabled like mine shows, then you have to get it enabled. I usually select to unhide (Uncheck) protected operating system files and then Apply and confirm YES. Then check it back to hide and select Apply and then the Apply to folders is usually enabled. Now select to Apply to folders, Apply again if enabled and OK.
Close out the folder.
Now log off desktop and log back on.
If you do not select to Apply to folders, then your selections may not stay as you set them or may not apply the settings to all folders with similar files.
Also, the bottom right of windows explorer has default thumbnail icon size you have chosen and details views to switch between that has these columns you created. And these setting will hold true for any other drives you have connected when you made these changes.
Also, once you do this, if you like the Icon thumbnail view by default when opening windows over the details view by default, all you have to do is on bottom right is switch to icon view, open file explorer options and do the same procedure in View Tab to APPLY, APPLY TO FOLDERS, OK. Now your will get Icon view by default and you have already set your details view for columns to switch to anytime and both settings are stored. There are a few Windows and users folders that you may have to manually set default view as they may even be small icons view when you have large icons by default view and of course your details view you setup. An example of this is Music Folder\Playlists, usually every time you open music folder, all the icons will be small. But most all folders will hold true your default view for open Windows.
Sorting Icons by;
In the windows where there are files, find a blank spot in the LARGE WHITE AREA and select in menu sort by and then select more. Here will give you more options to select. After you select your options, right click on a blank spot again and select in menu>sort by or group by and then select one of the choices.
3 Ways to Open File Explorer Options in Windows 10
In File Explorer Options (i.e. Folder Options), you can show the hidden files and folders, display check boxes to select items and make other settings on your Windows 10 PC. Thus, this article specially introduces three methods to open File Explorer Options in Windows 10 Pro Technical Preview.
Video guide on how to open File Explorer Options in Windows 10:
3 ways to open File Explorer Options in Windows 10:
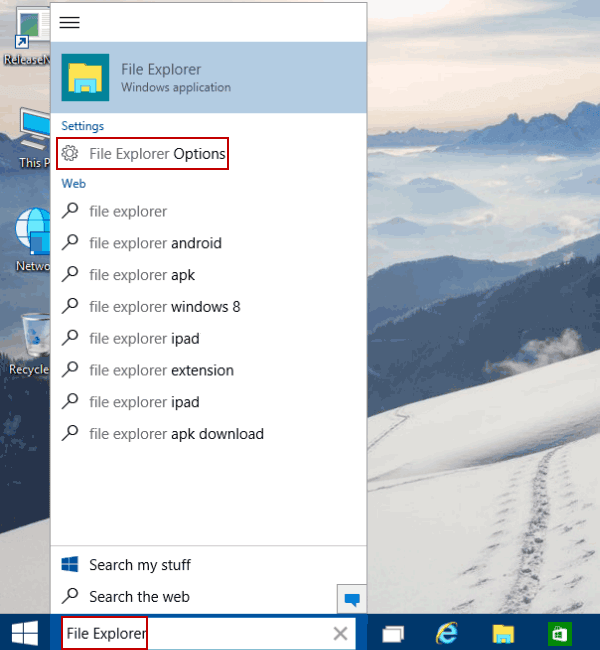
Way 1: Open it via search.
Type file explorer in the search box on taskbar, and choose File Explorer Options in the result.
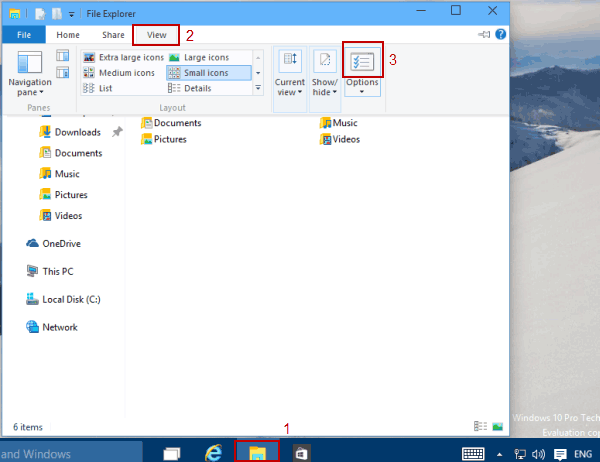
Way 2: Open Folder Options in File Explorer.
Click File Explorer on the desktop taskbar, open View and tap the icon located above Options.
Way 3: Open File Explorer Options in Control Panel.
Step 2: Click the bar on the right of View by, and then choose Small icons to view all items by small icons.
Step 3: Find and tap File Explorer Options.
How to show File Extensions in Windows 10
File Extension is that which identifies the file type. If you are a regular Windows user, then it is not at all a problem to identify the file type. For it is very important to see file extension to identify the type of file you are trying to open from a security point of view. So in this post, we will see how to hide or show File Extensions in Windows 10/8/7 and why you should show them.
Since file names allow you to use multiple full stops, the real name of a malware file could be realword .docx.exe . But because you have not set Windows to show file extensions, you would see only realword .docx . Thinking its a Word document, you could well end up clicking on it and infecting your computer. If you had, on the other hand, set your PC to show file extensions, you would see its full name – realword .docx.exe , which would help you to identify that it was actually an executable file and in all probability a malware file.
What are File Extensions & how are they useful
Different file types have different extensions. Audio files have .mp3, .wav, .wma, and more based on the program used to open that file. File extensions also help the operating system to identify the corresponding program to open that particular file. So, you should be able to see file extensions to be at the safer side, and we will let you know how to enable options to see file extensions in Windows.
As mentioned earlier, by default Windows does not show file extensions and they are hidden. But, you can toggle the option to see them.
Show File Extensions in Windows 10
There are five ways how you can go about accessing this setting:
- Through the File Explorer Options
- Through Windows Explorer Ribbon
- Using the Registry
- Using Command Prompt
- Using Group Policy Editor.
1] Through Folder or File Explorer Options
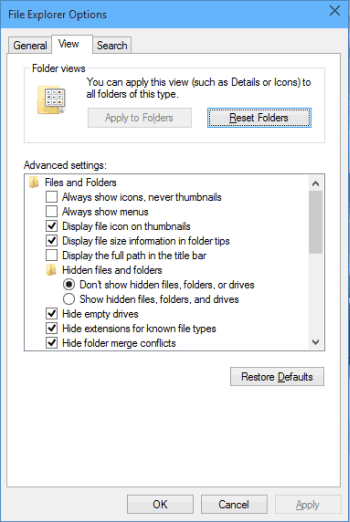
Open Control Panel > Appearance and Personalization. Now, click on Folder Options or File Explorer Option, as it is now called > View tab.
In this tab, under Advanced Settings, you will see the option Hide extensions for known file types. Uncheck this option and click on Apply and OK.
Windows 10 users may also search for File Explorer Options in Start search box and open this box.
Now, you can see file extensions for all files anywhere on your Windows system.
In Windows 10/8.1 Explorer, you can access File Explorer Options via Explorer.
Click View > Options > Change folder and search options.
Once here, you can do the needful as explained above.
In Windows 7, open Explorer, press Alt on your keyboard to make the Classic bar appear. Next, click on Tools > Folder Options. Now follow the steps mentioned above.
These are very simple steps to follow, and you do not need any third-party software to view file extensions. Windows provides us with everything which can be easily achieved, and the point lies in knowing and implementing them. This is the first way to see file extensions in Windows 7.
2] Via Windows File Explorer
Open Explorer and click on the View tab. Simply select the File name extensions checkbox, and you are all set.
3] Using the Registry Editor
Hit the WINKEY + R button combination to launch the Run utility, type in regedit and hit Enter. Once Registry Editor opens, navigate to the following key-
Look up for a DWORD entry labeled as HideFileExt.
Double click on the mentioned DWORD entry and set its value as 0. This will show up the hidden file extensions.
A value of 0 will hide the file extensions.
Exit the Registry Editor and then reboot your computer for the changes to take effect.
4] Use Windows Command Prompt
This fix can be used in both the scenarios mentioned above. Insert a bootable drive of Windows 10 installer.
Start by hitting the WINKEY + X combinations and select Command Prompt (Admin) to launch Command Prompt with Administrator Privileges.
Navigate to the root location of that bootable device inside the Command Prompt command line. Once you get there, type in the following to show the file extensions-
And then hit Enter.
You can also enter the following command to hide the file extensions,
5] Using Group Policy Editor
You can also use the Group Policy Editor and change the setting here:
User Configuration > Preferences > Control Panel Settings > Folder Options.
Set “Show hidden files and folders” and uncheck “Hide extensions for known file types”.
Thus, you can set your Windows to show file extensions in Windows 10/8. If you have anything to add, please do share it with us through comments.
Date: March 22, 2020 Tags: Explorer, Features
How to set a default Folder View for all folders in Windows 10
In Windows File Explorer, you might have noticed the different folder layout settings for different folders. Some of the folders have smaller icons while some puts on a large icons view layout. There are several folder layouts available in Windows 10/8/7 which you can choose from, for any folder. While Windows has set these defaults based on the nature of the files in the folder, if you wish, you can set a default Folder View for all folders. In this post, we will how to set & apply the same view settings of the current folder, as the default, for all other folders on your PC.
What are Folder Templates
Before rolling on to change the folder’s view settings, let’s take a look at how folder templates work. You might have noticed that folders that contain pictures have a different view layout than that which contains videos or documents. This is the folder optimization technique in play which chooses one of the five templates for any folder based on the content that is stored in it. These templates are:
- General Items – Applies to any folder that contains a mixed combination of files and other sub-folders.
- Documents – Applies to the folders that contain documents (Word files, text files, etc.)
- Pictures – Applies to the folders that contain image files (.jpg, .png files, etc.)
- Music – Applies to all such folders which contain music files (.mp3, .wav, etc.)
- Videos – Applies to any folder that contains just video items (.mp4, .avi, etc.)
Whenever you create a new folder and put some files in it, Windows does its best to decide the folder template based on the content. If you’re storing mixed type of files in any folder, Windows automatically assigns General Items as the folder template. If you want to view any folder’s template, right-click the folder icon and open its Properties window. In here, navigate to the Customize tab where you can see the correct template optimized for the folder in question.
Set a default Folder View for all folders
Now that we are clear on basics, let’s roll over to the task at hand. You can apply a folder’s view settings to only those folders which are optimized for the same folder template type. Once the view layout is generalized for a folder template type (say, Music), every time you change the layout of file icons (from tile icons to large icons), the same will be reflected in other folders as well that are optimized for Music template. Now, you can follow the below steps to apply the folder view settings across a folder template type:
1. Open File Explorer by using key combination Windows Key + E and navigate to the folder you want to use as a source for view layout settings.
2. Navigate to the View tab in ribbon bar on the top and change the settings per your wish. You can change the layout and choose the folder details to display, add extra panes, adjust column width, etc.
3. Once done with the changes, click Options to open Folder Options window.
4. Navigate to View tab in Folder Options window.
5. Click/Tap on Apply to Folders button.
6. Click/Tap Yes on the confirmation window that pops up.
7. Click/Tap OK on the Folder Options window to save the settings.
That is it. You have just generalized the view settings for a particular folder template type across the OS. Hope this works for you.
Set default in File Explorer to List View in Windows 10
Replies (53)
* Please try a lower page number.
* Please enter only numbers.
* Please try a lower page number.
* Please enter only numbers.
12 people found this reply helpful
Was this reply helpful?
Sorry this didn’t help.
Great! Thanks for your feedback.
How satisfied are you with this reply?
Thanks for your feedback, it helps us improve the site.
How satisfied are you with this reply?
Thanks for your feedback.
131 people found this reply helpful
Was this reply helpful?
Sorry this didn’t help.
Great! Thanks for your feedback.
How satisfied are you with this reply?
Thanks for your feedback, it helps us improve the site.
How satisfied are you with this reply?
Thanks for your feedback.
I have tried some thing and it seems to work.
Go to the folder that you want, click on View, click on Preview pane then on List.
Then shut down File Explorer and restart.
Get back in and pick the folder in File Explorer and it should be in list view.
This works on each folder by it self. Other folders can be different.
27 people found this reply helpful
Was this reply helpful?
Sorry this didn’t help.
Great! Thanks for your feedback.
How satisfied are you with this reply?
Thanks for your feedback, it helps us improve the site.
How satisfied are you with this reply?
Thanks for your feedback.
I appreciate the answer. I’ve done that about 10,000 times. Yes it may work the next time, but then for reasons I don’t understand, I’ll open up another folder or come back to that folder later and it will be back to the details view. It is very irritating. I have been using Microsoft OS since the DOS days. I’ve seen this problem for decades. I work at a computer all day and have been wasting my time on this for a long time. 🙁
Thanks anyway. It was kind of you to try to help.
67 people found this reply helpful
Was this reply helpful?
Sorry this didn’t help.
Great! Thanks for your feedback.
How satisfied are you with this reply?
Thanks for your feedback, it helps us improve the site.


