- Easiest Way to Extend System Partition in Windows 7 without Formatting
- Why do you want to extend Windows 7 system partition?
- How to free extend Windows 7 system partition with built-in tools?
- Method 1. Windows 7 Disk Management extend system partition
- Method 2. Extend system partition in Windows 7 via DiskPart
- Expand Windows 7 system partition via free partition software
- In summary
- 7 Ways on How to Expand or Extend Partition in Windows 7/8/10 without Data Loss
- Why Do You Need to Extend Partition in Windows 7
- Tool 1. Extend Partition in Windows 7 with EaseUS Partition Master
- Option 1. Extend Partition in Windows 7 with Adjacent or Non-adjacent Unallocated Space
- Option 2. Extend Windows 7 Partition without Unallocated Space
- Bonus Tip: How to Partition Windows 7 Hard Drive
- Tool 2. Extend Windows 7 Partition with Adjacent Unallocated Space in Disk Management
- Tool 3. Increase Windows 7 Partition Size with DiskPart
- Bonus Tips. 4 Methods to Expand Partition in Windows 7/8/10
- Method 1. Free Up TargetВ Partition Space — Delete Junk Files/Useless Large Files
- Method 2. Merge Two Disks — Extend Partition with Free Space on the Second Hard Drive
- Method 3. Clone and Replace Old Drive to A Bigger One
- Method 4. Delete Temporary Files, System Restore Image
- To Sum Up
Easiest Way to Extend System Partition in Windows 7 without Formatting
Learn how to extend Windows 7 system partition using Disk Management and free AOMEI Partition Assistant when the Extend Volume greyed out.
![]()
By Teresa  / Last Updated May 28, 2020
Why do you want to extend Windows 7 system partition?
“It is quite annoying when getting low disk space warning while working with my computer. It is like a threat that pushes me to delete files to free up disk space, or it will damage my system so that I cannot use it any more. Help please.”
Have you got such trouble on your Windows 7? Apparently, to extend Windows 7 boot partition mostly is to give sufficient space for the operating system as well as installed applications. Deleting useless files or uninstalling programs fix this trouble temporarily yet the same situation comes in the near future.
Another motivation for this behavior could be making full use of hard drive space. For example, you may want to extend C drive in Windows 7 with unallocated space or free space on the system hard drive. Surely, you can have another intention for system partition extending in Windows 7. For instance, extend system partition size to make partition size reasonable. Well, let’s find out how to extend system partition in Windows 7.
How to free extend Windows 7 system partition with built-in tools?
Windows 7 provides two disk partition managers that allow you to extend system partition in Windows 7 free, GUI Disk Management and CUI Diskpart. Let’s get to know them one by one.
Method 1. Windows 7 Disk Management extend system partition
Disk Management in Windows 7 adds two new functions named “Shrink Volume” and “Extend Volume”. «Shrink Volume» only creates unallocated space behind the partition, and «Extend Volume» can only work when there is contiguous unallocated space. Make sure you have unallocated space next to system partition.
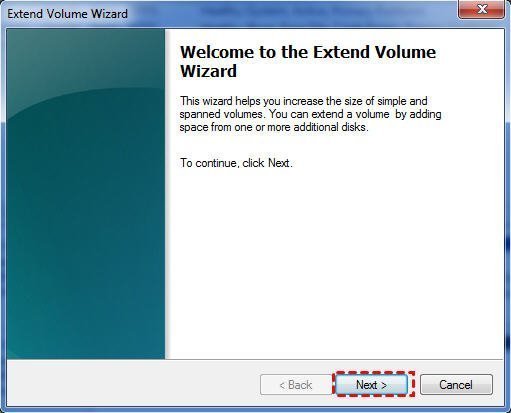
1. Open Disk Management [Computer > Manage > Storage] and right click Windows 7 system partition. Select “Extend Volume” from the given menu.
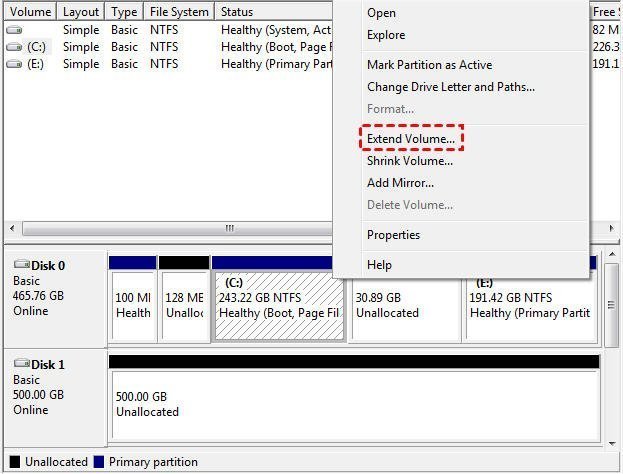
2. Follow the Extend Volume Wizard and click “Next” several times to complete.
Nevertheless, there are some limits you may want to know. To extend C drive to non-adjacent space, you need to delete the partition between system drive and free space. Otherwise, you’ll get into Windows 7 extend system partition grayed out trouble.
Method 2. Extend system partition in Windows 7 via DiskPart
Another helpful tool is Diskpart.exe in Windows 7. It is a more advanced operating method with which operations cannot be returned. Therefore, use this program with caution.
1. Open Run [press Windows key and R key simultaneously] and type “diskpart” and press Enter. Run as administrator.

2. Input commands below in order and each command has an “Enter” followed by.
select volume n [n is the number of your system C drive]
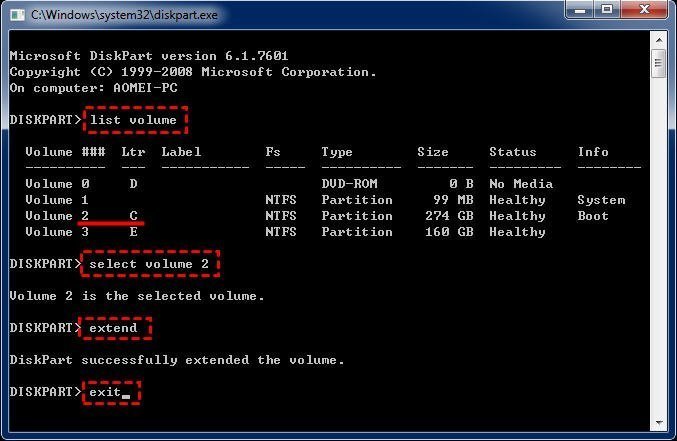
Go check in Disk Management and you’ll find system partition has been extended. However, same as Disk Management, when the unallocated space or free space is not adjacent to system drive, Diskpart cannot extend system drive in Windows 7, and it will give you error message saying: There is not enough usable free space on specified disk(s) to extend the volume.
Expand Windows 7 system partition via free partition software
When there is no adjacent unallocated space behind the system drive and you don’t want to delete any other partition, either, you can turn to the free manager software: AOMEI Partition Assistant Standard. It allows you to extend C drive in Windows 7 without formatting, both 32-bit and 64-bit. Its «Merge Partition» function can directly merge non-adjacent unallocated space into C drive or other partitions. Just to be on the safe side, backup important data beforehand. Then you can download the freeware and see how it extend Win7 boot drive.
Step 1. Installl and run this software. Clearly, behind D drive there has a large size of unallocated space. Right click C drive and choose «Merge Partitions».
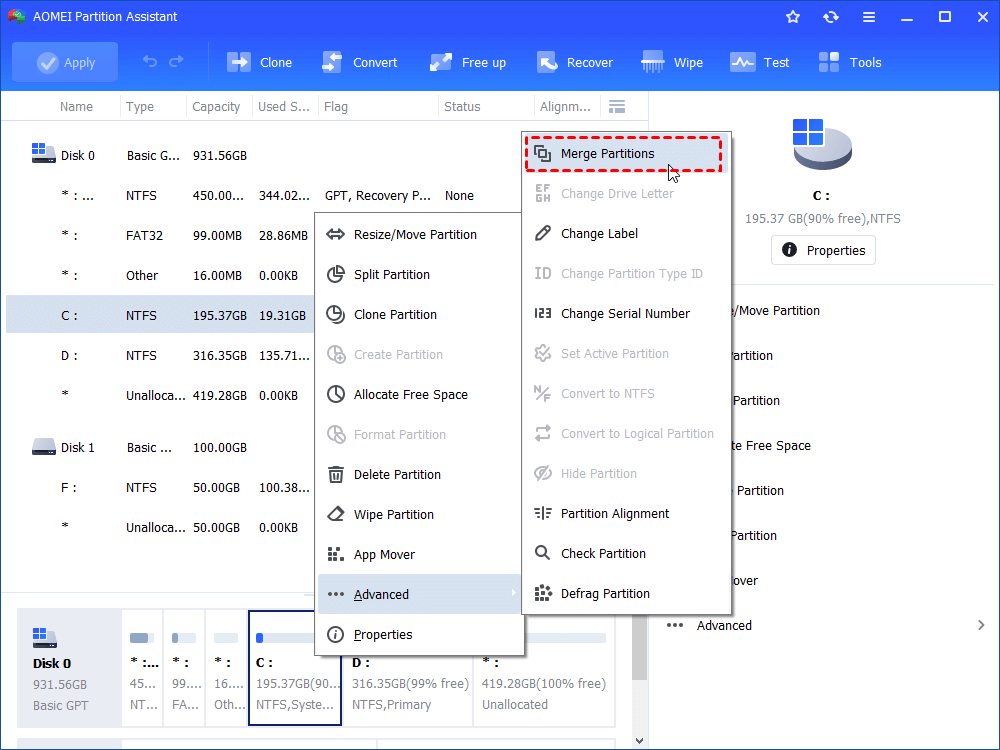
Step 2. In the following window, check system drive and all unallocated space and click «OK».
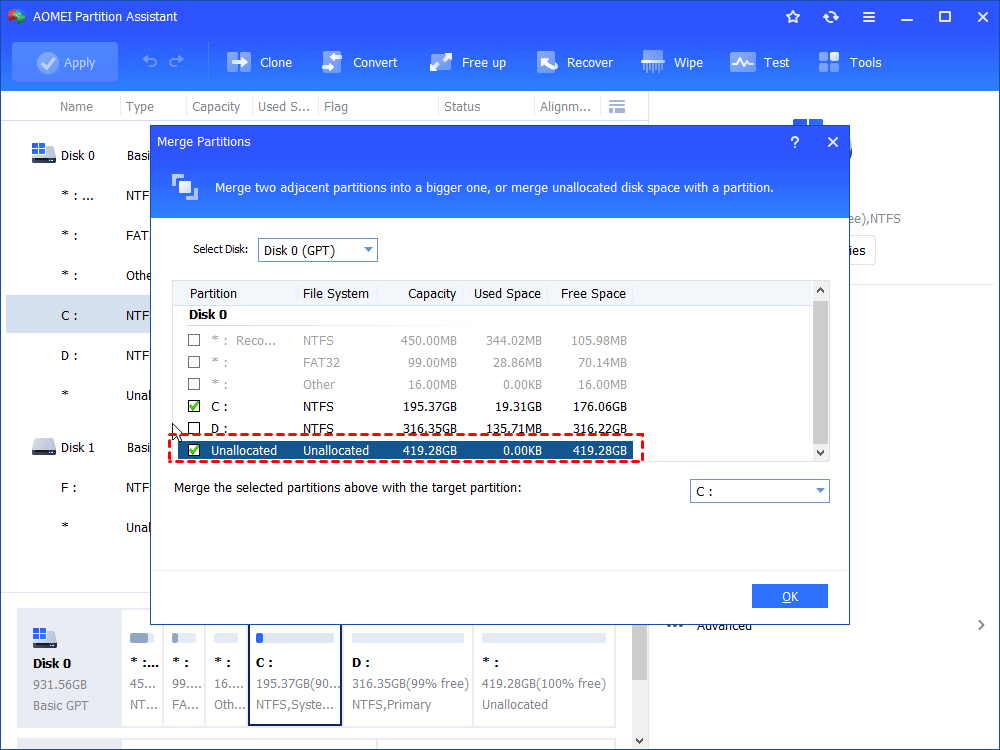
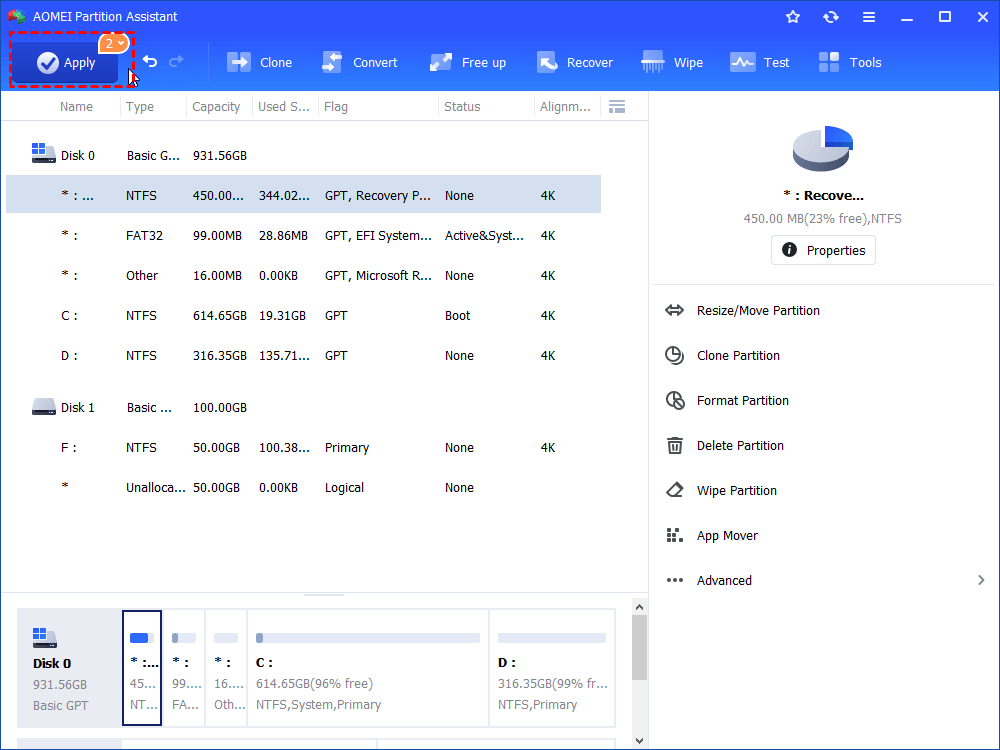
Step 3. Remember to click «Apply» to commit the task.
Tips:
в–ё If there is no free space or unallocated space on your hard drive, to extend system drive you can allocate Free Space from other redundant partitions after upgrade to Professional edition.
в–ё To avoid low disk space warning appears on the system partition, you can also install applications and third-party software separately to the system drive, data partition for example.
In summary
It is not so hard to extend Windows 7 system partition using either Disk Management or DiskPart. However, for the safety of your data, it is recommended to use the recommended freeware. Apart from extending Windows system partition in Windows 7, this method also applies to Windows 10/8/XP/Vista. AOMEI Partition Assistant is all-around software, for example, you can move partition to make unallocated space adjacent to the target partition you wish to extend, shrink C drive beyond half with it when C drive is too large, clone partition and more.
7 Ways on How to Expand or Extend Partition in Windows 7/8/10 without Data Loss
On this page, EaseUS software will help you expand partition in Windows 7/8/10 successfully with 3 tools with 4В practical methods. Most solutions can also be applied to expand the system partition.
Go through this page and find the best method to extend partition in Windows 7/8/10 on your own:
Applies to: Extend Windows 7 partition with adjacent unallocated space, expand partition with non-adjacent unallocated space or even without unallocated space.
Why Do You Need to Extend Partition in Windows 7
It’s sad that many Windows 7 users can no longer get new updates from Microsoft. When problems that occur to Windows 7 become more complex to get the issue resolved.
Fortunately, EaseUS software has never stopped supporting all Windows users. To keep your Windows 7 computer running with high performance, it’s recommended that you leave enough space on your computer.
It will also save your PC from the following issues:
- C drive is out of space
- Low disk space warning pop up in Windows 7
- Windows 7 computer becomes slow
Note: Normally, it’s recommended that you leave up at least 40% free space on your system partition so as to keep your Windows 7 computer running smoothly.
Continue reading and pick up the easiest or the most suitable way to extend your system partition in Windows 7 or Windows systems immediately.
Tool 1. Extend Partition in Windows 7 with EaseUS Partition Master
- Difficulty Level: Easiest
- Pros: No data loss;
- Best for: All levels of Windows 7/8/10 users, beginners best choice.
- Applies to: Extend system partition, expand data partition in Windows 10/8/10 with or without unallocated space.
As a matter of fact, most Windows 7 users also know very little about how to partition a hard drive on their computers. This is why we would like to pick up the easiest partition manager software — EaseUS Partition Master to help you extend the partition with ease.
It fully works to extend a partition to unallocated space regardless of whether the space is next to your target partition. Even if there is no unallocated space, you may still use it to extend a target partition successfully.
Open Disk Management to check if there is unallocated space on your disk and follow the right tutorial here to enlarge your partition with ease:
Option 1. Extend Partition in Windows 7 with Adjacent or Non-adjacent Unallocated Space
If the unallocated space on your hard drive is not next to your target partition, don’t worry. EaseUS Partition Master with its «Resize/Move» feature breaks the limit, allowing you flexibly extend the partition to unallocated space:
Step 1. Shrink partition to free up space to extend partition.
If the hard drive has enough unallocated space to extend the target partition, jump to Step 2, and continue. If not, free up space first:
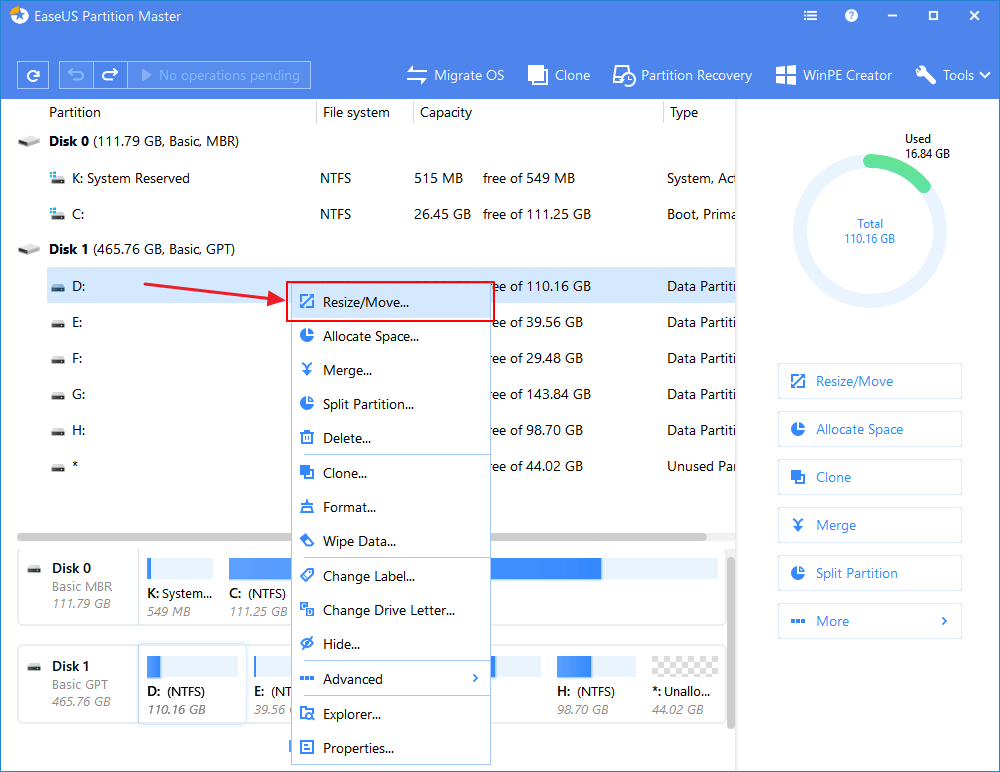
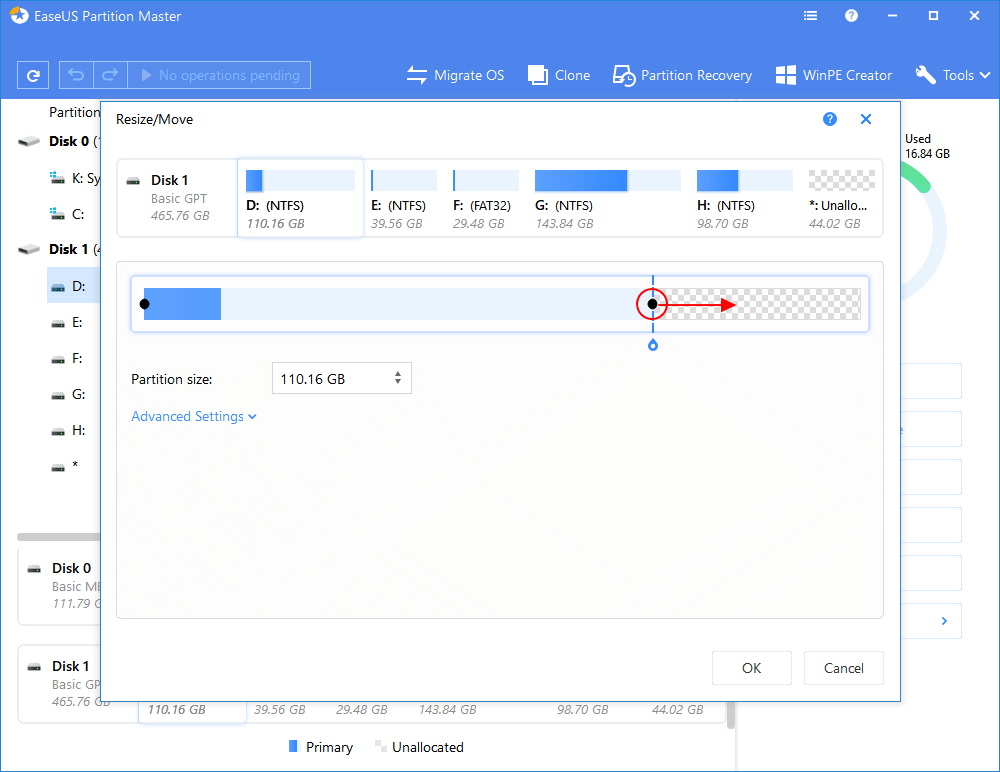
Right-click on a partition next to the target partition and select «Resize/Move».
Drag the partition ends to free up space, leaving enough unallocated space behind the target partition, click «OK».
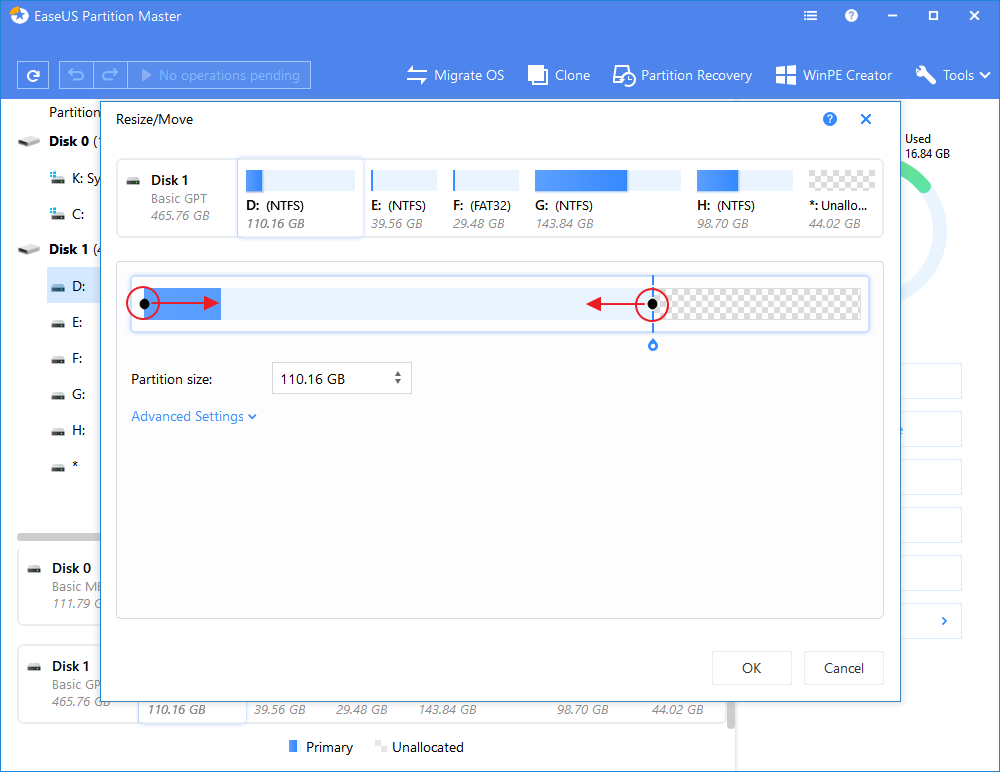
Step 2. Extend target partition.
Right-click on the target partition and select «Resize/Move».
Drag the target partition handle into the unallocated space to extend partition.
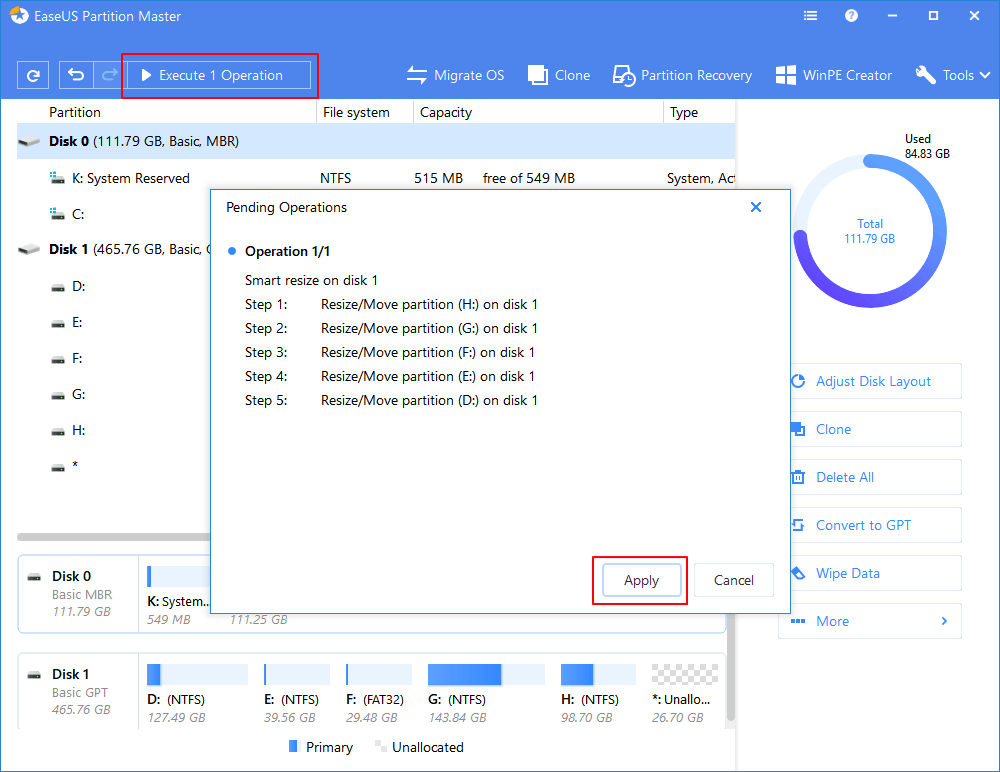
Step 3. Keep all changes.
Click the «Execute Operation» button and click «Apply» to keep all changes.
If your C drive is out of space, and you want to extend it, check this video to learn a smarter way with EaseUS Partition Master.
Option 2. Extend Windows 7 Partition without Unallocated Space
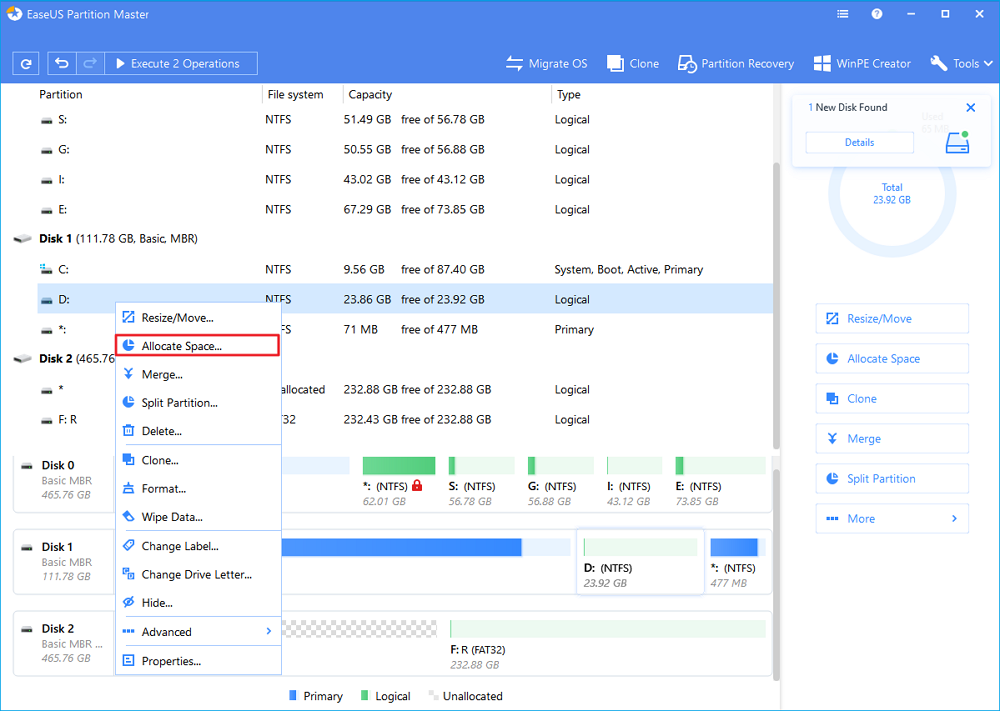
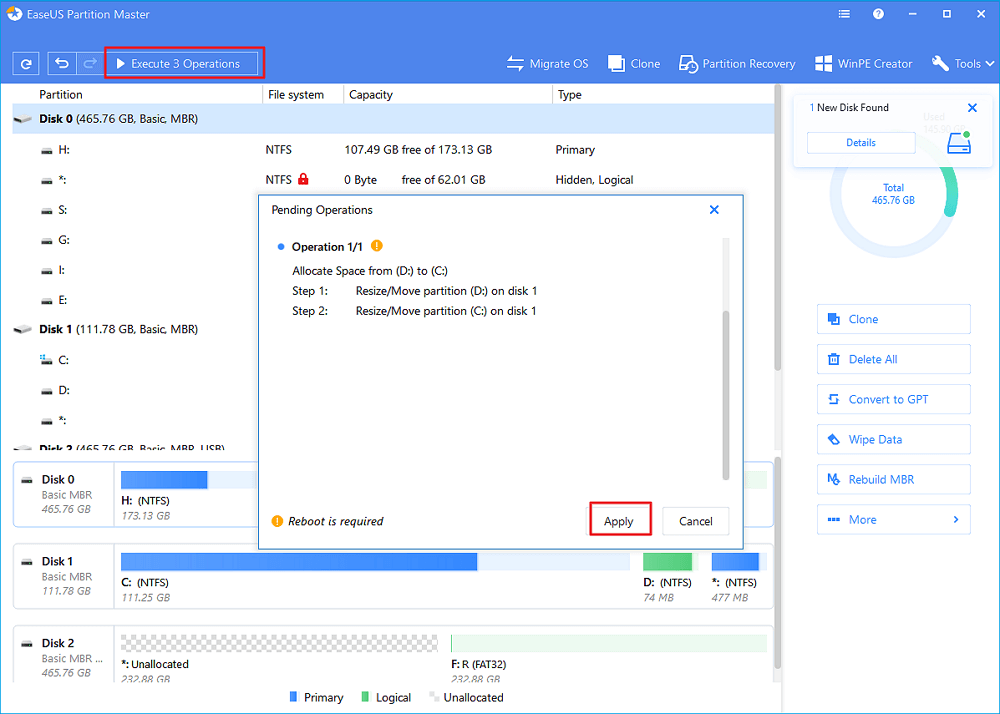
When there is no unallocated space left on your computer drive, you can use the «Allocate Space» feature in EaseUS Partition Master for help.
Here, we’ll take how to move space from D drive to C drive to show you the whole process:
Step 1. Right-click on the D: partition with enough free space and select «Allocate Space».
Step 2. Select the target partition — C:В drive andВ drag the partition panel rightward toВ add theВ free space from D: drive to C: drive. Then click «OK» to confirm.
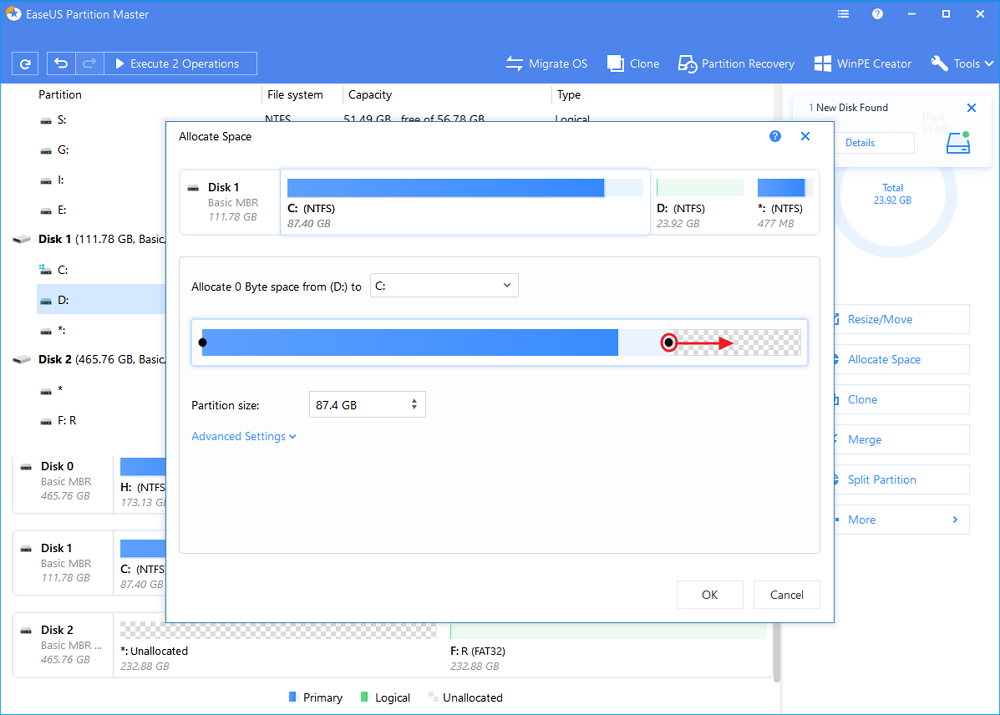
Step 3. Click the «Execute Operation» button and click «Apply» to start the process of moving free space from D: drive to C: drive.
Bonus Tip: How to Partition Windows 7 Hard Drive
After this, you’ve successfully extended Windows 7 partition with or without unallocated space. If you want to re-partition Windows 7 hard drive, such as resize partition, merge partitions, etc., EaseUS Partition Master can help you.
It allows you to flexibly manage the partition on your own. Watch the video guide below for further help:
Tool 2. Extend Windows 7 Partition with Adjacent Unallocated Space in Disk Management
- Difficulty Level: Medium
- Pros: Free; Cons: When the unallocated space is not next to the target partition, the Extend volume option will greyed out.
- Best for: Experienced Windows 7 users.
- Applies to: Expand data partition in Windows 10/8/10 with adjacent unallocated space.
In this part, we’ll show you how to extend Windows 7 partition with existing unallocated space — Disk Management. See the detailed steps on how to expand your partition with adjacent Disk Management:
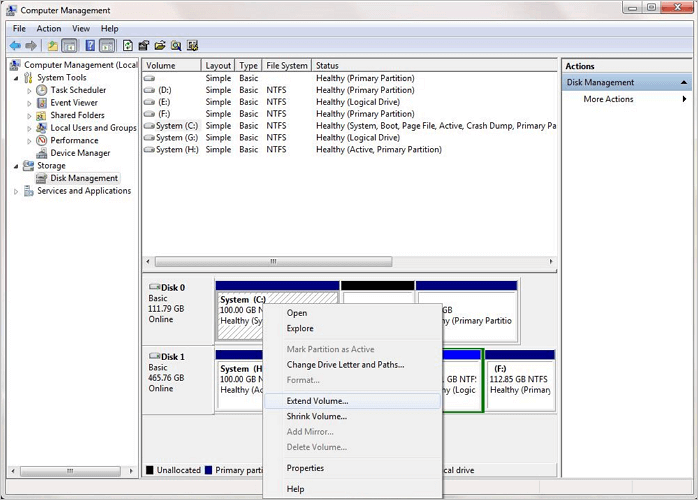
Step 1. Right-click My Computer and choose «Manage», click «Storage» and then select » Disk Management».
Step 2. Right-clickВ on the partition that you want to extend, and choose «Extend Volume» to continue.
Step 3. Set and add more size to your target partition and click «Next» to continue.В
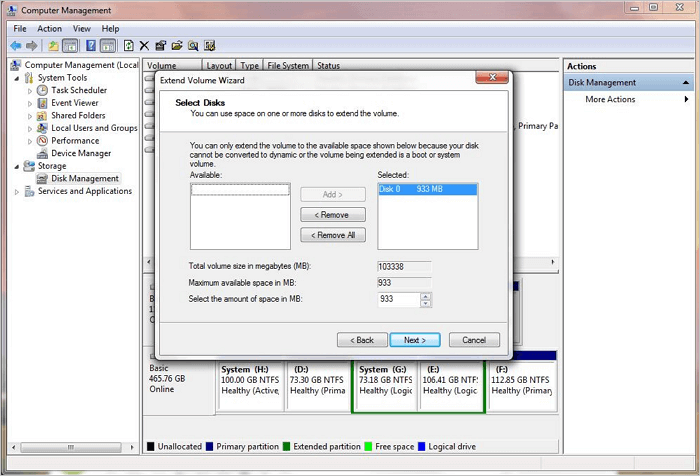
Step 4. Click «Finish» to complete the process.
If there is no unallocated space, you’ll need to right-click a neighbor drive and select «Delete volume » or «Shrink volume» to free up unallocated space. Back up data first if you intend to do so:
1. Open Disk Management, locate the partition next to your target one, and check its state:
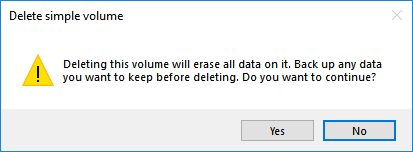
2. If the partition is empty, right-click on it and select «Delete Volume» > Click «Yes» to confirm.
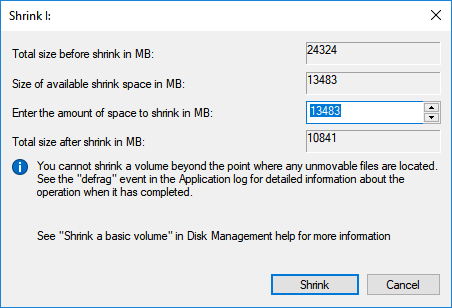
3. If the partition is not empty but has big enough space, right-click on it and select «Shrink Volume» > Enter the amount of space that you want to shrink and click «Shrink» to confirm.
Then repeat steps as shown above to extend partition with shrunk unallocated space in Windows 7 Disk Management.
Tool 3. Increase Windows 7 Partition Size with DiskPart
- Difficulty Level: Hard;
- Pros: Free; Cons: Can’t extend volume if the unallocated space is not behind target partition; Easy to lose data with false operation.
- Best for: Experienced & advanced Windows 7 users.
- Applies to: Increase partition size when the unallocated space is behind the target volume.
Some advanced Windows users and administrators prefer to use DiskPart command lines to extend their hard drive partition. This might be easy for them but complex for ordinary users. Also, any false operation may cause a serious result.
Therefore, follow the operations carefully:
Note that if the unallocated space is not behind your target volume, you’ll have to use Disk Management to shrink or delete a neighbor drive in advance.
Step 1. Right-click Windows 7 icon and select «Search».
Step 2. Type cmd and right-click on «Command Prompt», then select «Run as Administrator».
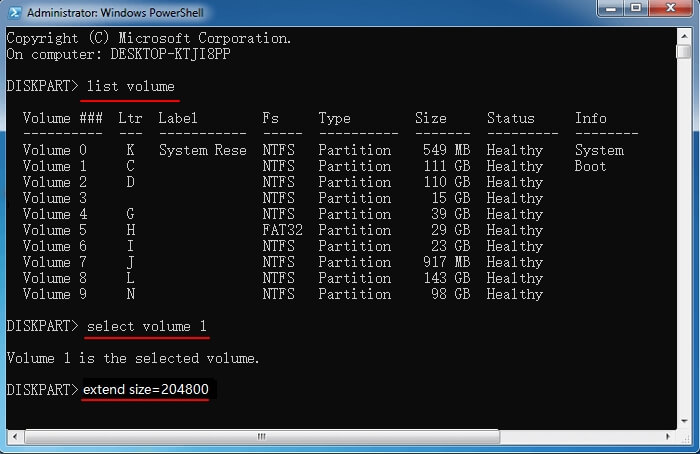
Step 4. Type the following command lines one by one and hit Enter each time:
- diskpart
- list volume
- select volume x (Replace X with the target drive number. In my case, the target drive is Volume 1.)
- extend size =number (Replace the number with the size in MB that you want to add to your target drive.)
Bonus Tips. 4 Methods to Expand Partition in Windows 7/8/10
The above 3 tools are direct solutions that can help you expand partition in Windows 7. Here, in the next part, we also collected some practical methods that can help you free up disk space, getting more usable space in Windows 7. Let’s see:
Method 1. Free Up TargetВ Partition Space — Delete Junk Files/Useless Large Files
Works to: Free up partition space on both system and non-system drive.
The target of this method is to extend the current usable space without changing the partition state on your hard drive.
To do so, you can use a disk cleaner software or third-party tool or help. Here, you can directly use EaseUS Tools M with its Large File Cleanup features for help:
Note:В During the cleaning process, please check the scan result carefully before you decide to delete them on Windows 7.
Step 1. оњљ DOWNLOAD EaseUS Tools M for free and install it on your computer.
Step 2. Launch EaseUS Tools M in Windows PC. Select «Large File Cleanup» on the main screen.
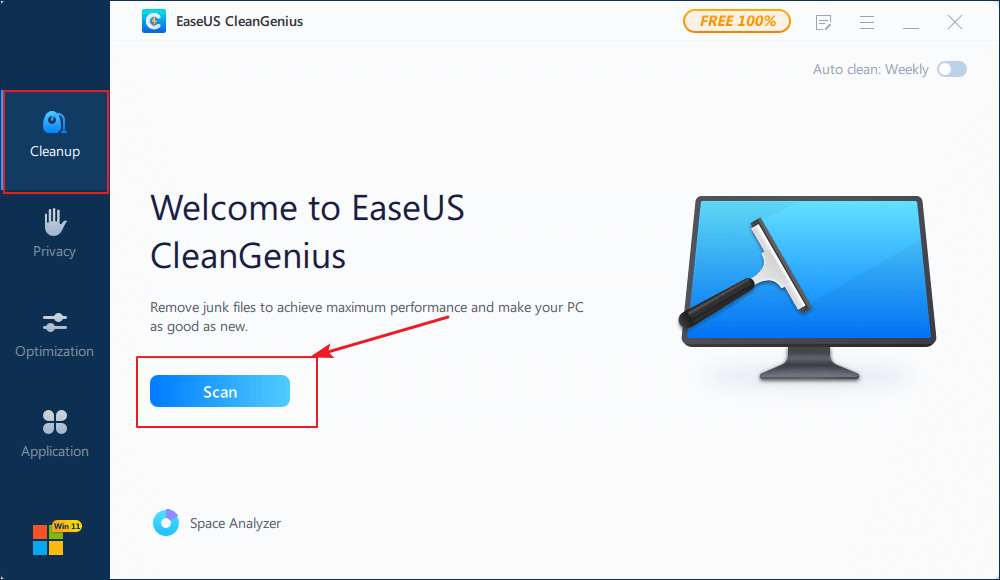
Step 3. Select the drive and click «Scan» to let the program locate, find all large files on your disk.
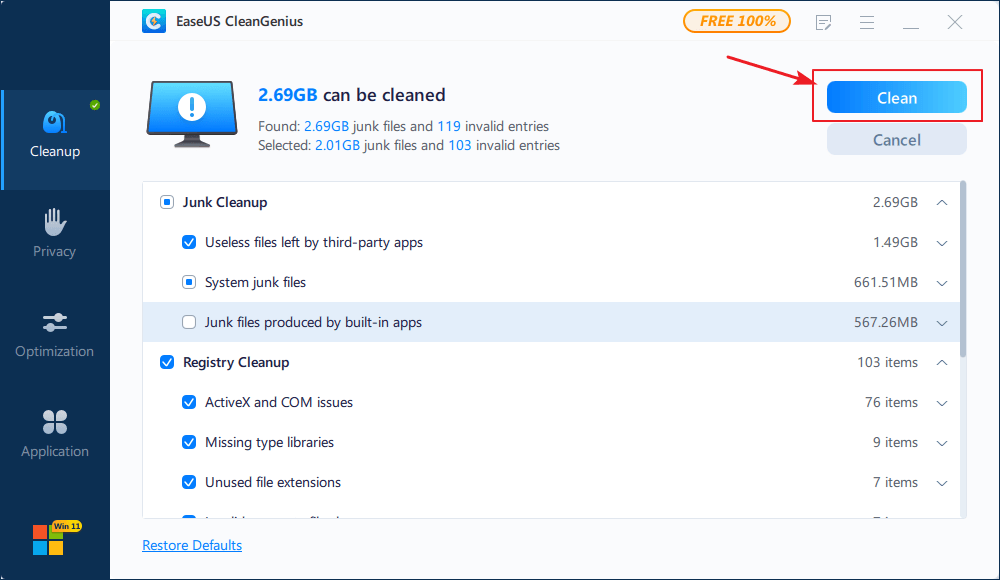
Step 4. Identify and select useless large files and click «Delete» to remove those files from your PC or laptop. A message pops up and tells you this process will permanently delete the files. Click «Yes» to start the process.

If it’s a system drive, you can also use its System Drive Cleanup feature for help.
Method 2. Merge Two Disks — Extend Partition with Free Space on the Second Hard Drive
Works to: Extend non-system disk partition space by converting two disks to dynamicВ and extend partition with free space on the second drive.
Requirement: 1. You have two or more disks on Windows 7 computer; 2. You need to convert disk to dynamic disk (both two disks).
Limit: This method only works on a data disk. If you convert a system disk to dynamic, it may result in OS boot failure issue.
For a step-by-step guide, follow How toВ Merge Disk 0 and Disk 1 to complete the process.
Method 3. Clone and Replace Old Drive to A Bigger One
Applies to: Upgrade disk to a larger HDD/SSD so as to extend partition with more space.
Requirement: 1.В A new and bigger hard drive (remember to initialize the disk after installing it to Windows 7) 2. A reliable disk cloning software
Advantages: 1. Faster reading and writing space in Windows 7; 2. Expanding partition with more available space.
To do so, you’ll need to buy a new and bigger hard drive in advance. And then use a disk cloning software to clone and replace the old hard drive with the bigger one.
Here, we’d like to recommend you use EaseUS Todo Backup Free for help. You can check and follow the tutorial steps below to replace your hard drive to a bigger new one now:
Step 1. Open your Windows 7 computer case, install new hard drive to your computer via a SATA or ATA cable correctly.
(Make sure the computer can detect your new drive.)
Step 2. Follow the video tutorial to clone and upgrade your old hard drive to a new bigger one:
Step 3. Restart Windows 7 if necessary and follow solutions in Part 1 to extend partition with free unallocated space in the new hard drive.
Method 4. Delete Temporary Files, System Restore Image
Works to: Free up space in system C drive
#1. Delete Temporary Files in Windows 7 C Drive
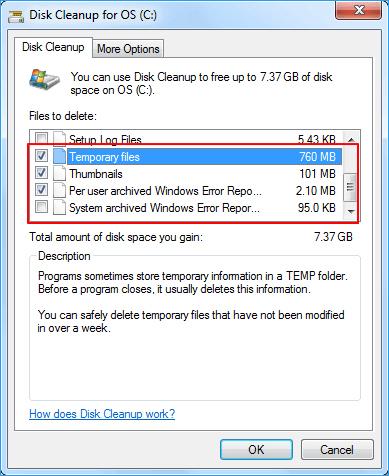
Step 1. Open My Computer, right-click the C drive, and select «Properties».
Step 2. Click «Disk Cleanup» in the disk properties window.
Step 3. Select temporary files, log files, Recycle Bin, and other useless files that you want to delete and click «OK».

Are you looking for a way to perform Recycle Bin recovery? FollowВ to learn how to recover deleted files from the Recycle Bin immediately.
#2. Back-Up Windows 7 To External Hard Drive and Delete System Image
Requirement: 1. Reliable Windows backup software, like EaseUS Todo Backup; 2. An empty external hard drive;
If you created a Windows system image on your computer, it’s suggested that you delete the system image as it would also take up certain disk space in the C drive. To protect your OS, we also suggest you create a backup of Windows 7 first.
Here are the complete steps:
Step 1. Back up Windows to an external hard drive via reliable Windows backup software.
Step 2. Open C drive or other partition where you saved the created system image.
Step 3. Delete the saved system image.
Sometimes, the system image may also be saved in a folder named Windows.old. All you need is to find it and remove it from the C drive.
After this, restart your computer. Windows 7 system drive will get a bigger free space by then.
To Sum Up
This page includes 3 direct tools to help you extend Windows 7 partition and other 4 reliable methods to free up disk space in Windows 7. With the provided solutions, you can easily make full use of Windows 7 disk partition size, getting a stable and fast computer
In conclusion, if you prefer the easiest way to extend partition in Windows 7/8/10, take EaseUS Partition Master as your first choice. It supports to extend a volume regardless of where there is unallocated space on your hard drive.
However, Disk Management and DiskPart cannot extend volume when there is no adjacent unallocated space next to a target drive. Besides, in order to save your Windows 7 partition size, we also suggest that you save all large files and even the system backup image to an external hard drive.


