- Zip and unzip files
- How to extract all files at once from multiple folders
- #1 KittiDS
- BC AdBot (Login to Remove)
- #2 ronakraj
- #3 KittiDS
- #4 1mikeg
- Recover personal files from the Windows.old Folder such as Documents Pictures and Windows Live Mail Emails in Windows 10
- How to extract all archived files inside a folder in Windows [Tip]
- How to extract all archived files inside a folder in Windows
- Extract all Zip’s in a directory (incl. subfolders) with a .bat file or dos command
- 6 Answers 6
- The Script:
- Explanation:
Zip and unzip files
Zipped (compressed) files take up less storage space and can be transferred to other computers more quickly than uncompressed files. In Windows, you work with zipped files and folders in the same way that you work with uncompressed files and folders. Combine several files into a single zipped folder to more easily share a group of files.
Locate the file or folder that you want to zip.
Press and hold (or right-click) the file or folder, select (or point to) Send to, and then select Compressed (zipped) folder.
A new zipped folder with the same name is created in the same location. To rename it, press and hold (or right-click) the folder, select Rename, and then type the new name.
Locate the zipped folder that you want to unzip (extract) files or folders from.
Do one of the following:
To unzip a single file or folder, open the zipped folder, then drag the file or folder from the zipped folder to a new location.
To unzip all the contents of the zipped folder, press and hold (or right-click) the folder, select Extract All, and then follow the instructions.
To add files or folders to a zipped folder you created earlier, drag them to the zipped folder.
If you add encrypted files to a zipped folder, they’ll be unencrypted when they’re unzipped, which might result in unintentional disclosure of personal or sensitive information. For that reason, we recommend that you avoid zipping encrypted files.
Some types of files, like JPEG images, are already highly compressed. If you zip several JPEG pictures into a folder, the total size of the folder will be about the same as the original collection of pictures.
How to extract all files at once from multiple folders
#1 KittiDS
On my old computer (vista) I could highlight multiple folders extract all and it would dump all files into a single folder, is there a way to do this using Windows 8? I’ve tried the «extract all» feature but it just unzips the contents of whichever single folder I right clicked on.
BC AdBot (Login to Remove)

- BleepingComputer.com
- Register to remove ads

#2 ronakraj
open the folder from which you want to extract the files and press F3 and type in *.* (asterisk dot asterisk). This will show you the contents of the folder and its subfolders. select the files which may be there scrolling under folder select them and copy them to another folder. I hope this may solve your problem
#3 KittiDS
Thank you for the response, I should have specified that I’m referring to ZIP files.
Your tip is still helpful and I’m sure I’ll use it in the future, but it doesn’t work on compressed files. Thanks!
#4 1mikeg
I found this topic on a google search for similar and even though it’s an old thread I wanted to reply with a solution I found.
In Windows 10, open the folder that contains your zip archives. In the search panel for the folder type either *.zip or *.rar or *.whatever file extension your archive uses. This will return the top file for each archive. Select all the files that return in the view and you can right click and select your extract options (assuming you have the corresponding extract manager integrated into command menu.
Recover personal files from the Windows.old Folder such as Documents Pictures and Windows Live Mail Emails in Windows 10
Technical Level : Intermediate
If you performed a custom install of Windows 10 intentionally or not and you are looking for your personal files after Windows is installed, then you might need to recover them manually. A custom install is similar to a clean install, but instead of wiping the hard disk clean, your previous Windows installation is moved to a folder called Windows.old. Windows.old is an archive of your old Windows installation. It is created by setup for a number of reasons depending on how the upgrade was initiated, including recovery of personal data or to facilitate the rollback to that previous version of Windows if you performed an in place upgrade. A custom install is sometimes initiated by booting from the Windows 10 install media (DVD or USB thumbdrive) or if you start the installation from within a previous running version of Windows at the desktop then select the option ‘Keep Nothing’. In this article, we take a look at how to recover your files if they are still there.
To recover your personal files, click Start > File Explorer
Click This PC
Open the system drive where Windows 10 is installed represented by the Windows logo.
Open the folder Windows.old
Open the Users folder
Open your old account folder which should contain your files. In my case, its Andre.
Open each personal folder which will contain your files.
Press Control + A or click Select All then click Copy or Cut
Launch a new File Explorer window (press Windows key + E or click Start > File Explorer) then navigate to the respective personal folder (Documents, Pictures, Music, Videos) then paste the files there.
Repeat the same steps for other folders containing files such as Music, Pictures, Videos and Downloads.
Import your Windows Live Mail messages from the Windows.old folder
Windows 10 comes built in with a new Mail app which is incompatible with older mail desktop apps such as Windows Live Mail and Outlook Express. This means, you won’t be able to import email messages into it from other mail programs. If you were previously running one of those mail programs, you will need to download then install the latest version which is Windows Live Mail 2012. It is included with the Windows Essentials 2012 suite which you can download for free at the following link.
Once you have downloaded Windows Essentials 2012, proceed to install it. You will need to ensure the .NET Framework 3.5 is installed, the Windows Essentials 2012 setup program will guide you through the installation.
Enable Show Hidden Files and Folders
Click Start > File Explorer > This PC > click the View tab then click Options
Click View tab again then select the Show hidden files, folders and drives radio box. Click Apply then OK
Launch Windows Live Mail 2012
Once Windows Live Mail 2012 is installed, launch the program from Start > All Apps > Windows Live Mail
You will be prompted to add an email account, click Cancel.
Click the File menu then click Import messages
Select the appropriate email program you were previously running. In this case, we will use Windows Live Mail. Click Next.
Click Browse
Expand This PC > Local Disk (where Windows 10 is installed) > Windows.old > Users > Your Old Account Folder (represented by the username) > expand AppData
Expand Local > Microsoft then select Windows Live Mail then click OK
Click Next
Make sure All folders is selected then click Next
Wait while your emails are imported.
Expand Storage folders > Imported folders > then click Inbox
Should you did delete the Windows.old folder?
It depends, I would wait 30 days before deleting it unless you are pressed for disk space. In which case you can do so. If an issue occurs where you might need to rollback to your previous version of Windows, you will have to do so using reinstall media.
Applications will need to be reinstalled for certain programs.
You will notice that application files are blank; you will need to reinstall the appropriate applications in order to view and edit them, examples include Microsoft Office. If you copied over your iTunes folder from the Music folder under your old account in Windows.old, simply reinstall iTunes and it should automatically import your audio files and playlist.
What about Microsoft Outlook?
Your old mail data is stored in C:\Windows.old\Users\AccountName\AppData\Local\Microsoft\Outlook
Copy the Outlook folder to Documents, launch Outlook then perform the import.
Previous Post
Next Post
How to extract all archived files inside a folder in Windows [Tip]
Tip / Trick
Nowadays, you’re free to choose from a wide range of archiving utility tools to extract or process your files as archives. There’s WinRAR WinZip, 7zip, etc. Speaking of which, most of these tools work by letting you choose the archived file that you wish to extract or vice versa. For archived files, you must directly select the file first before you can extract its contents. You can’t do it by simply right-clicking on its parent folder. Now, what if you have a lot of compressed or archived files that you wish to extract? Is it possible to extract them all in just one-click by simply putting them into one folder?
Well, if you’re using any of the archiving tools above, you won’t be able to do so. Thankfully, there’s another archiving tool that does the trick and this post will teach you how it works.
How to extract all archived files inside a folder in Windows
- First of all, download and save the “Unziplify” freeware for Windows from this link. It is compatible with Windows XP, 2000, 98, Me, NT, Vista, 7 and 8.
- Once downloaded, double-click on the “Unziplify13.exe” application on your computer to install it. Just follow the on-screen instructions for software installation.
- Once installed, you may configure or update Unziplify’s default settings. Just open your “All Programs” list then select and click “Unziplify Options”.

- On the Unziplify window, check or uncheck the options that you prefer for “Duplicate filenames” and “Extracting Files”. You may also select any of those extra options for deleting original archives (once successfully extracted), extracting all archives found inside archives and searching subfolders for archives to extract. Do not forget to click “Save & Exit” to confirm.
- Once done, Unziplify will automatically update the file context menu. So that’s pretty much it. You’re all set to extract all archived files inside a folder.

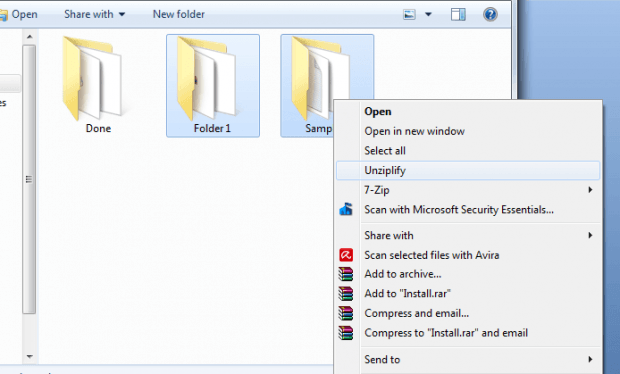
- For example, if “Folder 1” has two or more archived files in ZIP, RAR or ACE formats, you can extract all of these archived files at once using Unziplify. To do so, just right-click on “Folder 1” and on the context menu, select “Unziplify”. That’s it. All of the extracted files will be saved in either in a single subfolder or multiple subfolders. You’ll get a confirmation message once the file extraction process has been successfully done.

- That’s not all. The said tool can also extract multiple archived files from different folders. For example, if Folder 1 and Folder 2 both have archived files that you wish to extract in one-click, just select both folders and then right-click. Once again, choose “Unziplify” from the right-click menu. After which, just let the tool do its work.
That’s it. Unziplify really does work wonders especially if you have a lot of ZIP, RAR and ACE files that you wish to extract in just one-click!
Extract all Zip’s in a directory (incl. subfolders) with a .bat file or dos command
I want to extract all .zip’s and .rars in a folder and its children
The structure is like this:
I tried already this, which did not work
I use Windows and have 7-Zip installed.
Additional Question: Would it be possible to save all the extracted files from the last children (a.rar, b.rar) in one and the same folder (main folder)?

6 Answers 6
The Script:
Explanation:
This performs a loop for each file returned by the command dir /b /s *.zip *.rar . The /s tells dir to recurse into subdirectories and /b prints in bare format.
The filename is stored in the %%I variable for use later. If you were typing this at the prompt, you would use %I instead.
This performs the extraction. The argument -o»%%
dpI» extracts the file into the same directory where the archive resides. Other options:
dpI» — Extracts into the directory where the archive resides.
dpnI» — Creates a new directory in the hierarchy named after the archive and extracts there (that is, AFolder\archive.zip extracts into AFolder\archive\ ).
nI» — Creates a new directory in the current directory named after the archive and extracts there (that is, AFolder\archive.zip extracts into .\archive\ ).
Omit the -o argument — Extracts into the current directory.


