- Запуск Windows 10 в безопасном режиме
- Утилита MSConfig (Конфигурация системы)
- Сочетание Shift + Restart
- Запуск режим диагностики из интерфейса новой Панели управления
- Запуск безопасного режима из командой строки
- Возвращаем старое текстовое меню загрузки
- Запуск Safe Mode из режима восстановления
- BCDBoot Command-Line Options
- File Locations
- Supported operating systems
- How It Works
- Command-Line Options
- Repair the system partition
- Set up or repair the boot menu on a dual-boot PC
- Troubleshooting
Запуск Windows 10 в безопасном режиме
Windows 10 унаследовала все особенности системы загрузки у Windows 8, предоставляя такую же графическую среду для выполнения задач восстановления системы. Предполагается, что операции восстановления системы после сбоев будут преимущественно выполняться системой автоматического восстановления. В том случае, если Windows 10 не загружается корректно, запускается система автоматического восстановления, которая без участия пользователя пытается найти и исправить проблемы, мешающие нормальной загрузке системы. Однако это не означает, что в Windows 10 отсутствует безопасный режим (Safe mode), просто по умолчанию этот режим загрузки скрыт от пользователей.
В некоторых случаях необходимо запустить систему в безопасном режиме, например чтобы отладить или удалить службу, драйвер или приложение. Посмотрим как включить безопасный режим в Windows 10.
Windows 10 можно загрузить в безопасном режиме несколькими разными способами.
Утилита MSConfig (Конфигурация системы)
Самый простой способ загрузить Windows 10 в безопасном режиме, как и в предыдущих версиях Windows, воспользоваться утилитой msconfig.exe. Для этого:
- Нажмите сочетание клавиш Win+R и наберите msconfig
- В открывшемся окне перейдите на вкладку Boot
- В разделе Boot options поставьте флажок у пункта Safeboot

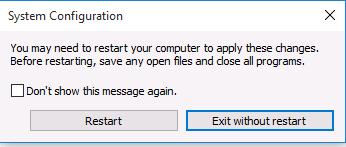
- Сохраните изменения (OK), согласитесь с предложением перезагрузить систему (Restart)
- После перезагрузки системы, Windows 10 загрузится в безопасном режиме (о чем свидетельствует надпись SafeMode во всех углах экрана)
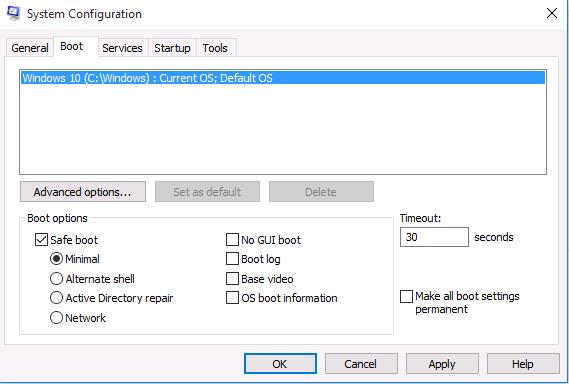

Совет. Отключить загрузку в безопасном режиме нужно также с помощью msconfig, сняв флажок у пункта Safe boot.
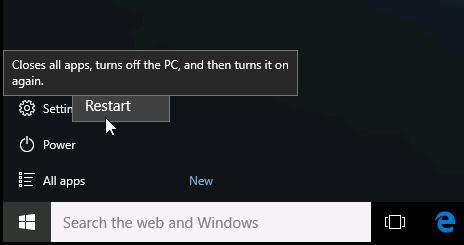
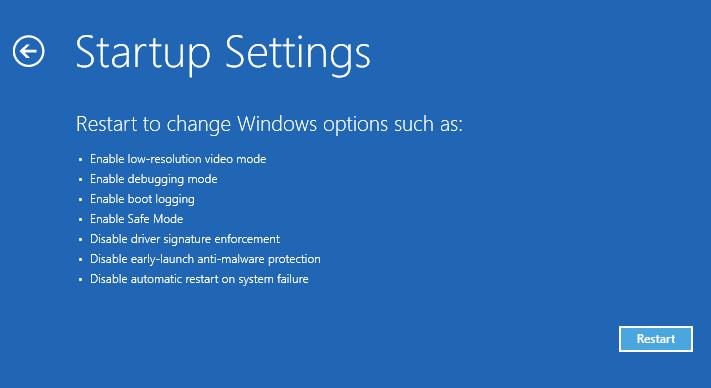
Сочетание Shift + Restart
В стартовом меню нажмите кнопку Power и, зажав Shift на клавиатуре, выберите пункт перезагрузки системы (Restart)
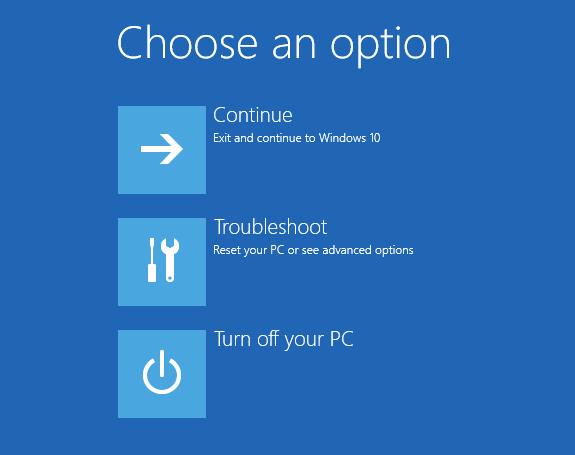
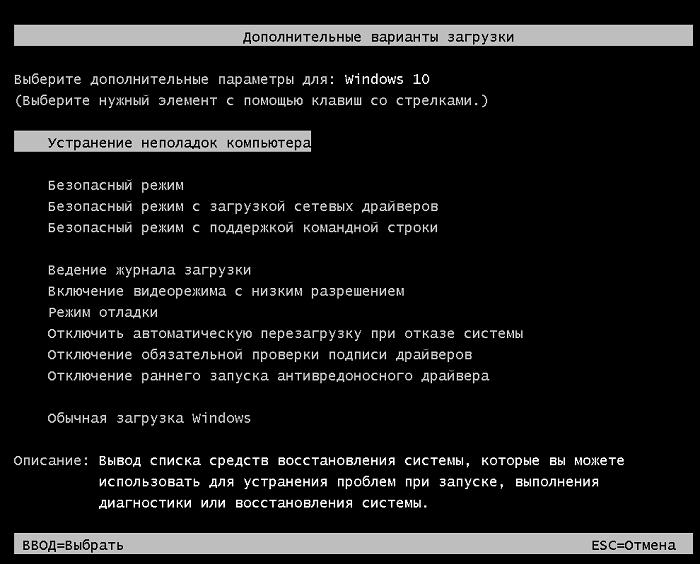
В появившемся диалоге последовательно выберите пункты Troubleshoot (Диагностика) -> Advanced options (Дополнительные параметры)-> Startup Settings (Параметры загрузки).
 Перезагружаем компьютер, нажав кнопку Restart.
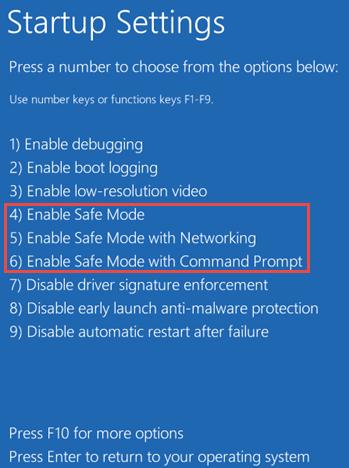
 После перезагрузки появится окно с доступными опциями загрузки системы ( 9 вариантов, включая три вида безопасного режима). Для загрузки в безопасном режиме, нажмите клавишу F4 или 4 (или F5/F6 для загрузки в безопасном режиме с поддержкой сети или командной строки соответственно).
Запуск режим диагностики из интерфейса новой Панели управления
Для запуска новой современной Панели управления Windows 10, нажмите кнопку Start и выберите меню Settings. Затем перейдите в раздел Update & security.
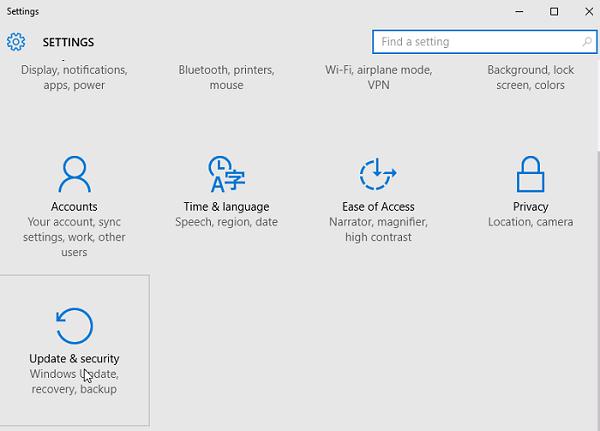
Перейдите в раздел Recovery и в секции Advanced Startup нажмите Restart now.

Далее все аналогично предыдущему способу.
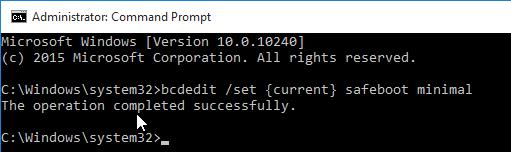
Запуск безопасного режима из командой строки
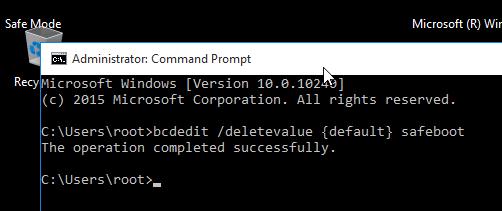
Возможно также настроить запуск Windows 10 в безопасном режиме и из командной строки. Для этого откройте командную строку (cmd) с правами администратора и выполните команду:
bcdedit /set
 Затем перезагрузите компьютер командой:
Теперь Windows 10 всегда будет загружаться в безопасном режиме. Чтобы вернуть обычный режим загрузки:
bcdedit /deletevalue
Возвращаем старое текстовое меню загрузки
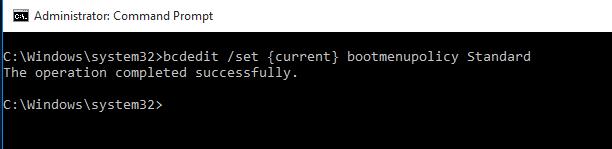
В Windows 10/8 возможно вернуться к старому текстовому загрузчику Windows, поддерживающего клавишу F8 (Shift+F8) и возможность выбора параметров запуска системы.
Чтобы вернуть тестовый загрузчик, выполните в командной строке с правами администратора:
bcdedit /set
Теперь при загрузке компьютера после стадии самотестирования (POST) , нужно несколько раз нажать клавишу F8. Должно появится старое-доброе текстовое меню с параметрами загрузки системы.
 Чтобы отключить текстовый режим загрузчика, и вернуться к быстрой загрузке, выполните:
bcdedit /set
Запуск Safe Mode из режима восстановления
Мало кто знает, что, чтобы включить безопасный режим и прочие параметры восстановления в Windows 10, достаточно 3 раза подряд прервать загрузку системы кнопкой отключения питания.
На 4 раз запустится среда восстановления системы (Recovery mode), из которой можно выбрать загрузку в безопасном режиме или другие варианты загрузки системы.
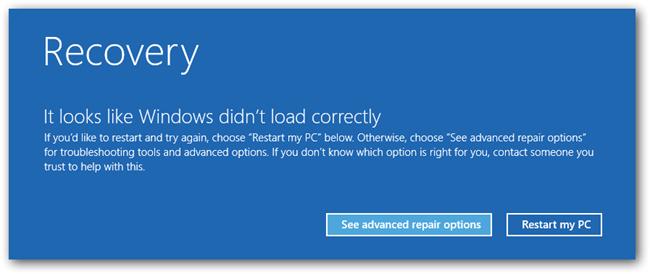 Выберите пункт See advanced repair options и следуйте инструкциям из второго пункта нашей статьи.


Нашел способ захода в безопасный режим на новых компьютерах, поддерживающих загрузку с efi-файла.
Необходимо просто выбрать в вариантах загрузки — загрузка с файла EFI (ну или как там будет написано).
Далее выбрать файл /efi/boot/bootx64.efi
Запустится автоматическое восстановление. Но необходимо нажать не кнопку восстановление, а отмену.
После этого переходим в раздел «Диагностика». Потом открываем подраздел «Дополнительные параметры». Перейдите в «Параметры загрузки». «Перезагрузить».
После перезагрузки откроется меню, в котором с помощью функциональных клавиш F1-F9 можно выбрать необходимый режим загрузки, например безопасный режим.
После восстановления работы не забываем включить F8 через команду bcdedit /set
Ну и пакость эта Win 10… замаялся искать причины тормозов. Уже поотключал все что позможно вирусы вычистил NOD-ом и касперским … все равно тормозит по страшнрому , загружается по 10 минут , посреди работы начинает обращаться к диску и наглухо зависает минут на 20 (можно пойти кофе попить прогулятться ) пока запускается приложение. Обращегние к диску загружено на 100 % . И не понять что за хрень. До этого была Win 7 купленная вместе с компом работала без проблем … Отвлекся на телефонный разговор не отменил очередное обновление и Мелкософт втюхал Win 10 … уроды !
Скорее всего винт посыпался, либо криво установили ОС
BCDBoot Command-Line Options
BCDBoot is a command-line tool used to configure the boot files on a PC or device to run the Windows operating system. You can use the tool in the following scenarios:
- Add boot files to a PC after applying a new Windows image. In a typical image-based Windows deployment, use BCDBoot to set up the firmware and system partition to boot to your image. To learn more, see Capture and Apply Windows, System, and Recovery Partitions.
- Set up the PC to boot to a virtual hard disk (VHD) file that includes a Windows image. To learn more, see Boot to VHD (Native Boot): Add a Virtual Hard Disk to the Boot Menu.
- Repair the system partition. If the system partition has been corrupted, you can use BCDBoot to recreate the system partition files by using new copies of these files from the Windows partition.
- Set up or repair the boot menu on a dual-boot PC. If you’ve installed more than one copy of Windows on a PC, you can use BCDBoot to add or repair the boot menu.
File Locations
In Windows and Windows Preinstallation Environment (WinPE)
In the Windows Assessment and Deployment Kit (WindowsВ ADK):
C:\Program Files (x86)\Windows Kits\10\Assessment and Deployment Kit\Deployment Tools\amd64\BCDBoot\BCDBoot.exe
Supported operating systems
BCDBoot can copy boot environment files from images of WindowsВ 10, Windows 8.1, WindowsВ 8, WindowsВ 7, WindowsВ Vista, Windows ServerВ 2016 Technical Preview, WindowsВ Server 2012 R2, Windows ServerВ 2012, Windows ServerВ 2008В R2, or WindowsВ ServerВ 2008.
How It Works
To configure the system partition, BCDBoot copies a small set of boot-environment files from the installed Windows image to the system partition.
BCDBoot can create a Boot Configuration Data (BCD) store on the system partition using the latest version of the Windows files:
- BCDBoot creates a new BCD store and initialize the BCD boot-environment files on the system partition, including the Windows Boot Manager, using the %WINDIR%\System32\Config\BCD-Template file.
- New in WindowsВ 10: During an upgrade, BCDBoot preserves any other existing boot entries, such as debugsettings, when creating the new store. Use the /c option to ignore the old settings and start fresh with a new BCD store.
- If there is already a boot entry for this Windows partition, by default, BCDBoot erases the old boot entry and its values. Use the /m option to retain the values from an existing boot entry when you update the system files.
- By default, BCDBoot moves the boot entry for the selected Windows partition to the top of the Windows Boot Manager boot order. Use the /d option to preserve the existing boot order.
On UEFI PCs, BCDBoot can update the firmware entries in the device’s NVRAM:
- BCDBoot adds a firmware entry in the NVRAM to point to the Windows Boot Manager. By default, this entry is placed as the first item in the boot list. Use the /p option to preserve the existing UEFI boot order. Use /addlast to add it to the bottom of the boot order list.
Command-Line Options
The following command-line options are available for BCDBoot.exe.
BCDBOOT [/l ] [/s [/f ]] [/v] [/m [<OS Loader GUID>]] [/addlast or /p] [/d] [/c]
| Option | Description |
|---|---|


