- Tutorial: What to Do to Fix Windows Fails to Start Error
- About «Windows failed to start» error
- What to do when “Windows fails to start” issue appears?
- Solution 1. Remove any hardware you recently installed
- Solution 2. Verify your PC detects the boot disk and is booting from it
- Solution 3. Use the Last Known Good Configuration to start Windows
- Solution 4. Launch Startup Repair
- Solution 5. Fix “Windows failed to start” with BCDEDIT command
- Solution 6. Fix damaged MBR
- Bottom Line
- Troubleshooting Windows 10 Failure to Start
- Comments (19)
Tutorial: What to Do to Fix Windows Fails to Start Error
Stuck with «Windows failed to start» error when booting up Windows? Here we will tell what to do when Windows fails to start.

By Emily  / Last Updated October 28, 2020
About «Windows failed to start» error
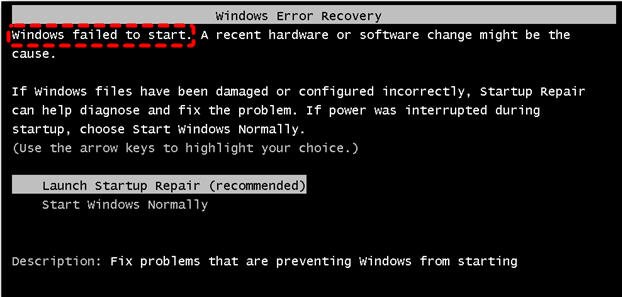
In some cases, computer users might be unable to start up their computer as usual and meet kinds or Windows boot errors, one of which is the “Windows failed to start” error. The entire error message is shown as following:
The causes of this issue can be anything ranging from incompatible or faulty hardware, recent software change, the recently-installed driver that corrupted the boot files, or the failing HDD or SSD drive.
What to do when “Windows fails to start” issue appears?
Because the causes behind the “Windows failed to start” error message are different, there should be more than one solution to this issue. The following are some of the most effective solutions you can try to tackle with this error message and then successfully boot into your operating system.
Solution 1. Remove any hardware you recently installed
Based on the error message, a recent hardware change might lead to “Windows failed to start” error. Therefore, if you recently installed any hardware such as printers or cameras, you can simply remove the hardware (leaving only the mouse and keyboard attached) and restart your computer. If your computer boots into its OS as it should, the hardware you removed was indeed the culprit. If the error message still appears, go for the next solution.
Solution 2. Verify your PC detects the boot disk and is booting from it
If your boot disk is not connected well or not set as the first boot device, it is more likely that you cannot boot into the operating system and meet the error message. In this case, you can do as below.
Step 1. Restart your computer and tap a function key like F2, F8, etc before the Windows logo shows up, and then you will enter the BIOS setup menu.
Step 2. Then access to the “Boot priority order” or “Boot order” menu. Select “Boot priority order” and hit on Enter.
Step 3. In the boot order list, you can check whether your boot disk is on the top of that list.
в–¶If your boot disk is not found in the list, open your computer and connect the disk to the motherboard correctly, and boot your computer and check if it shows up in the BIOS setting. If the BIOS still cannot detect it, you can run diagnostics on it to determine whether it is failing or has failed.
в–¶If your boot disk is there but not on the top, you can use the arrow key to move it to the top place. After that, save the change, exit the BIOS, and reboot your PC to see if the issue is resolved.
Solution 3. Use the Last Known Good Configuration to start Windows
“Last Known Good Configuration” is a recovery option that Microsoft built into all versions of Windows. If the “Windows failed to boot” problem is caused by one of the following factors, you can try this function.
в‘ A driver update, a newly-applied Windows Update or Automatic Update;
в‘ЎViruses, trojans, and rootkits interfering with the normal PC startup sequence;
в‘ўNewly-installed hardware conflicting with other devices;
в‘ЈNewly-installed software incorrectly written or conflicting with other programs.
To use “Last Known Good Configuration” to fix “Windows failed to boot” error message, follow the instruction:
Step 1. Reboot your PC from the Windows installation disk or DVD, and click “Next” on the Windows Setup window.
Step 2. Click “Repair your computer”.
Step 3. Then click “Troubleshoot” and then “Advanced Boot Options”.
Step 4. On the Advanced Boot Options screen, use the arrow keys to choose “Last Known Good Configuration (advanced)” (it may appear subtly different in older or newer versions of Windows), and then press “Enter”. Windows will start normally.
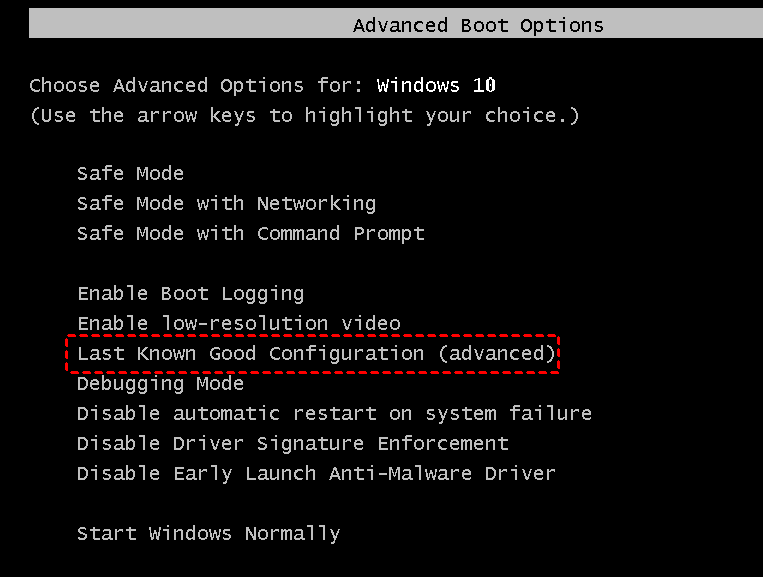
If you still can’t boot into Windows successfully, proceed to the next solution.
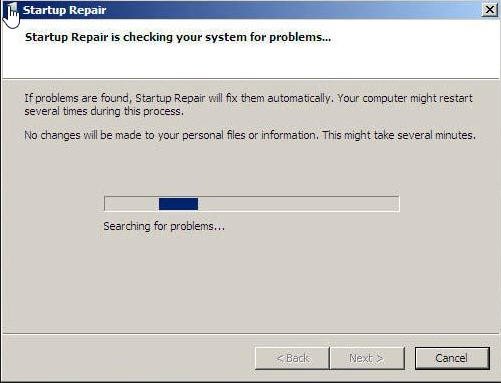
Solution 4. Launch Startup Repair
As shown in the screenshot above, the computer provides you with two options: Launch Startup Repair (recommended) and Start Windows Normally. Now that you are reading this post, I think you must have tried the option “Start Windows Normally” but in vain apart from the boot loop. So it’s time to try the first option (Startup Repair) to check whether the windows files are damaged/lost or not and fix the problem.
Choose “Launch Startup Repair (recommended)” and press “Enter”, and follow the hints to finish the repair. If any problem is found, the Startup Repair will fix them automatically. The checking and repairing process will cost minutes.
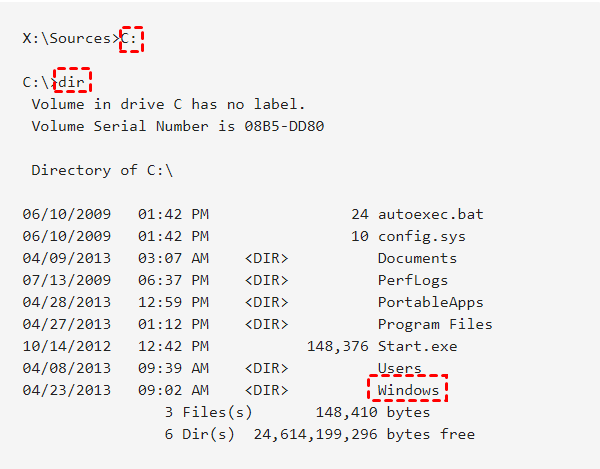
Solution 5. Fix “Windows failed to start” with BCDEDIT command
If the last solution gives no useful output or you stuck in Startup Repair loop, you can enter the Safe Mode to run BCDEDIT command to restore the BCD settings.
Step 1. Boot your computer from the Windows installation media.
Step 2. Click “Next”>“Repair your computer”.
Step 3. Then click “Troubleshoot” and then “Command Prompt”.
Step 4. At the command prompt, type “C:”, then “dir” to make sure the C: drive has Windows folder. If the C: drive doesn’t have “Windows” folder, change another letter drive (D:, E:, etc.) until you find a drive that has.
Step 5. Type “bcdedit /store C:\Boot\BCD /enum” to show boot entries. Find out the lines of “unknown” values, and correct them by setting the value to “partition=C:” — or another drive has “Windows” folder.
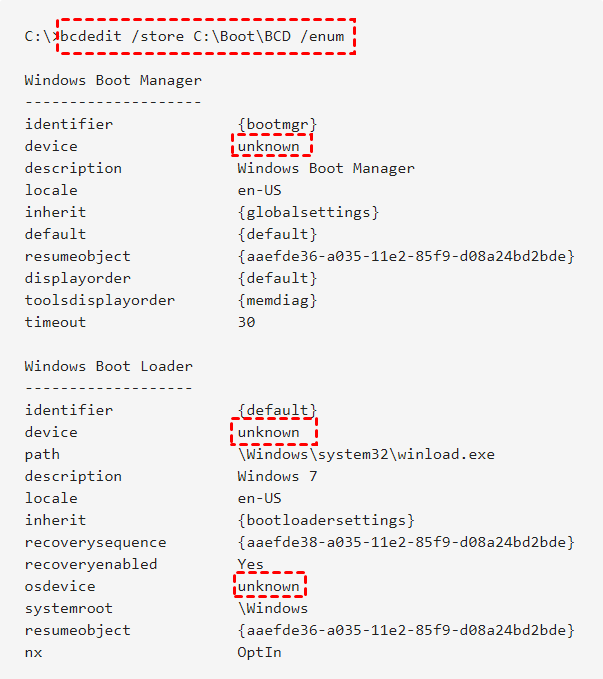
Step 6. To fix the lines with “unknown” values, use bcdedit as follows.
bcdedit /store C:\Boot\BCD /set
bcdedit /store C:\Boot\BCD /set
bcdedit /store C:\Boot\BCD /set
Solution 6. Fix damaged MBR
If the problem “Windows fails to start” still remains unsolved after trying the above solutions, you can run the following commands in the Command Prompt window to fix the damaged Master Boot Record:
If you don’t have the Windows installation media to access the Command Prompt, you can use AOMEI Partition Assistant Standard. With it, you can create a bootable USB flash drive, and fix boot problems in WinPE mode. Free download it and follow the steps:
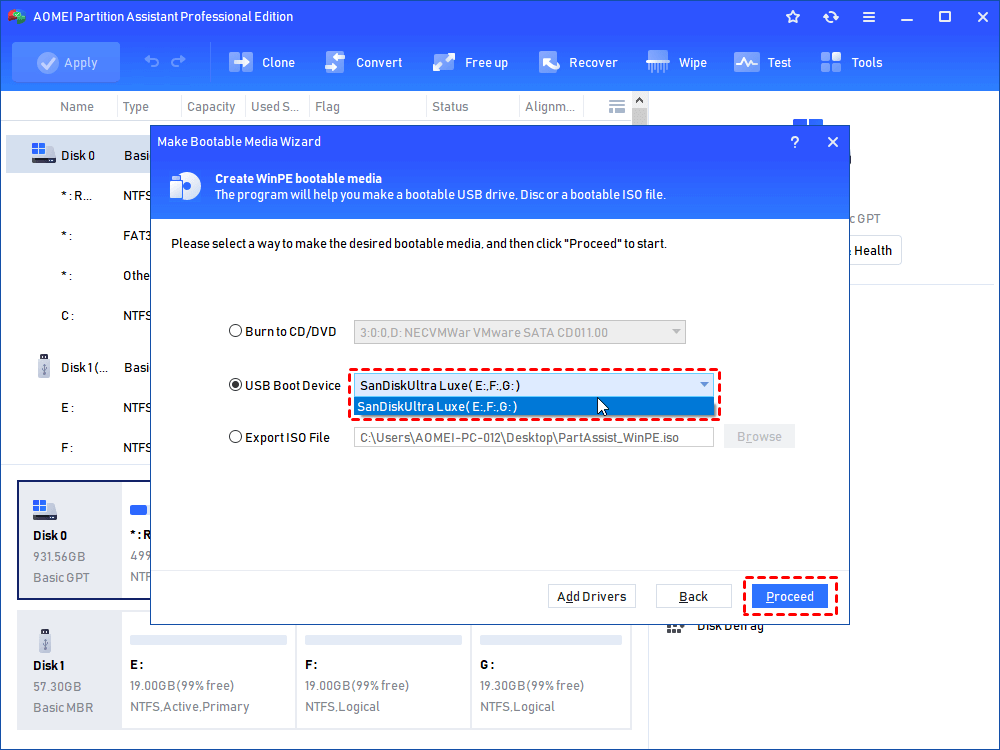
Step 1. Insert a blank USB drive to a working Windows computer and make sure it is detected successfully.
Step 2. Install and run the software on that working PC as well, click the “Make Bootable CD Wizard” in the left panel under the Wizards column, confirm your operation and click “Next”.

Step 3. Choose the target USB drive. Click “Proceed” to finish the rest operation.
After the bootable USB drive is created successfully, you can insert it into the computer with «Windows failed to start» error and change boot order to boot computer from it. Once you log in, the pre-installed AOMEI Partition Assistant Pro in the bootable USB will run automatically. Then you can use the following two functions to fix the error.
1. Check system partition error
Step 1. Right-click the system drive and click «Advanced»>“Check Partition».
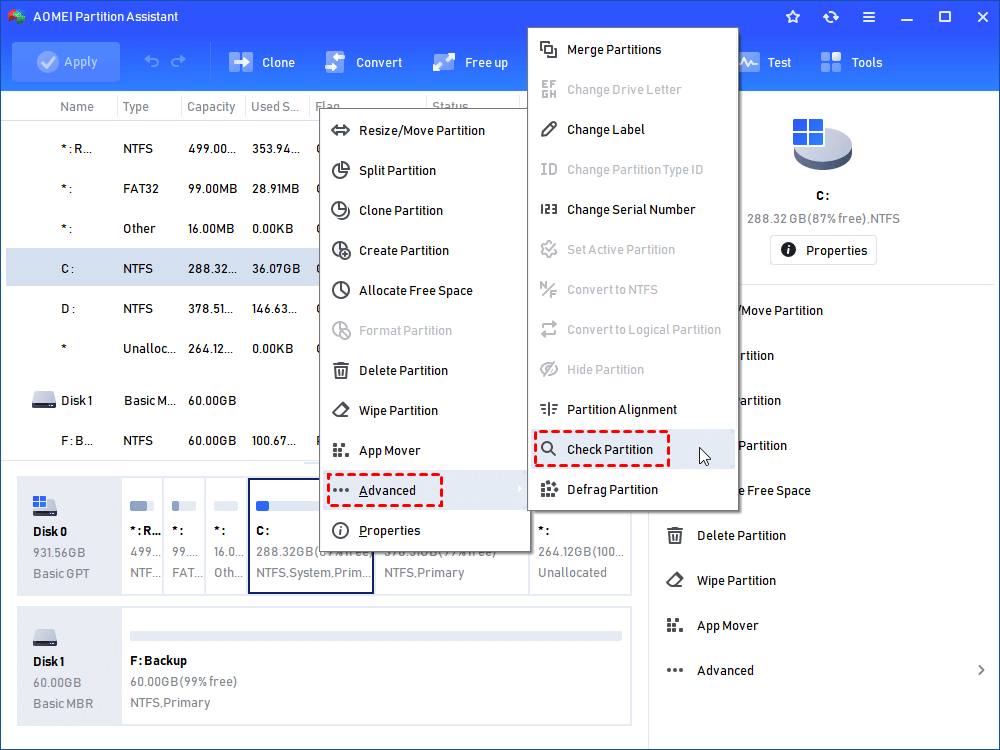
Step 2. In this window, tick the first checking method to both check and fix the partition error.

2. Rebuild MBR
If there is no error found on the system drive, you can rebuild MBR on the system disk to check if the Windows boot failure can be fixed.
Step 1. In the main interface of AOMEI Partition Assistant Standard, right-click the system disk and select «Rebuild MBR».
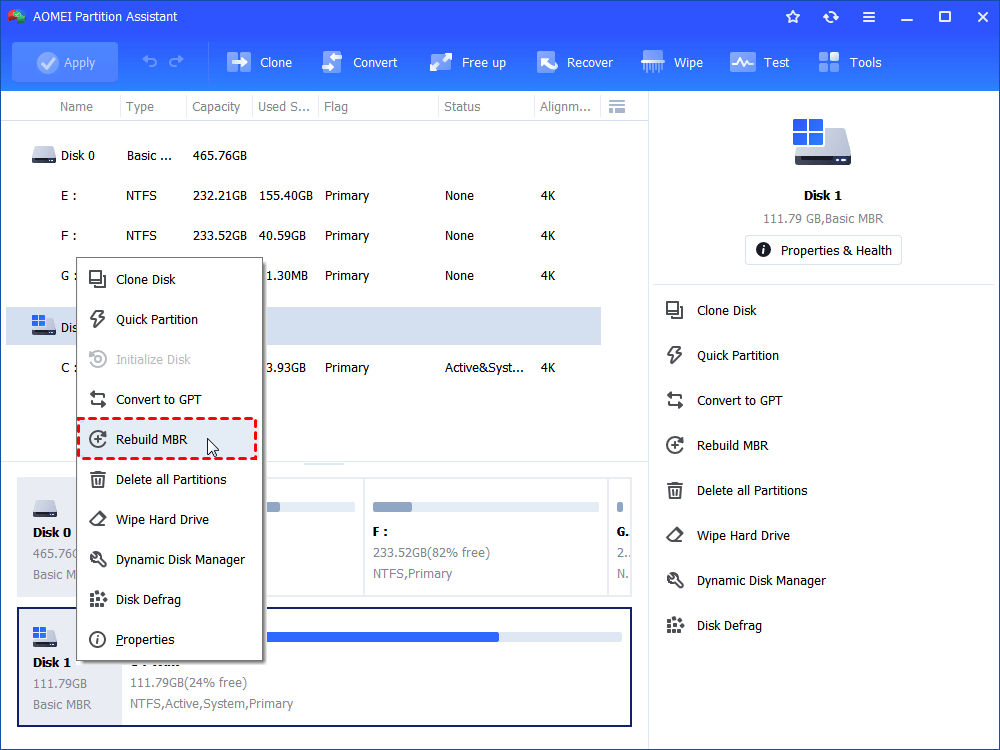
Step 2. Choose a proper MBR type for your current OS and click «OK».
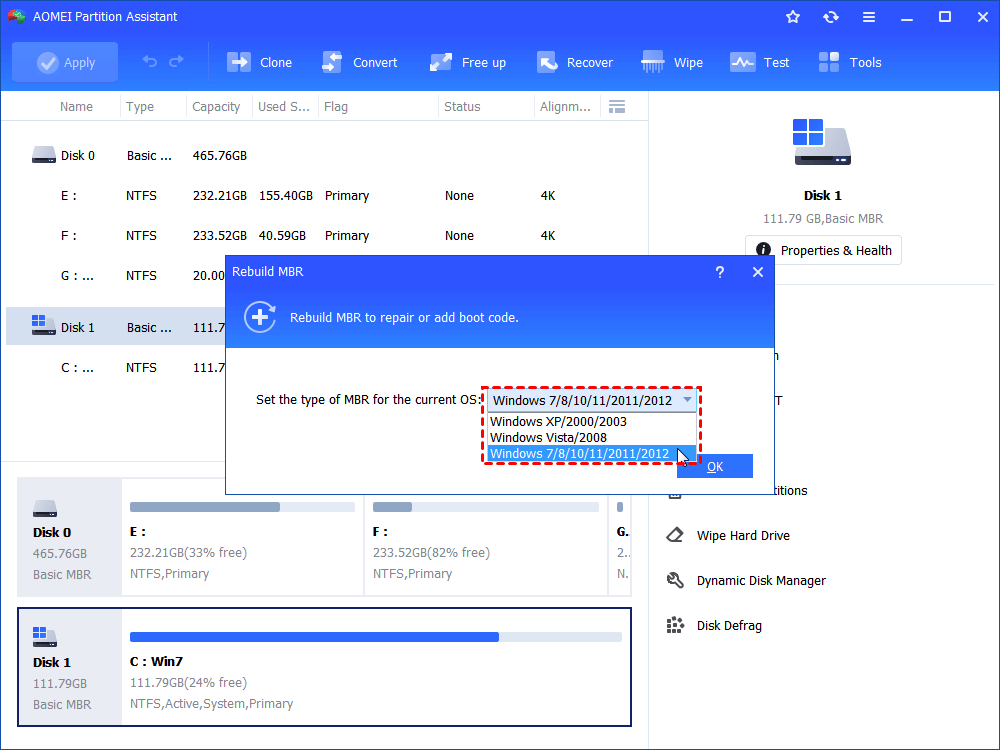
Step 3. Click «Apply” and then ”Proceed” to start rebuilding MBR.
Bottom Line
Now you might have known what to do when Windows fails to start in Windows7/8/10. Among all the available solutions, the AOMEI Partition Assistant provides the best and most convenient one. Besides, you can also use it to solve many other disk problems like fixing RAW drive, repairing damaged SSD, and solving USB flash drive 0 bytes or no media.
Troubleshooting Windows 10 Failure to Start
Technical Level : Intermediate
Summary
These steps will attempt to repair the OS using Advanced Startup Options . It does not cover hardware problems which might be indicated if these steps fail to run and can be tested using Memtest86+ to Test RAM for 5-6 passes, and hard drive Maker’s HD Diagnostic Extended CD scan followed by Disk Check from Advanced Startup Options Command Line, after checking that HD is detected in BIOS setup or UEFI firmware.
Details
Unplug all USB devices and disconnect if possible all other hard drives. Then unplug power and remove battery, press and hold Power button down for 30 seconds, plug back in power cable and try starting again.
If that fails follow whichever method will work here for How To Access Advanced Startup Options in Windows 8 or 10 . Note that Method 1 will sometimes work pressing Ctrl+Alt-Del to access Power icon in corner, then press Shift + click Restart.
But without access to the OS you may need to Create Windows 10 Installation Media or Create a recovery drive on another PC, boot by powering up while pressing the BIOS Boot Menu Key, choose the boot device as a UEFI device if offered, then on second screen choose Repair Your Computer.
From the Troubleshoot options first try (in this order) automated Startup Repair, System restore, Go Back to old Build, then if necessary from Startup Settings try to get into Safe Mode with Networking.
If Startup Repair won’t work after several tries in the Advanced Troubleshoot options access a Command Prompt to run these commands which should take care of corrupted boot records and blinking cursor problems:
Reboot to see if it starts and if not run the additional commands in How to Rebuild the BCD in Windows to export and then rebuild the BCD. Note that it is often necessary to export the BCD first as detailed in the link, and the drive letter referenced may not be C. To determine the boot partition’s drive letter run:
DISKPART
LIST VOLUME
Now look for the System partition. If it doesn’t have a letter run:
SELECT VOL # (replace # with Volume number for System Partition)
ASSIGN (to assign a drive letter, now detected by List Volume).
These repairs are automated along with all other necessary repairs in the enhanced Easy Recovery Essentials disks available from NeoSmart, makers of EasyBCD and the world’s top boot experts.
If nothing else works and Startup Settings are not available, you can try forcing the PC to restart into the legacy F8 Advanced Boot Options which is hidden in Windows 10 to choose Safe Mode with Networking. You’ll need to first turn off Fast Boot in UEFI firmware settings and/or Fast Startup at Control Panel\All Control Panel Items\Power Options\System Settings. Then via Advanced Startup Options in Windows 10 access the Command Prompt to type:
bcdedit /set
Restart computer and repeatedly hit F8 F8 F8 to get menu for Safe Mode with Networking.
From Safe Mode w/Networking type Update in Start Search box to Check For and expedite Updates that may be critical but are taking their time to install, right click Start button to open Device Manager, import any missing or erroring drivers from the PC or Device’s Support Downloads webpage. How to: Install and Update drivers in Windows 10 — Microsoft Community
If Safe Mode is stable the problem is most likely drivers, but could also need disinfection, System file repair or repair of the image. Most of the Upgrade problems seen are corruption passed from the old OS.
Download, install, decline trial version, update, then run full scans with Malwarebytes and AdwCleaner.
Uninstall any bloatware anti-virus like Norton, McAfee, AVG or Avast, enable built-in Defender to test performance. Use the special Uninstallers (removal tools) for common antivirus software — ESET Knowledgebase .
Right click the Task Bar to open Task Manager, on Startup tab disable everything until your install stabilizes, then only restore those you know for sure you absolutely need starting with Windows – none of them really need to unless you want them.
From the Advanced Options Command Prompt, or within Safe Mode accessing an Elevated Command Prompt , Copy and Paste or type each of these commands, each followed by Enter:
sfc /scannow
Dism /Online /Cleanup-Image /RestoreHealth
If it prompts for Sources file, mount or insert Windows 10 installation media, locate install.wim or .esd file in Sources folder, substitute it’s path in the following command (for example: Dism /Online /Cleanup-Image /RestoreHealth /Source:wim: H:\Sources\Install.wim :1)
Dism /Online /Cleanup-Image /RestoreHealth /Source:wim: Full Path to install.wim file :1
(or) Dism /Online /Cleanup-Image /RestoreHealth /Source:esd: Full Path to install.esd file :1
sfc/ scannow
Exit
If at any time you are returned enough functionality but still have problems with an app then Troubleshoot problems with an app — Windows Help .
If Safe Mode doesn’t help stabilize things then return to Advanced Startup Options in Windows 8 or 10. Next try Command Prompt to run above repair commands including sfc /scannow. If these fail or you want to skip further repairs then choose Windows 10 Reset.
Better yet do the vastly superior Clean Install Windows 10 which will reactivate with your Product Key, automatically from embedded Product Key if a factory install, or after connecting to the internet if free Upgrade was already activated.
**One last resort to save the old install while doing the new one is to shrink the C partition using a bootable Partition manager like free Easeus, install to the shrink space which should configure a Dual Boot menu from which the old install may well start up. If so you can post back a screenshot of Disk Management here and I will show you how to remove the rescue install and recover it’s space (using Delete and Extend in Disk Management as long as the new partition is not marked System Active), or if the old install will not start up you can set up the new one and copy over the files, I’ll show you how to remove the old one and recover its space.
At any time you can Rescue Files when Windows Won’t Start , or use a Linux disk, or boot Paragon Rescue Kit Free Edition File Recovery Wizard to copy files to USB flash stick or an external or another hard drive.
If these fail and/or you decide to go back to your previous install you can try to run Factory Recovery from it’s hotkey at boot; find yours by googling the “PC make/model + Run Factory Recovery.” Factory Recovery methods
Feel free to ask back any questions and keep us posted on how it goes.
Was this article helpful?
Sorry this didn’t help.
Great! Thanks for your feedback.
How satisfied are you with this article?
Thanks for your feedback, it helps us improve the site.
How satisfied are you with this article?
Thanks for your feedback.
Comments (19)
* Please try a lower page number.
* Please enter only numbers.
* Please try a lower page number.
* Please enter only numbers.
Hi, I am building a brand new PC and bought Win10 Pro USB Stick for $199. Win10 keeps crashing within less than a minute with different BSOD error message each time.
I replaced the RAM thinking of bad RAM to no avail. I also replaced the Motherboard thinking it was bad motherboard, but again to no avail. Created a brand new USB stick using Media creation tool and tried «Clean Install» with «Custom Install» option, but Win10 still keeps crashing either on startup or within 1min once I login. On phone customer tech support (sounds outside of USA from accent) don’t understand that that it’s a brand new PC build with brand new Win10 install and keep asking me about the upgrade. Can you provide me any help?? Is there an phone number I can call where I can talk to expert who can walk me step by step to troubleshoot Win10 crashes?? Here’s my PC config —
Processor: Intel i7-4700K (New Retail box)
Motherboard: ASRock Z97 Extreme6 (New Retail box)
RAM: G.Skill Ripjaw X series 2x8GB 1866 DDR3 (New Retail)
OS: Windows 10 Pro (Retail USB stick)
5 people found this comment helpful
Was this comment helpful?
Sorry this didn’t help.
Great! Thanks for your feedback.
How satisfied are you with this comment?
Thanks for your feedback, it helps us improve the site.
How satisfied are you with this comment?
Thanks for your feedback.
Are you booting the stick as a UEFI device as illustrated in Clean Install Windows 10 then deleting all partitions on the drive down to unallocated space before creating/formating new or just clicking Next to begin?
If it doesn’t get that far, or answer is yes, then go over your build. I would strip it down to only the motherboard and CPU, onboard GPU if applicable.
Did you calculate the power needs using Power Supply Calculator ?
These are preliminary steps but we need to get this thread out of an unrelated Wiki Comments section, so please start a new thread with a very descriptive title that will lure in hardware specialists who know how to troubleshoot a new build. Link the thread back here and I’ll contribute as able but I am mainly a software guy so can best help when its stable enough to install.
You were right to use MCT to create a new stick because we do see bad ones. But I still suspect build. So start there.
Over 100,000 helped in forums for 11 years. I don’t quit for those who are polite and cooperative.
Windows MVP 2010-21
2 people found this comment helpful
Was this comment helpful?
Sorry this didn’t help.
Great! Thanks for your feedback.
How satisfied are you with this comment?
Thanks for your feedback, it helps us improve the site.
How satisfied are you with this comment?
Thanks for your feedback.
Thanks for the quick response Greg. I was booting using the USB option rather than UEFI. So, I tried UEFI as noted in your wiki doc but it gets stuck at «Collecting information» during installation. See bottom left corner in the attached screen shot. I will start a new thread and link it here as you suggested. I have stripped down to just the bare bones (ie. MB, RAM and CPU only) and am using EVGA 650W GS power supply. I doubt it’s a hardware issue since I already replaced the MB and RAM sticks for new ones, and did a memory test and am able to go to UEFI settings. (unless it’s a bad Intel i7 processor-possible). I did see about 6 windows updates recommended after the install, including 1511 (4th or 5th in the list) and before I could take a picture, it crashed. And now, it keeps crashing either at the login screen or just after I login, so I could not get to the «Update and security» screen. I am pretty sure it is crashing during the updates. I was also able to check for updated driver before the crash and they were all up-to-date. I am going to try without entering the product key from my purchase as your recommended in your guide. Been struggling with this issue for 5 months now and always thought of a bad hardware or driver and gave Windows 10 Pro the benefit of doubt.
Microsoft billing says they cannot replace or refund my $199 since it is past 30 days. Hope I can get the Wind10 Pro working with the MS Community help.. Already spent 10+ hours with Windows tech support on phone and on IM chat to no avail.
Once again thanks for your quick response. I appreciate it.
1 person found this comment helpful
Was this comment helpful?
Sorry this didn’t help.
Great! Thanks for your feedback.
How satisfied are you with this comment?
Thanks for your feedback, it helps us improve the site.


