- Изменить скорость вращения кулера на Корпусе, CPU и GPU
- Изменить скорость вращения кулера на ЦП и корпусе через BIOS
- 3-pin и 4-pin
- Изменить скорость вращения кулера на видеокарте
- How to increase CPU fan speed in Windows 10
- How can I control my CPU fan speed in Windows 10?
- 1. Use a third-party solution for fan control
- Change the fan speed on Windows PCs using these 5 tools
- The best programs for changing your fan’s speed
- SpeedFan
- Download SpeedFan
- NoteBook FanControl
- Argus Monitor
- Run a System Scan to discover potential errors
- EasyTune 5 by Gigabyte
- TPFanControl
Изменить скорость вращения кулера на Корпусе, CPU и GPU
Каждый компьютер или ноутбук имеет встроенные вентиляторы для охлаждения, чтобы компоненты как процессор или видеокарта не перегревались. Если вы запустите массивную игру, которая требует мощных характеристик компьютера, то можете услышать как вентиляторы начинают работать быстрее и издавать больше шума. Если вы запустите на ноутбуке много вкладок в Chrome, то ноутбук начнет работать с большей отдачей ресурсов, и соответственно начнет больше греться, что приведет к увеличению скорости вращения кулера. Дело в том, что в компьютере или ноутбуке имеются датчики, которые периодически отслеживают температуру вашей системы, и когда она достигает определенного порога, они начинают вращаться быстрее, чтобы охладить тот или иной компонент оборудования.
К примеру у меня была видеокарта Readon 4870, это была из первых картах, которая имела турбо выдув, и её рабочая температура была все время 83 ℃. До этого на рынке были обычные карты в виде открытой платы, но Readon 4870 была в пластмассовой коробке и работала на выдув горячего воздуха. В летнее время температура доходила до 94 ℃, что заставило меня волноваться, и я решил вручную увеличить скорость вращения кулера, что позволило скинуть температуру до 73 ℃, жертвуя диким шумом.
Если вы хотите контролировать скорость вращения кулера в Windows 10, то это можно сделать при помощи изменения параметров в BIOS или при помощи сторонних программ. Вы должны понимать, что не все кулеры будут регулироваться программами, так как они могут быть подключены напрямую через блок питания или иметь двух или трех пиновый разьем. Я тестировал популярные программы как RivaTuner, SpeedFan, HWiNFO, и ни одна не сработала для моего железа.
Изменить скорость вращения кулера на ЦП и корпусе через BIOS
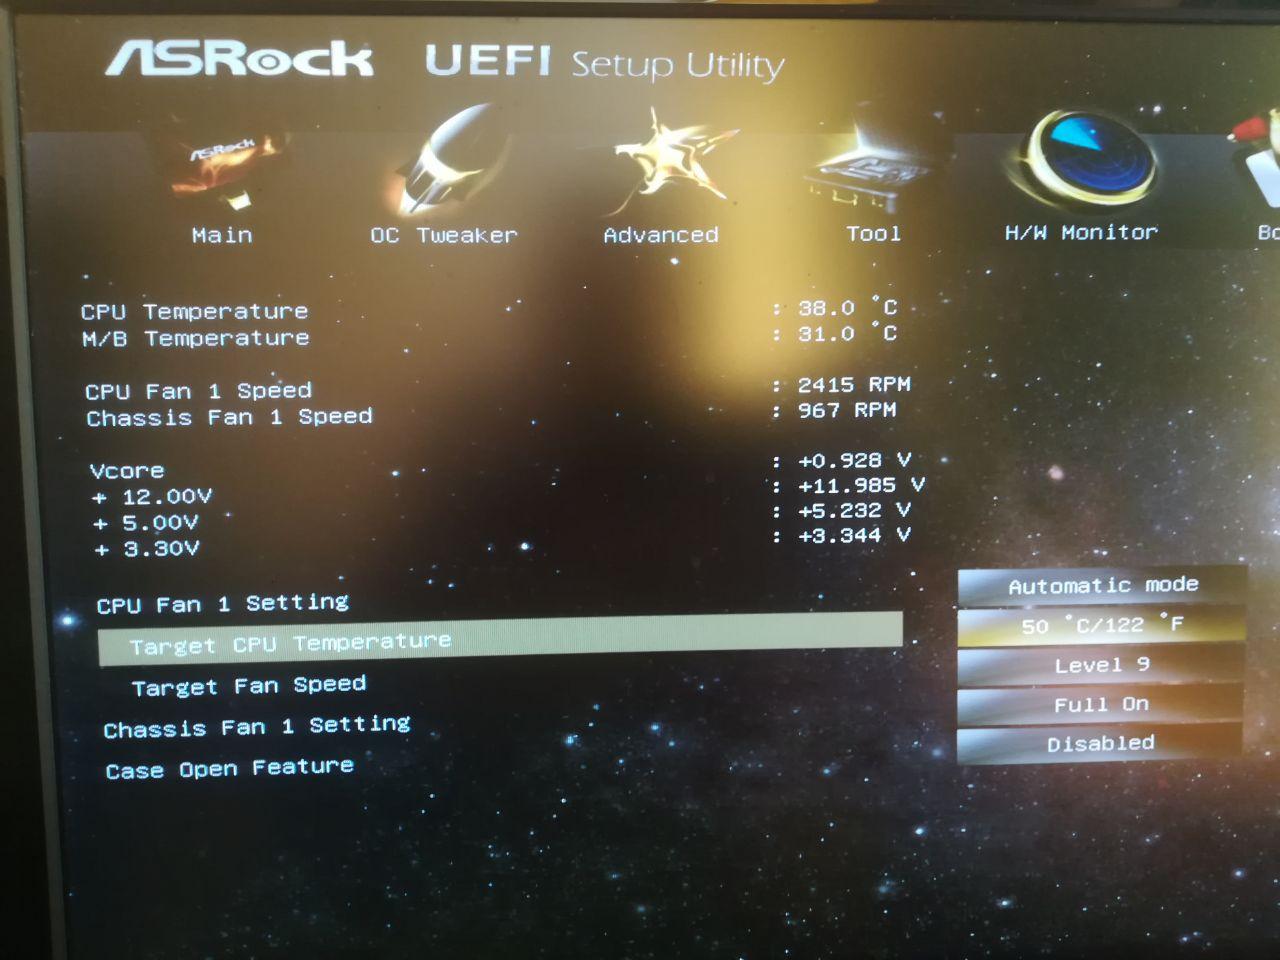
Это самый оптимальный вариант, так как ни одна сторонняя программа мне не помогла, чтобы изменить скорость вращения кулера на центральном процессоре и корпусе. При включении компьютера или ноутбука, сразу нажимайте кнопку на клавиатуре DEL или F2, чтобы войти в параметры BIOS. Так как производители материнских плат имеют разный BIOS или UEFI я буду показывать пример на Asrcok, но вы можете загуглить в картинках свою модель. В большинстве случаях вам нужно найти слово FAN или Speed. В моем случае имеем:
- CPU Fan 1 Setting установить значение напротив Automatic mode. Далее появится Target CPU Temperature и Target Fan Speed.
- Target CPU Temperature мы установим 50℃, а в Target Fan Speed установим Level 9. Получится, что при температуре выше 50℃, кулер начнется крутиться быстрее с уровнем 9. Уровень 9 это максимальный уровень вращения вентилятора. Вы можете задать свои температуры и уровень вращения.
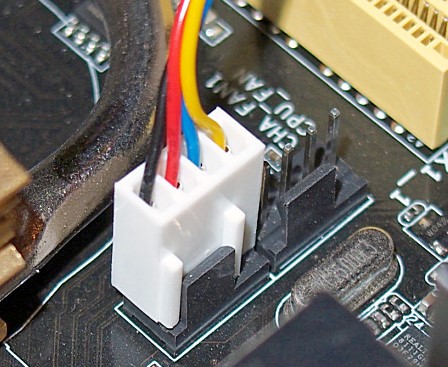
- Параметр Chsssis Fan 1 Setting отвечает за вентиляторы, которые присоединены через материнскую плату в 4 пиновый разьем. Это могут быть вентиляторы, которые находятся на корпусе. Но если корпусные вентиляторы подсоединены напрямую через блок питания, то этот параметр работать не будет.
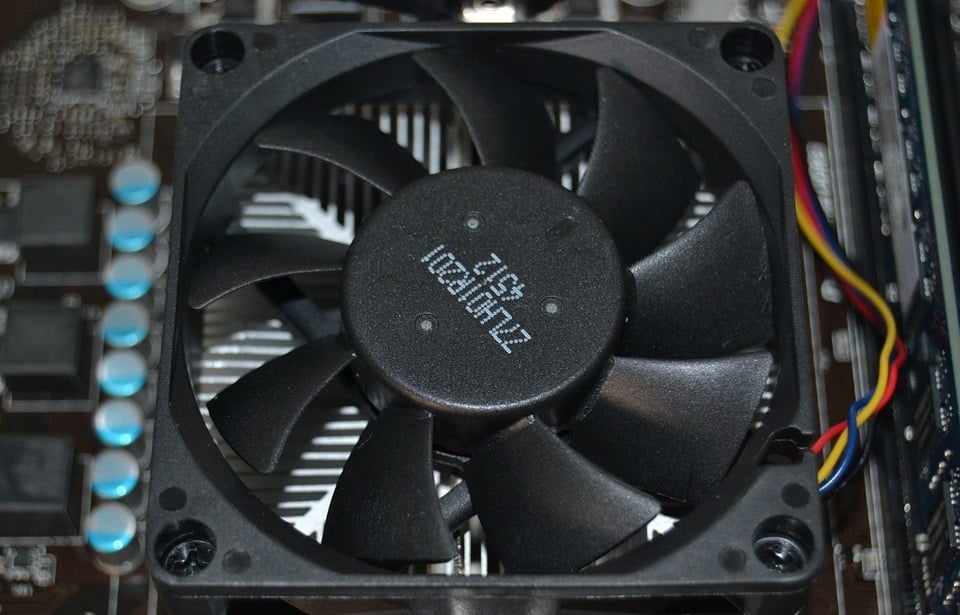
3-pin и 4-pin
3-pin — Провод отвечающий за сигнал передаёт скорость вращения кулера при нормальном напряжении 4 или 12 вольт. Одним словом, скорость кулера контролируется увеличением или уменьшением напряжения по силовому кабелю. Если вы подключили дополнительный кулер и он сильно шумит, то скорее всего вы его подключили к 12 вольт.
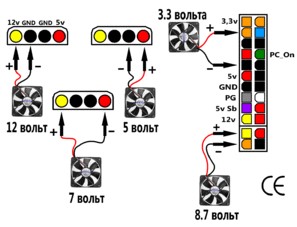
4-pin — Четвертый провод имеет регулятор оборотов, использует отправку сигналов на вентилятор у которого имеется чип. Чип и контролирует скорость вращения кулера.
Изменить скорость вращения кулера на видеокарте
Чтобы изменить скорость вращения кулера на видеокарте лучше воспользоваться программой msi afterburner . При первом запуске вы увидите параметры регулировки видеокарты. Найдите графу Fan Speed и нажмите в углу на Auto, чтобы была возможность вносить изменения. Задайте ползунком в процентном соотношении скорость вращения кулера на видеокарте и нажмите на галочку, чтобы проверить заданные параметры.
How to increase CPU fan speed in Windows 10

- Resource-consuming software can increase your CPU’s temperature and turn your PC’s housing unit in a cooking stove.
- There’s a bunch of software solutions that can help you change the speed of your fan without significant efforts.
- You can use a third-party solution for CPU fan speed control, and it will become an indispensable part of your daily workflow.
- Also, there is a fan setting hidden in the BIOS, so be sure to check the fan speed options. Read on to see the correct steps.
- Download Restoro PC Repair Tool that comes with Patented Technologies (patent available here).
- Click Start Scan to find Windows issues that could be causing PC problems.
- Click Repair All to fix issues affecting your computer’s security and performance
- Restoro has been downloaded by 0 readers this month.
The collaboration of software and hardware is what makes your system working as intended. Let’s take the CPU as an example – an essential part of a PC configuration, small but remarkably sturdy.
However, if exposed to abnormal temperatures for an extended period (gamers, we’re looking at you), the CPU might fail.
Now, there are various ways to avoid that (extra cooling fans is probably the best of those), and today we’ll show you one that’s rather important – how to increase the speed of the CPU fan.
This is the first line of defense, and even though your motherboard controls the CPU fan’s speed, sometimes it’s best to tend to that on your own.
If you’re not accustomed to changing the CPU fan’s speed in Windows 10, make sure to check the steps below.
How can I control my CPU fan speed in Windows 10?
- Use a third-party solution for fan control
- Check BIOS for fan speed options
1. Use a third-party solution for fan control
- DownloadSpeedFan for Windows 10.
- You should see the CPU and GPU fans in the left panel.
- There, you can choose the percentage of fan speed (100% is full throttle). On the right side, you should see the current temperatures of CPU cores individually.
- Regulate speed as you like manually, or you can automatize SpeedFan to increase the RPM (revolutions per minute) once the temperatures surpass the acceptable values.
Most of the time, the CPU fan speed is controlled by built-in resources. However, if you want to take matters into your own hands, there’s nothing as suitable as SpeedFan.
There are some conditions you’ll need to fulfill in order to use it and configuring it isn’t exactly a walk in the park, but once you get the hold of it, SpeedFan will become an indispensable part of your everyday workflow.
The conditions we mentioned are considering motherboard support for fan control. However, that’s in question only if you decide to add extra cooling fans.
Regarding CPU and GPU fans, you should be able to control them without any problems. Laptops are an exception, and SpeedFan won’t be of any use with portable computers, except for monitoring.
Your CPU speed should never cross 70 degrees Celsius, and around 60 degrees is an acceptable limit for an extended period of time.
Change the fan speed on Windows PCs using these 5 tools

- Keeping your PC’s temperature at a reasonable value can be difficult to achieve if you use demanding software on it.
- Overheating can cause a broad range of critical issues with your computer.
- You can improve the performance of your PC by monitoring your PC’s temperature with the proper tools.
- Download Restoro PC Repair Tool that comes with Patented Technologies (patent available here).
- Click Start Scan to find Windows issues that could be causing PC problems.
- Click Repair All to fix issues affecting your computer’s security and performance
- Restoro has been downloaded by 0 readers this month.
Keeping your system cool or reducing its noise can be easily done by adjusting your computer’s fan speed. This can be done both manually but also automatically via software for changing the fan’s speed.
Such a program monitors temperatures from several sources and allows you to change the speed on your computer’s fan when it’s needed.
There are various programs like this on the market, but we gathered five of the best ones that are compatible with computers running Windows 10 to show you their extended sets of features in order to help you make your decision much easier.
The best programs for changing your fan’s speed
SpeedFan
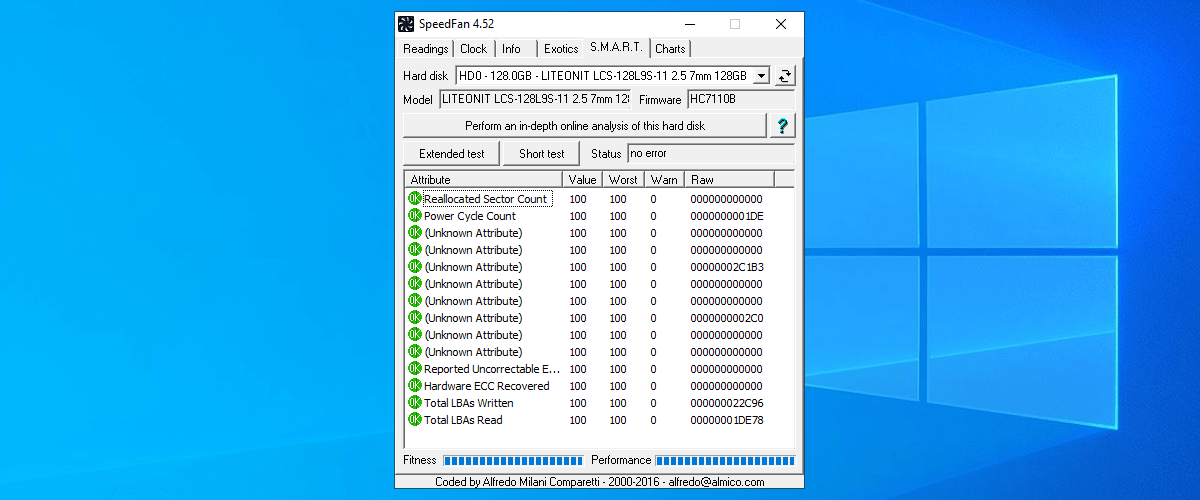
SpeedFan is a software for monitoring and controlling voltages, temperatures and fan speeds in computers with hardware chips.
This program is even able to access S.M.A.R.T. info and show you hard disk temperature. SpeedFan can access digital temperature sensors, and it can also change fan speeds accordingly, this way reducing noise.
Check out the best features that are included in this program:
- SpeedFan monitors the temperatures from various sources.
- If you configure the program the right way, you will be able to allow it to change the fan speed based on system temperatures.
- When you are choosing the parameter for minimum and maximum fan speed, you should set these manually and listen to the noise.
- When you hear no noise coming from the fan, this means that you can set the value as the minimum fan speed.
- The program can also change the fan speed at a warning temperature that you have previously set.
The software is able to handle any number of hardware monitor chips, hard disks, temperature readings, voltage readings, fan speed readings, PWMs and more.
Check out more details and functionalities that are included in SpeedFan on the official site where you can also download the software.
Download SpeedFan
NoteBook FanControl

NoteBook FanControl is a program that is designed to provide users with the ability to control the computer’s fan speed.
After you install the software, it will integrate with your PC’s taskbar, and it’s great that the program is not an obtrusive one.
After you launch it for the very first time, you will see that it comes with a really straightforward interface that can be managed and understood even by beginners.
Check out the most important functionalities that are included in NoteBook FanControl:
- You will be able to select one of the various configurations that are included in the program according to your laptop’s model and maker.
- You can see whether your laptop is supported or not by visiting the dedicated section on the program’s official GitHub page.
- Before starting the service, you have to choose one of the available predefined configs.
- After picking your configuration, you can enable and disable the fan control service.
- You can tweak the fan’s speed via a simple slider that is located in the middle part of the main menu.
- NoteBook FanControl offers you a real-time CPU temperature reading and also the current speed of the fan.
- You can configure the program to launch at system startup automatically.
NoteBook FanControl is a really easy-to-use program that will definitely come in handy when you need to get more out of your system’s cooling capabilities.
You can download NoteBook FanControl and try its great features for yourself.
Argus Monitor
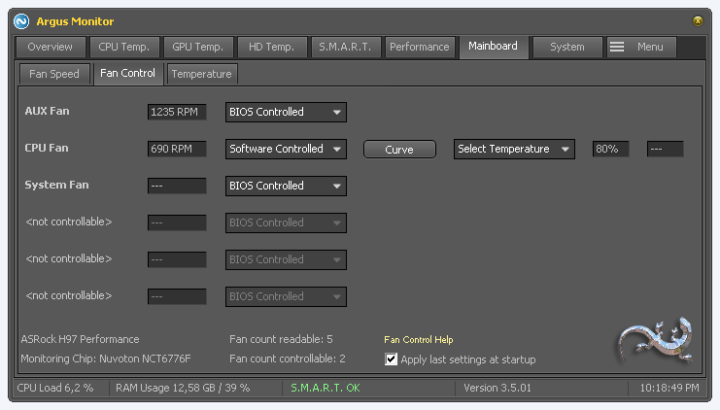
Argus Monitor is a really light program that runs as a background task, and it continually monitors the health of your hard disk.
It also offers you the ability to control the fan speed for the mainboard and GPU with a characteristic curve based on all the temperature sources that are available.
Check out the most impressive features and functionalities that come included in Argus Monitor:
- You will be able to monitor your hard disk drive temperature and also the health status of your hard disk drive by continually checking the vital S.M.A.R.T. attributes.
- The program is able to warn you with a probability of up to 70% before a hard drive will fail and this is just in time for users to be able to save their crucial data.
- The software offers a graphical display of the temperature of the hard drives.
- It also comes with monitoring and graphical display of GPU and CPU temperature.
- You will see a graphical display of the core frequency as well that will enable you to check if the power management is working properly.
- The HDD and SSD benchmark measures access time and transfer rates as well.
Run a System Scan to discover potential errors


The program will also display the speeds of your system’s fans, and it allows you to control the speed of the fans effortlessly.
You will be able to test Argus Monitor for 30 days, and if you want to continue using it, you will have to purchase a license key.
You can check out more functionalities and details related to the software by heading to Argus Monitor’s official website.
EasyTune 5 by Gigabyte
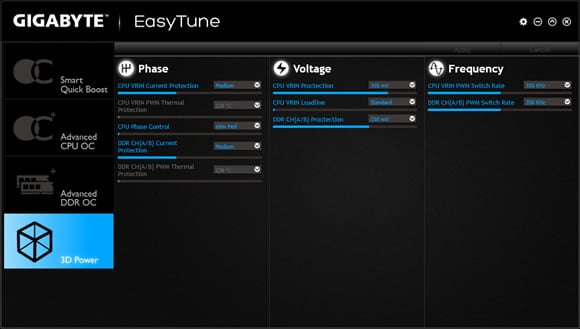
EasyTune 5 by Gigabyte presents a convenient Windows based system performance enhancement and manageability tool.
Check out the best functionalities and features that are included in it:
- It provides overclocking for enhancing the system’s performance.
- You will also get C.I.A. and M.I.B. tools for special enhancement for CPU and memory.
- EasyTune 5 by Gigabyte also comes with Smart-Fan control for managing fan speed control of the CPU’s cooling fan and the North-Bridge Chipset cooling fan.
- It includes PC health for monitoring system status.
- You can switch to different modes, and you can choose between the Easy Mode and the Advanced Mode.
- The Easy Mode allows you to change the system Bus Clock.
- The Advanced Mode lets you access the complete features of overclocking parameter settings such as configuring the C.I.A. and M.I.B. features.
You will be able to configure the fan speed of the CPU’s cooling fan according to a different temperature at different RPM. It is recommended to set the cooling fan of the CPU at full speed at 60oC.
You can check out more features and try EasyTune 5 by Gigabyte for yourself by heading to the official website of this tool.
TPFanControl
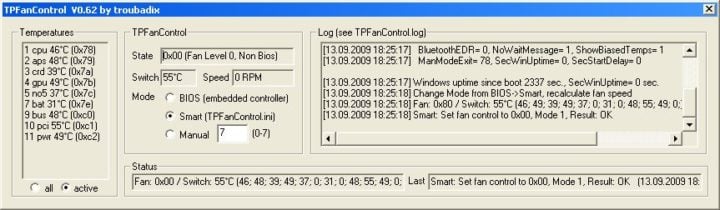
TPFanControl is able to reduce the fan noise of you Thinkpads, and it has been created a Vista version of the software as well.
It is able to monitor CPU and GPU temperatures in the background and set the appropriate fan speeds for perfect cooling. You will be able to see the CPU and the GPU temperature at a glance with a notification icon.
Check out the best features that are included in this program:
- The difference when you will run this program will turn out dramatic.
- When you are using the system, and the CPU does intensive work, it will spin up the fan only for it to keep the temperature low.
To install the software on Windows 10, you just have to open the Start Menu and type cmd. Then you have to right-click on cmd.exe and select Run as administrator.
You have to navigate to the temporary directory that you unzipped the files to and type install. The files will be automatically copied to c:tpfancontrol. TPFanControl will start to run, and it will start automatically after reboot.
You can download TPFanControl to see how it works on your system.
These are five of the best programs that allow you to control the fan’s speed of your system and they are all compatible with Windows systems. Check out their complete sets of features and get the one that best suits your needs.
If you have any other questions or suggestions, feel free to leave them in the comments section below.
RELATED STORIES TO CHECK OUT:


