- Run command for ‘Turn on or off Windows features’
- Windows Terminal Tips and Tricks
- On first launch
- Customization
- Global profile settings
- Custom color schemes
- Custom command line
- Old school fonts
- Places for background images
- Functionality
- wt.exe command line arguments
- Panes
- Copy and paste
- Defining key bindings and actions
- Send input commands
- WSL starting directory
- Cheers
- Enable or Disable Windows Features Using DISM
- To mount an offline image for servicing
- To find available Windows features in an image
- To enable Windows features
- To restore removed Windows features
- To disable Windows features
- To remove Windows features for on-demand installation
- To enable or disable Windows features by using DISM and an answer file
- To commit changes on an offline image
Run command for ‘Turn on or off Windows features’
In Windows 7, the features which are not installed by default, can be added from ‘Turn on or off Windows features‘ window. For example, in Windows 7 Enterprise edition, Games are not installed by default. Games can be added by selecting the corresponding check button in the Windows features.
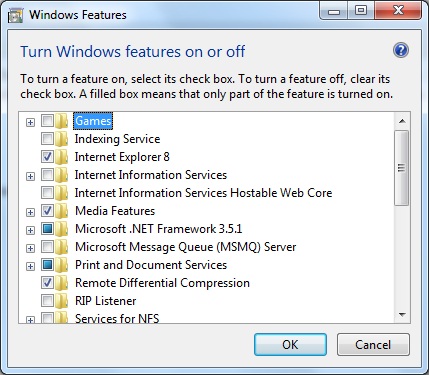
This window can be opened from Run by running the command ‘optionalfeatures‘. It also works from windows command prompt.
Thanks, Saved my minutes!!
HI
How can I copy one word to clipboard with a batch file?
If will be hopefull, if you help me.
best regards
amin
I knew that C:\Windows\Systems32\OptionalFeatures.exe is the “Windows Features” window.
But I haven’t known that how can I check the box on cmd.
I mean, I want to check “Game” in “Windows Features”.
How can I do on cmd.
I hope you will reply.
Thanks.
Everything is roll.
Dear,
You can check the desired selection box in windows features, while run the CMD with an administrator credential
THANK YOU WERY MUCH. (I have purchased W10 on “country’s” Serbian language, and can not “pick-up” new terminology at all…)
How can I call this “OptionalFeatures.exe” from inside a batch?
All my attempts fail with something like “… is not recognized as an internal or external command, operable program or batch file”.
Windows Terminal Tips and Tricks
October 15th, 2020
Windows Terminal comes with a lot of features that allow you to customize it and interact with it in a way that feels most comfortable to you. Let’s run through some tips and tricks that could help you set up your terminal in a way that’s perfect for you. At the time of this blog post, Windows Terminal is on version 1.3 and Windows Terminal Preview is on version 1.4.
On first launch
When you first install Windows Terminal, you will be greeted with a Windows PowerShell prompt. Windows Terminal ships with Windows PowerShell, Command Prompt, and Azure Cloud Shell profiles by default.
In addition to these profiles, if you have any Windows Subsystem for Linux (WSL) distributions installed, the terminal will automatically create profiles for those distros as well. If you would like to install additional WSL distros on your machine, you can do so after installing terminal and on your next terminal launch, the profiles for those distros should automatically appear. These profiles will have Tux as their icon, however you can change the icon of the distro in your settings to match whichever distro you have. You can find more information about WSL on the WSL docs site.
👉 Note: You will have to download the distro icons as they do not come shipped inside the terminal.
Customization
Windows Terminal comes with a large set of default settings, including color schemes and keyboard shortcuts. If you’d like to view the default settings file, you can hold Alt and click on the Settings button inside the dropdown menu.
Global profile settings
Windows Terminal provides you the option of applying a setting to every profile without having to duplicate the setting for each profile entry. This can be done by adding a setting inside the «defaults» array inside the «profiles» object. A list of all possible profile settings can be found on the Profile settings page on our docs site.
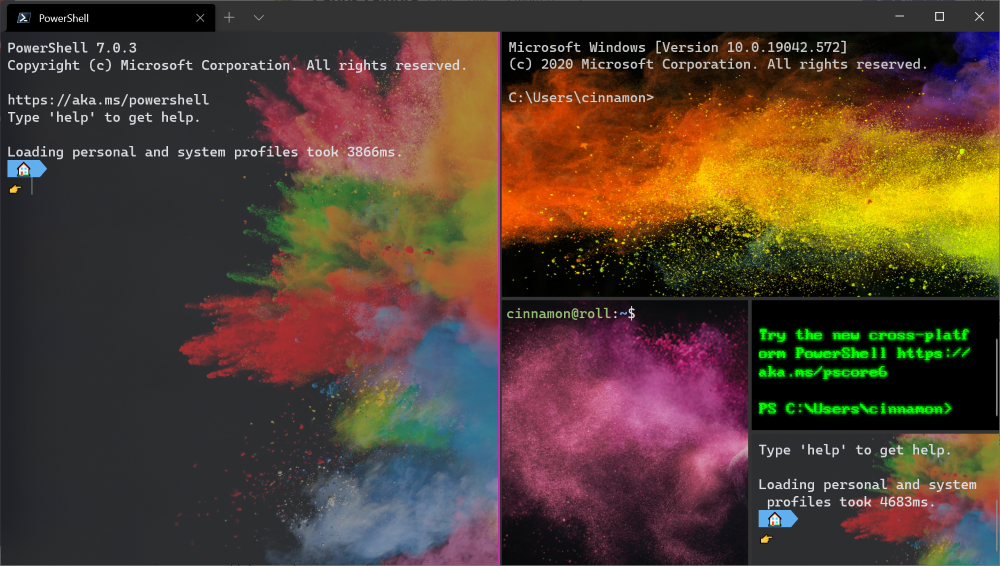
Custom color schemes
Windows Terminal comes with an assortment of color schemes by default. However, there are unlimited possibilities when it comes to color schemes. A great place to find additional terminal schemes is terminalsplash.com.
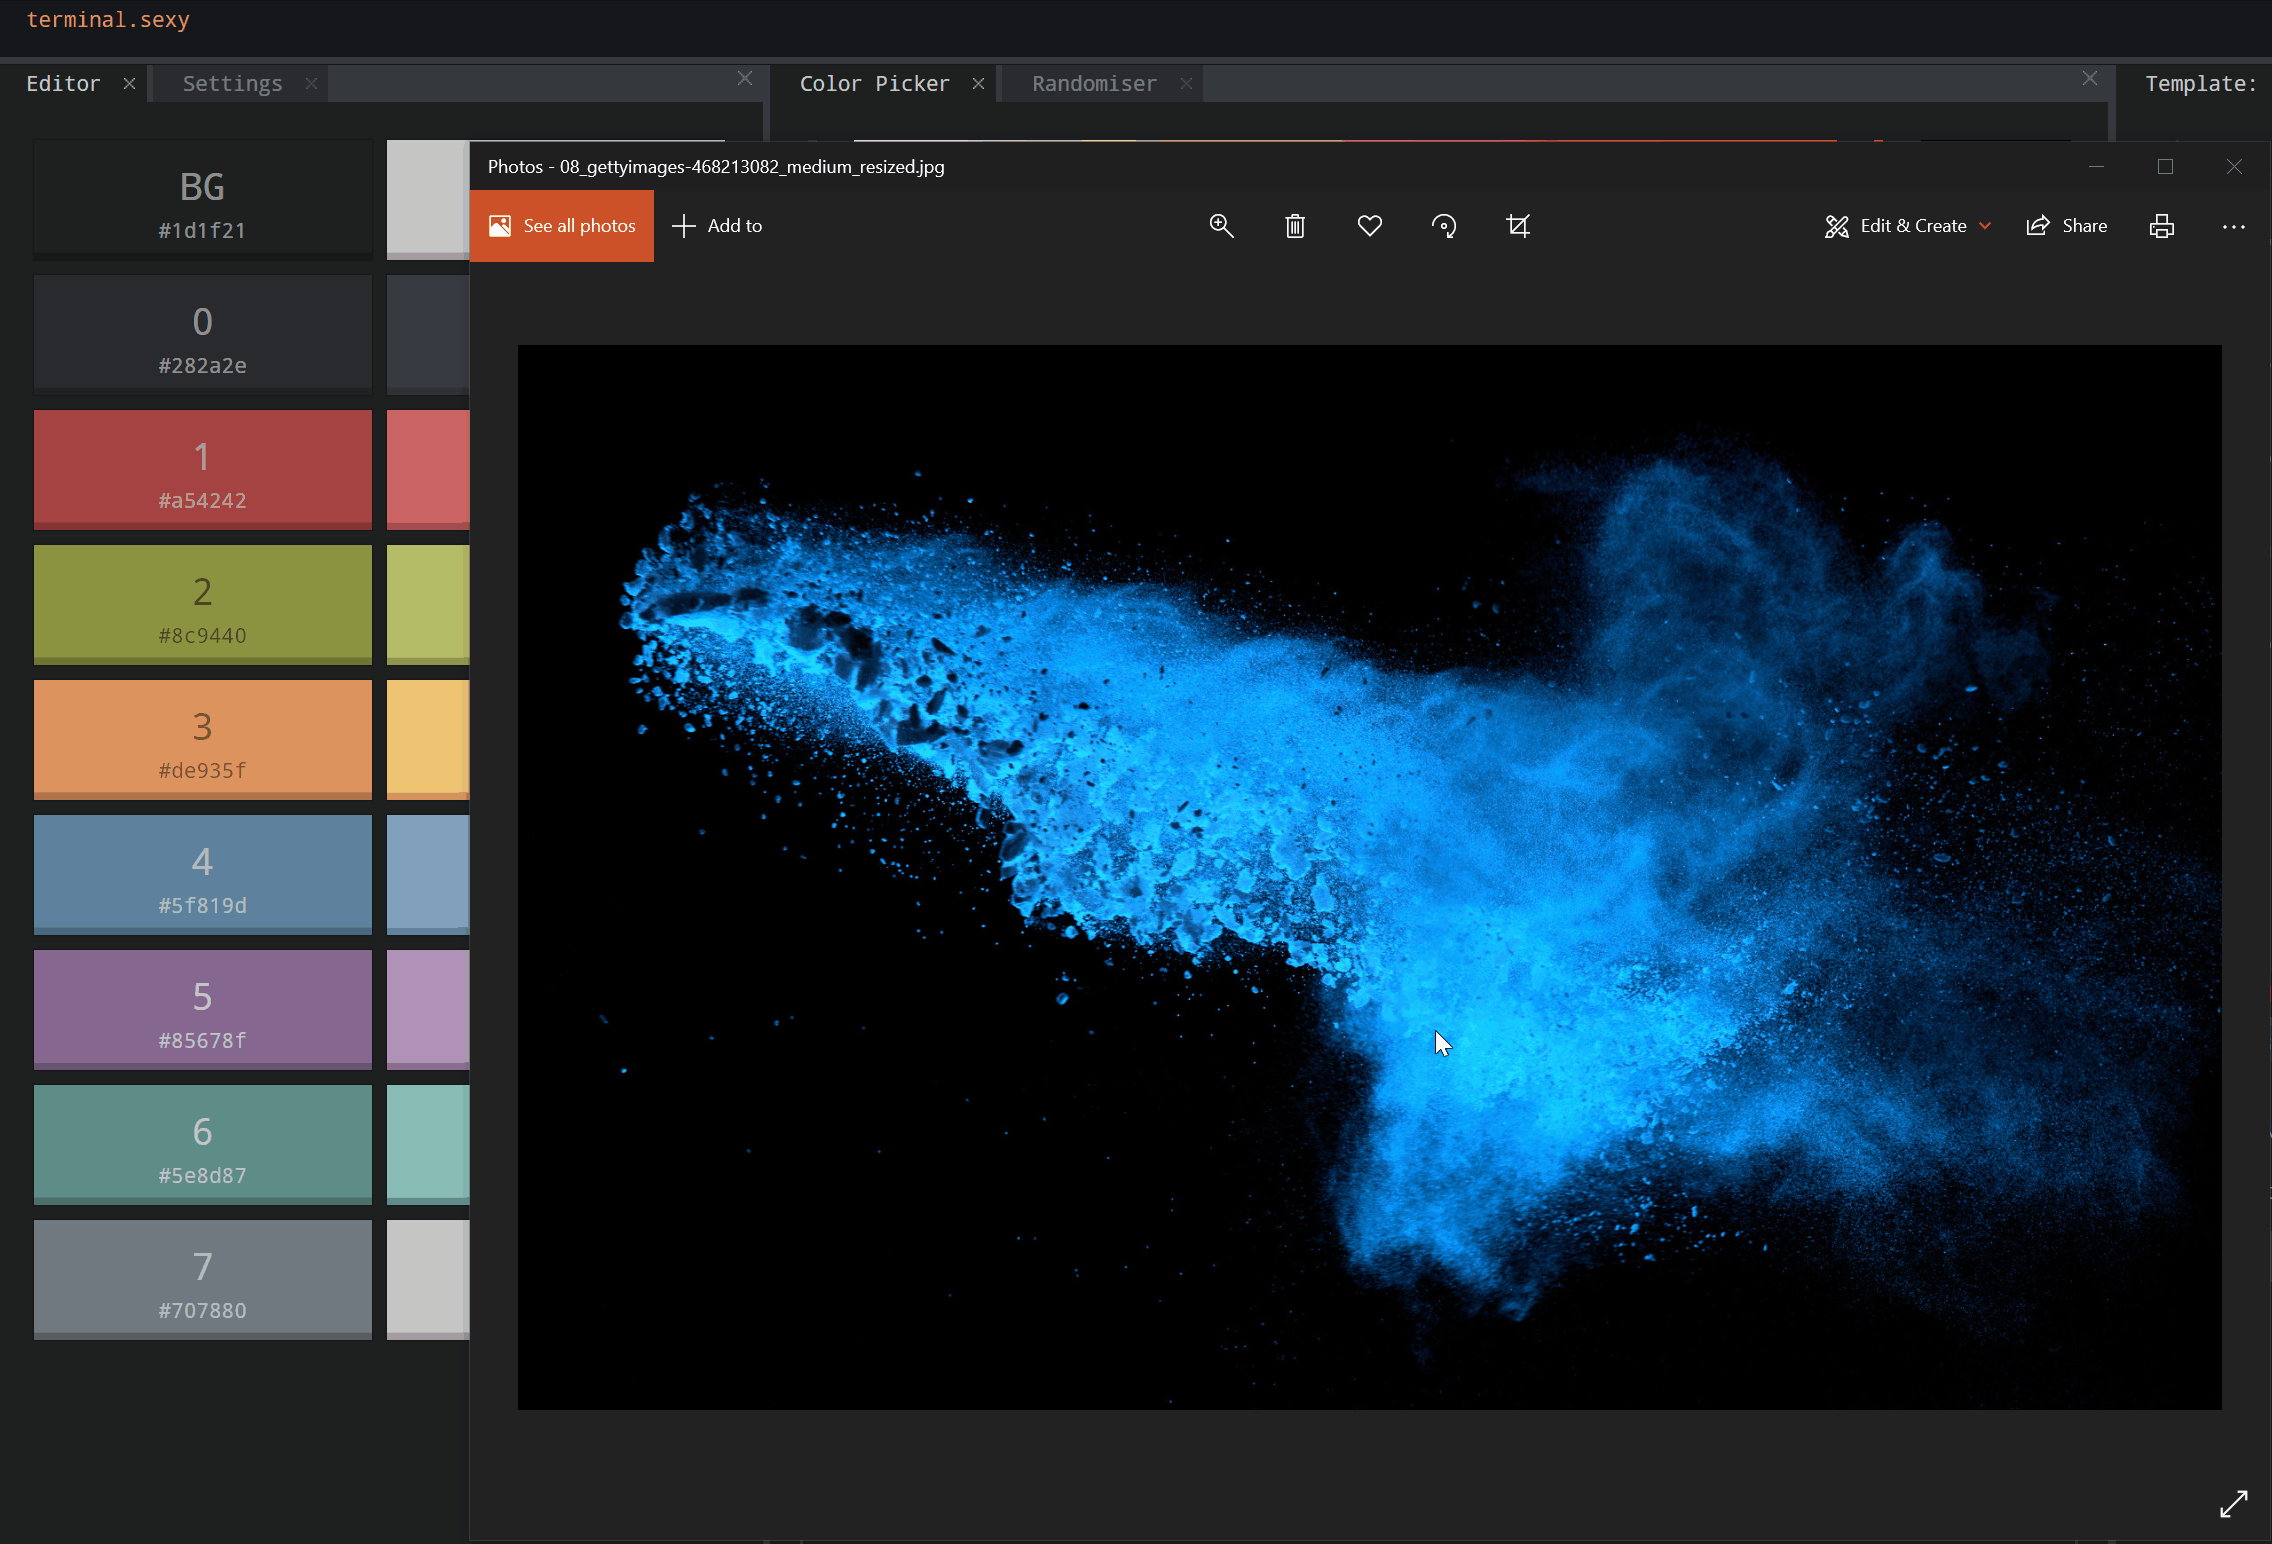
If you’d like to create your own color scheme, terminal.sexy is a great tool for creating and visualizing your own color schemes.
💡 Tip: You can match your custom color scheme to a background image by using the PowerToys color picker to grab hex codes for colors to use inside your scheme. PowerToys can be installed using winget with winget install powertoys .
Custom command line
You can give your command line some style with Oh my Posh and Terminal-Icons. These tools allow you to customize what your prompt looks like with colors, glyphs, and emojis. To get Oh my Posh with Posh-Git and PSReadline up and running, you can follow this tutorial.
Oh my Posh recently came out with Oh my Posh 3, which has a lot more customization options and is not only exclusive to PowerShell. After going through the tutorial linked above, you can upgrade to V3 with the following command:
You can add a bit more flair to your shell by adding custom icons with Terminal-Icons. The image below is also using a custom Posh theme to add emojis to the prompt line.
👉 Note: You will need to set your font to a Nerd Font in order to get the Terminal Icons to appear.
Old school fonts
For those of you who are fans of the retro terminal effect, a great place to find old school fonts is at https://int10h.org/oldschool-pc-fonts/.
Places for background images
Desktop wallpapers often look great inside Windows Terminal as background images. Some great places to find background images are Windows Themes as well as WallpaperHub. Windows Terminal supports both images and gifs for background images.
Another popular option is placing the logo of the shell you are using as the background image, to help identify which shell you are in. You can set where the background image is placed with «backgroundImageAlignment» in your settings. More information on background image settings can be found on our docs site.
Functionality
wt.exe command line arguments
You can launch your terminal in a specific configuration by using the wt.exe command. Some options you can set are tab and pane arrangements as well as their starting directories and profiles. You can save a custom command as a shortcut and pin it to your taskbar to open your desired configuration.
If you use the wt.exe command inside the command palette, it will take effect in your current terminal window, rather than spinning up a new terminal instance.
This example will open the PowerShell profile in the current working directory in a new tab with a vertical pane running your default profile.
wt -p «PowerShell» -d . ; split-pane -V
Full documentation about wt command line arguments can be found on our docs site.
Panes
Windows Terminal has pane support for profiles. You can open a new pane of a profile by either holding Alt and clicking on the profile in the dropdown, or by using the following keyboard shortcuts:
Automatic pane split of current profile
Horizontal pane split of default profile
Alt + Shift + Minus
Vertical pane split of default profile
Alt + Shift + Plus
You can also move focus around your panes by holding Alt and using the arrow keys. Lastly, you can resize your panes by holding Alt + Shift and using the arrow keys. You can find more information about panes on our docs site.
Copy and paste
In Windows Terminal, the default keyboard shortcuts for copy and paste are Ctrl + C and Ctrl + V , respectively. If you do not have a selection, Ctrl + C will act as normal as the break command.
You can customize which keys you’d like to copy and paste with by editing the «copy» and «paste» key bindings. If you delete these key bindings from your settings.json, the terminal will default to Ctrl + Shift + C and Ctrl + Shift + V . This can be especially helpful for WSL users who need Ctrl + C and Ctrl + V free to use for their shells.
You can also choose which formatting is copied to your clipboard along with newline characters with the «copyFormatting» and «singleLine» actions associated with the copy command. Full documentation on clipboard integration commands can be found on our docs site.
Defining key bindings and actions
A large portion of the customizable properties inside Windows Terminal come from key bindings and actions. Commands inside the «actions» array will automatically be added to your command palette. If you’d like to also use them with key bindings, you can add «keys» to them to invoke them with the keyboard. A full list of every possible command can be found on the Actions page of our docs site.
Send input commands
Windows Terminal gives you the ability to send input to your shell with a key binding. This can be done with the following structure inside your «actions» array.
Sending input to the shell with a keyboard shortcut can be useful for commands you run often. One example would be clearing your screen:
Navigating to the parent directory with a key binding may also be helpful.
You can also use this functionality to run builds or test scripts.
WSL starting directory
As of now, Windows Terminal defaults to setting WSL profiles’ starting directory as the Windows user profile folder. To set your WSL profile to start in the
folder, you can add the following line to your profile settings, replacing DISTRONAME and USERNAME with the appropriate fields.
Cheers
We hope you learned a few tips and tricks about Windows Terminal throughout this blog post. We are currently planning another release for the month of November, so keep your eyes peeled for that one! If you have any questions or feedback, feel free to reach out to Kayla (@cinnamon_msft) on Twitter. For more information about Windows Terminal, you can check out our docs site.

Kayla Cinnamon
Program Manager, Windows Terminal, Console, Command Line, & Cascadia Code
Enable or Disable Windows Features Using DISM
The Deployment Image Servicing and Management (DISM) tool is a command-line tool that is used to modify WindowsВ® images. You can use DISM to enable or disable Windows features directly from the command prompt, or by applying an answer file to the image. You can enable or disable Windows features offline on a WIM or VHD file, or online on a running operating system.
To mount an offline image for servicing
Open a command prompt with administrator privileges.
To use DISM from an installation of the Windows Assessment and Deployment Kit (WindowsВ ADK), locate the WindowsВ ADK servicing folder and navigate to this directory. By default, DISM is installed at C:\Program Files (x86)\Windows Kits\10.0\Assessment and Deployment Kit\Deployment Tools\ in WindowsВ 10, C:\Program Files (x86)\Windows Kits\8.1\Assessment and Deployment Kit\Deployment Tools\ in WindowsВ 8.1and C:\Program Files (x86)\Windows Kits\8.0\Assessment and Deployment Kit\Deployment Tools\ in WindowsВ 8.
DISM is available in:
- WindowsВ 10
- WindowsВ 8.1
- WindowsВ 8
- Windows ServerВ 2016 Technical Preview
- WindowsВ Server 2012 R2
- Windows ServerВ 2012
- Windows Preinstallation Environment (WinPE) for WindowsВ 10
- WinPE 5.0
- WinPEВ 4.0
You can install DISM and other deployment and imaging tools, such as Windows System Image Manager (WindowsВ SIM), on another supported operating system from the WindowsВ ADK. For more information, see DISM Supported Platforms.
Use the /Get-ImageInfo option to retrieve the name or index number for the image that you want to modify. An index or name value is required for most operations that specify an image file.
For example, at the command prompt type:
Mount the offline Windows image. For example, type:
To find available Windows features in an image
List all of the features available in the operating system. For example, type:
To service an offline image, specify the location of the mounted image directory. For example, type:
You can use >featurelist.txt to redirect the output of the command to a text file that is named featurelist.
Review the list of features to find the feature that you want to enable, disable, remove, or restore.
Use /Get-FeatureInfo to list information about the specific feature you are interested in. For example, type:
To enable Windows features
Enable a specific feature in the image. You can use the /All argument to enable all of the parent features in the same command. For example, type:
To service an offline image, specify the location of the mounted image directory. For example, type:
Optional: Get the status of the feature you have enabled. For example, type:
If the status is Enble Pending, you must boot the image in order to enable the feature entirely.
To restore removed Windows features
Enable a specific feature in the image. If you do not specify a source, DISM will look in the default location specified by group policy for the required files needed to enable the feature For more information, see Configure a Windows Repair Source.
If the files are not found in the default location, DISM will contact Windows Update (WU) for the required files. You can use the /LimitAccess argument to prevent DISM from contacting WU.
If you specify multiple /Source arguments, the files are gathered from the first location where they are found and the rest of the locations are ignored.
For example, type:
To service an offline image, specify the location of the mounted image directory. For example, type:
Optional: Get the status of the feature you have enabled. For example, type:
If the status is EnablePending, you must boot the image in order to enable the feature entirely.
To disable Windows features
Disable a specific feature in the image. For example, type:
To service an offline image, specify the location of the mounted image directory. For example, type:
Optional: Use DISM /GetFeatureInfo to get the status of the feature you have disabled. For example, type:
If the status is DisablePending, you must boot the image in order to disable the feature entirely.
To remove Windows features for on-demand installation
Remove a specific feature in the image without removing the feature’s manifest from the image. This option can only be used when servicing WindowsВ 10, WindowsВ 8.1, WindowsВ 8, Windows ServerВ 2016 Technical Preview, WindowsВ Server 2012 R2, or Windows ServerВ 2012. For more information, see Configure a Windows Repair Source.
For example, type:
To service an offline image, specify the location of the mounted image directory. For example, type:
Optional: Use DISM /GetFeatureInfo to get the status of the feature you have disabled. For example, type:
The status is Disabled. Beginning with Windows 10, the payload is not removed from Windows client SKUs in order to support push-button reset. The payload is removed from Windows Server SKUs.
To enable or disable Windows features by using DISM and an answer file
In WindowsВ SIM, open an existing catalog by clicking Select a Windows Image on the File menu and specifying the catalog file type (.clg) in the drop-down list, or create a new catalog by clicking Create Catalog on the Tools menu.
Expand the catalog in the Windows Image pane, and then expand Packages.
Expand Foundation, and right-click Microsoft-Windows-Foundation-Package.
Click Add to Answer File.
Click Enabled or Disabled next to the features that you intend to enable or disable. Click the arrow to select the opposite choice.
You might have to expand an item to see all its children. You must enable the parent if any one of its children are enabled.
NoteВ В You can’t restore or remove a Windows feature for features on demand with an unattended answer file.
Click Tools on the main menu, and then click Validate Answer File.
Correct any errors that appear in the Messages pane, and save the answer file.
At the command prompt, type the following command to apply the unattended answer file to the image.
To service an offline image, specify the location of the mounted image directory. For example, type:
To commit changes on an offline image
Commit the changes and unmount the image. For example, type:


