- Overview of Field Service Mobile (Xamarin app)
- Supported platforms
- Key capabilities
- Device requirements
- Installation
- Upgrade
- Authentication
- OAuth2
- Multi-factor authentication (MFA)
- Security
- Data encryption
- Synchronization
- Mobile device management (MDM)
- Auditing
- Dynamics security
- See also
- Установка и настройка Field Service Mobile
- Предварительные условия
- Шаг 1. Загрузка приложения Field Service Mobile на телефоне или планшете
- Шаг 2. Установка инструмента настройки Field Service Mobile (Woodford)
- Шаг 3. Импорт шаблона мобильного проекта
- Шаги начальной настройки
- Дальнейшие действия
- См. также
Overview of Field Service Mobile (Xamarin app)
Field technicians use the Field Service Mobile app to view their schedules, work orders, equipment details, and more as they travel to various customer locations each day. In this article, we’ll take a look at some basic details of the application.
For a guided walkthrough, check out the following video.
Supported platforms
- Windows 10, desktop + tablet
- iOS 11.0+, phones + tablets
- Android 7.0+, phones + tablets
Key capabilities
Native app: Field Service Mobile is a native app for Windows, iOS, and Android mobile devices. Native apps can use device-specific hardware and software, like the camera and microphone.
Offline capabilities: Field Service Mobile has full offline capabilities. This means work order details and other valuable information can be downloaded to the field technicians’ phones and tablets to use when internet connectivity is not available. When a field technician is working in «online mode,» the data on the mobile app reflects the server data. The app can be configured to always be online, online only when connected to WiFi, online when the field technician manually toggles to online mode, or never online. Sync filters allow administrators to decide which entities and records should be downloaded locally for offline mode. For example, an administrator can make it so only this week’s work orders to be downloaded.
| Online | Offline |
|---|---|
| Server data in real time | Data stored on device |
| No data stored locally | All data encrypted by default. File storage is encrypted to AES 256; data storage is encrypted to AES 128 |
| Requires internet connection | Data sent to device can be limited to records necessary for time, user, or role |
| Any and all entities can be forced to “Online”-only mode | Can schedule server syncs at intervals |
- Scan a barcode on a new piece of equipment that was recently installed for a customer — this automatically enters the barcode number on the customer asset record, saving the technician time from manually entering this information.
- Scan the barcode of an existing asset to automatically locate the asset record in the database. This ensures that new data is entered on the correct asset record for accurate service history.
GPS: The phone or tablet’s GPS allows an organization to schedule work orders to the closest available field technician, calculating arrival times to customer locations, and geofencing.
Camera: The app uses the device’s camera for pictures and videos. This means field technicians can take a picture of completed work to attach to an invoice or to help with resolution tracking for training purposes later on.
Barcode scanning: Using the device’s camera to scan barcodes helps field technicians in multiple scenarios including:

Dictation: This allows field technicians to enter notes and important work order data using the device’s speech-to-text capabilities. It’s helpful for field technicians who wear protective gloves and can’t type information into mobile forms.
Signature: Capture a digital signature from a customer in the mobile form, often as approval of completed work. For more comprehensive and legally binding requirements, digital signature service providers can be integrated with.
Email integration: Access emails, calendars, events, and contacts by enabling Exchange and other email providers on the mobile app without having to toggle to another mobile app.
Access documents: Beyond attaching documents as notes within work orders, you can integrate with document storage services like SharePoint and other cloud storage locations to give field technicians offline access to product manuals and instructions. Field Service Mobile also supports 3D file formats that display 3D models of equipment, tools, parts, and more.
Push notifications: Trigger push notifications to the field technician’s device reminding their to perform actions or enter data. For example, you can notify field technicians with a push notification when they have been booked to a new work order. Selecting a push notification can take the user to specific booking, work order, or other records.

Device requirements
Available Space: The amount of required mobile device space depends on the quantity of records that an organization wants to sync to mobile. You can connect to your organization with the app and go to the app’s settings on your phone to see how much space the app is utilizing. This amount can and will change based on how much data the app has to sync from the organization. Also note that you should account for how much data will be needed outside of Field Service Mobile (for photos, texts, other apps, and so on).В
RAM: Minimum 512 MB, though we recommend 1 GB, particularly for organizations with many records and customizations.В That said, how much RAM is required depends on how many apps a person will be using. For example, organizations that are using mobile device management (MDM) solutions, requiring their users to switch between multiple applications should provide mobile devices that have a minimum of 2 GB of RAM.
Processor: The typical standard is a minimum clock speed of approximately 1.4 GHz. Again, be sure to consider other app usage.В
Camera: Autofocus is required for both QR and barcode scanning.В
GPS: GPS is required if you need to use any locational functionalities, like navigation, maps, or location auditing.
Installation
Installing Field Service Mobile involves downloading the «Field Service Mobile» app from the relevant app store and setting up the mobile configuration tool. Instructions for both can be found in the Field Service installation article.
Upgrade
New versions of the Field Service Mobile app are released in a cadence similar to Dynamics 365 Field Service. They can be downloaded and applied through your relevant app store. In some cases — like with Windows 10 — downloading the app from the Windows Store allows for automatic upgrades as new versions are released.
The mobile configuration tool is also upgraded periodically, but not always on the same cadence as the app.
Authentication
OAuth2
The main security token for the mobile app is the application master password. The application uses this master password to encrypt the application database and other sensitive information stored in Field Service Mobile app.
If there are legacy authentication methods that require the app to submit the user’s password to the server, the server password is used for encrypting the application master password for the user’s convenience. With the OAuth2 authentication, the user must provide a dedicated password used for encrypting the application master password.
Regarding password storage, the app can be configured to either:
- Require the user to enter the password each time the application is launched (or resumed from the background), or
- Store the password in the device’s secure storage so that the user does not need to type it in repeatedly
Multi-factor authentication (MFA)
Multi-factor authentication based on the related Microsoft 365 tenant Azure active directory can be enabled for Field Service Mobile. This adds a second layer of security with a phone call or text message for user sign-in and transactions.
Security
Data encryption
Data encryption is based on an application key. The application key is randomly generated and protected by the user password. The key is used to encrypt all local Field Service data. Let’s take a look at how this works.
The application generates the random application key when it creates its local database. After that, it’s stored in an encrypted form on the device file system and the application decrypts it when needed. The application key (AES256) is used together with the user password (PBKDF2), a random initialization vector (IV), and salt for encryption and decryption.
Let’s take a look at how this works.
For encrypting the SQLite database, the application key is passed to the SQLite database driver.
The driver uses the application key and IV to encrypt or decrypt individual database pages using AES128 in cipher feedback (CFB) mode. Each page (1024 bytes) is encrypted separately. The IV is the page header (contains variable or unpredictable data).
Each file in the blob store (attachment store) contains a header with random IV (16 bytes) and encrypted data. The blob data is encrypted with AES256 in cipher block chaining (CBC) mode using the application key and file header IV. PKCS7 is used for data alignment.
Synchronization
Synchronization is when the Field Service Mobile app calls the server for new or updated data. For example, the app will need to synchronize to the server for a field technician to see a new work order booking scheduled by the dispatcher.

The app can perform a synchronization manually, timed, or based on available connection.
- If the password is stored, sync is automatic​
- If the password isn’t stored, password entry is required to sync
The system also keeps a synchronization log that tracks when users last synced and on what devices.
Mobile device management (MDM)
- Application sessions: Require sign-in after a specific number of minutes of inactivity. After the defined time in minutes passes, Field Service Mobile asks for the password to continue using it.

Lock: If a device is stolen or there are concerns about the security of offline data, the administrator is able to remotely lock the application on a single device, or a group of devices. This blocks the user from opening the application.
Wipe: In the worst case scenario, you can completely wipe out the data from the application. This is done remotely by just one action and regardless of the synchronization. This means that you delete the data remotely from the mobile device and users will no longer be able to see it.
Force Full Sync: This forces the application to perform a full synchronization of the data during the next synchronization of the app.
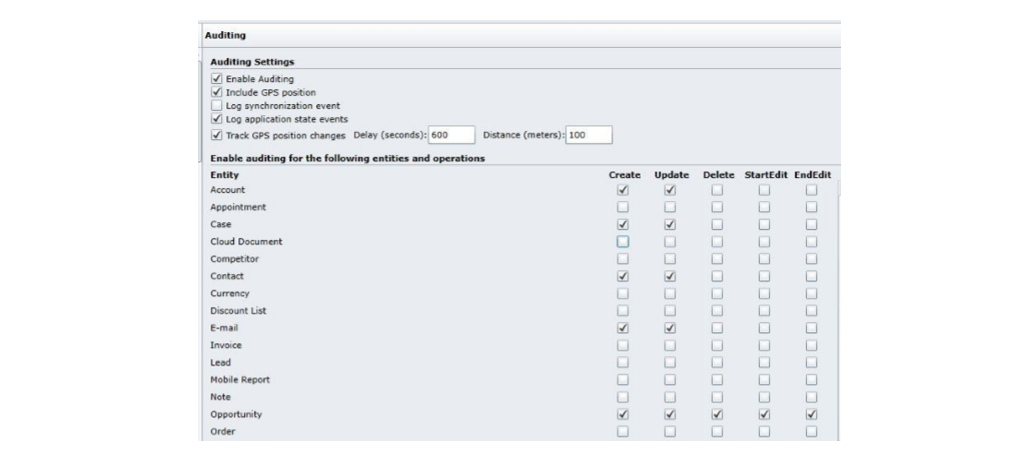
Auditing
You can keep an audit record of when specific entities are edited, as well as application state events and the GPS location of the device.
Dynamics security
For accessing Dynamics 365 Field Service entities and fields, the Field Service Mobile app uses the Dynamics 365 security role and field security profile framework. Additionally, entities and fields can be further restricted at the mobile app level, but a user cannot access any entity or field that could not be accessed in Dynamics 365.
See also
Can you tell us about your documentation language preferences? Take a short survey.
The survey will take about seven minutes. No personal data is collected (privacy statement).
Установка и настройка Field Service Mobile
Приложения Field Service Mobile предоставляет выездным специалистам всю необходимую информацию, чтобы быстро найти расположение клиента и выполнить заказ на работу. Dynamics 365 Field Service предоставляет кросс-платформенное приложение Field Service Mobile для нескольких устройство, которое создано для потребностей сотрудников выездного обслуживания. Это мобильное приложение является настраиваемым и расширяемым, оно позволяет любой организации оформить его как собственное с фирменной символикой, определить типы данных, доступные работникам выездного обслуживания, и многое другое.
Чтобы начать работу с Field Service Mobile, вам необходимо:
- Установить приложение Field Service Mobile на свой телефон, планшет или устройство с Windows 10.
- Установить мобильное средство конфигурации Woodford.
- Установить и настроить шаблон мобильного проекта.
В этой статье мы рассмотрим каждый из этих шагов. См. следующее видео для дополнительного прохождения.
Дополнительные видео по Field Service см. в этом полном списке воспроизведения.
Предварительные условия
В этой статье предполагается, что у вас уже есть среда Dynamics 365 с установленным приложением Field Service.
Шаг 1. Загрузка приложения Field Service Mobile на телефоне или планшете
Загрузите Field Service Mobile из магазина приложений Windows, Apple или Google Play или перейдите по следующим ссылкам. Для Field Service Mobile требуется Field Service версий 7.5.5 и 8.2+.

Шаг 2. Установка инструмента настройки Field Service Mobile (Woodford)
Средство конфигурации обеспечивает доступ к приложению для пользователей-выездных специалистов, и позволяет администраторам настраивать мобильную работу.
В организации Dynamics 365 перейдите в раздел Параметры > Решения. Выберите Импорт.
Возможно, вам придется выбрать значок шестеренки и перейти к Дополнительные настройки, чтобы получить доступ к варианту Решения из выпадающего списка настроек.

- На экране Выбор пакета решения выберите файл Woodford\_\#\_\#\_\#\_\#\_managed.zip и нажмите Далее.

- После завершения импорта убедитесь, что Woodford отображается в меню Параметры. Если решение не отображается, обновите страницу.

Шаг 3. Импорт шаблона мобильного проекта
Затем загрузите и импортируйте мобильный проект, который позволяет настроить мобильное приложение для вашей организации.
Шаблон мобильного проекта содержит все настройки для мобильного приложения Field Service Mobile. Мобильный проект позволяет настроить функции мобильных устройств на различных устройствах. Например, вы используете мобильный проект для добавления, удаления и изменения полей, сущностей, представлений и форм в мобильном приложении.
- Откройте мобильное средство конфигурации (Woodford), выбрав Параметры >Woodford и выбрав MobileCRM Woodford HTML5. Если возникла проблема при открытии или работе в версии HTML5, можно использовать старое приложение MobileCRM Woodford в не личном окне браузера Internet Explorer.

Может быть предложено установить квоту хранилища. Установите 500 МБ, затем выберите ОК.
Зарегистрируйтесь себя как пользователя.
Загрузите мобильный проект для Field Service Mobile (новейший) Field Service v7.5.5 и v8.2+ и сохраните в местоположении, отличном от папки загрузок. Если существует мобильный проект из предыдущей версии приложения, потребуется вручную переместить настройки для данного проекта в производные от этого проекта.
Мобильный проект периодически обновляется; установите закладку на этот веб-сайт для регулярного доступа к новейшему мобильному проекту.
Для предыдущих мобильных приложений для D365 for Field Service см. статью История версий шаблона проекта Field Service Mobile.
- Импортируйте файл мобильного проекта.

- В диалоговом окне Добавление мобильного проекта:
- Задайте Тип как Стандартный пользователь.
- Введите имя файла для загруженного файла мобильного проекта. В нашем примере это был FSDyn365_1.0.2735 (ваш может отличаться в зависимости от того, какую версию вы загрузили).
- Введите значение приоритета. В нашем примере мы установили его на 10.
- Назначьте шаблон всем ролям безопасности Field Service.
- Нажмите кнопку Сохранить.

- Дважды щелкните ваш импортированный файл мобильного проекта. Вы попадете на страницу сведений о проекте. Выберите Опубликовать.

- Вернитесь на главную страницу Woodford, нажав кнопку «Назад» на панели навигации, как показано на следующем снимке экрана.

- Выберите и выделите шаблон мобильного проекта и выберите Наследовать.

- Задайте Тип как Стандартный пользователь.
- Введите имя (в нашем примере «FSDyn365_1.0.2735-derivative»), более высокий приоритет (в нашем примере 20) и назначьте соответствующие роли безопасности Field Service.
- Нажмите кнопку Сохранить.

Обязательно опубликуйте проект, соответствующий версии Field Service Mobile, которую используют ваши технические специалисты. Например, если ваши технические специалисты используют Field Service Mobile v12.1, опубликуйте шаблон мобильного проекта в версии 12.1. Если ваши технические специалисты используют разные версии мобильного проекта, опубликуйте проект в самой низкой общей версии.

Дважды щелкните родительский шаблон мобильного проекта (не новый производный), затем выберите пункт Опубликовать все.
Проверьте, что мобильные конфигурации опубликованы, проверив наличие стрелки рядом с проектами.

Это пробная лицензия, действительная в течение 30 дней. Пробная версия может быть продлена в соответствии с инструкциями следующей статьи: Продление пробной версии средства конфигурации Field Service Mobile.
Шаги начальной настройки
Перейдите к пункту Подключаемые модули > Удалить.
Выберите заказы на работу и связанные с ними сущности, например продукты в заказах на работу, услуги и задачи сервиса.
Это гарантирует, что при удалении заказов на работу или связанных с ними записей на сервере они будут также удаляться из мобильного приложения. Дополнительные сведения см. в руководстве Woodford (PDF).

Сохраните.
Теперь перейдите в раздел Мобильные проекты и дважды щелкните свой шаблон мобильного проекта.
Выберите Конфигурация в левой панели.

В этом разделе рассматриваются задачи конфигурирования, связанные с пользовательским интерфейсом приложения Field Service Mobile (2017), а также с передачей данным между мобильным приложением и сервером.
Вот некоторые важные параметры, которые администраторы должны принимать во внимание при первоначальной настройке мобильного приложения.
Автоматическая синхронизация определяет, когда мобильное приложение отправляет данные на сервер. При использовании приложения в учебных или демонстрационных целях рекомендуется задавать для параметра «Автоматическая синхронизация» значение При запуске.
Задержка автоматической синхронизации — это таймер, который определяет, когда мобильное приложение будет пытаться автоматически отправлять данные на сервер и получать данные с сервера.
Сохранить пароль определяет, будет ли мобильное приложение запоминать пароль пользователя. При использовании приложения в учебных или демонстрационных целях рекомендуется задавать для этого параметра значение Истина.
Дальнейшие действия
Невозможно использовать приложение Field Service Mobile с организацией Dynamics 365, пока вы не выполните все описанные ниже действия и не настроите пользователей и резервируемые ресурсы, необходимые для доступа мобильных приложений в дополнение к шагам из этой статьи. Для использования Field Service Mobile в записи резервируемого ресурса (выездного специалиста) для параметра Включен для Field Service Mobile должно быть установлено значение Да.
См. также
Каковы ваши предпочтения в отношении языка документации? Пройдите краткий опрос (обратите внимание, что этот опрос представлен на английском языке).
Опрос займет около семи минут. Личные данные не собираются (заявление о конфиденциальности).


